在正式聊WMS之前,我们先来看看context.getSystemService其核心原理,才能找到WindowManager的实现类:
    @Override

    public Object getSystemService(String name) {

        return SystemServiceRegistry.getSystemService(this, name);

    }
private static final HashMap<String, ServiceFetcher<?>> SYSTEM_SERVICE_FETCHERS =

            new HashMap<String, ServiceFetcher<?>>();


public static Object getSystemService(ContextImpl ctx, String name) {

        ServiceFetcher<?> fetcher = SYSTEM_SERVICE_FETCHERS.get(name);

        return fetcher != null ? fetcher.getService(ctx) : null;

    }
能看到是实际上所有的我们通过Context获取系统服务,是通过SYSTEM_SERVICE_FETCHERS这个提前存放在HashMap的服务集合中。这个服务是在静态代码域中提前注册。
        registerService(Context.WINDOW_SERVICE, WindowManager.class,

                new CachedServiceFetcher<WindowManager>() {

            @Override

            public WindowManager createService(ContextImpl ctx) {

                return new WindowManagerImpl(ctx);

            }});
能看到此时实际上WindowManager的interface是由WindowManagerImpl实现的。
这里先上一个WindowManager的UML类图。
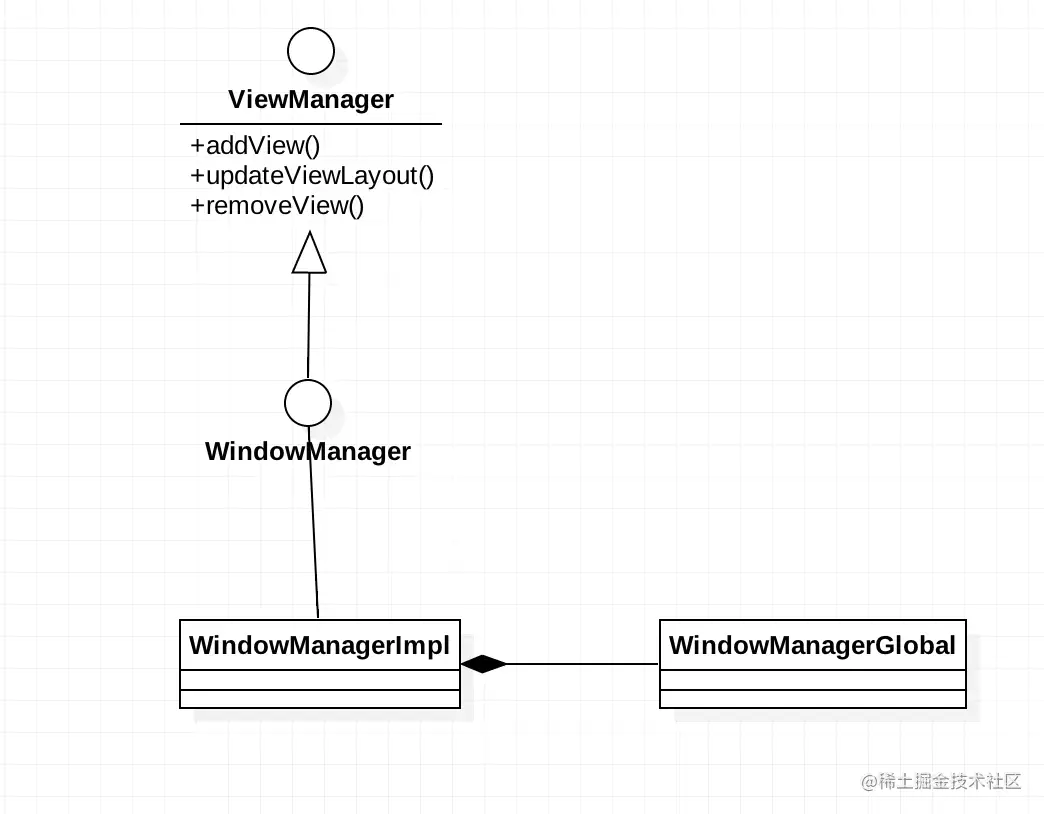
我们能够从这个UML图能够看到,其实所有的事情都委托给WindowManagerGlobal工作。因此我们只需要看WindowManagerGlobal中做了什么。
因此我们要寻求WindowManager的addView的方法,实际上就是看WindowManagerGlobal的addView方法。
public void addView(View view, ViewGroup.LayoutParams params,

            Display display, Window parentWindow) {

       ...

        final WindowManager.LayoutParams wparams = (WindowManager.LayoutParams) params;

        if (parentWindow != null) {

         parentWindow.adjustLayoutParamsForSubWindow(wparams);

        } else {

            // If there's no parent, then hardware acceleration for this view is

            // set from the application's hardware acceleration setting.

            final Context context = view.getContext();

            if (context != null

                    && (context.getApplicationInfo().flags

                            & ApplicationInfo.FLAG_HARDWARE_ACCELERATED) != 0) {

                wparams.flags |= WindowManager.LayoutParams.FLAG_HARDWARE_ACCELERATED;

            }

        }


        ViewRootImpl root;

        View panelParentView = null;


        synchronized (mLock) {

            // Start watching for system property changes.

            ...

            int index = findViewLocked(view, false);

            if (index >= 0) {

                if (mDyingViews.contains(view)) {

                    // Don't wait for MSG_DIE to make it's way through root's queue.

                    mRoots.get(index).doDie();

                } else {

                    throw new IllegalStateException("View " + view

                            + " has already been added to the window manager.");

                }

                // The previous removeView() had not completed executing. Now it has.

            }


            // If this is a panel window, then find the window it is being

            // attached to for future reference.

            if (wparams.type >= WindowManager.LayoutParams.FIRST_SUB_WINDOW &&

                    wparams.type <= WindowManager.LayoutParams.LAST_SUB_WINDOW) {

                final int count = mViews.size();

                for (int i = 0; i < count; i++) {

                    if (mRoots.get(i).mWindow.asBinder() == wparams.token) {

                        panelParentView = mViews.get(i);

                    }

                }

            }


            root = new ViewRootImpl(view.getContext(), display);


            view.setLayoutParams(wparams);


            mViews.add(view);

            mRoots.add(root);

            mParams.add(wparams);


            // do this last because it fires off messages to start doing things

            try {

                root.setView(view, wparams, panelParentView);

            } catch (RuntimeException e) {

                // BadTokenException or InvalidDisplayException, clean up.

                if (index >= 0) {

                    removeViewLocked(index, true);

                }

                throw e;

            }

        }

    }
这里能够看到一个新的addView的时候,会找到是否有父Window。没有则继续往后走,判断新建窗体的type是否是子窗口类型,是则查找传进来的Binder对象和存储在缓存中的Binder对象又没有对应的Window。有则作为本次新建窗口的复窗口。
最后能够看到我们熟悉的类ViewRootImpl。这个类可以说是所有View绘制的根部核心,这个类会在后面View绘制流程聊聊。最后会调用ViewRootImpl的setView进一步的沟通系统应用端。
这里涉及到了几个有趣的宏,如WindowManager.LayoutParams.FIRST_SUB_WINDOW 。它们象征这当前Window处于什么层级。
Window的层级
Window的层级,我们大致可以分为3大类:System Window(系统窗口),Application Window(应用窗口),Sub Window(子窗口)
Application Window(应用窗口)
Application值得注意的有这么几个宏:
| type | 描述 |
|---|
| FIRST_APPLICATION_WINDOW = 1 | 应用程序窗口初始值 |
| TYPE_BASE_APPLICATION = 1 | 应用窗口类型初始值,其他窗口以此为基准 |
| TYPE_APPLICATION = 2 | 普通应用程序窗口类型 |
| TYPE_APPLICATION_STARTING = 3 | 应用程序的启动窗口类型,不是应用进程支配,当第一个应用进程诞生了启动窗口就会销毁 |
| TYPE_DRAWN_APPLICATION = 4 | 应用显示前WindowManager会等待这种窗口类型绘制完毕,一般在多用户使用 |
| LAST_APPLICATION_WINDOW = 99 | 应用窗口类型最大值 |
因此此时我们能够清楚,应用窗口的范围在1~99之间。
Sub Window(子窗口)
| type | 描述 |
|---|
| FIRST_SUB_WINDOW = 1000 | 子窗口初始值 |
| TYPE_APPLICATION_PANEL = FIRST_SUB_WINDOW | 应用的panel窗口,在父窗口上显示 |
| TYPE_APPLICATION_MEDIA = FIRST_SUB_WINDOW + 1 | 多媒体内容子窗口,在父窗口之下 |
| TYPE_APPLICATION_SUB_PANEL = FIRST_SUB_WINDOW + 2 | 也是一种panel子窗口,位于所有TYPE_APPLICATION_PANEL之上 |
| TYPE_APPLICATION_ATTACHED_DIALOG = FIRST_SUB_WINDOW + 3 | dialog弹窗 |
| TYPE_APPLICATION_MEDIA_OVERLAY = FIRST_SUB_WINDOW + 4 | 多媒体内容窗口的覆盖层 |
| TYPE_APPLICATION_ABOVE_SUB_PANEL = FIRST_SUB_WINDOW + 5 | 位于子panel之上窗口 |
| LAST_SUB_WINDOW = 1999 | 子窗口类型最大值 |
能够看到子窗口的范围从1000~1999
System Window(系统窗口)
| type | 描述 |
|---|
| FIRST_SYSTEM_WINDOW = 2000 | 系统窗口初始值 |
| TYPE_STATUS_BAR = FIRST_SYSTEM_WINDOW | 系统状态栏 |
| TYPE_SEARCH_BAR = FIRST_SYSTEM_WINDOW+1 | 搜索条窗口 |
| TYPE_PHONE = FIRST_SYSTEM_WINDOW+2 | 通话窗口 |
| TYPE_SYSTEM_ALERT = FIRST_SYSTEM_WINDOW+3 | alert窗口,电量不足时警告 |
| TYPE_KEYGUARD = FIRST_SYSTEM_WINDOW+4 | 屏保窗口 |
| TYPE_TOAST = FIRST_SYSTEM_WINDOW+5 | Toast提示窗口 |
| TYPE_SYSTEM_OVERLAY = FIRST_SYSTEM_WINDOW+6 | 系统覆盖层窗口,这个层不会响应点击事件 |
| TYPE_PRIORITY_PHONE = FIRST_SYSTEM_WINDOW+7 | 电话优先层,在屏保状态下显示通话 |
| TYPE_SYSTEM_DIALOG = FIRST_SYSTEM_WINDOW+8 | 系统层级的dialog,比如RecentAppDialog |
| TYPE_KEYGUARD_DIALOG= FIRST_SYSTEM_WINDOW+9 | 屏保时候对话框(如qq屏保时候的聊天框) |
| TYPE_SYSTEM_ERROR= FIRST_SYSTEM_WINDOW+10 | 系统错误窗口 |
| TYPE_INPUT_METHOD= FIRST_SYSTEM_WINDOW+11 | 输入法窗口 |
| TYPE_INPUT_METHOD_DIALOG= FIRST_SYSTEM_WINDOW+12 | 输入法窗口上的对话框 |
| TYPE_WALLPAPER= FIRST_SYSTEM_WINDOW+13 | 壁纸窗口 |
| TYPE_STATUS_BAR_PANEL = FIRST_SYSTEM_WINDOW+14 | 滑动状态栏窗口 |
| LAST_SYSTEM_WINDOW = 2999 | 系统窗口最大值 |
常见的系统级别窗口主要是这几个。能够注意到系统窗口层级是从2000~2999。
这些层级有什么用的?这些层级会作为参考,将会插入到显示栈的位置,层级值越高,越靠近用户。这个逻辑之后会聊到。
ViewRootImpl setView
ViewRootImpl里面包含了许多事情,主要是包含了我们熟悉的View的绘制流程,以及添加Window实例的流程。
本文是关于WMS,因此我们只需要看下面这个核心函数
这个方法有两个核心requestLayout以及addToDisplay。
- 1.requestLayout实际上就是指View的绘制流程,并且最终会把像素数据发送到Surface底层。
- 2.mWindowSession.addToDisplay 添加Window实例到WMS中。
WindowManager的Session设计思想
先来看看Session类:
class Session extends IWindowSession.Stub implements IBinder.DeathRecipient
得知此时Session实现了一个IWindowSession的Binder对象。并且实现了Binder的死亡监听。
那么这个Session是从哪里来的呢?实际上是通过WMS通过跨进程通信把数据这个Binder对象传递过来的:
    @Override

    public IWindowSession openSession(IWindowSessionCallback callback, IInputMethodClient client,

            IInputContext inputContext) {

        if (client == null) throw new IllegalArgumentException("null client");

        if (inputContext == null) throw new IllegalArgumentException("null inputContext");

        Session session = new Session(this, callback, client, inputContext);

        return session;

    }
通着这种方式,就能把一个Session带上WMS相关的环境送给客户端操作。这种方式和什么很相似,实际上和servicemanager查询服务Binder的思路几乎一模一样。
@Override

    public int addToDisplay(IWindow window, int seq, WindowManager.LayoutParams attrs,

            int viewVisibility, int displayId, Rect outFrame, Rect outContentInsets,

            Rect outStableInsets, Rect outOutsets,

            DisplayCutout.ParcelableWrapper outDisplayCutout, InputChannel outInputChannel) {

        return mService.addWindow(this, window, seq, attrs, viewVisibility, displayId, outFrame,

                outContentInsets, outStableInsets, outOutsets, outDisplayCutout, outInputChannel);

    }
很有趣的是,我们能够看到,按照道理我们需要添加窗体实例到WMS中。从逻辑上来讲,我们只需要做一次跨进程通信即可。但是为什么需要一个Session作为中转站呢?
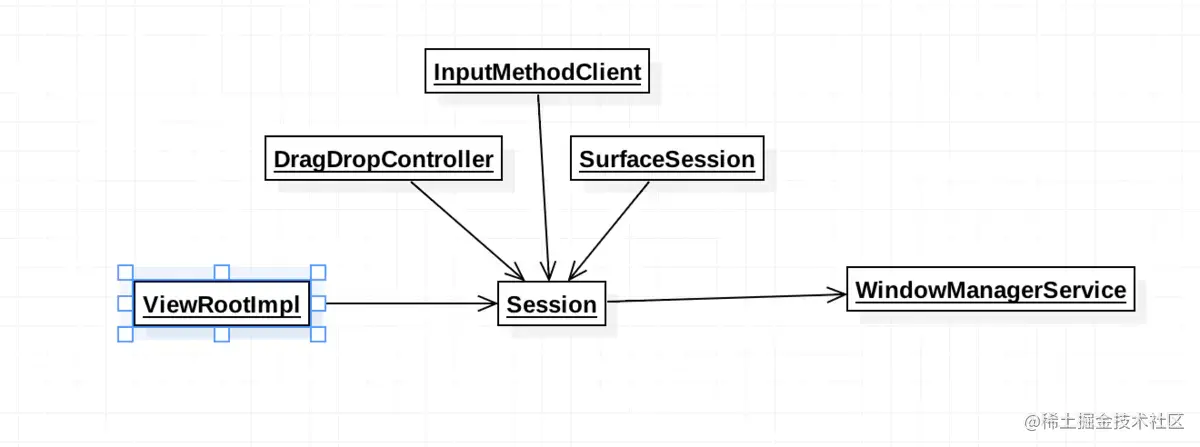
能够看到实际上Session(会话)做的事情不仅仅只有沟通WMS这么简单。实际上它还同时处理了窗口上的拖拽,输入法等逻辑,更加重要的是Session面对着系统多个服务,但是通过这个封装,应用程序只需要面对这个Sesion接口,真的是名副其实的"会话"。
这种设计想什么?实际上就是我们常说的门面设计模式。
IWindow对象
注意,这里面除了IWindowSession之外,当我们调用addWindow添加Window到WMS中的时候,其实还存在一个IWindow接口.这个IWindow是指PhoneWindow吗?
很遗憾。并不是。PhoneWindow基础的接口只有Window接口。它并不是一个IBinder对象。我们转过头看看ViewRootImpl.
public ViewRootImpl(Context context, Display display) {

        mContext = context;

        mWindowSession = WindowManagerGlobal.getWindowSession();

        mDisplay = display;

        mBasePackageName = context.getBasePackageName();

        mThread = Thread.currentThread();

        mLocation = new WindowLeaked(null);

        mLocation.fillInStackTrace();

        mWidth = -1;

        mHeight = -1;

        mDirty = new Rect();

        mTempRect = new Rect();

        mVisRect = new Rect();

        mWinFrame = new Rect();

        mWindow = new W(this);

        mTargetSdkVersion = context.getApplicationInfo().targetSdkVersion;

        mViewVisibility = View.GONE;

        mTransparentRegion = new Region();

        mPreviousTransparentRegion = new Region();

        mFirst = true; // true for the first time the view is added

        mAdded = false;

        mAttachInfo = new View.AttachInfo(mWindowSession, mWindow, display, this, mHandler, this,

                context);

...

        mViewConfiguration = ViewConfiguration.get(context);

        mDensity = context.getResources().getDisplayMetrics().densityDpi;

        mNoncompatDensity = context.getResources().getDisplayMetrics().noncompatDensityDpi;

        mFallbackEventHandler = new PhoneFallbackEventHandler(context);

        mChoreographer = Choreographer.getInstance();

        mDisplayManager = (DisplayManager)context.getSystemService(Context.DISPLAY_SERVICE);


        if (!sCompatibilityDone) {

            sAlwaysAssignFocus = mTargetSdkVersion < Build.VERSION_CODES.P;


            sCompatibilityDone = true;

        }


        loadSystemProperties();

    }
能看到此时,实际上在ViewRootImpl的构造函数会对应当前生成一个W的内部类。这个内部类:
static class W extends IWindow.Stub
这个内部类实际上就是一个Binder类,里面回调了很多方法来操作当前的ViewRootImpl。换句话说,就是把当前的ViewRootImpl的代理W交给WMS去管理。
那么我们可以总结,IWindow是WMS用来间接操作ViewRootImpl中的View,IWindowSession是App用来间接操作WMS。
WMS.addWindow
WMS的addWindow很长,因此我这边拆开成3部分聊
添加窗体的准备步骤
我们抛开大部分的校验逻辑。实际上可以把这个过程总结为以下几点:
- 1.判断又没有相关的权限
- 2.尝试着获取当前displayId对应的DisplayContent,没有则创建。其逻辑实际上和我上一篇说的创建DisplayContent一摸一样
- 3.通过mWindowMap,判断当前IWindow是否被添加过,是的话说明已经存在这个Window,不需要继续添加
- 4.如果当前窗口类型是子窗口,则会通过WindowToken.attrs参数中的token去查找当前窗口的父窗口是什么。
- 5.如果有父窗口,则从DisplayContent中以父窗口的IWindow获取父窗口WindowToken的对象,否则尝试的获取当前窗口对应的WindowToken对象。
我们稍微探索一下其中的几个核心:
通过windowForClientLocked查找父窗口的WindowState
final WindowState windowForClientLocked(Session session, IBinder client, boolean throwOnError) {

        WindowState win = mWindowMap.get(client);

        if (localLOGV) Slog.v(TAG_WM, "Looking up client " + client + ": " + win);

        if (win == null) {

            if (throwOnError) {

                throw new IllegalArgumentException(

                        "Requested window " + client + " does not exist");

            }

            Slog.w(TAG_WM, "Failed looking up window callers=" + Debug.getCallers(3));

            return null;

        }

        if (session != null && win.mSession != session) {

            if (throwOnError) {

                throw new IllegalArgumentException("Requested window " + client + " is in session "

                        + win.mSession + ", not " + session);

            }

            Slog.w(TAG_WM, "Failed looking up window callers=" + Debug.getCallers(3));

            return null;

        }


        return win;

    }
实际上可以看到这里面是从mWindowMap通过IWindow获取WindowState对象。还记得我上篇说过很重要的数据结构吗?mWindowMap实际上是保存着WMS中IWindow对应WindowState对象。IWindow本质上是WMS控制ViewRootImpl的Binder接口。因此我们可以把WindowState看成应用进程的对应的对象也未尝不可。
获取对应的WindowToken
            AppWindowToken atoken = null;

            final boolean hasParent = parentWindow != null;

//从DisplayContent找到对应的WIndowToken

            WindowToken token = displayContent.getWindowToken(

                    hasParent ? parentWindow.mAttrs.token : attrs.token);
从这里面我们能够看到WindowToken,是通过DisplayContent获取到的。
WindowToken getWindowToken(IBinder binder) {

        return mTokenMap.get(binder);

    }
这样就能看到我前两篇提到过的很重要的数据结构:mTokenMap以及mWindowMap。这两者要稍微区分一下:
mWindowMap是以IWindow为key,WindowState为value。
mTokenMap是以WindowState的IBinder(一般为IApplicationToken)为key,WindowToken为value
还记得mTokenMap在Activity的启动流程中做的事情吗?在创建AppWIndowContainer的时候,会同时创建AppWindowToken,AppWIndowToken的构造会把当前的IBinder作为key,AppWindowToken作为value添加到mTokenMap中。
也就是说,如果系统想要通过应用进程给的IWindow找到真正位于WMS中Window的句柄,必须通过这两层变换才能真正找到。
拆分情况获取对应的WindowToken和AppWindowToken
这个时候就分为两种情况,一种是存在WindowToken,一种是不存在WindowToken。
            boolean addToastWindowRequiresToken = false;


            if (token == null) {

            //校验窗口参数是否合法

            ...


                final IBinder binder = attrs.token != null ? attrs.token : client.asBinder();

                final boolean isRoundedCornerOverlay =

                        (attrs.privateFlags & PRIVATE_FLAG_IS_ROUNDED_CORNERS_OVERLAY) != 0;

                token = new WindowToken(this, binder, type, false, displayContent,

                        session.mCanAddInternalSystemWindow, isRoundedCornerOverlay);

            } else if (rootType >= FIRST_APPLICATION_WINDOW && rootType <= LAST_APPLICATION_WINDOW) {

                atoken = token.asAppWindowToken();

                  if (atoken == null) {

                    return WindowManagerGlobal.ADD_NOT_APP_TOKEN;

                }

...

                } else if (atoken.removed) {

...

                } else if (type == TYPE_APPLICATION_STARTING && atoken.startingWindow != null) {

...


                }

            } else if (rootType == TYPE_INPUT_METHOD) {

...


            } else if (rootType == TYPE_VOICE_INTERACTION) {

...

            } else if (rootType == TYPE_WALLPAPER) {

 ...

            } else if (rootType == TYPE_DREAM) {

...

            } else if (rootType == TYPE_ACCESSIBILITY_OVERLAY) {

...

            } else if (type == TYPE_TOAST) {

....

           } else if (type == TYPE_QS_DIALOG) {

...

            } else if (token.asAppWindowToken() != null) {


                attrs.token = null;

                token = new WindowToken(this, client.asBinder(), type, false, displayContent,

                        session.mCanAddInternalSystemWindow);

            }
当我们通过mTokenMap获取WindowToken的时候,大致分为四种情况。WindowToken会尝试的获取父窗口对应的Token,找不到则使用WindowManager.LayoutParams中的WindowToken。一般来说我们找到的都有父亲的WindowToken。
- 1.无关应用的找不到WindowToken
- 2.有关应用找不到WindowToken。
- 3.无关应用找到WindowToken
- 4.有关应用找到WindowToken
前两种情况解析
实际上前两种情况,一旦发现找不到WindowToken,如果当前的窗口和应用相关的,就一定爆错误。如Toast,输入法,应用窗口等等。
因此在Android 8.0开始,当我们想要显示Toast的时候,加入传入的Context是Application而不是Activity,此时一旦发现mTokenMap中找不到IApplicationToken对应的WindowToken就爆出了错误。正确的做法应该是需要获取Activity当前的Context。
在上面的情况应用启动窗口,此时并没有启动Activity。因此不可能会被校验拦下,因此并没有异常抛出。就会自己创建一个WindowToken。
后两种的解析
当找到WindowToken,一般是指Activity启动之后,在AppWindowToken初始化后,自动加入了mTokenMap中。此时的情况稍微复杂了点。
当是子窗口的时候,则会判断当前的WindowToken是不是AppWindowToken。不是,或者被移除等异常情况则报错。
如果是壁纸,输入法,系统弹窗,toast等窗口模式,子窗口和父窗口的模式必须一致。
当此时的AppWindowToken不为空的时候,说明在New的时候已经生成,且没有移除,将会生成一个新的WindowToken。
为什么要生成一个新的windowToken?可以翻阅之前我写的文章,只要每一次调用一次构造函数将会把当前的WindowToken添加到mTokenMap中,实际上也是担心,对应的AppWindowToken出现的重新绑定的问题。
添加WindowState实例到数据结构
但是别忘了,我们这个时候还需要把相关的数据结构存储到全局。
            final WindowState win = new WindowState(this, session, client, token, parentWindow,

                    appOp[0], seq, attrs, viewVisibility, session.mUid,

                    session.mCanAddInternalSystemWindow);

            if (win.mDeathRecipient == null) {

...

                return WindowManagerGlobal.ADD_APP_EXITING;

            }


            if (win.getDisplayContent() == null) {

...

                return WindowManagerGlobal.ADD_INVALID_DISPLAY;

            }


            final boolean hasStatusBarServicePermission =

                    mContext.checkCallingOrSelfPermission(permission.STATUS_BAR_SERVICE)

                            == PackageManager.PERMISSION_GRANTED;

            mPolicy.adjustWindowParamsLw(win, win.mAttrs, hasStatusBarServicePermission);

            win.setShowToOwnerOnlyLocked(mPolicy.checkShowToOwnerOnly(attrs));


            res = mPolicy.prepareAddWindowLw(win, attrs);

            if (res != WindowManagerGlobal.ADD_OKAY) {

                return res;

            }

            // From now on, no exceptions or errors allowed!


            res = WindowManagerGlobal.ADD_OKAY;

            if (mCurrentFocus == null) {

                mWinAddedSinceNullFocus.add(win);

            }


            if (excludeWindowTypeFromTapOutTask(type)) {

                displayContent.mTapExcludedWindows.add(win);

            }


            origId = Binder.clearCallingIdentity();


            win.attach();

//以IWindow为key,WindowState为value存放到WindowMap中

            mWindowMap.put(client.asBinder(), win);


            win.initAppOpsState();


....

            win.mToken.addWindow(win);
因为完全可能出现新的WindowToken,因此干脆会创建一个新的WindowState。此时会对调用WindowState.attach方法
    void attach() {

        mSession.windowAddedLocked(mAttrs.packageName);

    }
这方法挺重要的,Session做了一次添加锁定。
void windowAddedLocked(String packageName) {

        mPackageName = packageName;

        mRelayoutTag = "relayoutWindow: " + mPackageName;

        if (mSurfaceSession == null) {

            if (WindowManagerService.localLOGV) Slog.v(

                TAG_WM, "First window added to " + this + ", creating SurfaceSession");

            mSurfaceSession = new SurfaceSession();

            if (SHOW_TRANSACTIONS) Slog.i(

                    TAG_WM, "  NEW SURFACE SESSION " + mSurfaceSession);

            mService.mSessions.add(this);

            if (mLastReportedAnimatorScale != mService.getCurrentAnimatorScale()) {

                mService.dispatchNewAnimatorScaleLocked(this);

            }

        }

        mNumWindow++;

    }
此时的工作是什么?联系上下文,当我们新增了PhoneWindow,就会一个ViewRootImpl,也因此新增了Session。此时说明诞生一个新界面,此时已经诞生了相关的容器对象,但是相关的绘制到底层对象还没有创建出来。
命名逻辑和Session很相似。Session是WMS给应用App的会话对象,SurfaceSession是SurfaceFlinger面向上层每一个WIndow需要绘制内容对象。
这个SurfaceSession和SurfaceControl都是重点,联通到SurfaceFlinger很重要的对象。
最后再添加到mWindowMap中。并且把WindowState添加到WindowToken中,让每一个WindowToken赋予状态的信息。我们稍微探索一下addWindow的方法。


