1. Builder
Retrofit通过Retrofit.Builder创建,主要是配置各种工厂Factory。
val retrofit = Retrofit.Builder()

    .baseUrl("this is baseUrl")

    .addCallAdapterFactory(RxJava2CallAdapterFactory.create())

    .addConverterFactory(GsonConverterFactory.create())

    .build()
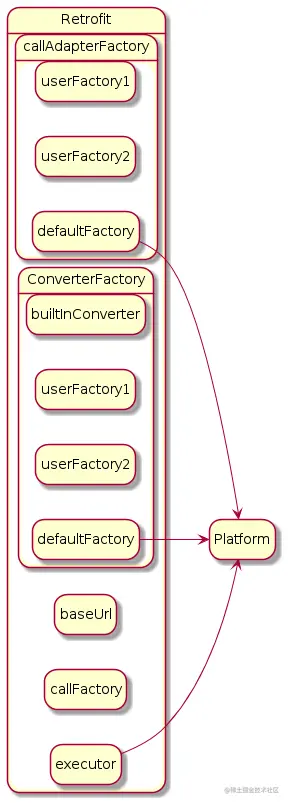
Builder.builder()主要有五个步骤:
- 获取
Platform对象,Platform是平台适配器,主要为了跨平台使用,类如安卓平台实现就是Android。 - 初始化
CallFactroy,CallFactroy的作用是生产realCall,网络请求由他发出。默认值是OkHttp的OKHttpClient。 - 初始化
Executor,默认通过Platform获取。 - 初始化
CallAdapter.Factroy,CallAdapter.Factroy生产CallAdapter,CallAdapter是realCall的适配器,通过对realCall的包装,实现Executor,java8的Futrue,rxjava等调度方法。存在多个,顺序是自定义配置-->默认配置。默认配置通过Platform获得。 - 初始化
Converter.Factory,Converter.Factory生产Converter,Converter是数据转换器,将返回的数据转换为需要的数据,一般转换为我们要用的对象。存在多个,顺序是内置配置-->自定义配置-->默认配置。默认配置通过Platform获得。
class Builder{


    Builder(Platform platform) {

        this.platform = platform;

    }


    public Builder() {

        //step 0

        this(Platform.get());

    }


    public Retrofit build() {

        if (baseUrl == null) {

            throw new IllegalStateException("Base URL required.");

        }


        // step1

        okhttp3.Call.Factory callFactory = this.callFactory;

        if (callFactory == null) {

            callFactory = new OkHttpClient();

        }


        //step2

        Executor callbackExecutor = this.callbackExecutor;

        if (callbackExecutor == null) {

            callbackExecutor = platform.defaultCallbackExecutor();

        }


        //step3

        List<CallAdapter.Factory> callAdapterFactories = new ArrayList<>(this.callAdapterFactories);

        callAdapterFactories.addAll(platform.defaultCallAdapterFactories(callbackExecutor));


        //step4

        List<Converter.Factory> converterFactories = new ArrayList<>(

                1 + this.converterFactories.size() + platform.defaultConverterFactoriesSize());

        converterFactories.add(new BuiltInConverters());

        converterFactories.addAll(this.converterFactories);

        converterFactories.addAll(platform.defaultConverterFactories());


        return new Retrofit(callFactory, baseUrl, unmodifiableList(converterFactories),

                unmodifiableList(callAdapterFactories), callbackExecutor, validateEagerly);

    }

}
到这里,Retrofit对象创建完成,一个大致的结构如下图:
2. 创建API对象
Retrofit通过定义网络请求的接口设置请求参数和返回类型,通过调用retrofit.create()创建这个接口的对象,调用这个对象的方法生成最终的网络请求。
interface MyService {

    @GET("/user")

    fun getUser(): Observable<Response<User>>

}


val myServiceClass: MyService = retrofit.create(MyService::class.java)
进入到create方法,可以看到是直接调用Proxy.newProxyInstance()方法创建出对象。这是标准库提供的动态代理机制,在运行时创建接口的实例对象。
Proxy.newProxyInstance()方法有三个参数:
classLoader: 类加载器
interfaces:需要实现的接口
InvocationHandler:代理方法
public <T> T create(final Class<T> service) {

    return (T) Proxy.newProxyInstance(service.getClassLoader(), new Class<?>[] { service },

            new InvocationHandler() {

                private final Platform platform = Platform.get();

                private final Object[] emptyArgs = new Object[0];


                @Override public @Nullable Object invoke(Object proxy, Method method,

                                                         @Nullable Object[] args) throws Throwable {

                    if (method.getDeclaringClass() == Object.class) {

                        return method.invoke(this, args);

                    }

                    if (platform.isDefaultMethod(method)) {

                        return platform.invokeDefaultMethod(method, service, proxy, args);

                    }

                    return loadServiceMethod(method).invoke(args != null ? args : emptyArgs);

                }

            });

}
为了更好的理解动态代理,可以当做动态代理自动帮我们生成一个接口的实现类。将所有的方法都通过handler.invoke()代理,如下面的代码所示。只不过动态代理是运行时生成的这个类,并且是直接生成了字节码。
interface MyService {

    @GET("/user")

    fun getUser(): Observable<Response<User>>


    @GET("/name")

    fun getName(userId: String): Observable<Response<String>>

}


//自动生成的代码示例

class SuspendServiceProxy implements SuspendService {

    InvocationHandler handler;


    @NonNull

    @Override

    public Observable<Response<User>> getUser() {

        return handler.invoke(

                this,

                SuspendService.class.getMethod("getUser", String.class),

                new Object[]{}

        );

    }


    @NonNull

    @Override

    public Observable<Response<String>> getName(@NonNull String userId) {

        return handler.invoke(

                this,

                SuspendService.class.getMethod("getName", String.class),

                new Object[]{userId}

        );

    }

}
3. 创建请求对象
创建好API对象之后,就可以调用它的方法创建请求对象。
val observable = myServiceClass.getUser()
根据前面可以知道,这个方法代理给了InvocationHandler,在这个方法首先判断这个方法对象是不是实体对象,如果是的话就直接调用就行。
如果不是一个对象,就把调用再代理给ServiceMethod。首先调用loadServiceMethod()创建ServiceMethod对象,然后调用invoke()方法得到返回值。
public @Nullable Object invoke(Object proxy, Method method, @Nullable Object[] args) throws Throwable {

    // 判断这个方法对象是不是实体对象,如果是的话就直接调用

    if (method.getDeclaringClass() == Object.class) {

        return method.invoke(this, args);

    }

    // 判断这个方法对象是不是实体对象,如果是的话就直接调用

    if (platform.isDefaultMethod(method)) {

        return platform.invokeDefaultMethod(method, service, proxy, args);

    }

    return loadServiceMethod(method).invoke(args != null ? args : emptyArgs);

}
3.1. 创建ServiceMethod对象
ServiceMethod是Retrofit内部的自定义的代理方法,实际的逻辑是交给它处理。
abstract class ServiceMethod<T> {

    abstract @Nullable T invoke(Object[] args);

}
loadServiceMethod()方法获取ServiceMethod对象。
方法对象Method作为Key缓存ServiceMethod对象在Retrofit中,因为创建ServiceMethod是一个耗时过程,所以弄成单例模式。
如果拿不到缓存,就调用ServiceMethod.parseAnnotations()创建一个ServiceMethod对象。
private final Map<Method, ServiceMethod<?>> serviceMethodCache = new ConcurrentHashMap<>();


ServiceMethod<?> loadServiceMethod(Method method) {

    ServiceMethod<?> result = serviceMethodCache.get(method);

    if (result != null) return result;


    synchronized (serviceMethodCache) {

        result = serviceMethodCache.get(method);

        if (result == null) {

            result = ServiceMethod.parseAnnotations(this, method);

            serviceMethodCache.put(method, result);

        }

    }

    return result;

}
ServiceMethod.parseAnnotations()中只做了一件事,创建RequestFactory然后将创建ServiceMethod的工作又交给了子类HttpServiceMethod处理。
RequestFactory是接口的参数配置,通过解析接口的注解,返回值,入参及其注解等获得这些参数。
之后将解析完成的数据传递给HttpServiceMethed,由它继续创建ServiceMethod。
abstract class ServiceMethod<T> {

    static <T> ServiceMethod<T> parseAnnotations(Retrofit retrofit, Method method) {

        RequestFactory requestFactory = RequestFactory.parseAnnotations(retrofit, method);

        ...

        return HttpServiceMethod.parseAnnotations(retrofit, method, requestFactory);

    }


    abstract @Nullable T invoke(Object[] args);

}
3.1.1. 创建RequstFactory
RequestFactory内部也是一个Builder模式。主要做了两件事:
- 遍历接口注解,初始化配置参数,这里读取的是
POST、GET等注释。 - 遍历入参及其注解,将入参转换为
ParameterHandler对象,将每个参数的设置配置的逻辑代理给了它处理。
final class RequestFactory {

    static RequestFactory parseAnnotations(Retrofit retrofit, Method method) {

        return new RequestFactory.Builder(retrofit, method).build();

    }


    }

}
3.1.2.2. OkHttpCall
最终创建的网络请求对象是OkHttpCall。
OkHttpCall实现了Retrofit.Call接口,这个接口与OkHttp.Call基本一致,这里只介绍它的三个方法:
execute()同步发起请求并且返回请求体Response。enqueue()异步发起请求,通过Callback通信,需要注意的是处理的回调也是在异步中调用的。cancel()取消请求。
查看OkHttpCall的实现,可以发现所有的Call接口方法的具体实现都是代理给了rawCall。
cancel()直接代理给rawCall.cancel()。
execute()代理给rawCall.execute(),将返回值交给parseResponse()转换了一次。
enqueue()代理给rawCall.enqueue(),多加了一层Callback回调,在成功回调中也是交给parseResponse()转换之后再回调给原始的Callback。
也就是说OkHttpCall把所有的逻辑静态代理给了rawCall,这样做的好处是可以在对应的地方做一下额外的处理,也就是获得返回值通过parseResponse()转换数据。
fAndroid平台默认的CallBackExecutor在Platform的实现类Android中,将Runnable抛到MainHandler中,实现回调到主线程。
static final class Android extends Platform {


    @Override public Executor defaultCallbackExecutor() {

        return MainThreadExecutor();

    }


    static class MainThreadExecutor implements Executor {

        private final Handler handler = new Handler(Looper.getMainLooper());


        @Override public void execute(Runnable r) {

            handler.post(r);

        }

    }

}
3.1.2.3.2. RxJava2CallAdapterFactory
RxJava2CallAdapterFactory只在返回类型是Observable之类的时候创建CallAdapter。
public final class RxJava2CallAdapterFactory extends CallAdapter.Factory {


    @Override

    public @Nullable CallAdapter<?, ?> get(

            Type returnType, Annotation[] annotations, Retrofit retrofit) {

        Class<?> rawType = getRawType(returnType);


        if (rawType != Observable.class) { //省略了其他类型

            return null;

        }


        boolean isResult = false;

        boolean isBody = false;

        Type responseType;


        Type observableType = getParameterUpperBound(0, (ParameterizedType) returnType);

        Class<?> rawObservableType = getRawType(observableType);

        if (rawObservableType == Response.class) {

            responseType = getParameterUpperBound(0, (ParameterizedType) observableType);

        }

        ...

        return new RxJava2CallAdapter(...);

    }

}
RxJava2CallAdapter中的adapt()将Call封装成observable返回。
final class RxJava2CallAdapter<R> implements CallAdapter<R, Object> {


    @Override public Object adapt(Call<R> call) {

        Observable<Response<R>> observable = new CallExecuteObservable<>(call);

        ...

        return RxJavaPlugins.onAssembly(observable);

    }

}
最后进到CallExecuteObservable,在启动的时候调用call.execute()并将结果抛给观察者。
final class CallExecuteObservable<T> extends Observable<Response<T>> {

    private final Call<T> originalCall;


    CallExecuteObservable(Call<T> originalCall) {

        this.originalCall = originalCall;

    }


    @Override protected void subscribeActual(Observer<? super Response<T>> observer) {

        Call<T> call = originalCall.clone();

        try {

            ...

            Response<T> response = call.execute();

            observer.onNext(response);

        }

    }

}
3.2. 回顾
Api接口实例动态代理给HttpServiceMethod。- 网络请求的真实执行者是
OkHttpClient创建的RealCall。 Api接口的调用到RealCall直接有两层静态代理 OkHttpCall和CallAdapter。OkHttpCall代理了RealCall,额外调用Converter做序列化处理。CallAdapter代理了OkHttpCall,可以在这里做扩展,将Call转换为实际的返回类型。
4. 协程实现
在看Retrofit如何实现协程之前,先梳理一下协程的基本概念。
当有一个延迟任务,后续的逻辑又需要等待这个任务执行完成返回数据,能继续执行,为了不阻塞线程,一般就需要就需要通过线程调度和传递回调来通信。在使用了协程之后,却只需要像同步代码那样书写,就可以完成这些操作。
但这并不是什么黑魔法,并不是用了协程之后不需要线程调度和传递回调,而是将这些繁琐的事进行复杂的封装并且为我们自动生成。将回调封装成Continuation,将线程的调度封装成调度器。
Continuation ,调用它的 resume 或者 resumeWithException 来返回结果或者抛出异常,跟我们所说的回调一模一样。
调度器的本质是一个协程拦截器,它拦截的对象就是Continuation,进而在其中实现回调的调度。调度器一般使用现成的,类如Dispatchers.Main,如果去挖它的源码,你会发现到了最后,还是使用的handler.post(),也跟我们所说的线程调度一模一样。
而前面有讲到Retrofit的实现很多时候需要依据返回类型做不同的处理,所以就需要了解协程是如何自动生成的回调代码和如何传递回调。写一个简单的协程接口,看一下转换后的Java代码,以及尝试在Java代码中调用协程接口。
可以看到返回值String被封装成了Continuation<String>作为入参传递,思考一下回调不也是这样实现的。
真实的返回值成了Object(用于状态机状态切换)。
//Kotlin代码

interface SuspendService {

    suspend fun C(c1: Long): String

}


//字节码转化的Java代码

public interface SuspendService {

   @Nullable

   Object C(long var1, @NotNull Continuation var3);

}


//尝试在Java中调用suspend方法

class MMM {

    SuspendService service;


    public static void main(String[] args) {

        MMM mmm = new MMM();

        mmm.service.C(1L, new Continuation<String>() {

            @NonNull

            @Override

            public CoroutineContext getContext() {

                return null;

            }


            @Override

            public void resumeWith(@NonNull Object o) {


            }

        });

    }

}
接着回到动态代理那部分,因为suspend生成的代码会多加一个回调参数Continuation,那么动态代理的时候这个参数就会传入到代理的handler中。
Continuation的创建和使用十分的繁琐,最好的处理方法应该是把它再丢进一个kotlin的suspend方法中,让编译器去处理这些东西,而这个也就是Retrofit实现协程的原理。
interface SuspendService {

    @GET("/user")

    suspend fun getUser(): Response<User>


    @GET("/name")

    suspend fun getName(userId: String): Response<String>

}


//动态代理生成字节码示例

class SuspendServiceProxy implements SuspendService {

    InvocationHandler handler;


    @Nullable

    @Override

    public Object getUser(@NonNull Continuation<? super Response<User>> $completion) {

        return handler.invoke(

                this,

                SuspendService.class.getMethod("getUser", Continuation.class),

                new Object[]{$completion}

        );

    }


    @Nullable

    @Override

    public Object getName(@NonNull String userId, @NonNull Continuation<? super Response<String>> $completion) {

        return handler.invoke(

                this,

                SuspendService.class.getMethod("getName", String.class, Continuation.class),

                new Object[]{userId, $completion}

        );

    }

}
接着再回到HttpServiceMethod,看看刚才被省略的代码。
在这里面会判断是不是suspend方法,判断的逻辑在RequestFactory中,判断的方法就是判断参数有没有Continuation对象,感兴趣可以去RequestFactory源码瞅瞅。
现在如果是suspend方法,会直接自定义一个类型adapterType,它的实际类型是Call,泛型是实际的返回类型(Response<T>里面的T)。之后将他作为返回类型去创建CallAdapter,而这里实际创建的就是DefaultCallAdapterFactory的ExecutorCallbackCall。最后创建SuspendForResponse对象返回。
abstract class HttpServiceMethod<ResponseT, ReturnT> extends ServiceMethod<ReturnT> {


    static <ResponseT, ReturnT> retrofit2.HttpServiceMethod<ResponseT, ReturnT> parseAnnotations(

            Retrofit retrofit, Method method, RequestFactory requestFactory) {


        /**

         * 通过判断参数是不是Continuation,标志函数是不是suspend

         * 在requestFactory内部处理

         */

        boolean isKotlinSuspendFunction = requestFactory.isKotlinSuspendFunction;

				...

        Annotation[] annotations = method.getAnnotations();

        Type adapterType;

        if (isKotlinSuspendFunction) {

            Type[] parameterTypes = method.getGenericParameterTypes();

            Type responseType = Utils.getParameterLowerBound(0,

                    (ParameterizedType) parameterTypes[parameterTypes.length - 1]);


          if (getRawType(responseType) == Response.class && responseType instanceof ParameterizedType) {

            // Unwrap the actual body type from Response<T>.

            responseType = Utils.getParameterUpperBound(0, (ParameterizedType) responseType);

            continuationWantsResponse = true;

     		  }

          	/**

 						 * 自己新建一个返回类型,将实际的返回例行包装给Call

 						 */

            adapterType = new Utils.ParameterizedTypeImpl(null, Call.class, responseType);

        } else {

            adapterType = method.getGenericReturnType();

        }


        CallAdapter<ResponseT, ReturnT> callAdapter =

                createCallAdapter(retrofit, method, adapterType, annotations);

        Type responseType = callAdapter.responseType();


        Converter<ResponseBody, ResponseT> responseConverter =

                createResponseConverter(retrofit, method, responseType);


        okhttp3.Call.Factory callFactory = retrofit.callFactory;

        if (!isKotlinSuspendFunction) {

            return new CallAdapted<>(requestFactory, callFactory, responseConverter, callAdapter);

        } else {

            return (HttpServiceMethod<ResponseT, ReturnT>) new SuspendForResponse<>(requestFactory,

                    callFactory, responseConverter, (CallAdapter<ResponseT, Call<ResponseT>>) callAdapter);

        }

    }

}
在SuspendForResponse中,adapt()的返回类型对应到了suspend的返回类型Object。并且其中的逻辑就是解析出Call和Continuation对象,然后有调用KotlinExtensions.awaitResponse(),就如之前说的,它是一个suspend方法,在代理中不处理Continuation,而是交给编译器去处理。
static final class SuspendForResponse<ResponseT> extends HttpServiceMethod<ResponseT, Object> {

    private final CallAdapter<ResponseT, Call<ResponseT>> callAdapter;


    SuspendForResponse(RequestFactory requestFactory, okhttp3.Call.Factory callFactory,

                       Converter<ResponseBody, ResponseT> responseConverter,

                       CallAdapter<ResponseT, Call<ResponseT>> callAdapter) {

        super(requestFactory, callFactory, responseConverter);

        this.callAdapter = callAdapter;

    }


    @Override

    protected Object adapt(Call<ResponseT> call, Object[] args) {

        call = callAdapter.adapt(call);


        Continuation<Response<ResponseT>> continuation =

                (Continuation<Response<ResponseT>>) args[args.length - 1];

        ...

        return KotlinExtensions.awaitResponse(call, continuation);

    }

}
KotlinExtensions.awaitResponse()是Call的扩展函数,扩展函数的实现是通过静态方法传入this的方法实现的,所以前面传入awaitResponse()的参数有两个,分别是Call对象和Continuation对象。
KotlinExtensions.awaitResponse()的主体是suspendCancellableCoroutine方法,suspendCancellableCoroutine运行在协程当中并且帮我们获取到当前协程的 CancellableContinuation 实例,CancellableContinuation是一个可取消的Continuation。通过调用它的 invokeOnCancellation 方法可以设置一个取消事件的回调,一旦这个回调被调用,那么意味着调用所在的协程被取消了,这时候我们也要相应的做出取消的响应,也就是把OkHttp发出去的请求给取消掉。这段建议多读几遍。
之后调用Call.enqueue()发送网络请求,在Callback中调用CancellableContinuation的 resume 或者 resumeWithException 来返回结果或者抛出异常。
这里的Callback也是经过了callAdapter和OkHttpCall处理,乏了。
suspend fun <T> Call<T>.awaitResponse(): Response<T> {

  return suspendCancellableCoroutine { continuation ->

    continuation.invokeOnCancellation {

      cancel()

    }

    enqueue(object : Callback<T> {

      override fun onResponse(call: Call<T>, response: Response<T>) {

        continuation.resume(response)

      }


      override fun onFailure(call: Call<T>, t: Throwable) {

        continuation.resumeWithException(t)

      }

    })

  }

}


//扩展函数示例

fun <T> Call<T>.awaitResponse(){

    toString()

}


//扩展函数示例转换为Java代码

public static final void awaitResponse(@NotNull Call $this$awaitResponse) {

    $this$awaitResponse.toString();

}


