


简易的Android网络图片加载器
在项目开发中,我们加载图片一般使用的是第三方库,比如Glide,在闲暇之余突发奇想,自己动手实现一个简单的Android网络图片加载器。
首先定义API,API的定义应该简单易用,比如
imageLoader.displayImage(imageView,imagePath);其次应该支持缓存。缓存一般是指三级缓存,先定义一个入口类ImageLoader
public ImageLoader(Activity activity) {
    this.activity = activity;
    memoryCache = new MemoryCache();
    diskCache = new DiskCache(activity);
    netCache = new NetCache(activity,memoryCache,diskCache);
}
在初始化的时候就初始化内存缓存,磁盘缓存,网络缓存三个变量,然后定义加载方法:
public void displayImage(final ImageView imageView, String url,int placeholder){
    imageView.setTag(url);
    imageView.setImageResource(placeholder);
    Bitmap bitmap;
    bitmap = memoryCache.getBitmap(url);
    if(bitmap != null){
        imageView.setImageBitmap(bitmap);
        Log.i(TAG, "从内存中获取图片");
        return;
    }
    bitmap = diskCache.getBitmap(url);
    if(bitmap != null){
        imageView.setImageBitmap(bitmap);
        memoryCache.setBitmap(url,bitmap);
        Log.i(TAG, "从磁盘中获取图片");
        return;
    }
    netCache.getBitmap(imageView,url);
}
首先将图片地址设置给ImageView的tag,防止因为ImageView复用导致图片错乱的问题。然后设置一个占位图防止图片加载过慢ImageVIew显示白板
三级缓存中从内存中加载缓存信息是最快的,所以第一步从内存缓存中查找,如果找到了就直接设置给ImageView,否则继续从磁盘缓存中查找,找到了就显示,最后实在找不到就从网络下载图片
内存缓存
public class MemoryCache {
    private LruCache<String,Bitmap> lruCache;
    public MemoryCache() {
        long maxMemory  = Runtime.getRuntime().maxMemory() / 8;
        lruCache = new LruCache<String,Bitmap>((int) maxMemory){
            @Override
            protected int sizeOf(String key, Bitmap value) {
                return value.getByteCount();
            }
        };
    }
    public Bitmap getBitmap(String url) {
        return lruCache.get(url);
    }
    public void setBitmap(String url,Bitmap bitmap) {
        lruCache.put(url,bitmap);
    }
}
内存缓存比较简单,只需要将加载过的图片放入内存,然后下次加载直接获取,由于内存大小有限制,所以这里使用了LruCache算法保证缓存不会无限制增长。
磁盘缓存
对于已经缓存在磁盘上的文件,就不需要在从网络下载了,直接从磁盘读取。
public Bitmap getBitmap(String url) {
    FileInputStream is;
    String cacheUrl = Md5Utils.md5(url);
    File parentFile = new File(Values.PATH_CACHE);
    File file = new File(parentFile,cacheUrl);
    if(file.exists()){
        try {
            is = new FileInputStream(file);
            Bitmap bitmap =  decodeSampledBitmapFromFile(file.getAbsolutePath());
            is.close();
            return bitmap;
        } catch (Exception e) {
            e.printStackTrace();
        }
    }
    return null;
}
考虑到多图加载的时候,如果图片太大容易OOM,所以需要对加载的图片稍作处理
public  Bitmap decodeSampledBitmapFromFile(String pathName){
    BitmapFactory.Options options = new BitmapFactory.Options();
    options.inJustDecodeBounds = true;
    BitmapFactory.decodeFile(pathName,options);
    options.inSampleSize = calculateInSampleSize(options)*2;
    options.inJustDecodeBounds = false;
    options.inPreferredConfig = Bitmap.Config.RGB_565;
    return BitmapFactory.decodeFile(pathName,options);
}
这里降低了图片的采样,对图片的质量进行了压缩
对于本地没有缓存的图片,需要从网络下载,当获取到图片流之后,保存在本地
public void saveBitmap(InputStream inputStream, String url) throws IOException {
    String cacheUrl = Md5Utils.md5(url);
    File parentFile = new File(Values.PATH_CACHE);
    if(!parentFile.exists()){
        parentFile.mkdirs();
    }
    FileOutputStream fos = new FileOutputStream(new File(parentFile,cacheUrl));
    byte[] bytes = new byte[1024];
    int index = 0;
    while ((index = inputStream.read(bytes))!=-1){
        fos.write(bytes,0,index);
        fos.flush();
    }
    inputStream.close();
    fos.close();
}
为了防止图片url带一些非法字符导致创建文件失败,所以对url进行了md5处理
网络缓存
这里比较简单,直接从服务器加载图片信息就可以了,访问网络使用了OkHttp
public void getBitmap(final ImageView imageView, final String url) {
    OkHttpClient client = new OkHttpClient();
    Request request = new Request.Builder() .get().url(url).build();
    client.newCall(request).enqueue(new Callback() {
        @Override
        public void onFailure(Call call, IOException e) {
            imageView.setImageResource(R.mipmap.ic_error);
        }
        @Override
        public void onResponse(Call call, Response response) throws IOException {
            InputStream inputStream = response.body().byteStream();
            diskCache.saveBitmap(inputStream, url);
            activity.runOnUiThread(new Runnable() {
                @Override
                public void run() {
                    if (url != null && url.equals(imageView.getTag())) {
                        Bitmap bitmap = diskCache.getBitmap(url);
                        memoryCache.setBitmap(url, bitmap);
                        if (bitmap != null) {
                            imageView.setImageBitmap(bitmap);
                        } else {
                            imageView.setImageResource(R.mipmap.ic_error);
                        }
                    } else {
                        imageView.setImageResource(R.mipmap.ic_place);
                    }
                }
            });
        }
    });
}
当获取到图片后,分别放入磁盘和内存缓存起来
使用
最后直接在需要加载图片的地方调用
new ImageLoader(activity).displayImage(imageView,path)
作者:晚来天欲雪_
来源:juejin.cn/post/7088693420109070373
年薪最高21万?哈哈想去杜蕾斯公司应聘了


来源:xhs@🌵
【入门级】Java解决动态规划背包问题
前言
本文是最入门级别的动态规划背包问题的解题过程,帮助小白理解动态规划背包问题的解题思路和转化为代码的过程。
动态规划背包问题是什么?
一个背包只能装下5kg物品;
现有:
物品一:1kg价值6元,
物品二:2kg价值10元,
物品三:3kg价值15元,
物品四:4kg价值12元。
问:怎么装,价值最大化? (每样物品只有一件,且每个物品不可拆分)
动态规划解题转代码
动态规划的解题套路千千万,但都是离不开穷举+if装这个物品会怎样else不装会怎样,最终比较一下结果哪条路得到价值最大,就是哪条路。
我选个最好理解的。
总体思路是:背包总共5kg分成1kg1kg的作为最外层循环(穷举的根),每次都取最优。
第一步:拆包填表格
| 当背包只有1kg时 | 当背包只有2kg时 | 当背包只有3kg时 | 当背包只有4kg时 | 当背包只有5kg时 | |
| 加入物品一(1kg,¥6) | |||||
| 加入物品二(2kg,¥10) | |||||
| 加入物品三(3kg,¥15) | |||||
| 加入物品四(4kg,¥12) |
如何填写表格?把当前状态(背包为某kg)下,最多能装的价格填进去!
1)横着看第一行:当背包1kg时,加入物品1是多少¥,就填进去;当背包是2kg,加入物品一是多少¥,就填进去......以此类推
| 当背包只有1kg时 | 当背包只有2kg时 | 当背包只有3kg时 | 当背包只有4kg时 | 当背包只有5kg时 | |
| 加入物品一(1kg,¥6) | ¥6 | ¥6 | ¥6 | ¥6 | ¥6 |
| 加入物品二(2kg,¥10) | |||||
| 加入物品三(3kg,¥15) | |||||
| 加入物品四(4kg,¥12) |
2)横着看第二行:当背包1kg时,加不进去物品二,那当背包1k时候利益最大就是¥6;当背包2kg时候加物品二是¥10,比加物品一的¥6多,所以利益最大是放二物品 ;当背包是3kg时候,在原有物品一的基础上,还可以再加物品二,价值就变为¥6+¥10=¥16元,以此类推。
| 当背包只有1kg时 | 当背包只有2kg时 | 当背包只有3kg时 | 当背包只有4kg时 | 当背包只有5kg时 | |
| 加入物品一(1kg,¥6) | ¥6 | ¥6 | ¥6 | ¥6 | ¥6 |
| 加入物品二(2kg,¥10) | ¥6 | ¥10 | ¥16 | ¥16 | ¥16 |
| 加入物品三(3kg,¥15) | |||||
| 加入物品四(4kg,¥12) |
3)横着看第三行:1kg放不下;2kg也装不下,取之前最大利益10¥;3kg可以装下,但是3kg全装物品三价值为¥15,但是之前两物品可以得到¥16,那么还是之前的落下来¥16。4kg时候,装3kg物品三还剩1kg装下物品一后二者之和为¥21,所以最大值取物品三加物品一的。
| 当背包只有1kg时 | 当背包只有2kg时 | 当背包只有3kg时 | 当背包只有4kg时 | 当背包只有5kg时 | |
| 加入物品一(1kg,¥6) | ¥6 | ¥6 | ¥6 | ¥6 | ¥6 |
| 加入物品二(2kg,¥10) | ¥6 | ¥10 | ¥16 | ¥16 | ¥16 |
| 加入物品三(3kg,¥15) | ¥6 | ¥10 | ¥16 | ¥21 | ¥25 |
| 加入物品四(4kg,¥12) |
4)横着看第四行:同上道理
| 当背包只有1kg时 | 当背包只有2kg时 | 当背包只有3kg时 | 当背包只有4kg时 | 当背包只有5kg时 | |
| 加入物品一(1kg,¥6) | ¥6 | ¥6 | ¥6 | ¥6 | ¥6 |
| 加入物品二(2kg,¥10) | ¥6 | ¥10 | ¥16 | ¥16 | ¥16 |
| 加入物品三(3kg,¥15) | ¥6 | ¥10 | ¥16 | ¥21 | ¥25 |
| 加入物品四(4kg,¥12) | ¥6 | ¥10 | ¥16 | ¥21 | ¥25 |
以上,物品加完,价值最大在哪里?在表格最右下角!
这个思路,和穷举四个物品432*1=24种结果区别在哪里?这种方式相当于穷举每次都有最优解!
这就是状态转移方程: 就是拿装和 不装 每次都和上面的比较,大了就装,小了就不装!
第二步:转为代码
以上这拆包填表过程转为伪代码是什么?
一、首先看空表格:即初始化代码
1、最基础的准备:
        // 物品价值

		int value[] = { 6, 10, 15, 12 };

		// 物品重量

		int weight[] = { 1, 2, 3, 4 };

		// 背包总容量

		int bagWeight = 5;

		// 物品总数量

		int num = 4;
2、准备下面这个表格:二维数组
        // 表格内容:第一个[]表示行(坐标) 第二个[]表示列 (坐标)

        // [][] 两个坐标定位出哪个表格,dp[][]取出的就是最大价值金额

        // 防止越界可以加个1,横是待装物品个数,竖是被拆分的背包重量

int dp[][] = new int[num + 1][bagWeight + 1];| 当背包只有1kg时 | 当背包只有2kg时 | 当背包只有3kg时 | 当背包只有4kg时 | 当背包只有5kg时 | |
| 加入物品一(1kg,¥6) | |||||
| 加入物品二(2kg,¥10) | |||||
| 加入物品三(3kg,¥15) | 坐标是[2][3]dp[2][3] = ¥21 | ||||
| 加入物品四(4kg,¥12) | 这里是最大 |
二、看怎么循环填表格
1、按行循环
// 最外层循环即 表格横向有几行就循环几次

for (int i = 1; i <= num; i++) {


}
2、每行里按列循环
// 被拆分的背包 单行从左到右依次循环,有几列循环几次

for (int everyBagWeight = 1; everyBagWeight <= bagWeight; everyBagWeight++) {


}
3、表格里填入多少如何判断
1)能装下这个物品:
// if 物品重量 小于 当前拆分后背包的重量 就是能装

// weight[i是最外层的循环(有几个物品i就等于几,i-1下标的值就是第几个物品的重量值)]

if (weight[i - 1] <= everyBagWeight) {


}
1-1)能装下这个物品,装还是不装
// 能装就计算装之后和装之前 哪个是最大价值

dp[i][everyBagWeight] = Math.max(

	// 装之后

	value[i - 1] + dp[i - 1][everyBagWeight - weight[i - 1]],

	// 装之前

	dp[i - 1][everyBagWeight]

);
这里很晕举个例子说明,以红色格子为例子:
| 横坐标[1] | 横坐标[2] | 横坐标[3] | 横坐标[4] | 横坐标[5] | |
| 纵坐标[1] | ¥6 | ¥6 | ¥6 | ¥6 | ¥6 |
| 纵坐标[2] | ¥6 | ¥10 | ¥16 | ¥16 | ¥16 |
| 纵坐标[3] | ¥6 | ¥10 | ¥16 | ¥21 | ¥25 |
| 纵坐标[4] | ¥6 | ¥10 | ¥16 | ¥21 | ¥25 |
// 红色格子能装就计算装之后和装之前 哪个是最大价值

//给纵坐标4,横坐标5的格子赋值

dp[i=4 ][everyBagWeight = 5kg] =


    Math.max(

	    // 装之后~~~~~~~~~~~~~~~~

        //value[i-1=3]是第四个物品的价值 = 12¥

        //dp[i-1=3]是纵坐标是[3],

        //[5 - weight[3]]即(总重量)减掉(当前物品四的weight[3]=4kg )=1kg

        //dp[3][1]是纵坐标是[3],横坐标为[1]即粉色格子值¥6

        //所以装之后总价值为¥12+¥6=¥18


	    value[i-1] + dp[i - 1][everyBagWeight - weight[i - 1]],//=¥18


	    //-----------------------------------------------------

        // 装之前~~~~~~~~~~~~~~~

        //dp[i-1=3][everyBagWeight = 5]

        //纵坐标是3 横坐标是5 即是绿色格子的值 ¥25

	    dp[i - 1][everyBagWeight]

    );

//取最大:25>18所以是赋值25
2)装不下
	            // 装不下 就是绿色格子直接赋值上面的价值

				} else {

					dp[i][everyBagWeight] = dp[i - 1][everyBagWeight];

				}
三、输出结果(最大价值)
//表格右下角就是结果

System.out.print(dp[num][bagWeight]);
第三步:完整代码
public class Bag {

	public static void main(String[] args) {

		// 物品价值

		int value[] = { 6, 10, 15, 12 };

		// 物品重量

		int weight[] = { 1, 2, 3, 4 };

		// 背包总容量

		int bagWeight = 5;

		// 物品总数量

		int num = 4;

		// 表格内容:第一个[]表示价值 第二个[]表示重量??

		int dp[][] = new int[num + 1][bagWeight + 1];


		// 每次加物品 最外层循环即表格横向有几行就循环几次

		for (int i = 1; i <= num; i++) {


			// 被拆分的背包 单行从左到右依次循环,有几列循环几次

			for (int everyBagWeight = 1; everyBagWeight <= bagWeight; everyBagWeight++) {


				// 尝试装物品

				// if装 : 物品重量 小于 当前拆分后背包的重量

				if (weight[i - 1] <= everyBagWeight) {

					// 能装就计算装之后和装之前 哪个是最大价值

					dp[i][everyBagWeight] = Math.max(

							// 装之后

							value[i - 1] + dp[i - 1][everyBagWeight - weight[i - 1]],

							// 装之前

							dp[i - 1][everyBagWeight]);


					// 装不下 就是上面的价值

				} else {

					dp[i][everyBagWeight] = dp[i - 1][everyBagWeight];

				}

			}

		}

		//表格右下角就是结果

		System.out.print(dp[num][bagWeight]);

	}


}
动态规划写出路径
以上问题,我们只是计算出了最大价值是多少,那如果需要输出拿了哪个物品呢?
我们只需要把最右列倒着遍历,即背包重量最大时的容量都装了哪些物品,即可
| 当背包只有1kg时 | 当背包只有2kg时 | 当背包只有3kg时 | 当背包只有4kg时 | 当背包只有5kg时 | |
| 加入物品一(1kg,¥6) | ¥6 [1][5] | ||||
| 加入物品二(2kg,¥10) | ¥16 [2][5] | ||||
| 加入物品三(3kg,¥15) | ¥25 [3][5] | ||||
| 加入物品四(4kg,¥12) | ¥25 [4][5] |
拿这道题举例子,有如下这么几种情况:
1)如果加了物品四和没加物品四是一样的,代表物品四根本没有加入。即dp[4][5] ==dp[3][5]
2)如果加了物品三和没加物品三是不一样的,代表物品三是加入了的,需要输出!
3)因为我们表格横纵坐标都是从1开始的,所以遍历不到,最后补上就可以。
        // 具体的物品输出,只需要遍历最后一列即可(从右下角表格向上走)

		for (int j = num; j > 1; j--) {

			if (dp[j][bagWeight] == dp[j - 1][bagWeight]) {

				// 该物品加入,与没加入没有差别,意味着该物品没有加入,即不用输出

			} else {

				// 该物品被加入了,输出即可

				System.out.println("加入物品" + j + ":重量=" + weight[j - 1] + ";价值=" + value[j - 1]);

				bagWeight = bagWeight - weight[j - 1];

			}

		}

		// 如果背包不等于0,就要把最后一个商品加进来

		if (bagWeight != 0) {

			System.out.println("最后加入物品" + 1 + ":重量=" + weight[0] + ";价值=" + value[0]);

		}
以上就是入门全部过程~
作者:Java程序员调优
链接:https://juejin.cn/post/7151416114949324813
来源:稀土掘金
著作权归作者所有。商业转载请联系作者获得授权,非商业转载请注明出处。
Flutter 组件集录 | 日期范围组件 - DateRangePickerDialog
前言
今天随手翻翻源码,突然看到 showDateRangePicker,心中狂喜。原来 Flutter 早已将 日期范围选择器 内置了,可能有些小伙伴已经知道,但应该还有一部分朋友不知道。想当年,为了日期范围选择可吃了不少坑。做为 Flutter 内置组件收集狂魔的我,自然要发篇文章来安利一下这个组件。另外,该组件已经收录入 FutterUnit ,可更新查看。
| 1 | 2 | 3 |
|---|---|---|
1. 日期范围选择器的使用
如下所示,是最简单的日期选择器操作示意:点击选择按钮时,触发下面代码中的 _show 方法:
| 主界面 | 选择器界面 | 保存后界面 |
|---|---|---|
showDateRangePicker 是 Flutter 内置的方法,用于弹出日期范围的对话框。其中必传的参数有三个:
| 参数 | 类型 | 描述 |
|---|---|---|
| context | BuildContext | 构建上下文 |
| firstDate | DateTime | 可选择的最早日期 |
| lastDate | DateTime | 可选择的最晚日期 |
该方法返回 DateTimeRange? 泛型的 Future 对象,如下代码所示:可以通过 async/await 来等待 showDateRangePicker 任务的完成,获取 DateTimeRange? 结果对象。
void _show() async {

  DateTime firstDate = DateTime(2021, 1, 1);

  DateTime lastDate = DateTime.now();

  DateTimeRange? range = await showDateRangePicker(

    context: context,

    firstDate: firstDate,

    lastDate: lastDate,

  );

  print(range);

}
2. 日期范围选择器的语言
默认情况下,你会发现选择器是 英文 的(左图),怎么能改成中文呢?
| 英文 | 中文 |
|---|---|
默认情况下,应用是不支持多语言,对于日历这种内置组件的多语言,可以通过加入 flutter_localizations 依赖实现:
dependencies:

  flutter_localizations:

    sdk: flutter
在 MaterialApp 中指定 localizationsDelegates 和 supportedLocales 。如果应用本身没有多语言的需求,可以指定只支持中文:
如果需要多语言,可以通过 locale 参数指定语言。如果未指定的话,会使用当前项目中的当前语言。
简单瞄一眼 showDateRangePicker 源码,可以看出 locale 非空时,会通过 Localizations.override 来让子树使用指定的 locale 语言:
3. 日期范围选择器的其他参数
除了默认的必需参数外,还有一些参数用于指定相关文字。下面三张图中标注了相关文本对应的位置,如果需要修改相关文字,设置对应参数即可:
| 1 | 2 | 3 |
|---|---|---|
另外,showDateRangePicker 方法中可以传入 initialDateRange 设置弹出时的默认时间范围; currentDate 可以设置当前日期,如下右图的 8 日 :
DateTimeRange? range = await showDateRangePicker(

    context: context,

    firstDate: firstDate,

    lastDate: lastDate,

    initialDateRange: DateTimeRange(

      start: DateTime(2022, 10, 1),

      end: DateTime(2022, 10, 6),

    ),

    currentDate: DateTime(2022, 10, 8)

);| 未设置默认情况 | 设置默认值 |
|---|---|
4. 源码简看
showDateRangePicker 方法,本质上就是就是通过 showDialog 方法展示对话框:
其中的内容是 DateRangePickerDialog 组件,方法中的绝大多数参数都是为了创建 DateRangePickerDialog 对象而准备的。
DateRangePickerDialog 就是一个很普通的 StatefulWidget 的派生类:
依赖 _DateRangePickerDialogState 状态类进行组件构建。如果在开发中,DateRangePickerDialog 无法满足使用需求,可以将代码拷贝一份进行魔改。
@override

State<DateRangePickerDialog> createState() => _DateRangePickerDialogState();
如下所示,可以在月份条目下叠放月份信息,看起来更直观;或者修改选中时的激活端点的装饰:
| 月份背景 | 修改端点装饰 |
|---|---|
如下稍微翻翻源码,可以找到每个月份是通过 _MonthItem 组件构建的,所以需要对条目进行魔改,就在这里处理:
在 _MonthItemState 中,有 _buildDayItem 方法,如下是两端激活处的 BoxDecoration 装饰对象。 Decoration 的自定义能力非常强, BoxDecoration 如果无法满足需求,可以通过自定义 Decoration 进行绘制。
抓住这些核心的构建处理场合,我们可以更灵活地根据具体需求来魔改。而不是让应用千篇一律,毕竟 Flutter 框架中封装的组件只能满足大多数的基本使用场景,并不能尽善尽美。
需求是无限的,变化也是无限的,能应对变化的只有变化本身,能操纵变化的是我们编程者。
希望通过本文可以让更多的朋友知道 DateRangePickerDialog 的存在,让你的日期选择需求变得简单。那本文就到这里,谢谢观看 ~
作者:张风捷特烈
链接:https://juejin.cn/post/7153054582162063390
来源:稀土掘金
著作权归作者所有。商业转载请联系作者获得授权,非商业转载请注明出处。
Kotlin对象的懒加载方式?by lazy 与 lateinit 的异同
前言
属性或对象的延时加载是我们相当常用的,一般我们都是使用 lateinit 和 by lazy 来实现。
他们两者都是延时初始化,那么在使用时那么他们两者有什么区别呢?
lateinit
见名知意,延时初始化的标记。lateinit var可以让我们声明一个变量并且不用马上初始化,在我们需要的时候进行手动初始化即可。
如果我们不初始化会怎样?
    private lateinit var name: String


    findViewById<Button>(R.id.btn_load).click {


        YYLogUtils.w("name:$name age:$age")


    }
会报错:
所以对应这一种情况我们会有一个是否初始化的判断
    private lateinit var name: String


    findViewById<Button>(R.id.btn_load).click {


        if (this::name.isInitialized) {

           YYLogUtils.w("name:$name age:$age")

        }


    }
lateinit var的作用相对较简单,其实就是让编译期在检查时不要因为属性变量未被初始化而报错。(注意一定要记得初始化哦!)
by lazy
by lazy 委托延时处理,分为委托和延时
其实如果我们不想延时初始化,我们直接使用委托by也可以实现。
   private var age: Int by Delegates.observable(18) { property, oldValue, newValue ->

        YYLogUtils.w("发生了回调 property:$property oldValue:$oldValue newValue:$newValue")

    }


    findViewById<Button>(R.id.btn_load).click {

        age = 25


        YYLogUtils.w("name:$name age:$age")


    }
我们通过 by Delegates 的方式就可以指定委托对象,这里我用的 Delegates.obsevable 它的作用是修改 age 的值之后会有回调的处理。
运行的效果:
除了 Delegates.obsevable 它还有其他的用法。
public object Delegates {


    public fun <T : Any> notNull(): ReadWriteProperty<Any?, T> = NotNullVar()


    public inline fun <T> observable(initialValue: T, crossinline onChange: (property: KProperty<*>, oldValue: T, newValue: T) -> Unit):

            ReadWriteProperty<Any?, T> =

        object : ObservableProperty<T>(initialValue) {

            override fun afterChange(property: KProperty<*>, oldValue: T, newValue: T) = onChange(property, oldValue, newValue)

        }


    public inline fun <T> vetoable(initialValue: T, crossinline onChange: (property: KProperty<*>, oldValue: T, newValue: T) -> Boolean):

            ReadWriteProperty<Any?, T> =

        object : ObservableProperty<T>(initialValue) {

            override fun beforeChange(property: KProperty<*>, oldValue: T, newValue: T): Boolean = onChange(property, oldValue, newValue)

        }

}


private class NotNullVar<T : Any>() : ReadWriteProperty<Any?, T> {

    private var value: T? = null


    public override fun getValue(thisRef: Any?, property: KProperty<*>): T {

        return value ?: throw IllegalStateException("Property ${property.name} should be initialized before get.")

    }


    public override fun setValue(thisRef: Any?, property: KProperty<*>, value: T) {

        this.value = value

    }

}- notNull方法我们可以看到就是说这个对象不能为null,否则就会抛出异常。
- observable方法主要用于监控属性值发生变更,类似于一个观察者。当属性值被修改后会往外部抛出一个变更的回调。
- vetoable方法跟observable类似,都是用于监控属性值发生变更,当属性值被修改后会往外部抛出一个变更的回调。与observable不同的是这个回调会返回一个Boolean值,来决定此次属性值是否执行修改。
其实用不用委托没什么区别,就是看是否需要属性变化的回调监听,否则我们直接用变量即可
   private var age: Int  = 18


    findViewById<Button>(R.id.btn_load).click {

        age = 25


        YYLogUtils.w("name:$name age:$age")


    }
如果我们想实现延时初始化的关键就是 lazy 关键字,所以,lazy是如何工作的呢? 让我们一起在Kotlin标准库参考中总结lazy()方法,如下所示:
- lazy() 返回的是一个存储在lambda初始化器中的Lazy类型实例。
- getter的第一次调用执行传递给lazy()的lambda并存储其结果。
- 后面再调用的话,getter调用只返回存储中的值。
简单地说,lazy创建一个实例,在第一次访问属性值时执行初始化,存储结果并返回存储的值。
   private val age: Int by lazy { 18 / 2 }


    findViewById<Button>(R.id.btn_load).click {

        age = 25


        YYLogUtils.w("name:$name age:$age")


    }
由于我们使用的是 by lazy ,归根到底还是一种委托,只是它是一种特殊的委托,它的过程是这样的:
我们的属性 age 需要 by lazy 时,它生成一个该属性的附加属性:age?delegate。
在构造器中,将使用 lazy(()->T) 创建的 Lazy 实例对象赋值给 age?delegate。
当该属性被调用,即其getter方法被调用时返回 age?delegate.getVaule(),而 age?delegate.getVaule()方法的返回结果是对象 age?delegate 内部的 _value 属性值,在getVaule()第一次被调用时会将_value进行初始化并储存起来,往后都是直接将_value的值返回,从而实现属性值的唯一一次的初始化,并无法再次修改。所以它是只读的。
当我们调用这个 age 这个属性的时候才会初始化,它属于一种懒加载,既然是懒加载,就必然涉及到线程安全的问题,我们看看lazy是怎么解决的。
public actual fun <T> lazy(initializer: () -> T): Lazy<T> = SynchronizedLazyImpl(initializer)


public actual fun <T> lazy(mode: LazyThreadSafetyMode, initializer: () -> T): Lazy<T> =

    when (mode) {

        LazyThreadSafetyMode.SYNCHRONIZED -> SynchronizedLazyImpl(initializer)

        LazyThreadSafetyMode.PUBLICATION -> SafePublicationLazyImpl(initializer)

        LazyThreadSafetyMode.NONE -> UnsafeLazyImpl(initializer)

    }


public actual fun <T> lazy(lock: Any?, initializer: () -> T): Lazy<T> = SynchronizedLazyImpl(initializer, lock)
我们需要考虑的是线程安全和非线程安全
SYNCHRONIZED通过加锁来确保只有一个线程可以初始化Lazy实例,是线程安全的
PUBLICATION表示不加锁,可以并发访问多次调用,但是我之接收第一个返回的值作为Lazy的实例,其他后面返回的是啥玩意儿我不管。这也是线程安全的
NONE不加锁,是线程不安全的
总结
总的来说其实 lateinit 是延迟初始化, by lazy 是懒加载即初始化方式已确定,只是在使用的时候执行。
虽然两者都可以推迟属性初始化的时间,但是 lateinit var 只是让编译期忽略对属性未初始化的检查,后续在哪里以及何时初始化还需要开发者自己决定。而by lazy真正做到了声明的同时也指定了延迟初始化时的行为,在属性被第一次被使用的时候能自动初始化。
并且 lateinit 是可读写的,by lazy 是只读的。
那我们什么时候该使用 lateinit,什么时候使用 by lazy ?
其实大部分情况下都可以通用,只是 by lazy 一般用于非空只读属性,需要延迟加载情况,而 lateinit 一般用于非空可变属性,需要延迟加载情况。
惯例,如有错漏还请指出,如果有更好的方案也欢迎留言区交流。
如果感觉本文对你有一点点的启发,还望你能点赞支持一下,你的支持是我最大的动力。
Ok,这一期就此完结。
作者:newki
链接:https://juejin.cn/post/7152689103794864159
来源:稀土掘金
著作权归作者所有。商业转载请联系作者获得授权,非商业转载请注明出处。
落地 Kotlin 代码规范,DeteKt 了解一下~
前言
各个团队多少都有一些自己的代码规范,但制定代码规范简单,困难的是如何落地。如果完全依赖人力Code Review难免有所遗漏。
这个时候就需要通过静态代码检查工具在每次提交代码时自动检查,本文主要介绍如何使用DeteKt落地Kotlin代码规范,主要包括以下内容
- 为什么使用
DeteKt? IDE接入DeteKt插件CLI命令行方式接入DeteKtGradle方式接入DeteKt- 自定义
Detekt检测规则 Github Action集成Detekt检测
为什么使用DeteKt?
说起静态代码检查,大家首先想起来的可能是lint,相比DeteKt只支持Kotlin代码,lint不仅支持Kotlin,Java代码,也支持资源文件规范检查,那么我们为什么不使用Lint呢?
在我看来,Lint在使用上主要有两个问题:
- 与
IDE集成不够好,自定义lint规则的警告只有在运行./gradlew lint后才会在IDE上展示出来,在clean之后又会消失 lint检查速度较慢,尤其是大型项目,只对增量代码进行检查的逻辑需要自定义
而DeteKt提供了IDE插件,开启后可直接在IDE中查看警告,这样可以在第一时间发现问题,避免后续检查发现问题后再修改流程过长的问题
同时Detekt支持CLI命令行方式接入与Gradle方式接入,支持只检查新增代码,在检查速度上比起lint也有一定的优势
IDE接入DeteKt插件
如果能在IDE中提示代码中存在的问题,应该是最快发现问题的方式,DeteKt也贴心的为我们准备了插件,如下所示:
主要可以配置以下内容:
DeteKt开关- 格式化开关,
DeteKt直接使用了ktlint的规则 Configuration file:规则配置文件,可以在其中配置各种规则的开关与参数,默认配置可见:default-detekt-config.ymlBaseline file:基线文件,跳过旧代码问题,有了这个基线文件,下次扫描时,就会绕过文件中列出的基线问题,而只提示新增问题。Plugin jar: 自定义规则jar包,在自定义规则后打出jar包,在扫描时就可以使用自定义规则了
DeteKt IDE插件可以实时提示问题(包括自定义规则),如下图所示,我们添加了自定义禁止使用kae的规则:
对于一些支持自动修复的格式问题,DeteKt插件支持自动格式化,同时也可以配置快捷键,一键自动格式化,如下所示:
CLI命令行方式接入DeteKt
DeteKt支持通过CLI命令行方式接入,支持只检测几个文件,比如本次commit提交的文件
我们可以通过如下方式,下载DeteKt的jar然后使用
curl -sSLO https://github.com/detekt/detekt/releases/download/v1.22.0-RC1/detekt-cli-1.22.0-RC1.zip

unzip detekt-cli-1.22.0-RC1.zip

./detekt-cli-1.22.0-RC1/bin/detekt-cli --help
DeteKt CLI支持很多参数,下面列出一些常用的,其他可以参见:Run detekt using Command Line Interface
Usage: detekt [options]

  Options:

    --auto-correct, -ac

      支持自动格式化的规则自动格式化,默认为false

      Default: false

    --baseline, -b

      如果传入了baseline文件,只有不在baseline文件中的问题才会掘出来

    --classpath, -cp

      实验特性:传入依赖的class路径和jar的路径,用于类型解析

    --config, -c

      规则配置文件,可以配置规则开关及参数

    --create-baseline, -cb

      创建baseline,默认false,如果开启会创建出一个baseline文件,供后续使用

    --input, -i

      输入文件路径,多个路径之间用逗号连接

    --jvm-target

      EXPERIMENTAL: Target version of the generated JVM bytecode that was

      generated during compilation and is now being used for type resolution

      (1.6, 1.8, 9, 10, 11, 12, 13, 14, 15, 16 or 17)

      Default: 1.8

    --language-version

      为支持类型解析,需要传入java版本

    --plugins, -p

      自定义规则jar路径,多个路径之间用,或者;连接
在命令行可以直接通过如下方式检查
java -jar /path/to/detekt-cli-1.21.0-all.jar # detekt-cli-1.21.0-all.jar所在路径

-c /path/to/detekt_1.21.0_format.yml # 规则配置文件所在路径

--plugins /path/to/detekt-formatting-1.21.0.jar # 格式化规则jar,主要基于ktlint封装

-ac # 开启自动格式化

-i $FilePath$ # 需要扫描的源文件,多个路径之间用,或者;连接
通过如上方式进行代码检查速度是非常快的,根据经验来说一般就是几秒之内可以完成,因此我们完成可以将DeteKt与git hook结合起来,在每次提交commit的时候进行检测,而如果是一些比较耗时的工具比如lint,应该是做不到这一点的
类型解析
上面我们提到了,DeteKt的--classpth参数与--language-version参数,这些是用于类型解析的。
类型解析是DeteKt的一项功能,它允许 Detekt 对您的 Kotlin 源代码执行更高级的静态分析。
通常,Detekt 在编译期间无法访问编译器语义分析的结果,我们只能获取Kotlin源代码的抽象语法树,却无法知道语法树上符号的语义,这限制了我们的检查能力,比如我们无法判断符号的类型,两个符号究竟是不是同一个对象等
通过启用类型解析,Detekt 可以获取Kotlin编译器语义分析的结果,这让我们可以自定义一些更高级的检查。
而要获取类型与语义,当然要传入依赖的class,也就是classpath,比如android项目中常常需要传入android.jar与kotlin-stdlib.jar
Gradle方式接入DeteKt
CLI方式检测虽然快,但是需要手动传入classpath,比较麻烦,尤其是有时候自定义规则需要解析我们自己的类而不是kotlin-stdlib.jar中的类时,那么就需要将项目中的代码的编译结果传入作为classpath了,这样就更麻烦了
DeteKt同样支持Gradle插件方式接入,这种方式不需要我们另外再配置classpath,我们可以将CLI命令行方式与Gradle方式结合起来,在本地通过CLI方式快速检测,在CI上通过Gradle插件进行完整的检测
接入步骤
// 1. 引入插件

plugins {

    id("io.gitlab.arturbosch.detekt").version("[version]")

}


repositories {

    mavenCentral()

}


// 2. 配置插件

detekt {

    config = files("$projectDir/config/detekt.yml") // 规则配置

    baseline = file("$projectDir/config/baseline.xml") // baseline配置

    parallel = true

}


// 3. 自定义规则

dependencies {

    detektPlugins "io.gitlab.arturbosch.detekt:detekt-formatting:1.21.0"

    detektPlugins project(":customRules")

}


// 4. 配置 jvmTarget

tasks.withType(Detekt).configureEach {

    jvmTarget = "1.8"

}

// DeteKt Task用于检测,DetektCreateBaselineTask用于创建Baseline

tasks.withType(DetektCreateBaselineTask).configureEach {

    jvmTarget = "1.8"

}


// 5. 只分析指定文件

tasks.withType<io.gitlab.arturbosch.detekt.Detekt>().configureEach {

    // include("**/special/package/**") //  只分析 src/main/kotlin 下面的指定目录文件

    exclude("**/special/package/internal/**") // 过滤指定目录

}
如上所示,接入主要需要做这么几件事:
- 引入插件
- 配置插件,主要是配置
config与baseline,即规则开关与老代码过滤 - 引入
detekt-formatting与自定义规则的依赖 - 配置
JvmTarget,用于类型解析,但不用再配置classpath了。 - 除了
baseline之外,也可以通过include与exclude的方式指定只扫描指定文件的方式来实现增量检测
通过以上方式就接入成功了,运行./gradlew detektDebug就可以开始检测了,扫描结果可在终端直接查看,并可以直接定位到问题代码处,也可以在build/reprots/路径下查看输出的报告文件:
自定义Detekt检测规则
要落地自己制定的代码规范,不可避免的需要自定义规则,当然我们首先要看下DeteKt自带的规则,是否已经有我们需要的,只需把开关打开即可.
DeteKt自带规则
DeteKt自带的规则都可以通过开关配置,如果没有在 Detekt 闭包中指定 config 属性,detekt 会使用默认的规则。这些规则采用 yaml 文件描述,运行 ./gradlew detektGenerateConfig 会生成 config/detekt/detekt.yml 文件,我们可以在这个文件的基础上制定代码规范准则。
detekt.yml 中的每条规则形如:
complexity: # 大类

  active: true

  ComplexCondition: # 规则名

    active: true  # 是否启用

    threshold: 4  # 有些规则,可以设定一个阈值

# ...
更多关于配置文件的修改方式,请参考官方文档-配置文件
Detekt 的规则集划分为 9 个大类,每个大类下有具体的规则:
| 规则大类 | 说明 |
|---|---|
| comments | 与注释、文档有关的规范检查 |
| complexity | 检查代码复杂度,复杂度过高的代码不利于维护 |
| coroutines | 与协程有关的规范检查 |
| empty-blocks | 空代码块检查,空代码应该尽量避免 |
| exceptions | 与异常抛出和捕获有关的规范检查 |
| formatting | 格式化问题,detekt直接引用的 ktlint 的格式化规则集 |
| naming | 类名、变量命名相关的规范检查 |
| performance | 检查潜在的性能问题 |
| potentail-bugs | 检查潜在的BUG |
| style | 统一团队的代码风格,也包括一些由 Detekt 定义的格式化问题 |
更细节的规则说明,请参考:官方文档-规则集说明
自定义规则
接下来我们自定义一个检测KAE使用的规则,如下所示:
//  入口

class CustomRuleSetProvider : RuleSetProvider {

    override val ruleSetId: String = "detekt-custom-rules"

    override fun instance(config: Config): RuleSet = RuleSet(

        ruleSetId,

        listOf(

            NoSyntheticImportRule(),

        )

    )

}


// 自定义规则

class NoSyntheticImportRule : Rule() {

    override val issue = Issue(

        "NoSyntheticImport",

        Severity.Maintainability,

        "Don’t import Kotlin Synthetics as it is already deprecated.",

        Debt.TWENTY_MINS

    )


    override fun visitImportDirective(importDirective: KtImportDirective) {

        val import = importDirective.importPath?.pathStr

        if (import?.contains("kotlinx.android.synthetic") == true) {

            report(

                CodeSmell(

                    issue,

                    Entity.from(importDirective),

                    "'$import' 不要使用kae,推荐使用viewbinding"

                )

            )

        }

    }

}
代码其实并不复杂,主要做了这么几件事:
- 添加
CustomRuleSetProvider作为自定义规则的入口,并将NoSyntheticImportRule添加进去 - 实现
NoSyntheticImportRule类,主要包括issue与各种visitXXX方法 issue属性用于定义在控制台或任何其他输出格式上打印的ID、严重性和提示信息visitImportDirective即通过访问者模式访问语法树的回调,当访问到import时会回调,我们在这里检测有没有添加kotlinx.android.synthetic,发现存在则报告异常
支持类型解析的自定义规则
上面的规则没有用到类型解析,也就是说不传入classpath也能使用,我们现在来看一个需要使用类型解析的自定义规则
比如我们需要在项目中禁止直接使用android.widget.Toast.show,而是使用我们统一封装的工具类,那么我们可以自定义如下规则:
class AvoidToUseToastRule : Rule() {

    override val issue = Issue(

        "AvoidUseToastRule",

        Severity.Maintainability,

        "Don’t use android.widget.Toast.show",

        Debt.TWENTY_MINS

    )


    override fun visitReferenceExpression(expression: KtReferenceExpression) {

        super.visitReferenceExpression(expression)

        if (expression.text == "makeText") {

            // 通过bindingContext获取语义

            val referenceDescriptor = bindingContext.get(BindingContext.REFERENCE_TARGET, expression)

            val packageName = referenceDescriptor?.containingPackage()?.asString()

            val className = referenceDescriptor?.containingDeclaration?.name?.asString()

            if (packageName == "android.widget" && className == "Toast") {

                report(

                    CodeSmell(

                        issue, Entity.from(expression), "禁止直接使用Toast,建议使用xxxUtils"

                    )

                )

            }

        }

    }

}可以看出,我们在visitReferenceExpression回调中检测表达式,我们不仅需要判断是否存在Toast.makeTest表达式,因为可能存在同名类,更需要判断Toast类的具体类型,而这就需要获取语义信息
我们这里通过bindingContext来获取表达式的语义,这里的bindingContext其实就是Kotlin编译器存储语义信息的表,详细的可以参阅:K2 编译器是什么?世界第二高峰又是哪座?
当我们获取了语义信息之后,就可以获取Toast的具体类型,就可以判断出这个Toast是不是android.widget.Toast,也就可以完成检测了
Github Action集成Detekt检测
在完成了DeteKt接入与自定义规则之后,接下来就是每次提交代码时在CI上进行检测了
一些大的开源项目每次提交PR都会进行一系列的检测,我们也用Github Action来实现一个
我们在.github/workflows目录添加如下代码
name: Android CI


on:

  push:

    branches: [ "main" ]

  pull_request:

    branches: [ "main" ]


jobs:

  detekt-code-check:


    runs-on: ubuntu-latest


    steps:

    - uses: actions/checkout@v3

    - name: set up JDK 11

      uses: actions/setup-java@v3

      with:

        java-version: '11'

        distribution: 'temurin'

        cache: gradle


    - name: Grant execute permission for gradlew

      run: chmod +x gradlew

    - name: DeteKt Code Check

run: ./gradlew detektDebug这样在每次提交PR的时候,就都会自动调用该workflow进行检测了,检测不通过则不允许合并,如下所示:
点进去也可以看到详细的报错,具体是哪一行代码检测不通过,如图所示:
总结
本文主要介绍了DeteKt的接入与如何自定义规则,通过IDE集成,CLI命令行方式与Gradle插件方式接入,以及CI自动检测,可以保证代码规范,IDE提示,CI检测三者的统一,方便提前暴露问题,提高代码质量。
如果本文对你有所帮助,欢迎点赞~
示例代码
本文所有代码可见:github.com/RicardoJian…
参考资料
作者:程序员江同学
链接:https://juejin.cn/post/7152886037746827277
来源:稀土掘金
著作权归作者所有。商业转载请联系作者获得授权,非商业转载请注明出处。 收起阅读 »
Android修改弹窗样式的几种方式
一、载入布局修改样式
这种方式大家都比较熟悉,直接在xml 上设计布局的内容,然后创建弹窗时加载这个布局,这个方式可以让我们更好的自定义样式,比较考验个人的审美和写UI 的能力,如果你很强的话,那么你可以设计各种花里胡哨的的弹窗,下面我简单的介绍一下这个方式的使用。
先定义一个edit_name.xml 的文件,在这个文件中写入下面的代码。
<?xml version="1.0" encoding="utf-8"?>

<LinearLayout xmlns:android="http://schemas.android.com/apk/res/android"

    android:layout_width="match_parent"

    xmlns:app="http://schemas.android.com/apk/res-auto"

    android:orientation="vertical"

    android:layout_height="wrap_content">


    <TextView

        android:layout_marginTop="10dp"

        android:padding="10dp"

        android:layout_width="match_parent"

        android:text="@string/please_input_name"

        android:textSize="20sp"

        android:textAlignment="center"

        android:layout_height="wrap_content"

        android:gravity="center_horizontal">

    </TextView>


    <EditText

        android:id="@+id/name_edit"

        android:layout_width="match_parent"

        android:layout_height="wrap_content">

    </EditText>


    <androidx.constraintlayout.widget.ConstraintLayout

        android:layout_width="match_parent"

        android:layout_marginTop="10dp"

        android:padding="15dp"

        android:layout_height="wrap_content">


        <TextView

            android:id="@+id/info_n"

            app:layout_constraintTop_toTopOf="parent"

            android:text="@string/cancel"

            android:textSize="18sp"

            android:layout_width="wrap_content"

            android:layout_height="wrap_content"

            app:layout_constraintLeft_toLeftOf="parent"

            app:layout_constraintHorizontal_bias="0.3"

            app:layout_constraintRight_toRightOf="parent">

        </TextView>


        <TextView

            android:id="@+id/info_y"

            app:layout_constraintTop_toTopOf="parent"

            android:text="@string/sure"

            android:textSize="18sp"

            android:layout_width="wrap_content"

            android:layout_height="wrap_content"

            app:layout_constraintLeft_toLeftOf="parent"

            app:layout_constraintHorizontal_bias="0.7"

            app:layout_constraintRight_toRightOf="parent">

        </TextView>


    </androidx.constraintlayout.widget.ConstraintLayout>


</LinearLayout>
上面的布局文件出来的效果是这样的 。
xml 文件写好了,那么我们看看代码是如何载入这个布局的。先创建一个 AlertDialog(dialog) 和 View ( dialogView) 对象 , 然后 dialogView 载入上面写好的布局文件, 通过 dialog.setView(dialogView) 设置 dialog 的布局。
private void showDialog1() {

        // 创建一个 dialogView 弹窗

        AlertDialog.Builder builder = new

                AlertDialog.Builder(MainActivity.this);

        final AlertDialog dialog = builder.create();

        View dialogView = null;

        //设置对话框布局

        dialogView = View.inflate(MainActivity.this,

                R.layout.edit_name, null);

        dialog.setView(dialogView);

        dialog.show();

        // 获取布局控件

        editName =(EditText) dialogView.findViewById(R.id.name_edit);

        editN= (TextView) dialogView.findViewById(R.id.info_n);

        editY = (TextView) dialogView.findViewById(R.id.info_y);

        editN.setOnClickListener(new View.OnClickListener() {

            @Override

            public void onClick(View v) {

                dialog.dismiss();

            }

        });

        editY.setOnClickListener(new View.OnClickListener() {

            @Override

            public void onClick(View v) {

                Toast.makeText(MainActivity.this,"姓名为:"+editName.getText().toString(),Toast.LENGTH_SHORT).show();

                dialog.dismiss();

            }

        });

    }
这种方式的载入布局,后面如果你有需求要改动,或者改变样式,那么你直接修改 xml 文件 , 或者在java 代码中重新设置一个新的布局。
二、载入style样式
载入style 样式呢,这个方法适用于所有Android 布局控件,所有控件都可以通过这个方式去修改样式,当然前提是你得会写 style 样式。当然,我也对这个东西了解不是很深,在这就先班门弄斧、关公面前舞大刀一下,浅浅的介绍一下这个东西。
首先在values目录下创建一个 styles.xml 文件
在文件中创建一个自定义的样式,如下所示,这个样式特别简单,就是一些基本的定义。这里的 name="myDialogStyle" 很重要,下面我们载入这个样式时,就是根据这个 name 找到这个样式的。
<!--重写系统弹出Dialog -->

    <style name="myDialogStyle" parent="android:Theme.Dialog">

        <item name="android:windowFrame">@null</item>

        <item name="android:windowIsFloating">true</item>

        <item name="android:windowIsTranslucent">false</item>

        <item name="android:windowNoTitle">true</item><!--除去title-->

        <item name="android:windowContentOverlay">@null</item>

        <item name="android:backgroundDimEnabled">false</item>

        <item name="android:windowBackground">@null</item><!--除去背景色-->

    </style>
在 java 代码中创建弹窗时载入这个样式。
 private void showDialog3() {

        AlertDialog mDialog = new AlertDialog.Builder(MainActivity.this, R.style.myDialogStyle)

                .setTitle("标题")

                .setMessage("这个是什么呢?")

                .setPositiveButton(R.string.sure,null)

                .setNegativeButton(R.string.cancel, null)

                .create();

        mDialog.show();

    }
额,好吧,我承认有点丑,毕竟我不是做UI的,似乎这是个很好的借口。。。。。
人都是爱美的,看到这么丑总觉得怪怪的,重新扣了下面的这段样式
<style name="myDialogStyleAlert"  parent="@android:style/Theme.Holo.Light.Dialog">

        <item name="android:windowBackground">@android:color/transparent</item>

        <item name="android:windowContentOverlay">@null</item>

        <item name="android:windowMinWidthMajor">@android:dimen/dialog_min_width_major</item>

        <item name="android:windowMinWidthMinor">@android:dimen/dialog_min_width_minor</item>

    </style>
在代码中引入这个样式后,效果如下所示。似乎好看点了。
当然这篇文章的主要目的并不是让你弄成一个好看的弹窗,这个我也不会,还是回归主题,我们如何修改弹窗的样式,用这种方法呢,也能争对性的修改弹窗的样式,只要你知道样式的内容代表什么,那么都能进行简单的修改。
三、通过反射机制修改弹窗样式
我们直接看代码,大家可能会好奇,哎,这个东西是怎么来的,为什么这么写呢?说起这个,那我们不得不先看看源码了。
private void showDialog2() {

        AlertDialog mDialog = new AlertDialog.Builder(MainActivity.this)

                .setTitle("标题")

               .setMessage("这个是什么呢?")

                .setPositiveButton(R.string.sure,null)

                .setNegativeButton(R.string.cancel, null)

                .show();

       // 修改弹窗的背景颜色

       mDialog.getWindow().setBackgroundDrawableResource(R.color.purple_200);

       // 修改 确定取消 按钮的字体大小

       mDialog.getButton(AlertDialog.BUTTON_POSITIVE).setTextSize(20);

       mDialog.getButton(DialogInterface.BUTTON_NEGATIVE).setTextSize(20);

       try {

            //获取mAlert对象

            Field mAlert = AlertDialog.class.getDeclaredField("mAlert");

            mAlert.setAccessible(true);

            Object mAlertController = mAlert.get(mDialog);


            //获取mTitleView并设置大小颜色

            Field mTitle = mAlertController.getClass().getDeclaredField("mTitleView");

            mTitle.setAccessible(true);

            TextView mTitleView = (TextView) mTitle.get(mAlertController);

            mTitleView.setTextSize(40);

            mTitleView.setTextColor(Color.WHITE);


           //获取mMessageView并设置大小颜色

           Field mMessage = mAlertController.getClass().getDeclaredField("mMessageView");

           mMessage.setAccessible(true);

           TextView mMessageView = (TextView) mMessage.get(mAlertController);

           mMessageView.setTextColor(Color.RED);

           mMessageView.setTextSize(30);

       } catch (IllegalAccessException e) {

            e.printStackTrace();

       } catch (NoSuchFieldException e) {

            e.printStackTrace();

       }

    }
在 android studio 中 使用 ctrl + shift + n 的快捷键, 然后搜索 AlertDialog 就可以看到源码的文件,我们打开这个文件
在 AlertDialog 这个文件中,在开头的位置,很容易就看到 mAlert 这个对象的声明
下面这段代码就是通过放射机制获取 mAlert 这个对象。
//获取mAlert对象

Field mAlert = AlertDialog.class.getDeclaredField("mAlert");

mAlert.setAccessible(true);

Object mAlertController = mAlert.get(mDialog);
通过同样的方法 查看 AlertController.java 这个文件的代码,查看这个代码可以发现这里声明了一些变量,这些变量就是弹窗的组成,通过变量名能够大概知道它代表着什么东西。
下面这两段就是设置弹窗标题和消息的样式的代码。
//获取mTitleView并设置大小颜色

Field mTitle = mAlertController.getClass().getDeclaredField("mTitleView");

mTitle.setAccessible(true);

TextView mTitleView = (TextView) mTitle.get(mAlertController);

mTitleView.setTextSize(40);

mTitleView.setTextColor(Color.WHITE);


//获取mMessageView并设置大小颜色

Field mMessage = mAlertController.getClass().getDeclaredField("mMessageView");

mMessage.setAccessible(true);

TextView mMessageView = (TextView) mMessage.get(mAlertController);

mMessageView.setTextColor(Color.RED);

mMessageView.setTextSize(30);
效果是这样的。细心的人可能会发现,上面设置的内容好像 跟下面显示的不一样吧,我读书少,你别骗我啊!
确实,上面通过反射的方式并没有让我的弹窗样式修改成功。
我查看了log ,发现有报错,大概就是因为无法通过反射机制找到对于的对象,所以并没有修改样式成功,那是不是说这个方法不可行呢,并不是,我简单查找了一下原因,怀疑是本地的环境有冲突,存在多个AlertDialog.java 这个文件的源码,无法精准的找到对应的变量,导致冲突报错了。
提示: 上面的方式提供一个思想,如果你在实际应用中没有找到别的方法解决,这个方式可以提供参考,当然,可能你得先解决这个报错的问题。
四、设置App style样式
上面讲了如何设置弹窗的 style样式,这里再讲讲从 App的层面来修改样式,也就是说设置App 的主题风格来设置弹窗的样式。
先在 styles.xml 文件中声明一个 App 样式,我设置的如下所示。
<style name="myAppTheme" parent="Theme.AppCompat.DayNight.NoActionBar">

        <!--<item name="android:windowFullscreen">true</item>-->

        <item name="android:windowContentOverlay">@null</item>

        <item name="android:windowBackground">@android:color/white</item>

        <!-- item name="android:windowIsTranslucent">true</item -->

        <item name="android:windowTranslucentNavigation">true</item>

        <item name="android:selectableItemBackground">@null</item>

        <item name="android:selectableItemBackgroundBorderless">@null</item>

        <item name="android:windowEnableSplitTouch">false</item>

        <item name="android:splitMotionEvents">false</item>

        <item name="android:textColorPrimary">@color/teal_700</item>

        <item name="android:colorControlNormal">@android:color/white</item>

        <item name="android:textColorAlertDialogListItem">@android:color/white</item>

    </style>
然后在 AndroidManifest.xml 使用这个theme 。
下面我们看看Java 代码
CharSequence[] stringList = new CharSequence[]{"苹果","香蕉","梨"};

private void showDialog4() {

    int index = 1;

    AlertDialog mDialog = new AlertDialog.Builder(MainActivity.this)

            .setTitle("标题")

            .setIcon(null)

            .setNegativeButton(R.string.cancel, null)

            .setPositiveButton(null, null)

            .setSingleChoiceItems(stringList, index,null)

            .create();

    mDialog.show();

    // 修改弹窗的背景颜色

    mDialog.getWindow().setBackgroundDrawableResource(R.color.dialog_background_color);

}
效果如下所示。
不知道大家有没有发现,上面的弹窗跟前面几个不一样的,它是动态加载的,里面的内容可以根据需求动态增加,这种动态变化的,如果我要修改苹果、香蕉这些文字的颜色是白色时,前面的几种方式中,第一种是很难进行修改的,这个是动态变化的也不是直接在xml 上写死能解决的。第二种也是可以的,就是载入style样式后,弹窗并没有官方的那么美观,如果你能写成一模一样,那当我没说。通过放射机制修改,也是可以,就是我试了一下,没找到怎么改(好吧,是我太菜!)。
好了,说了这么多,主要的需求就是,怎么把上面的苹果、香蕉这些文字的颜色改成白色。其实我已经给了解决方案 , 上面的 style 样式中的最后一行代码, 没错就是下面这行代码。 为什么是这行代码呢,不能别的吗? 额 ,还真不能! 下面听我娓娓道来。
<item name="android:textColorAlertDialogListItem">@android:color/white</item>
搜索源码 values.xml 文件,搜索 AlertDialog, 查找到下面的的位置。
其中下面红色的框框是我们要找的东西,这里进入这个布局文件
在这个布局文件中,我们可以发现下面设置 textColor , 这个就是设置选择框文字的颜色,我们再点进去查看这个设置的资源
点击上面的资源会跳转到下面的位置 ,这里可以看到一个name 为 textColorAlertDialogListItem 的资源,在这个文件中,查找这个name ,
就可以看到在这里设置颜色,所以这个 android:textColorAlertDialogListItem 就是我们要的东西。
在定义的布局文件中,重新定义这个 android:textColorAlertDialogListItem 的变量的颜色。也就是上面我写的这行代码。
<item name="android:textColorAlertDialogListItem">@android:color/white</item>
上面已经讲了一下修改弹窗样式的方式的思维方式,我写的样式很丑并不重要,重要的是这个思维,这种思维方式并不仅仅适用于弹窗的样式,其他安卓控件也是适用。毕竟编程的思维是相通的。
下面我找到的一些常用的样式 仅供参考,具体效果还望实际操作后看效果。
<style name="AppThemeDemo" parent="Theme.AppCompat.Light.DarkActionBar">


  <!-- 应用的主要色调,actionBar默认使用该颜色,Toolbar导航栏的底色 -->

  <item name="colorPrimary">@color/white</item>

  <!-- 应用的主要暗色调,statusBarColor 默认使用该颜色 -->

  <item name="colorPrimaryDark">@color/white</item>

  <!-- 一般控件的选中效果默认采用该颜色,如 CheckBox,RadioButton,SwitchCompat,ProcessBar等-->

  <item name="colorAccent">@color/colorAccent</item>


  <!-- 状态栏、顶部导航栏 相关-->

  <!-- status bar color -->

  <item name="android:statusBarColor">#00000000</item>

  <!-- activity 是否能在status bar 底部绘制 -->

  <item name="android:windowOverscan">true</item>

  <!-- 让status bar透明,相当于statusBarColor=transparent + windowOverscan=true -->

  <item name="android:windowTranslucentStatus">true</item>

  <!-- 改变status bar 文字颜色, true黑色, false白色,API23可用-->

  <item name="android:windowLightStatusBar">true</item>

  <!-- 全屏显示,隐藏状态栏、导航栏、底部导航栏 -->

  <item name="android:windowFullscreen">true</item>

  <!-- hide title bar -->

  <item name="windowNoTitle">true</item>

  <!-- 底部虚拟导航栏颜色 -->

  <item name="android:navigationBarColor">#E91E63</item>

  <!-- 让底部导航栏变半透明灰色,覆盖在Activity之上(默认false,activity会居于底部导航栏顶部),如果设为true,navigationBarColor 失效 -->

  <item name="android:windowTranslucentNavigation">true</item>


  <!-- WindowBackground,可以设置@drawable,颜色引用(@color),不能设置颜色值(#fffffff),

  Window区域说明:Window涵盖整个屏幕显示区域,包括StatusBar的区域。当windowOverscan=false时,window的区域比Activity多出StatusBar,当windowOverscan=true时,window区域与Activity相同-->

  <item name="android:windowBackground">@drawable/ic_launcher_background</item>

  <!--<item name="android:windowBackground">@color/light_purple</item>-->


  <!-- 控件相关 -->

  <!-- button 文字是否全部大写(系统默认开)-->

  <item name="android:textAllCaps">false</item>


  <!-- 默认 Button,TextView的文字颜色 -->

  <item name="android:textColor">#B0C4DE</item>

  <!-- 默认 EditView 输入框字体的颜色 -->

  <item name="android:editTextColor">#E6E6FA</item>

  <!-- RadioButton checkbox等控件的文字 -->

  <item name="android:textColorPrimaryDisableOnly">#1C71A9</item>

  <!-- 应用的主要文字颜色,actionBar的标题文字默认使用该颜色 -->

  <item name="android:textColorPrimary">#FFFFFF</item>

  <!-- 辅助的文字颜色,一般比textColorPrimary的颜色弱一点,用于一些弱化的表示 -->

  <item name="android:textColorSecondary">#C1C1C1</item>

  <!-- 控件选中时的颜色,默认使用colorAccent -->

  <item name="android:colorControlActivated">#FF7F50</item>

  <!-- 控件按压时的色调-->

  <item name="android:colorControlHighlight">#FF00FF</item>

  <!-- CheckBox,RadioButton,SwitchCompat等默认状态的颜色 -->

  <item name="android:colorControlNormal">#FFD700</item>

  <!-- 默认按钮的背景颜色 -->

  <item name="android:colorButtonNormal">#1C71A9</item>


  <!-- 【无效】 在theme中设置Activity的属性无效, 请到AndroidManifest中Activity标签下设置 -->

  <item name="android:launchMode">singleTop</item>

  <item name="android:screenOrientation">landscape</item>


</style>
代码已上传至 gitee :zpeien/AndroidProject - 码云 - 开源中国 (gitee.com)
作者:zpeien
链接:https://juejin.cn/post/7149415708626485284
来源:稀土掘金
著作权归作者所有。商业转载请联系作者获得授权,非商业转载请注明出处。 收起阅读 »
不使用第三方库怎么实现【前端引导页】功能?
前言
随着应用功能越来越多,繁多而详细的功能使用和说明文档,已经不能满足时代追求 快速 的需求,而 引导页(或分步引导) 本质就是 化繁为简,将核心功能以更简单、简短、明了的文字指引用户去使用对应的功能,特别是 ToB 的项目,各种新功能需求迭代非常快,免不了需要 引导页 的功能来快速帮助用户引导。
下面我们通过两个方面来围绕着【前端引导页】进行展开:
哪些第三方库可以直接使用快速实现功能?
如何自己实现前端引导页的功能?
第三方库的选择
如果你不知道如何做技术选型,可以看看 山月大佬 的这一篇文章 在前端中,如何更好地做技术选型?,下面就简单列举几个相关的库进行简单介绍,具体需求具体分析选择,其他和 API 使用、具体实现效果可以通过官方文档或对应的 README.md 进行查看。
vue-tour
vue-tour 是一个轻量级、简单且可自定义的 Tour 插件,配置也算比较简单清晰,但只适用于 Vue2 的项目,具体效果可以直接参考对应的前面链接对应的内容。
driver.js
driver.js 是一个强大而轻量级的普通 JavaScript 引擎,可在整个页面上驱动用户的注意力,只有 4kb 左右的体积,并且没有外部依赖,不仅高度可定制,还可以支持所有主流浏览器。
shepherd.js
shepherd.js 包含的 API 众多,大多场景都可以通过其对应的配置得到,缺点就是整体的包体积较大,并且配置也比较复杂,配置复杂的内容一般都需要进行二次封装,将可变和不可变的配置项进行抽离,具体效果可见其 官方文档。
intro.js
intro.js 是是一个开源的 vanilla Javascript/CSS 库,用于添加分步介绍或提示,大小在 10kB左右,属于轻量级的且无外部依赖,详情可见 官方文档。
实现引导页功能
引导页核心功能其实就两点:
一是 高亮部分
二是 引导部分
而这两点其实真的不难实现,无非就是 引导部分 跟着 高亮部分 移动,并且添加一些简单的动画或过渡效果即可,也分为 蒙层引导 和 无蒙层引导,这里介绍相对比较复杂的 蒙层引导,下面就简单介绍两种简单的实现方案。
cloneNode + position + transition
核心实现:
高亮部分
通过
el.cloneNode(true)复制对应目标元素节点,并将克隆节点添加到蒙层上
通过
margin(或tranlate、position等)实现克隆节点的位置与目标节点重合
引导部分 通过
position: fixed实现定位效果,并通过动态修改left、top属性实现引导弹窗跟随目标移动过渡动画 通过
transition实现位置的平滑移动页面 位置/内容 发生变化时(如:
resize、scroll事件),需要重新计算位置信息
缺点:
目标节点需要被深度复制
不能实现边引导边操作
效果演示:
核心代码:
// 核心配置参数
const selectors = [
  {
    selector: "#btn1",
    message: "点此【新增】数据!",
  },
  {
    selector: "#btn2",
    message: "小心【删除】数据!",
  },
  {
    selector: "#btn3",
    message: "可通过此按钮【修改】数据!",
  },
  {
    selector: "#btn4",
    message: "一键【完成】所有操作!",
  },
];

// Guide.vue
<script setup>
import { computed, onMounted, ref } from "vue";

const props = defineProps({
  selectors: Array,
});

const guideModalRef = ref(null);
const guideBoxRef = ref(null);

const index = ref(0);
const show = ref(true);
let cloneNode = null;
let currNode = null;

let message = computed(() => {
  return props.selectors[index.value]?.message;
});

const genGuide = (hasChange = true) => {
  // 前置操作
  cloneNode && guideModalRef.value?.removeChild(cloneNode);

  // 所有指引完毕
  if (index.value > props.selectors.length - 1) {
    show.value = false;
    return;
  }

  // 获取目标节点信息
  currNode =
    currNode || document.querySelector(props.selectors[index.value].selector);
  const { x, y, width, height } = currNode.getBoundingClientRect();

  // 克隆节点
  cloneNode = hasChange ? currNode.cloneNode(true) : cloneNode;
  cloneNode.id = currNode.id + "_clone";
  cloneNode.style = `
  margin-left: ${x}px;
  margin-top: ${y}px;
  `;

  // 指引相关
  if (guideBoxRef.value) {
    const halfClientHeight = guideBoxRef.value.clientHeight / 2;
    guideBoxRef.value.style = `
   left:${x + width + 10}px;
   top:${y <= halfClientHeight ? y : y - halfClientHeight + height / 2}px;
  `;
    guideModalRef.value?.appendChild(cloneNode);
  }
};

// 页面内容发生变化时,重新计算位置
window.addEventListener("resize", () => genGuide(false));
window.addEventListener("scroll", () => genGuide(false));

// 上一步/下一步
const changeStep = (isPre) => {
  isPre ? index.value-- : index.value++;
  currNode = null;
  genGuide();
};

onMounted(() => {
  genGuide();
});
</script>

<template>
  <teleport to="body">
    <div v-if="show" ref="guideModalRef" class="guide-modal">
      <div ref="guideBoxRef" class="guide-box">
        <div>{{ message }}</div>
        <button class="btn" :disabled="index === 0" @click="changeStep(true)">
          上一步
        </button>
        <button class="btn" @click="changeStep(false)">下一步</button>
      </div>
    </div>
  </teleport>
</template>

<style scoped>
.guide-modal {
  position: fixed;
  z-index: 999;
  left: 0;
  right: 0;
  top: 0;
  bottom: 0;
  background-color: rgba(0, 0, 0, 0.3);
}
.guide-box {
  width: 150px;
  min-height: 10px;
  border-radius: 5px;
  background-color: #fff;
  position: absolute;
  transition: 0.5s;
  padding: 10px;
  text-align: center;
}
.btn {
  margin: 20px 5px 5px 5px;
}
</style>
z-index + position + transition
核心实现:
高亮部分 通过控制
z-index的值,让目标元素展示在蒙层之上引导部分 通过
position: fixed实现定位效果,并通过动态修改left、top属性实现引导弹窗跟随目标移动过渡动画 通过
transition实现位置的平滑移动页面 位置/内容 发生变化时(如:
resize、scroll事件),需要重新计算位置信息
缺点:
当目标元素的父元素
position: fixed | absolute | sticky时,目标元素的z-index无法超过蒙版层(可参考shepherd.js的svg解决方案)
效果演示:
核心代码:
<script setup>
import { computed, onMounted, ref } from "vue";

const props = defineProps({
  selectors: Array,
});

const guideModalRef = ref(null);
const guideBoxRef = ref(null);

const index = ref(0);
const show = ref(true);
let preNode = null;

let message = computed(() => {
  return props.selectors[index.value]?.message;
});

const genGuide = (hasChange = true) => {
  // 所有指引完毕
  if (index.value > props.selectors.length - 1) {
    show.value = false;
    return;
  }

  // 修改上一个节点的 z-index
  if (preNode) preNode.style = `z-index: 0;`;

  // 获取目标节点信息
  const target =
    preNode = document.querySelector(props.selectors[index.value].selector);
  target.style = `
  position: relative;
  z-index: 1000;
  `;
  const { x, y, width, height } = target.getBoundingClientRect();

  // 指引相关
  if (guideBoxRef.value) {
    const halfClientHeight = guideBoxRef.value.clientHeight / 2;
    guideBoxRef.value.style = `
   left:${x + width + 10}px;
   top:${y <= halfClientHeight ? y : y - halfClientHeight + height / 2}px;
  `;
  }
};

// 页面内容发生变化时,重新计算位置
window.addEventListener("resize", () => genGuide(false));
window.addEventListener("scroll", () => genGuide(false));

const changeStep = (isPre) => {
  isPre ? index.value-- : index.value++;
  genGuide();
};

onMounted(() => {
  genGuide();
});
</script>

<template>
  <teleport to="body">
    <div v-if="show" ref="guideModalRef" class="guide-modal">
      <div ref="guideBoxRef" class="guide-box">
        <div>{{ message }}</div>
        <button class="btn" :disabled="index === 0" @click="changeStep(true)">
          上一步
        </button>
        <button class="btn" @click="changeStep(false)">下一步</button>
      </div>
    </div>
  </teleport>
</template>

<style scoped>
.guide-modal {
  position: fixed;
  z-index: 999;
  left: 0;
  right: 0;
  top: 0;
  bottom: 0;
  background-color: rgba(0, 0, 0, 0.3);
}
.guide-box {
  width: 150px;
  min-height: 10px;
  border-radius: 5px;
  background-color: #fff;
  position: absolute;
  transition: 0.5s;
  padding: 10px;
  text-align: center;
}
.btn {
  margin: 20px 5px 5px 5px;
}
</style>【扩展】SVG 如何完美解决 z-index 失效的问题?
这里以 shepherd.js 来举例说明,先来看起官方文档展示的 demo 效果:
在上述展示的效果中进行了一些验证:
正常点击
NEXT进入下一步指引,仔细观察SVG相关数据发生了变化等到指引部分指向代码块的内容区时,复制了此时
SVG中和path相关的参数返回到第一步很明显此时的高亮部分高度较小,将上一步复制的参数直接替换当前
SVG中和path相关的参数,此时发现整体SVG高亮内容宽高发生了变化
核心结论:通过 SVG 可编码的特点,利用 SVG 来实现蒙版效果,并且在绘制蒙版时,预留出目标元素的高亮区间(即 SVG 不需要绘制这一部分),这样就解决了使用 z-index 可能会失效的问题。
最后
以上就是一些简单实现,但还有很多细节需要考虑,比如:边引导边操作的实现、定位原因导致的图层展示问题等仍需要优化。
相信大部分人第一直觉是:直接使用第三方库实现功能就好了呀,自己实现功能不全、也未必好用,属实没有必要。
对于这一点其实在早前看到的一句话说的挺好:了解底层实现原理比使用库本身更有意义,当然每个人的想法不同,不过如果你想开始了解原理又不能立马挑战一些高深的内容,为什么不先从自己感兴趣的又不是那么复杂的功能开始呢?
作者:熊的猫
来源:juejin.cn/post/7142633594882621454
昔日内地首富,快发不起员工工资了……
时来天地皆同力,运去英雄不自由!
那个曾被誉为「商界枭雄」的黄光裕,最近陷入了舆论漩涡。曾经的首富,现在连员工的工资都快发不起了。
近日,据财新报道称,有国美员工表示其被通知今年8月份工资将延迟发放,但具体发放时间和比例均不清晰,此前拖欠员工的半年绩效也未发放。

谁曾想到,曾经的「美苏争霸」如今却如过眼烟云,一个被全球追债惶惶如丧家之犬,一个拖欠员工工资不复当年一掷千金之勇。
很明显,属于两位电器霸主的时代过去了!
1 重蹈苏宁覆辙?
曾几何时,国美与苏宁也是先进商业模式的「两个代表」,依靠巨大的门店出货量带来的渠道议价能力,国美和苏宁做到了大规模集中采购,一件电器能够比市面价便宜很多。
加之彼时房地产行业的快速起飞,家电需求激增,国美和苏宁因此扶摇而上成为了「商界炸子鸡」。
2004年前后,苏宁和国美先后上市,黄光裕的个人资产更是突破百亿,一跃成为内地首富。
相较而言;黄光裕和张近东这两个狠人,前者要更狠一些,2005年,黄光裕意气风发地将国美的旗舰店开到了苏宁总部的对面。
2008年,国美的GMV已经突破1200亿元,苏宁渐渐在「美苏争霸」开始乏力。然而,一切都随着黄光裕的入狱戛然而止,因为涉嫌操纵股价,黄光裕被关了12年。
在黄光裕入狱前,国美销量破千亿,旗下资本矩阵估值也超千亿,当年的国美,估值几乎可以和「腾讯+阿里」极限一换一,而当时的京东GMV不过10亿元,都没有国美的零头多。
看上去苏宁笑到了最后,遗憾的是,张近东没把握住机会,生生荒废了12年。

失去了对手的苏宁,开启了互联网转型的步伐。如果转型成功,现在的互联网江湖,可能就是另一番模样了。
然而,成就自己的却也限制了自己,苏宁还是舍弃不下线下门店,结果就是苏宁的转型「一顿操作猛如虎,回头一看原地杵」。
12年过去了,苏宁耗光了自己账面的现金流。一个月前,张近东父子更是陷入了被全球追债的漩涡。
有网友戏谑称,黄光裕蹲了12年牢,最后还是赢了张近东和他的苏宁。
「力争用未来的18个月时间,恢复原有市场地位。」
去年4月,出狱不久的黄光裕依然不改张狂本色,一番狂言可谓「鸡血」效果十足。黄光裕正式获释后,国美零售股价甚至一度达到2.55港元/股的高点。
然而,18个月过去了,黄光裕的豪言壮语似乎并未实现。
2真快乐?真头疼!
在黄光裕出狱前一个月,国美将旗下电商平台改名「真快乐」,在不少人眼中,曾经的「价格屠夫」强势归来。
「真快乐」,像极了黄光裕本人的心声。

出狱后的他,斥巨资打造了「娱乐化零售平台」的概念,先后推出了「真快乐」、「打扮家」和「折上折」三款产品,并在抖音、小红书等社交网络平台买了不少流量。
此外,黄光裕也没忘记自己的成名绝技——价格战。
2021年五一,国美宣布「真快乐」App平台的上万款商品全部保证全网底价。
最开始,国美的「引流+低价」策略效果确实不错,去年4月,黄光裕曾表示,「真快乐」App的GMV同比增长近4倍,月活稳定在4000万规模,活动单日日活近千万。

但后来很长一段时间,数据停留在这个水平上徘徊不前。根据国美今年4月发布的全年财报显示,真快乐APP在2021年全年的平均月活仅为4244万。
一番操作下来,国美的市场份额几乎没有一丁点儿变化。
黄老板懵了,怎么这世道变了吗?还有砸钱搞不定的事情?
作为曾经的「商界第一狠人」,黄光裕觉得是员工没了狼性,已经忘了如何打仗。
于是,在2021年11月,一份来自国美控股集团有限公司的内部文件被曝光,这份文件披露了「摸鱼」员工的情况,针对员工的网络流量使用情况详细地罗列出员工所在部门和办公室,并给予了警告和清退等处罚。
然而,这一切引来的却是网友的无情嘲讽。
更关键的是,在互联网流量红利见顶,用户增速放缓的时候,国美发力布局电商,颇有些“49年入国军”的味道。
这不禁让不少人怀疑,12年的铁窗泪,是否让黄光裕连最基本的商业嗅觉都丧失殆尽了呢?国美的打法仿佛是黄老板报了个互联网短期补习班做出来的大杂烩,根本看不到战略层面的新思路。
当然,老板是永远不会错的,错也应该是高管的错。
于是,国美从互联网公司挖来的一众高管,陆续离开。曾经百度的二号人物向海龙加盟国美并出任国美在线CEO一年后离职。来自阿里的曹成智、丁薇和胡冠中也在加入后不久先后离开。
频繁的折腾,让国美本不富裕的现金流雪上加霜。
根据财报,2021年国美零售营收为464.84亿元,同比增长了5.36%,但净利润亏损44.02亿元。更要命的是,截至2021年上半年末,国美账期为157天,年末升至175天,2022年上半年则大幅增加至301天。
这哪里是真快乐,是“真头疼”。
3 3年计划or缓兵之计?
现金流枯竭,最大的问题是供应商和员工的利益受到损失。
今年4月,国美与多家供应商的合作传出负面消息。
国美济南分部的员工被爆出殴打美的旗下员工,美的发函表示将撤出该分部、并宣布停止供货。

无独有偶,惠而浦亦因国美拖欠其约8000万货款,宣布与后者分道扬镳。 此外,据经济观察报报道,部分给国美真快乐做拉新服务的代理商也未收到结算款。
现在,员工的工资发放也变得困难起来。
9月26日,国美方面对界面新闻回应称,本月临时调整只是短期、阶段性应急举措,企业经营一旦好转,将第一时间给员工补足薪资,同时兑现离职员工相应补偿。
目前来看,这个「一旦」好转,还不如等朱一旦好转更实际。
在内外交困之下,狠人黄光裕终于示弱了,「我们对执行的困难预料不足,加之疫情长时间扰动,导致现实与这一目标有一定差距。」
18个月的豪言壮语逐个破灭后,黄光裕又祭出了新的三年战略。
黄光裕在对外的公开信中承诺,「我作为大股东将促使管理团队实现未来较好业绩的承诺对赌,实现『1+1+1』的三年战略发展目标:在2023年实现较高盈利并达到以往较高水平,2024年达到历史最好水平,2025年明显超越历史最好水平。」
就在三年战略推出的同时,黄老板似乎也开始给自己留后路了。
此前,国美零售在港交所发布公告称,为了提升盈利能力,将从黄光裕手中买下两块物业,一个是建筑面积达52.46万平方米的国美商都,一个是建筑面积为13.05万平方米的湘江玖号。
国美零售称,交易价格很优惠,不会增加上市公司的资金压力。
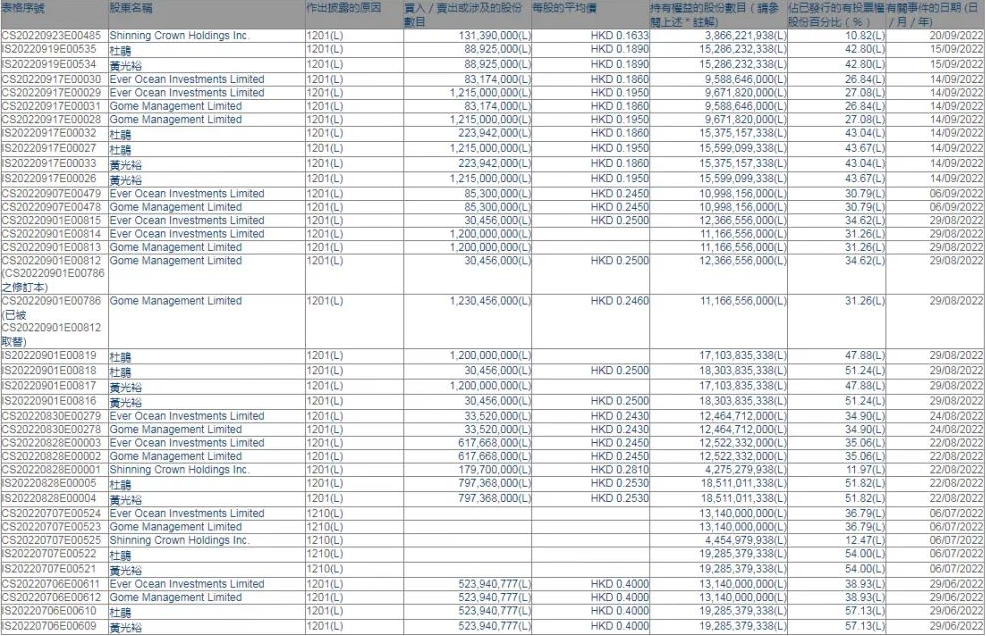
此外,黄光裕、杜鹃夫妇今年1月到9月,进行过10次减持操作,累计卖出45.98亿股。据经济观察网统计,黄光裕夫妇套现金额达9.6亿港元。
在黄光裕出狱的时候,人们希望他成为下一个褚时健,上演一幕王者归来。然而这位潮汕狠人,在现实中却跟老对手张近东越走越近。
现在的国美,用国足那句非著名座右铭来形容似乎最恰当不过了,「留给黄光裕的时间,不多了!」
来源:功夫财经-老谢
收起阅读 »上班做“副业”被抓,惨遭解雇,还要退还所有工资
摘要:做副业的程序员并不少见,但一般情况下很少会有人在工作时间做,一是没时间,二是的确不太合适。然而,有个人在公司工作了十个月,最终被发现在上班时间做个人项目惨遭解雇,结果还被要求退还这十个月的工资,这是对是错?
很多程序员在忙碌的全职工作之余还会做一些兼职工作,比如从事一些自由职业项目。如果说合同上写明了允许做兼职,那么肯定没有任何问题。
然而,并非所有科技公司都会如此大度。我有一个朋友就职于德国谷歌。他告诉我,根据雇佣协议,他不能从事任何外部工作。在就职期间,他编写的任何代码都归谷歌所有。
听到这里,我感到很惊讶。不过,后来我才知道,谷歌在不同的国家和区域有着不同的规定。
但一般情况下,公司会在签订合同之前与你协商,而你也可以和他们谈判。当遇到特殊情况,合同并没有具体写明,就只能诉诸法律了。然而,打官司可不是喜闻乐见的事儿。
我不打算在此详细讨论相关的法律条文,我只想谈一谈此次事件本身。
被抓现形
我的这位同事在一个月内两次未能在截止期限之前顺利完成工作。他的主管非常恼火,因为分配给他的任务并没有那么复杂,不至于一拖再拖。
另外,如果一个团队不能按时完成项目,那么整个团队的业绩考核都会受到影响。所以,整个团队都对他很不满。后来有一天,一名团队成员(匿名)向项目经理打小报告说,他经常在办公时间内做个人项目。这有可能是他未能在截止期限之前顺利完成工作的原因之一。
听了这话,项目经理顿时火冒三丈。但他没有声张,因为他想获取一些真凭实据。后来,我的这位同事真的被经理当场抓获。于是,经理立即向上级汇报。
惩一儆百
很快,我的同事就被解雇了。原本事情到此就告一段落了,然而公司想将他树成典型,惩一儆百。
由于每家公司招聘开发人员都需要付出高额的成本,如果开发人员在几个月后辞职或被解雇,那么对公司来说就是一个重大的损失。因此,公司觉得只是解雇他还不够。
我的这位同事在这家公司工作了十个月。如今公司解雇了他,还要求他退还十个月的工资,否则就要对他发起诉讼。
这明显有违法律条规,而且也非常不道德。然而,我的这位同事只是一名初级开发人员,他不希望自己将来的事业发展受影响,于是悄悄地交了罚款,然后离开了公司。
对还是错?
我不打算在此讨论此次事件涉及的个人与公司,我们来谈谈开发人员是否可以在办公时间内做其他项目。
开发人员可以在办公时间内做其他项目吗?我认为不可以,即便他们在办公时间内无事可做也不应该做其他项目。开发人员应该看一看自己的就业合同;如果合同中没有明确规定,那么就应该看一看当地的法律法规。如果合同或法律条文不允许,那么就没什么好说的。
既然雇主支付了工资,那么就意味着你的工作时间归公司支配,除非这是一份合同工,你只需要交付成果物。
如果公司允许,那当然也没任何问题。
另一方面,我认为公司也不应该强迫开发人员加班,却不支付任何费用。
就开发人员能否在工作时间从事其他项目,大多数国家或地区的法律条文都站在雇主一方。举个例子,根据美国加利福尼亚州的法律,如果以下任何一种情况属实,则所有知识产权都归公司或雇主所有。
如果你使用了公司的资源;
公司的计算机、笔记本电脑或任何设备;
公司的手机;
公司的办公场所;
还有办公时间。这一点很重要,因为我的这位同事就是占用了办公时间。
使用公司的任何资源都是有风险的,因为你开发的产品的知识产权统统归公司所有。如果你看过美剧《硅谷》,相信对类似的情况并不陌生。
总结
我个人有一个非常简单的规则,不做任何复杂的个人项目。有时我会做一些简单的项目,但仅限周末和个人的笔记本电脑。所以,我认为我是安全的,但我也知道公司不一定满意我的这种做法。
但作为一名员工,我认为我有这个权利。我可以利用业余时间赚一些外快。我不会利用公司做宣传,我会尊重公司提供的资源,在办公时间内认真工作,并按时完成公司分配给我的任务。如果时间紧迫,我也可以适当地加班。
对此,你怎么看呢?留言区聊聊呗
来源:程序人生
收起阅读 »一组纯CSS开发的聊天背景图,帮助避免发错消息的尴尬
我与好友的故事
我好友,人美心善,就是做事有点小迷糊。这不,她最近好几次差点消息发错群。主要是群太多,不好区分。
于是,我准备想个法子,省得她一不小心,变成大型社死现场。
2小时之后
来自网友的智慧
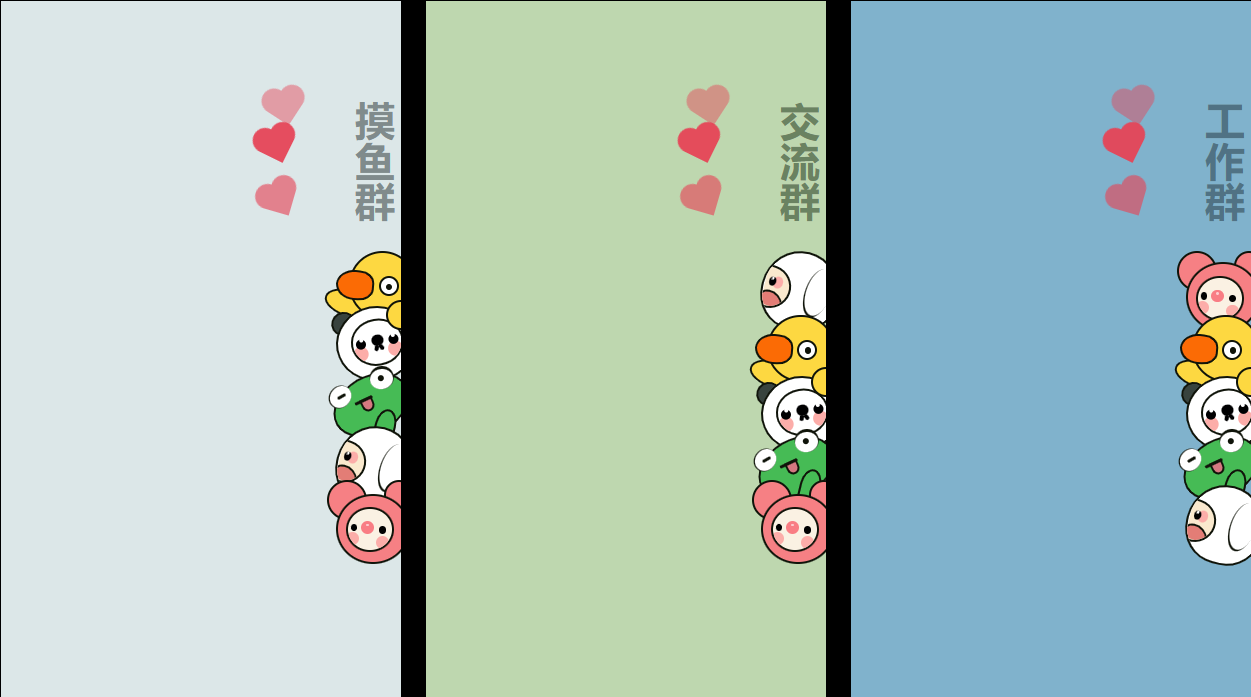
网友提供了一组聊天背景图,右上是群分类,几种分类,我挑了三个很适合好友的:交流群、工作群、摸鱼群。
文字在图片右侧,自己没发言,就能很清楚的看到文字。还有一群可爱的小动物,为背景图增加了一丝趣味。
一组聊天背景图
上效果
先来看最终实现的效果
一张背景图
从上面的代码展示中不难发现,整个背景图左侧是很空旷的。因为群聊里,一般其他人的发言在屏幕的左侧,自己的发言在右侧,所以没有发言之前,可以很清晰的看到右侧的背景信息。而背景图的右上角是当前群的类型名,基本打开群聊,一眼就发现背景图上的文字了。
垂直书写模式
文字的垂直书写模式是通过CSS提供的writing-mode实现的。
writing-mode定义了文本在水平或垂直方向上如何排布。
以下知识点来自菜鸟教程
| 参数 | 描述 |
|---|---|
| horizontal-tb | 水平方向自上而下的书写方式。即 left-right-top-bottom |
| vertical-rl | 垂直方向自右而左的书写方式。即 top-bottom-right-left |
| vertical-lr | 垂直方向内内容从上到下,水平方向从左到右 |
| sideways-rl | 内容垂直方向从上到下排列 |
| sideways-lr | 内容垂直方向从下到上排列 |
背景图中文字的效果就是为文本设置了writing-mode属性值为vertical-rl。
.chat-title {
  writing-mode: vertical-rl;
  font-size: 32px;
  font-weight: 600;
  position: absolute;
  top: 80px;
  right: 0;
}
一组卡通形象
文字下面是一组可爱的卡通形象。我摸了摸下巴,感觉是可以用CSS实现的。
小鸡 🐤
小鸡图形由这以下部分组成:
头、一只眼睛、嘴巴、左手臂、右手臂
基本都是用圆和椭圆组成的,整体色调是黄色的,除了鼻子设计成了橘色,基本没有什么实现难度。
注:温馨提示,如果有四肢的卡通形象,如果后面没有遮挡物,最好把身体画出来。
熊猫 🐼
熊猫图形由这以下部分组成:
头、脸、左眼睛、右眼睛、左腮红、右腮红、鼻子、嘴巴、左耳朵
除了嘴巴基本都是用圆和椭圆组成的,整体色调是黑、白色,除了腮红设计成了粉色,基本没有什么实现难度。
说说嘴巴的实现吧。
一些卡通形象或者颜文字中,会有向下的尖括号代表嘴巴,比如(╥╯^╰╥)、(〒︿〒)、╭(╯^╰)╮。一般表示不开心或者傲娇。而这里的熊猫整体是有些高冷的,所以嘴巴没有设计成小羊或者青蛙那样张开的。
这种类型的嘴巴用CSS实现很简单,有几种方式,我一般是用两个直线,结合定位+旋转实现。
.panda-mouth {
  width: 3px;
  height: 5px;
  background: #000001;
  border-radius: 2px;
  position: absolute;
  top: 19px;
  z-index: 199;
}
.panda-mouth-left {
  left: 16px;
  transform: rotate(20deg);
}
.panda-mouth-right {
  left: 20px;
  transform: rotate(-30deg);
}

<div class="panda-mouth panda-mouth-left"></div>
<div class="panda-mouth panda-mouth-right"></div>
青蛙 🐸
青蛙图形由这以下部分组成:
头、左眼睛、右眼睛、鼻子、嘴巴、舌头、左手臂
基本都是用圆和椭圆组成的,整体色调是黑、白、绿色,除了舌头设计成了粉色,基本没有什么实现难度。
小羊 🐑
小羊图形由这以下部分组成:
头、脸、右眼睛、嘴巴、舌头、耳朵
基本都是用圆和椭圆组成的,整体色调是黑、白色,舌头和腮红是粉色,基本没有什么实现难度。
介绍一下耳朵的实现。
一般羊的耳朵尖而长,是耷拉在脑袋两侧的,所以这里也是这样设计的,因为小羊是侧颜,所以只需要实现一只耳朵即可。因为耳朵也是白色的,所以要展示一部分颜色深的地方好和头进行区分。
这样实现方式就有很多了,加阴影啦,使用两层元素啦,伪元素啦,都可以,我这里用了伪元素实现的。
.sheep-ear {
  position: absolute;
  width: 20px;
  height: 40px;
  border-radius: 100%;
  background: #10140a;
  top: 8px;
  right: 5px;
  transform: rotate(6deg);
}
.sheep-ear::before {
  content: '';
  width: 20px;
  height: 39px;
  border-radius: 100%;
  background: #fff;
  position: absolute;
  top: -1px;
  left: 1px;
  z-index: 199;
}

<div class='sheep-ear'></div>
比啾
这个卡通形象眼熟,但是叫不上来名字,所以我给它起名叫“比啾”。(因为罗小黑里有一个比丢也很可爱)
比啾图形由这以下部分组成:
头、脸、左眼睛、右眼睛、左腮红、右腮红、鼻子。左耳朵、右耳朵
基本都是用圆和椭圆组成的,整体色调是黑、粉色,脸是藕色,基本没有什么实现难度。
一组背景图
不同类型群组的背景图,除了名字不同,卡通的顺序也适当的做了调整,避免看错群。
注入灵魂
背景图是静态的,但是我们的页面可以是动起来的。所以我为背景图注入了一丝灵动。
三个心,有间隔的从第一个玩偶边上飞出来,飞一段时间消失。
我基本实现心形都是中间一个矩形、两边各一个圆形。
飞出来和消失使用animation动画实现,因为三颗心路径是一致的,所以需要设置间隔时间,否则就会重叠成一个。
.chat-heart {
  position: absolute;
  left: 200px;
  top: 200px;
}
.heart {
  position: absolute;
  width: 20px;
  height: 20px;
  background-color: #e64356;
  opacity: 0;
  top: 6px;
  left: 45px;
}
.heart:before,
.heart:after {
  content: '';
  position: absolute;
  width: 100%;
  height: 100%;
  border-radius: 50%;
  background-color: #e64356;
}
.heart:after {
  bottom: 0px;
  left: -53%;
}
.heart:before {
  top: -53%;
  right: 0px;
  transform: rotate(45deg);
}
.heart1 {
  animation: heartfly 2s ease-out infinite 0.5s;
}
.heart2 {
  animation: heartfly 2s ease-out infinite 1s;
}
.heart3 {
  animation: heartfly 2s ease-out infinite 1.5s;
}
@keyframes heartfly {
  70% {
    opacity: 1;
  }
  100% {
    transform: rotate(35deg) translateY(-100px) translateX(-100px);
    opacity: 0;
  }
}

<div class='chat-heart'>
  <div class='heart heart1'></div>
  <div class='heart heart2'></div>
  <div class='heart heart3'></div>
</div>
故事的结尾
故事的结尾就是,有人更换了微信聊天背景,有人写完了一篇文章,愿友谊地久天长。
不会以为这就是结尾吧,哈哈哈。
作者:叶一一
来源:juejin.cn/post/7141316944354885669
在寒冬里,不要丧失斗志
前言
或许出来工作久了,见的事情多了,经历的事情多了,打交道的人多了,就会发现自己的渺小,容易emo。我记得看过一个视频,里头有人讲了一句话:眼界开了有时也是一件糟糕的事,因为很多事情其实是无能为力,但是你又看到了,明白是那么回事,但是就是办不到。
其实这是很正常的现象,导致的因素有很多,比如说大环境经济的不景气,各种大厂在削减自身的开支,即使前几年行情还不错,就会流行内卷的说法,还有一些原因是在外头看的事情多了,人都会有攀比的心理(这是人性),当各种社交媒体一直鼓吹这些美好的东西的时候,会让人不自觉的感觉自己好像很差劲。
就像马斯克讲的:
社交媒体有时比较糟糕的,就是每个人都在上面发表自己美好的一面,导致大家觉得每个人都过得很好,你却过得很糟糕,需要理性去看待社交媒体。
寒冬
从今年开始,作为互联网的小伙伴都可以感受到这股寒意,身边很多朋友裁员的裁员,内卷的内卷,有些晚上10点下班,大厂也频频爆出各种财报也是不理想的,更别说中小企业。我相信在当前市场各种人才济济,我一个朋友在大厂当面试官的,他说一个岗位放出来,很多阿里的投进去,你知道竞争有多大了吧~
在寒冬里,不要丧失斗志
是啊,很多时候危机也孕育着机会,历史也向我们展示了很多绝地反击,更有很多抄底神迹,那都源于自身独特的眼光。
在前几天翻微信的时候,发现之前一个请教过我的小伙子,今年刚刚毕业,从他之前朋友圈来看,是一个比较积极进取的人,他在大学参与各种开源社区的那种夏令营,其实就是社区会有一些小任务,你在导师的指导下完成了就有一些奖章,甚至有些优秀的直接被鹅厂录取了。
我看他前几天发的一个秋招的情况,挺厉害的,至少比我当年强很多很多,我也羡慕不已。他本身学历不错,加上学习各种技能也还行,挺优秀的。
不得不感叹,学历是个好东西,当初我一个高中师兄在北航,一毕业就拿了10几个offer~
回归正题,并不是为了炫别人多厉害多厉害,其实这背后给了我一剂强心剂,市场岗位是有的,只是你需要更优秀,更突出,更有价值。
自我成长
不管什么时候,自我成长是一个一生的话题,而懒惰真是我们需要对抗的,这种懒惰不仅包括身体上,还有精神上的懒惰。
1、体力上的懒惰,可能平时坐享其成,不想去付出,然后自己满足当下,没有其他追求。
2、精神上的懒惰,举个例子,比如说有些事的处理方式不对的,但是却一直按照旧的方法去解决,懒得动脑筋去思考,那么人也是在这个时候停止进步
当然并不是给大家灌鸡汤,就是我们需要多努力,多拼命干嘛,其实我们需要的是每天进步一点点
古人云:士别三日,需刮目相待。是啊,就是能否每次都比上一次做得更好,每天有一丢丢的进步,日积月累下来,那进步的非常可观的~
所以国庆那会我也在家好好规划下自己的职业生活
作为互联网打工人
发展方向不外乎几个:
1、技术能力
2、管理能力(项目、人)
3、工程思维
4、软能力
前两点大家都很好理解,第三点其实是技术推动生产力,比如说一些云产品,可伸缩扩容缩容,通过技术手段来减少成本。或者说有一些方案,通过技术手段解决人工的问题,机械手,代替以为人工的作业。
第四点:在我这一年接触的工作内容,会涉及越来越多的软能力,包括沟通能力,文档表达能力、ppt能力,这些能力最终目的也是为了实现目的,完成我们任务。
如果让我排成长方向的权重的话,技术能力 我会打4分,软能力 打3分,管理能力 打2分,工程思维 打1分。
当自己能力还有水平,以及工作年限到达一定程度,他们之间的占比也是会不同的。
广东入秋了,大家多添衣~
作者:大鸡腿同学
来源:https://juejin.cn/post/7152530211127427086
细说Android apk四代签名:APK v1、APK v2、APK v3、APK v4
简介
大部分开发者对apk签名还停留在APK v2,对APK v3和APK v4了解很少,而且网上大部分文章讲解的含糊不清,所以根据官网文档重新整理一份。
apk签名从APK v1到APK v2改动很大,是颠覆性的,而APK v3只是对APK v2的一次升级,APK v4则是一个补充。
本篇文章主要参考Android各版本改动: developer.android.google.cn/about/versi…
APK v1
就是jar签名,apk最初的签名方式,大家都很熟悉了,签名完之后是META-INF 目录下的三个文件:MANIFEST.MF、CERT.SF、CERT.RSA。
MANIFEST.MF
MANIFEST.MF中是apk种每个文件名称和摘要SHA1(或者 SHA256),如果是目录则只有名称
CERT.SF
CERT.SF则是对MANIFEST.MF的摘要,包括三个部分:
SHA1-Digest-Manifest-Main-Attributes:对 MANIFEST.MF 头部的块做 SHA1(或者SHA256)后再用 Base64 编码
SHA1-Digest-Manifest:对整个 MANIFEST.MF 文件做 SHA1(或者 SHA256)后再用 Base64 编码
SHA1-Digest:对 MANIFEST.MF 的各个条目做 SHA1(或者 SHA256)后再用 Base64 编码
CERT.RSA
CERT.RSA是将CERT.SF通过私钥签名,然后将签名以及包含公钥信息的数字证书一同写入 CERT.RSA 中保存
通过这三层校验来确保apk中的每个文件都不被改动。
APK v2
官方说明:source.android.google.cn/security/ap…
APK 签名方案 v2 是在 Android 7.0 (Nougat) 中引入的。为了使 APK 可在 Android 6.0 (Marshmallow) 及更低版本的设备上安装,应先使用 JAR 签名功能对 APK 进行签名,然后再使用 v2 方案对其进行签名。
APK v1的缺点就是META-INF目录下的文件并不在校验范围内,所以之前多渠道打包等都是通过在这个目录下添加文件来实现的。
APK 签名方案 v2 是一种全文件签名方案,该方案能够发现对 APK 的受保护部分进行的所有更改,从而有助于加快验证速度并增强完整性保证。
使用 APK 签名方案 v2 进行签名时,会在 APK 文件中插入一个 APK 签名分块,该分块位于“ZIP 中央目录”部分之前并紧邻该部分。在“APK 签名分块”内,v2 签名和签名者身份信息会存储在 APK 签名方案 v2 分块中。
通俗点说就是签名信息不再以文件的形式存储,而是将其转成二进制数据直接写在apk文件中,这样就避免了APK v1的META-INF目录的问题。
在 Android 7.0 及更高版本中,可以根据 APK 签名方案 v2+ 或 JAR 签名(v1 方案)验证 APK。更低版本的平台会忽略 v2 签名,仅验证 v1 签名。
APK v3
官方说明:source.android.google.cn/security/ap…
APK 签名方案 v3 是在 Android 9 中引入的。
Android 9 支持 APK 密钥轮替,这使应用能够在 APK 更新过程中更改其签名密钥。为了实现轮替,APK 必须指示新旧签名密钥之间的信任级别。为了支持密钥轮替,我们将 APK 签名方案从 v2 更新为 v3,以允许使用新旧密钥。v3 在 APK 签名分块中添加了有关受支持的 SDK 版本和 proof-of-rotation 结构的信息。
简单来说APK v3就是为了Andorid9的APK 密钥轮替功能而出现的,就是在v2的基础上增加两个数据块来存储APK 密钥轮替所需要的一些信息,所以可以看成是v2的升级。具体结构见官网说明即可。
APK 密钥轮替功能可以参考:developer.android.google.cn/about/versi…
具有密钥轮转的 APK 签名方案
Android 9 新增了对 APK Signature Scheme v3 的支持。该架构提供的选择可以在其签名块中为每个签名证书加入一条轮转证据记录。利用此功能,应用可以通过将 APK 文件过去的签名证书链接到现在签署应用时使用的证书,从而使用新签名证书来签署应用。
注:运行 Android 8.1(API 级别 27)或更低版本的设备不支持更改签名证书。如果应用的 minSdkVersion 为 27 或更低,除了新签名之外,可使用旧签名证书来签署应用。
详细了解如何使用 apksigner 轮转密钥参考:developer.android.google.cn/studio/comm…
在 Android 9 及更高版本中,可以根据 APK 签名方案 v3、v2 或 v1 验证 APK。较旧的平台会忽略 v3 签名而尝试验证 v2 签名,然后尝试验证 v1 签名。
APK v4
官方说明:source.android.google.cn/security/ap…
APK 签名方案 v4 是在 Android 11 中引入的。
Android 11 通过 APK 签名方案 v4 支持与流式传输兼容的签名方案。v4 签名基于根据 APK 的所有字节计算得出的 Merkle 哈希树。它完全遵循 fs-verity 哈希树的结构(例如,对salt进行零填充,以及对最后一个分块进行零填充。)Android 11 将签名存储在单独的 .apk.idsig 文件中。v4 签名需要 v2 或 v3 签名作为补充。
APK v4同样是为了新功能而出现的,这个新功能就是ADB 增量 APK 安装,可以参考Android11 功能和 API 概览: developer.android.google.cn/about/versi…
ADB 增量 APK 安装
在设备上安装大型(2GB 以上)APK 可能需要很长的时间,即使应用只是稍作更改也是如此。ADB(Android 调试桥)增量 APK 安装可以安装足够的 APK 以启动应用,同时在后台流式传输剩余数据,从而加速这一过程。如果设备支持该功能,并且您安装了最新的 SDK 平台工具,adb install 将自动使用此功能。如果不支持,系统会自动使用默认安装方法。
运行以下 adb 命令以使用该功能。如果设备不支持增量安装,该命令将会失败并输出详细的解释。
adb install --incremental
在运行 ADB 增量 APK 安装之前,您必须先为 APK 签名并创建一个 APK 签名方案 v4 文件。必须将 v4 签名文件放在 APK 旁边,才能使此功能正常运行。
因为需要流式传输,所以需要将文件分块,对每一块进行签名以便校验,使用的方式就是Merkle 哈希树(http://www.kernel.org/doc/html/la… v4就是做这部分功能的。所以APK v4与APK v2或APK v3可以算是并行的,所以APK v4签名后还需要 v2 或 v3 签名作为补充。
运行 adb install --incremental 命令时,adb 会要求 .apk.idsig 文件存在于 .apk 旁边(所以APK v4的签名文件.apk.idsig并不会打包进apk文件中)
默认情况下,它还会使用 .idsig 文件尝试进行增量安装;如果此文件缺失或无效,该命令会回退到常规安装。
总结
综上,可以看到APK v4是面向ADB即开发调试的,而如果我们没有签名变动的需求也可以不考虑APK v3,所以目前国内大部分还停留在APK v2。
作者:BennuCTech
来源:juejin.cn/post/7068079232290652197
前端线上图片生成马赛克

说起图片的马赛克,可能一般都是由后端实现然后传递图片到前端,但是前端也是可以通过canvas来为图片加上马赛克的,下面就通过码上掘金来进行一个简单的实现。
最开始需要实现马赛克功能是需要通过canvas提供的一个获取到图片每一个像素的方法,我们都知道,图片本质上只是由像素组成的,越清晰的图片,就有着越高的像素,而像素的本质,就只是一个个拥有颜色的小方块而已,只要把一张图片放大多倍,就能够清楚的发现。
通过 canvas 的 getImageData 这个方法,我们就能够拿到图像上所有像素组成的数组,并且需要生成马赛克,意味着我们需要把一个范围内的色块的颜色都改成一样的,也就是通过canvas来重绘图片,
let pixeArr = ctx.getImageData(0, 0, w, h).data;
let sampleSize = 40;

for (let i = 0; i < h; i += sampleSize) {
    for (let j = 0; j < h; j += sampleSize) {
      let p = (j + i * w) * 4;
      ctx.fillStyle =
        "rgba(" +
        pixeArr[p] +
        "," +
        pixeArr[p + 1] +
        "," +
        pixeArr[p + 2] +
        "," +
        pixeArr[p + 3] +
        ")";
      ctx.fillRect(j, i, sampleSize, sampleSize);
    }
}而上文中出现问题的图片是存放在本地的或者线上的,本地的图片默认是没有域名的,线上的图片并且是跨域的,所以浏览器都认为你是跨域,导致报错。
那么对于本地图片,我们只需要将图片放到和html对应的文件夹下,子文件夹也是不可以的,就能够解决,对于线上的图片,我们可以采用先把它下载下来,再用方法来获取数据的这种方式来进行。
function getBase64(imgUrl) {
  return new Promise(function (resolve, reject) {
    window.URL = window.URL || window.webkitURL;
    let xhr = new XMLHttpRequest();
    xhr.open("get", imgUrl, true);
    xhr.responseType = "blob";
    xhr.onload = function () {
      if (this.status == 200) {
        let blob = this.response;
        let oFileReader = new FileReader();
        oFileReader.onloadend = function (e) {
          let base64 = e.target.result;
          resolve(base64);
        };
        oFileReader.readAsDataURL(blob);
      }
    };
    xhr.send();
  });
}
下载图片就不说了,通过浏览器提供的 API 或者其他封装好的请求工具都是可以的,在请求成功之后,我们将图片转化为 base64 并且返回,这样就能够获取线上图片的数据了。
本文提供了一种前端生成马赛克图片的方案,并且对于线上的图片,也能够通过先异步下载图片在进行转换的策略,实现了图片添加马赛克的功能。
链接:https://juejin.cn/post/7142406330618216456
项目开发过程中,成员提离职,怎么办?
环境
从问题发生的环境看,如果我们有一个好的氛围,好的企业文化。员工会不会突然突出离职?或者哪怕提出离职,会不会给我们更多一点时间,在离职期间仍然把事情做好?如果答案是肯定的,那么管理者可以尝试从问题发生的上游解决问题。
提前安排更多的资源来做项目,预防资源不足的情况发生。比如整体预留了20%的开发时间做缓冲,或者整体安排的工作量比规划的多20%。
问题本身
从问题本身思考,员工离职导致的问题是资源不够用。
新增资源,能不能快速找到替代离职员工的人?或者我们能不能使用外包方式完成需求?跟团队商量增加一些工作时间或提高工作效率?
减少需求,少做一些不是很重要的需求,把离职员工的需求分给其他人。
这2个解决方案其实都有一个前提,那就是离职人员的代码是遵循编码规范的,这样接手的人才看得懂。否则,需要增加的资源会比原来规划的多很多。这种问题不能靠员工自觉,而应该要有一套制度来规范编码。
问题的主体
我们不一定能解决问题,但可以解决让问题发生的人。这样问题就不存在了。比如,既然问题出现在张三面前,那就想办法搞定张三,让他愿意按计划把项目完成。如果公司里没人能搞定这个事,这里还有另一个思路,就是想想谁能解决这个问题,找那个能解决问题的人。
从环境、问题本身、问题的主体三个维度来分析,我们得到了好几个解决方案。我们接着分析哪种方案更靠谱。
解决方案分析
方案一,从环境角度分析,让问题不发生。这种成本是最小的。但如果问题已经发生,那这个方案就没用了。
方案二,在项目规划的时候,提前安排更多资源。这招好是好,但前提是你公司有那么多资源。大部分公司都是资源不足。
方案三,新增资源,这个招人不会那么快,就算招进来了,一时半会还发挥不出多大的价值。请外包的话,其实跟招人一样,一时半会还发挥不出多大的价值,成本还更高,也不适合。至于跟团队成员商量提高工作效率或者大家加个班赶上进度,这也是一个解决方案。不过前提是团队还有精力承担这些工作。
方案四,减少需求。这个成本最小,对大部分公司其实也适用。关键是需求管理要做好,对需求的优先级有共识。
方案五,解决让问题发生的人。这个如果不是有大的积怨,也是一个比较好的方案。对整个项目来说,成本也不会很大,项目时间和质量都有保证。
项目管理里有一个生命周期概念,越是在早期发生问题,成本越小。越到后期成本越大。所以,如果让我选,我会选择方案一。但如果已经发生,那只能在四和五里选一个。
实战经验
离职是一场危机管理
让问题不发生,那么解决之道就是不让员工离职。尤其是不让核心骨干员工提离职。离职就是一场危机管理。
这里的本质的是人才是资产,我们在市场上看到很多案例,很多企业的倒闭并不是因为经营问题,而是管理层的大批量流失,资本市场也不看好管理层流失的企业。了解这点,你就能理解为什么人才是资产了。所以对企业来说,核心员工离职不亚于一场危机。
下面分享一个危机管理矩阵,这样有助于我们对危机进行分类。
横轴是一件事情发生之后,危害性有多大,我们分为大、中、小。纵轴就是这件事发生的概率,也可以分为大、中、小。然后就形成了九种不同的类型。
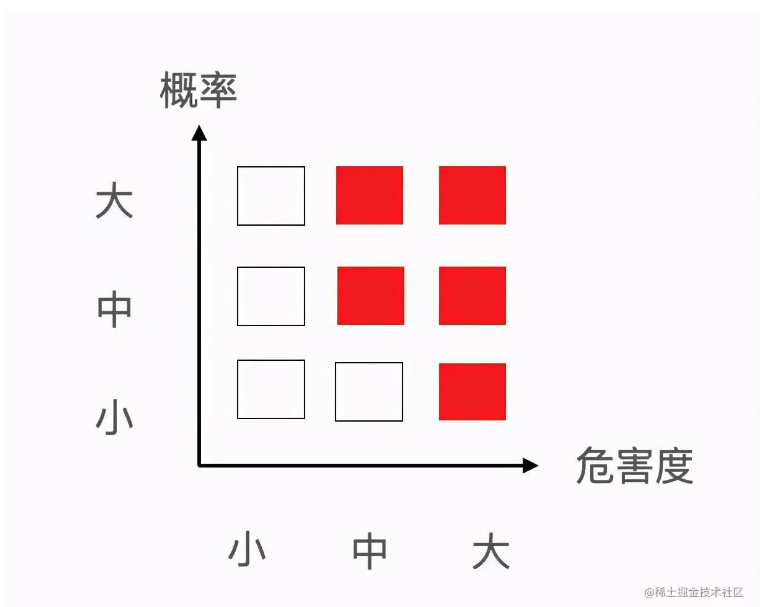
我自己的理解是,有精力的话,上图红色区域是需要重点关注的。如果精力有限,就关注最右边那三种离职后,危害性特别大的员工(不管概率发生的大小)。要知道给企业造成大影响的往往是那些发生概率小的,因为概率大的,你肯定有预防动作,而那些你认为不会离职的员工,突然一天找到你提离职,你连什么准备都没,这种伤害是最大的。
理论上所有岗位都应该准备好”接班人“计划,但实际上很多公司没办法做到。在一些小公司是一个萝卜一个坑,这个岗位人员离职,还得现招。这不合理,但这就是现状。
公司如何管理危机?
好,回到公司身上,公司如何管理危机?
第一,稳住关键性员工,让员工利益和公司利益进行深入绑定。
那些创造利润最大的前10~20%的员工,就应该获得50%甚至更高的收益。当然除了金钱上的激励外,还要有精神上的激励,给他目标,让他有成就感等等。
第二,有意识地培养关键岗位的接班人或者助理。
比如通过激励鼓励他们带新人、轮岗等等
第三,人员的危机管理是动态变化的,要时不时地明确团队各成员的位置。
比如大公司每年都会做人才盘点。
第四,当危机真的出现后,要有应对方案。
也就是把危机控制在可承受的范围内。比如,项目管理中的playB方案,真遇到资源不够,时间不够的情况下,我们能不能放弃一些不重要的需求?亦或者能不能先用相对简单但可用的方案?
离职管理的核心是:降低离职发生的概率和降低离职造成危害的大小。
离职沟通
如果事情已经发生了,管理者应该先通过离职沟通,释放自己的善意。我会按照如下情况跟离职员工沟通
第一,先做离职沟通,了解对方为什么离职?还有没有留下来的可能,作为管理者有什么能帮他做的?
第二,确定走的话,确认下对方期望的离职时间,然后根据公司情况,协商一个双方都能接受的离职时间点。不要因为没有交接人,就不给明确时间。
第三,征求对方意见,是否需要公布离职。然后一起商量这段时间的工作安排。比如,你会坦诚告知会减少工作量,但哪些工作是需要他继续支持的。希望他能一如既往地高效完成工作。
第四,如果还没有交接人到岗,最好在一周内安排人员到岗,可以考虑内部换岗,内招、猎聘等手段尽快让人员到岗。
第五,如果已经到离职时间,但还没有交接人,作为公司管理者,你就是最好的交接人。在正式交接工作之前,要理清楚需要哪些相关的资料,做好文档分类。如果实在对离职员工的工作不了解,可以让离职人员写一封日常工作的总结。
如果做完这些,离职员工还是消极怠工。作为管理者能做得就比较有限,可以尝试以下几个方法
1、再进行一次沟通。表明现在公司的情况,希望他给予支持。
2、看看自己能给予对方哪些帮助,先把这些落实好。比如写推荐信。另外有些公司入职的时候会做背景调查,这也是你能够帮助到他的。
3、如果你有权利,可以跟离职员工商量是否可以以兼职的方式来完成后续工作。这种方式对大家都好,他可以早点离职,你也不用担心因为时间仓促招错人。
如果做完以上这些还不行,那么就考虑减少一些需求,用更简单的方案先用着,后期做迭代。至于说让团队加班加点赶进度,这个要根据项目实际情况来定。
总结:今天给大家分享了一个简单分析问题的方法。然后重点聊了一下项目成员突然要离职,项目负责人有哪些应对方案。如果你看完有收获,欢迎留言讨论。
链接:https://juejin.cn/post/7147319129542770702
收起阅读 »
MVP 架构最终审判 —— MVP 解决了哪些痛点,又引入了哪些坑?(三)
复杂度
Android 架构演进系列是围绕着复杂度向前推进的。
软件的首要技术使命是“管理复杂度” —— 《代码大全》
因为低复杂度才能降低理解成本和沟通难度,提升应对变更的灵活性,减少重复劳动,最终提高代码质量。
架构的目的在于“将复杂度分层”
复杂度为什么要被分层?
若不分层,复杂度会在同一层次展开,这样就太 ... 复杂了。
举一个复杂度不分层的例子:
小李:“你会做什么菜?”
小明:“我会做用土鸡生的土鸡蛋配上切片的番茄,放点油盐,开火翻炒的番茄炒蛋。”
听了小明的回答,你还会和他做朋友吗?
小明把不同层次的复杂度以不恰当的方式揉搓在一起,让人感觉是一种由“没有必要的具体”导致的“难以理解的复杂”。
小李其实并不关心土鸡蛋的来源、番茄的切法、添加的佐料、以及烹饪方式。
这样的回答除了难以理解之外,局限性也很大。因为它太具体了!只要把土鸡蛋换成洋鸡蛋、或是番茄片换成块、或是加点糖、或是换成电磁炉,其中任一因素发生变化,小明就不会做番茄炒蛋了。
再举个正面的例子,TCP/IP 协议分层模型自下到上定义了五层:
- 物理层
- 数据链路成
- 网络层
- 传输层
- 应用层
其中每一层的功能都独立且明确,这样设计的好处是缩小影响面,即单层的变动不会影响其他层。
这样设计的另一个好处是当专注于一层协议时,其余层的技术细节可以不予关注,同一时间只需要关注有限的复杂度,比如传输层不需要知道自己传输的是 HTTP 还是 FTP,传输层只需要专注于端到端的传输方式,是建立连接,还是无连接。
有限复杂度的另一面是“下层的可重用性”。当应用层的协议从 HTTP 换成 FTP 时,其下层的内容不需要做任何更改。
引子
该系列的前三篇结合“搜索”这个业务场景,讲述了不使用架构写业务代码会产生的痛点:
- 低内聚高耦合的绘制:控件的绘制逻辑散落在各处,散落在各种 Activity 的子程序中(子程序间相互耦合),分散在现在和将来的逻辑中。这样的设计增加了界面刷新的复杂度,导致代码难以理解、容易改出 Bug、难排查问题、无法复用。
- 耦合的非粘性通信:Activity 和 Fragment 通过获取对方引用并互调方法的方式完成通信。这种通信方式使得 Fragment 和 Activity 耦合,从而降低了界面的复用度。并且没有一种内建的机制来轻松的实现粘性通信。
- 上帝类:所有细节都在界面被铺开。比如数据存取,网络访问这些和界面无关的细节都在 Activity 被铺开。导致 Activity 代码不单纯、高耦合、代码量大、复杂度高、变化源不单一、改动影响范围大。
- 界面 & 业务:界面展示和业务逻辑耦合在一起。“界面该长什么样?”和“哪些事件会触发界面重绘?”这两个独立的变化源没有做到关注点分离。导致 Activity 代码不单纯、高耦合、代码量大、复杂度高、变化源不单一、改动影响范围大、易改出 Bug、界面和业务无法单独被复用。
详细分析过程可以点击下面的链接:
这一篇试着引入 MVP 架构(Model-View-Presenter)进行重构,看能不能解决这些痛点。
在重构之前,先介绍下搜索的业务场景,该功能示意图如下:
业务流程如下:在搜索条中输入关键词并同步展示联想词,点联想词跳转搜索结果页,若无匹配结果则展示推荐流,返回时搜索历史以标签形式横向铺开。点击历史可直接发起搜索跳转到结果页。
将搜索业务场景的界面做了如下设计:
搜索页用Activity来承载,它被分成两个部分,头部是常驻在 Activity 的搜索条。下面的“搜索体”用Fragment承载,它可能出现三种状态 1.搜索历史页 2.搜索联想页 3.搜索结果页。
Fragment 之间的切换采用 Jetpack 的Navigation。关于 Navigation 详细的介绍可以点击关于 Navigation 更详细的介绍可以点击Navigation 组件使用入门 | Android 开发者 | Android Developers
生命周期不友好
Presenter 在调 View 层接口的时候是鲁莽的,它并不顾及界面的生命周期,这会发生 crash。
假设用户触发搜索后,正好网络不佳,等了好久搜索结果一直未展示,用户退出了搜索页。但退出没多久后,客户端接收到了网络响应,然后 Presenter 就会调用 View 层接口,通知界面跳转到搜索结果页,此时就会发生如下的 crash:
java.lang.IllegalArgumentException: Navigation action/destination cannot be found from the current destination NavGraph
即在当前的 NavGraph 中无法找到要跳转的目的地。(它的确是不存在了)
解决方案是得让 Presenter 具备生命周期感知能力,当界面的生命周期不可见时,就不再调用 View 层接口。
通常的做法的是为业务接口新增和生命周期相关的方法:
interface SearchPresenter {

    fun onDestory() // 新增生命周期方法

}


// 将 View 层接口改为可空类型

class SearchPresenterImpl(private val searchView: SearchView?) : SearchPresenter {

    override fun onDestroy() {

        searchView = null // 生命周期结束时 View 层接口置空

    }

}


class TemplateSearchActivity : AppCompatActivity(), SearchView {

    override fun onDestroy() {

        super.onDestroy()

        // 将生命周期传递给 Presenter

        searchPresenter.onDestroy()

    }

}
在生命周期结束时将 View 层接口置空。执行业务逻辑时得对 searchView 先判空。
在没有 JetPack 的 Lifecycle 之前上述代码是让 Presenter 感知生命周期的惯用写法。有了 Lifecycle 后,代码可以得到简化:
class SearchPresenterImpl(private val searchView: SearchView) : SearchPresenter {

    init {

        // 将 View 层接口强转成 LifecycleOwner,并添加生命周期监听者

        (searchView as? LifecycleOwner)?.lifecycle?.onStateChanged {

            // 在生命周期为 ON_DESTROY 时,调用 onDestroy()

            if (it == Lifecycle.Event.ON_DESTROY) onDestroy()

        }

    }

    private fun onDestroy() {

        searchView = null

    }

}
虽然传进来的是 View 层接口,但它的实现者是 Activity,可以把它强转为 LifecycleOwner,并添加生命周期观察者。这样就可以在 Presenter 内部监听生命周期的变化。
其中的 onStateChanged() 是 Lifecycle 的扩展方法:
// 扩展方法简化了业务层使用的代码量

fun Lifecycle.onStateChanged(action: ((event: Lifecycle.Event) -> Unit)) {

    addObserver(object : LifecycleEventObserver {

        override fun onStateChanged(source: LifecycleOwner, event: Lifecycle.Event) {

            action(event)

            if (event == Lifecycle.Event.ON_DESTROY) {

                removeObserver(this)

            }

        }

    })

}
生命周期安全还可以更进一步。当界面生命周期完结后,除了不把晚到的数据推送给界面之外,还可以取消异步任务,节约资源并避免内存泄漏。
还是拿刚才联想词的交互来举例,点击联想词记为一次搜索,得录入搜索历史,而搜索历史得做持久化,采用 MMKV,这个细节应该被封装在 SearchRepository 中:
class SearchRepository {

    // 获取搜索历史

    suspend fun getHistory(): List<String> = suspendCancellableCoroutine { continuation->

        val historyBundle = MMKV.mmkvWithID("template-search")?.decodeParcelable("search-history", Bundle::class.java)

        val historys = historyBundle?.let { (it.getStringArray("historys") ?: emptyArray()).toList() }.orEmpty()

        continuation.resume(historys,null)

    }

    // 更新搜索历史

    suspend fun putHistory(historys:List<String>) = suspendCancellableCoroutine<Unit> { continuation ->

        val bundle = Bundle().apply { putStringArray("historys", historys.toTypedArray()) }

        MMKV.mmkvWithID("template-search")?.encode("search-history", bundle)

        continuation.resume(Unit,null)

    }

}
虽然 MMKV 足够快,但 IO 还是充满了不确定性。顺手异步化一下没毛病,使用suspendCancellableCoroutine将同步方法转成 suspend 方法。
这样的话得为 suspend 提供一个协程运行环境:
class SearchPresenterImpl(private val searchView: SearchView) : SearchPresenter {

    // 协程域

    private val scope = CoroutineScope(SupervisorJob() + Dispatchers.IO)

    private val searchRepository: SearchRepository = SearchRepository()

    private val historys = mutableListOf<String>()

    // 初始化读历史

    override fun init() {

        searchView.initView()

        // 初始化时,启动协程获取历史

        scope.launch {

            searchRepository.getHistory().also { historys.addAll(it) }

            withContext(Dispatchers.Main) {

                searchView.showHistory(historys)

            }

        }

    }

    // 搜索时写历史

    override fun search(keyword: String, from: SearchFrom) {

        searchView.gotoSearchPage(keyword, from)

        searchView.stretchSearchBar(true)

        searchView.showSearchButton(false)

        // 新增历史

        if (historys.contains(keyword)) {

            historys.remove(keyword)

            historys.add(0, keyword)

        } else {

            historys.add(0, keyword)

            if (historys.size > 11) historys.removeLast()

        }

        searchView.showHistory(historys)

        // 启动协程持久化历史

        scope.launch { searchRepository.putHistory(historys) }

    }

}
新建了一个 CoroutineScope 用于启动协程,CoroutineScope 的用意是控制协程的生命周期。但上述的写法和GlobalScope.launch()半径八两,因为没有在界面销毁时取消协程释放资源。所以 Presenter.onDestroy() 还得新增一行逻辑:
class SearchPresenterImpl(private val searchView: SearchView) : SearchPresenter {

    private val scope = CoroutineScope(SupervisorJob() + Dispatchers.IO)

    private fun onDestroy() {

        searchView = null

        scope.cancel()

    }

}
阶段性总结:
- 生命周期安全包括两个方面:
- 以生命周期安全的方式刷新界面:当界面生命周期结束时,不再推送数据刷新之。
- 异步任务与界面生命周期绑定:当界面生命周期结束时,取消仍未完成的异步任务,以释放资源,避免内存泄漏
- MVP 架构没有内建的机制来实现上述的生命周期安全,它是手动挡,得自己动手建立一套生命周期安全的机制。而 MVVM 和 MVI 是默认具备生命周期感知能力的。(在后续篇章展开)
困难重重的业务复用
业务接口复用
整个搜索业务中,触发搜索行为的有3个地方,分别是搜索页的搜索按钮(搜索 Activity)、点击搜索历史标签(历史 Fragment)、点击搜索联想词(联想 Fragment)。
这三个触发点分别位于三个不同的界面。而触发搜索的业务逻辑被封装在 SearchPresenter 的业务接口中:
class SearchPresenterImpl(private val searchView: SearchView) : SearchPresenter {

    private val historys = mutableListOf<String>() // 历史列表

    override fun search(keyword: String, from: SearchFrom) {

        searchView.gotoSearchPage(keyword, from) // 跳转到搜索结果页

        searchView.stretchSearchBar(true) // 拉升搜索条

        searchView.showSearchButton(false) // 隐藏搜索按钮

        // 更新历史

        if (historys.contains(keyword)) {

            historys.remove(keyword)

            historys.add(0, keyword)

        } else {

            historys.add(0, keyword)

            if (historys.size > 11) historys.removeLast()

        }

        // 刷新搜索历史

        searchView.showHistory(historys)

        // 搜索历史持久化

        scope.launch { searchRepository.putHistory(historys) }

    }

}
理论上,三个不同的界面应该都调用这个方法触发搜索,这使得搜索这个动作的业务实现内聚于一点。但在 MVP 中情况比想象的要复杂的多。
首先 SearchPresenter 的实例只有一个且被搜索 Activity 持有。其他两个 Fragment 如何获取该实例?
当然可以有一个非常粗暴的方式,即先将 Activity 持有的 Presenter 实例 public 化,然后就能在 Fragment 中先获取 Activity 实例,再获取 Presenter 实例。但这样写使得 Fragment 和 Activity 强耦合。
那从 Fragment 发一个广播到 Activity,Activity 在接收到广播后调用 Presenter.search() 可否?
不行!因为点击联想词有两个效果:1. 触发搜索 2. 更新历史
发广播可以实现第一个效果,但更新历史不能使用广播,因为历史列表historys: List<String>是保存在 Presenter 层,直接从联想页发广播到历史页拿不到当前的历史列表,就算能拿到,也不该这么做,因为这形成了一条新的更新历史的路径,增加复杂度和排查问题的难度。
所以 MVP 架构在单 Activity + 多 Fragment 场景下,无法优雅地轻松地实现多界面复用业务逻辑。
而在 MVVM 和 MVI 中这是一件轻而易举的事情。(后续篇章会展开)
View 层接口复用
当前 MVP 的现状如下:Activity 是 Presenter 的唯一持有者,也是 View 层接口的唯一实现者。
这样的设计就会产生一些奇怪的代码,比如下面这个场景。为了让搜索历史展示,得在 View 层接口中新增一个方法:
interface SearchView {

    fun showHistory(historys: List<String>)// 新增刷新历史的 View 层接口

}


// 搜索 Activity

class TemplateSearchActivity : AppCompatActivity(), SearchView {

    override fun showHistory(historys: List<String>) {

        // 奇怪的实现:Activity 通知 Fragment 刷新界面

        EventBus.getDefault().post(SearchHistorysEvent(historys))

    }

}


// 搜索历史页

class SearchHistoryFragment : BaseSearchFragment() {

    override fun onCreate(savedInstanceState: Bundle?) {

        super.onCreate(savedInstanceState)

        EventBus.getDefault().register(this)

    }

    override fun onDestroy() {

        super.onDestroy()

        EventBus.getDefault().unregister(this)

    }

    @Subscribe(threadMode = ThreadMode.MAIN)

    fun onHints(event: SearchHistorysEvent) {

        showHistory(event.history) // 接收到 Activity 的消息后,展示搜索历史

    }

}
奇怪的事情发生了,为了在发起搜索行为后刷新搜索历史,引入了广播。(此处无法使用 Navigation 的带参跳转,因为搜索行为发生后要跳的界面是结果页而非历史页)
之所以会这样是因为“Activity 是 View 层接口的唯一实现者”,其实 showHistory() 这个 View 层接口应该在历史页 Fragment 实现,因为展示历史的不是 Activity 而是 Fragment。
那把 View 层接口在 Fragment 在实现一遍,然后注册给 Presenter?
这样语义就很变扭了,因为 Fragment 得实现一堆和自己无关的 View 层接口(除了 showHistory()),这些冗余接口得保持空实现。
而且 Presenter 当前只支持持有一个 View 层接口,得重构成支持多 View 层接口。当持有多个 View 层接口,且它们生命周期不完全同步时,如何正确的区别对待?这又是一件复杂的事情。
最后 Fragment 也无法优雅地轻松地获取 Presenter 实例。
用流程图来描述下单 Activity + 多 Fragment 界面框架下的 MVP 的窘境:
即 Activity 同子 Fragment 发起同一个业务请求,该请求会同时触发 Activity 及子 Fragment 的界面刷新。
MVP 无法轻松地实现该效果,它不得不这样蹩脚地应对:
即发起业务请求以及响应界面刷新都途径 Activity。这加重了 Activity 的负担。
成也 View 层接口,败也 View 层接口。下面这个例子又在 View 层接口的伤疤上补了一刀。
产品需求:当搜索为空匹配时,展示推荐流。
推荐流在另一个业务模块中已通过 MVP 方式实现。可否把它拿来一用?
另一个业务模块的 View 层接口中有 6 个方法。当前 Activity 得是现在这些和它无关的冗余方法们并保持空实现。
当前 Activity 还得持有一个新的 Presenter。在搜索匹配结果为空的时,再调新 Presenter 的一个业务接口拉取推荐流。然后在新 View 层接口中绘制推荐流。(搜索结果的展示没有做到内聚,分散在了两个 View 层接口中,增加了维护难度)
虽然不那么优雅,但还是实现了需求。上例中的搜索和推荐接口是串行关系,还比较好处理,若改成更复杂的并行,View 层界面就无力招架了,比如同时拉取两个接口,待它们全返回后才刷新界面。
这是一个如何等待多个异步回调的问题,在面试题 | 等待多个并发结果有哪几种方法?中有详细介绍。普通的异步回调还好弄,但现在异步回调的实现者是 Activity,就有点难办了。(因为无法手动创建 Activity 实例)
再看下面这个产品需求:当展示搜索结果时,上拉加载更多搜索结果。当展示推荐流时,上拉加载更多推荐结果。
界面应该只提供加载更多的时机,至于加载更多是拉取搜索接口还是推荐接口,这是业务逻辑,界面应该无感知,得交给 Presenter 处理。
搜索和推荐分处于两个 Presenter,它们只知道如何加载更多的自己,并不知道对方的存在。关于搜索和推荐业务如何组是一个新的业务逻辑,既不属于推荐 Presenter,也不属于搜索 Presenter。若采用 Activity 持有两个 Presenter 的写法,新业务逻辑势必得在 Activity 中展开,违背了界面和业务隔离的原则。
拦截转发是我能想到的一个解决方案:新建一个 Presenter,持有两个老 Presenter,在内部构建 View 层口的实例并注册给老 Presenter 实现拦截,然后在内部实现等待多个 View 层接口以及加载更多的业务逻辑。
这个方案听上去就很费劲。。。
之所以会这样,是因为 View 层接口是一个 “具体的接口”,而它又和一个 “具体的界面” 搭配在一起。这使得 Presenter 和“这种类型的界面”耦合在一起,较难在其他界面复用。
总结
经过三篇对搜索业务场景的重构,现总结 MVP 的优缺点如下:
- 分层:MVP 最大的贡献在于将界面绘制与业务逻辑分层,前者是 MVP 中的 V(View),后者是 MVP 中的 P(Presenter)。分层实现了业务逻辑和界面绘制的解耦,让各自更加单纯,降低了代码复杂度。
- 面向接口通信:MVP 将业务和界面分层之后,各层之间就需要通信。通信通过接口实现,接口把做什么和怎么做分离,使得关注点分离成为可能:接口的持有者只关心做什么,而怎么做留给接口的实现者关心。界面通过业务接口向 Presenter 发出请求以触发业务逻辑,这使得它不需要关心业务逻辑的实现细节。Presenter 通过 view 层接口返回响应以指导界面刷新,这使得它不需要关心界面绘制的细节。
- 有限的解耦:因为 View 层接口的存在,迫使 Presenter 得了解该把哪个数据塞给哪个 View 层接口。这是一种耦合,Presenter 和这个具体的 View 层接口耦合,较难复用于其他业务。
- 有限内聚的界面绘制:MVP 并未向界面提供唯一 Model,而是将描述一个完整界面的 Model 分散在若干 View 层接口回调中。这使得界面的绘制无法内聚到一点,增加了界面绘制逻辑维护的复杂度。
- 困难重重的复用:理论上,界面和业务分层之后,各自都更加单纯,为复用提供了可能性。但不管是业务接口的复用,还是View层接口的复用都相当别扭。
- Presenter 与界面共存亡:这个特性使得 MVP 无法应对横竖屏切换的场景。
- 无内建跨界面(粘性)通信机制:MVP 无法优雅地实现跨界面通信,也未内建粘性通信机制,得借助第三方库实现。
- 生命周期不友好:MVP 并未内建生命周期管理机制,易造成内存泄漏、crash、资源浪费。
作者:唐子玄
链接:https://juejin.cn/post/7151809060407345189
来源:稀土掘金
著作权归作者所有。商业转载请联系作者获得授权,非商业转载请注明出处。
MVP 架构最终审判 —— MVP 解决了哪些痛点,又引入了哪些坑?(二)
复杂度
Android 架构演进系列是围绕着复杂度向前推进的。
软件的首要技术使命是“管理复杂度” —— 《代码大全》
因为低复杂度才能降低理解成本和沟通难度,提升应对变更的灵活性,减少重复劳动,最终提高代码质量。
架构的目的在于“将复杂度分层”
复杂度为什么要被分层?
若不分层,复杂度会在同一层次展开,这样就太 ... 复杂了。
举一个复杂度不分层的例子:
小李:“你会做什么菜?”
小明:“我会做用土鸡生的土鸡蛋配上切片的番茄,放点油盐,开火翻炒的番茄炒蛋。”
听了小明的回答,你还会和他做朋友吗?
小明把不同层次的复杂度以不恰当的方式揉搓在一起,让人感觉是一种由“没有必要的具体”导致的“难以理解的复杂”。
小李其实并不关心土鸡蛋的来源、番茄的切法、添加的佐料、以及烹饪方式。
这样的回答除了难以理解之外,局限性也很大。因为它太具体了!只要把土鸡蛋换成洋鸡蛋、或是番茄片换成块、或是加点糖、或是换成电磁炉,其中任一因素发生变化,小明就不会做番茄炒蛋了。
再举个正面的例子,TCP/IP 协议分层模型自下到上定义了五层:
- 物理层
- 数据链路成
- 网络层
- 传输层
- 应用层
其中每一层的功能都独立且明确,这样设计的好处是缩小影响面,即单层的变动不会影响其他层。
这样设计的另一个好处是当专注于一层协议时,其余层的技术细节可以不予关注,同一时间只需要关注有限的复杂度,比如传输层不需要知道自己传输的是 HTTP 还是 FTP,传输层只需要专注于端到端的传输方式,是建立连接,还是无连接。
有限复杂度的另一面是“下层的可重用性”。当应用层的协议从 HTTP 换成 FTP 时,其下层的内容不需要做任何更改。
引子
该系列的前三篇结合“搜索”这个业务场景,讲述了不使用架构写业务代码会产生的痛点:
- 低内聚高耦合的绘制:控件的绘制逻辑散落在各处,散落在各种 Activity 的子程序中(子程序间相互耦合),分散在现在和将来的逻辑中。这样的设计增加了界面刷新的复杂度,导致代码难以理解、容易改出 Bug、难排查问题、无法复用。
- 耦合的非粘性通信:Activity 和 Fragment 通过获取对方引用并互调方法的方式完成通信。这种通信方式使得 Fragment 和 Activity 耦合,从而降低了界面的复用度。并且没有一种内建的机制来轻松的实现粘性通信。
- 上帝类:所有细节都在界面被铺开。比如数据存取,网络访问这些和界面无关的细节都在 Activity 被铺开。导致 Activity 代码不单纯、高耦合、代码量大、复杂度高、变化源不单一、改动影响范围大。
- 界面 & 业务:界面展示和业务逻辑耦合在一起。“界面该长什么样?”和“哪些事件会触发界面重绘?”这两个独立的变化源没有做到关注点分离。导致 Activity 代码不单纯、高耦合、代码量大、复杂度高、变化源不单一、改动影响范围大、易改出 Bug、界面和业务无法单独被复用。
详细分析过程可以点击下面的链接:
这一篇试着引入 MVP 架构(Model-View-Presenter)进行重构,看能不能解决这些痛点。
在重构之前,先介绍下搜索的业务场景,该功能示意图如下:
业务流程如下:在搜索条中输入关键词并同步展示联想词,点联想词跳转搜索结果页,若无匹配结果则展示推荐流,返回时搜索历史以标签形式横向铺开。点击历史可直接发起搜索跳转到结果页。
将搜索业务场景的界面做了如下设计:
搜索页用Activity来承载,它被分成两个部分,头部是常驻在 Activity 的搜索条。下面的“搜索体”用Fragment承载,它可能出现三种状态 1.搜索历史页 2.搜索联想页 3.搜索结果页。
Fragment 之间的切换采用 Jetpack 的Navigation。关于 Navigation 详细的介绍可以点击关于 Navigation 更详细的介绍可以点击Navigation 组件使用入门 | Android 开发者 | Android Developers
业务和访问数据分离
上一篇使用 MVP 重构了搜索条,引出了 MVP 中的一些基本概念,比如业务接口,View 层接口,双向通信。
这一篇开始对搜索联想进行重构,它的交互如下:
输入关键词的同时请求网络拉取联想词并展示为列表,点击联想词跳转到搜索结果页。再次点击输入框时,对当前词触发联想。
新增了一个业务场景,就在 SearchPresenter 中新增接口:
interface SearchPresenter {

    fun init()

    fun backPress()

    fun touchSearchBar(text: String, isUserInput: Boolean)

    fun clearKeyword()

    fun search(keyword: String, from: SearchFrom)

    fun inputKeyword(input: Input)

    // 拉取联想词

    suspend fun fetchHint(keyword: String): List<String>

    // 展示联想页

    fun showHintPage(hints: List<SearchHint>)

}若每次输入框内容发生变化都请求网络则浪费流量,所以得做限制。使用响应式编程使得问题的求解变得简单,详细讲解可以点击写业务不用架构会怎么样?(三)
现套用这个解决方案,并将它和 Presenter 结合使用:
// TemplateSearchActivity.kt

etSearch.textChangeFlow { isUserInput, char -> Input(isUserInput, char.toString()) }

    // 键入内容后高亮搜索按钮并展示 X

    .onEach { searchPresenter.inputKeyword(it) }

    .filter { it.keyword.isNotEmpty() }

    .debounce(300)

    // 拉取联想词

    .flatMapLatest { flow { emit(searchPresenter.fetchHint(it.keyword)) } }

    .flowOn(Dispatchers.IO)

    // 跳转到联想页并展示联想词列表

    .onEach { searchPresenter.showHintPage(it.map { SearchHint(etSearch.text.toString(), it) }) }

.launchIn(lifecycleScope)其中textChangeFlow() 是一个 EditText 的扩展方法,该方法把监听输入框内容变化的回调转换为一个Flow,而Input是一个 data class:
fun <T> EditText.textChangeFlow(elementCreator: (Boolean, CharSequence?) -> T): Flow<T> = callbackFlow {

    val watcher = object : TextWatcher {

        private var isUserInput = true

        override fun beforeTextChanged(p0: CharSequence?, p1: Int, p2: Int, p3: Int) {

        }


        override fun onTextChanged(char: CharSequence?, p1: Int, p2: Int, p3: Int) {

            isUserInput = this@textChangeFlow.hasFocus()

        }


        override fun afterTextChanged(p0: Editable?) {

            trySend(elementCreator(isUserInput, p0?.toString().orEmpty()))

        }


    }

    addTextChangedListener(watcher)

    awaitClose { removeTextChangedListener(watcher) }

}

//用于表达用户输入内容

data class Input(val isUserInput: Boolean, val keyword: String)
SearchPresenter.fetchHint()对界面屏蔽了访问网络的细节:
class SearchPresenterImpl(private val searchView: SearchView) : SearchPresenter {

    private val retrofit = Retrofit.Builder()

            .baseUrl("https://XXX")

            .addConverterFactory(MoshiConverterFactory.create())

            .client(OkHttpClient.Builder().build())

            .build()

    private val searchApi = retrofit.create(SearchApi::class.java)


    override suspend fun fetchHint(keyword: String): List<String> = suspendCancellableCoroutine { continuation ->

        searchApi.fetchHints(keyword)

            .enqueue(object : Callback<SearchHintsBean>() {

                override fun onResponse(call: Call<SearchHintsBean>, response: Response<SearchHintsBean>) {

                    if (response.body()?.result?.hints?.isNotEmpty() == true) {

                        val hints = if (result.data.hints.contains(keyword))

                            result.data.hints

                        else listOf(keyword, *result.data.hints.toTypedArray())

                        continuation.resume(hints, null)

                    } else {

                        continuation.resume(listOf(keyword), null)

                    }

                }


                override fun onFailure(call: Call<SearchHintsBean>, t: Throwable) {

                    continuation.resume(listOf(keyword), null)

                }

        })

    }

}
访问网络的细节包括如何将 url 转换为请求对象、如何发起 Http 请求、怎么变换响应、如何将响应的异步回调转换为 suspend 方法。这些细节都被隐藏在 Presenter 层,界面无感知,它只要关心如何绘制。
按照这个思路,访问数据库,访问文件的细节也都不应该让界面感知。有没有必要把这些访问数据的细节再抽取出来成为新的一层叫“数据访问层”?
这取决于数据访问是否可供其他模块复用,或者数据访问的细节是否会发生变化。
若另一个 Presenter 也需要做同样的网络请求(新业务界面请求老接口还是挺常见的),像上面这种写,请求的细节就无法被复用。此时只能祭出复制粘贴。
而且搜索可以发生在很多业务场景,这次是搜索模板,下次可能是搜索素材。它们肯定不是一个服务端接口。这就是访问的细节发生变化。若新的搜索场景想复用这次的 SearchPresenter,则访问网络的细节就不该出现在 Presenter 层。
为了增加 Presenter 和网络请求细节的复用性,通常的做法是新增一层 Repository:
class SearchRepository {

    private val retrofit = Retrofit.Builder()

            .baseUrl("https://XXX")

            .addConverterFactory(MoshiConverterFactory.create())

            .client(OkHttpClient.Builder().build())

            .build()

    private val searchApi = retrofit.create(SearchApi::class.java)


    override suspend fun fetchHint(keyword: String): List<String> = suspendCancellableCoroutine { continuation ->

        searchApi.fetchHints(keyword)

            .enqueue(object : Callback<SearchHintsBean>() {

                override fun onResponse(call: Call<SearchHintsBean>, response: Response<SearchHintsBean>) {

                    if (response.body()?.result?.hints?.isNotEmpty() == true) {

                        val hints = if (result.data.hints.contains(keyword)) result.data.hints else listOf(keyword, *result.data.hints.toTypedArray())

                        continuation.resume(hints, null)

                    } else {

                        continuation.resume(listOf(keyword), null)

                    }

                }


                override fun onFailure(call: Call<SearchHintsBean>, t: Throwable) {

                    continuation.resume(listOf(keyword), null)

                }

        })

    }

}
然后 Presenter 通过持有 Repository 具备访问数据的能力:
class SearchPresenterImpl(private val searchView: SearchView) : SearchPresenter {

    private val searchRepository: SearchRepository = SearchRepository()

    // 将访问数据委托给 repository

    override suspend fun fetchHint(keyword: String): List<String> {

        return searchRepository.fetchSearchHint(keyword)

    }

}又引入了一个新的复杂度数据访问层,它封装了所有访问数据的细节,比如怎样读写内存缓存、怎样访问网络、怎样访问数据库、怎样读写文件。数据访问层通常向上层提供“原始数据”,即不经过任何业务封装的数据,这样的设计使得它更容易被复用于不同的业务。Presenter 会持有数据访问层并将所有访问数据的工作委托给它,并将数据做相应的业务转换,最终传递给界面。
Model 去哪了?
至此业务架构表现为如下状态:
业务架构分为三层:
- 界面层:是 MVP 中的 V,它只描述了界面如何绘制,通过实现 View 层接口表达。它会持有 Presenter 的实例,用以发送业务请求。
- 业务层:是 MVP 中的 P,它只描述业务逻辑,通过实现业务接口表达。它会持有 View 层接口的实例,以指导界面如何绘制。它还会持有带有数据存储能力的 Repository。
- 数据存取层:它在 MVP 中找不到自己的位置。它描述了操纵数据的能力,包括读和写。它向上层屏蔽了读写数据的细节,是从网络读,还是从文件,数据库,上层都不需要关心。
MVP 中的 M 在哪里?难道是 Repository 吗?我不觉得!
若 Repository 代表 M,那就意味着 M 不仅代表了数据本身,还包含了获取数据的方式。
但 M 明明是 Model,模型(名词)。Trygve Reenskaug,MVC 概念的发明者,在 1979 年就对 MVC 中的 M 下过这样的结论:
The View observes the Model for changes
M 是用来被 View 观察的,而 Repository 获取的数据是原始数据,需要经过一次包装或转换才能指导界面绘制。
按照这个定义当前架构中的 M 应该如下图所示:
每一个从 Presenter 通过 View 层接口传递出去的参数才是 Model,因为它才直接指导界面该如何绘制。
正因为 Presenter 向界面提供了多个 Model,才导致上一节“有限内聚的界面绘制”,界面绘制无法内聚到一点的根本原因是因为有多个 Model。MVI 在这一点上做了一次升级,叫“唯一可信数据源”,真正地做到了界面绘制内聚于一点。(后续篇章会展开分析)
下面这个例子再一次展示出“多 Model 导致有限内聚的界面刷新”的缺点。
当前输入框的 Flow 如下:
整个流上有两个刷界面的点,一个在流的上游,一个在流的下游。所以不得不把上游切换到主线程执行,否则会报:
E CrashReport: android.view.ViewRootImpl$CalledFromWrongThreadException: Only the original thread that created a view hierarchy can touch its views.
这也是“有限的内聚”引出的没有必要的线程切换,理想状态下,刷界面应该内聚在一点且处于整个流的末端。(后续篇章会展开)
跨界面通信?
触发拉取联想词的动作在搜索页 Activity 中发生,联想接口的拉取也在 Activity 中进行。这就产生了一个跨界面通信场景,得把 Activity 中获取的联想词传递给联想页 Fragment。
当拉取联想词结束后,数据会流到 SearchPresenter.showHintPage():
class SearchPresenterImpl(private val searchView: SearchView) : SearchPresenter {

    override fun showHintPage(hints: List<SearchHint>) {

        searchView.gotoHintPage(hints) // 跳转到联想页

    }

}


interface SearchView {

    fun gotoHintPage(hints: List<SearchHint>) // 跳转到联想页

}
为 View 层接口新增了一个界面跳转的方法,待 Activity 实现之:
class TemplateSearchActivity : AppCompatActivity(), SearchView {

    override fun gotoHintPage(hints: List<SearchHint>) {

        // 跳转到联想页,联想词作为参数传递给联想页

        findNavController(NAV_HOST_ID.toLayoutId())

            .navigate(R.id.action_to_hint, bundleOf("hints" to hints))

    }

}
为了将联想词传递给联想页,得序列化之:
@Parcelize // 序列化注解

data class SearchHint( val keyword: String, val hint: String ):Parcelable
然后在联想页通过 getArguement() 就能获取联想词:
override fun onViewCreated(view: View, savedInstanceState: Bundle?) {

    super.onViewCreated(view, savedInstanceState)

    // 获取联想词

    val hints = arguments?.getParcelableArrayList<SearchHint>("hints").orEmpty()

}
当前传递的数据简单,若复杂数据采用这种方式传递,可能发生性能上的损耗,首先序列化和反序列化是耗时的。再者当通过 Intent 传递大数据时可能发生TransactionTooLargeException。
展示联想词的场景是“界面跳转”和“数据传递”同时发生,可以借用界面跳转携带数据。但有些场景下不发生界面跳转也得传递数据。比如下面这个场景:
点击联想词也记为一次搜索,也得录入搜索历史。
当点击联想词时发生的界面跳转是从联想页 Fragment 跳到搜索结果 Fragment,但数据传递却需要从联想页到历史页。在这种场景下无法通过界面跳转来携带参数。
因为 Activity 和 Fragment 都能轻松地拿到对方的引用,所以通过直接调对方的方法实现参数传递也不是不可以。只是这让 Activity 和 Fragment 耦合在一起,使得它们无法单独被复用。
正如写业务不用架构会怎么样?(三)中描述的那样,界面之间需要一种解耦的、高性能的、最好还带粘性能力的通信方式。
MVP 并未内建这种通信机制,只能借助于第三方库 EventBus:
class TemplateSearchActivity : AppCompatActivity(), SearchView {

    override fun sendHints(searchHints: List<SearchHint>) {

        findNavController(NAV_HOST_ID.toLayoutId()).navigate(R.id.action_to_hint, bundleOf("hints" to hints))

        EventBus.getDefault().postSticky(SearchHintsEvent(searchHints))// 发送粘性广播

    }

}

// 将联想词封装成实体类便于广播发送

data class SearchHintsEvent(val hints: List<SearchHint>)


class SearchHintFragment : BaseSearchFragment() {

    override fun onCreate(savedInstanceState: Bundle?) {

        super.onCreate(savedInstanceState)

        EventBus.getDefault().register(this) // 注册

    }


    override fun onDestroy() {

        super.onDestroy()

        EventBus.getDefault().unregister(this)// 注销

    }


    @Subscribe(threadMode = ThreadMode.MAIN,sticky = true)

    fun onHints(event: SearchHintsEvent) {

        hintsAdapter.dataList = event.hints // 接收粘性消息并刷新列表

    }

}
而 MVVM 和 MVI 就内建了粘性通信机制。(会在后续文章展开)
一切从头来过
产品需求:增加搜索条的过渡动画
搜索业务的入口是另一个 Activity,其中也有一个长得一模一样的搜索条,点击它会跳转到搜索页 Activity。在跳转过程中,两个 Activity 的搜索条有一个水平+透明度的过渡动画。
这个动画的加入引入了一个 Bug:进入搜索页键盘不再自动弹起,搜索历史页没加载出来。
那是因为原先初始化是在 onCreate() 中触发的:
// TemplateSearchActivity.kt

override fun onCreate(savedInstanceState: Bundle?) {

    super.onCreate(savedInstanceState)

    searchPresenter.init()

}
加入过渡动画后,onCreate() 执行的时候,动画还未完成,即初始化时机就太早了。解决方案是监听过渡动画结束后才初始化:
// TemplateSearchActivity.kt

override fun onCreate(savedInstanceState: Bundle?) {

    super.onCreate(savedInstanceState)

    window?.sharedElementEnterTransition?.doOnEnd {

        searchPresenter.init()

    }

}
做了这个调整之后,又引入了一个新 Bug:当在历史页横竖屏切换后,历史不见了。
那是因为横竖屏切换会重新构建 Activity,即重新执行 onCreate() 方法,但这次并没有产生过渡动画,所以初始化方法没有调用。解决办法如下:
// TemplateSearchActivity.kt

override fun onCreate(savedInstanceState: Bundle?) {

    super.onCreate(savedInstanceState)

    window?.sharedElementEnterTransition?.doOnEnd {

        searchPresenter.init()

    }

    // 横竖屏切换时也得再次初始化

    if(savedInstanceState != null) searchPresenter.init()

}
即当发生横竖屏切换时,也手动触发一下初始化。
虽然这样写代码就有点奇怪,因为有两个不同的初始化时机(增加了初始化的复杂度),不过问题还是是解决了。
但每一次横竖屏切换都会触发一次读搜索历史的 IO 操作。当前场景数据量较小,也无大碍。若数据量大,或者初始化操作是一个网络请求,这个方案就不合适了。
究其原因是因为没有一个生命周期比 Activity 更长的数据持有者在横竖屏切换时暂存数据,待切换完成后恢复之。
很可惜 Presenter 无法成为这样的数据持有者,因为它在 Activity 中被构建并被其持有,所以它的生命周期和 Activity 同步,即横竖屏切换时,Presenter 也重新构建了一次。
而 MVVM 和 MVI 就没有这样的烦恼。(后续篇章展开分析)
总结
- 在 MVP 中引入数据访问层是有必要的,这一层封装了存取数据的细节,使得访问数据的能力可以单独被复用。
- MVP 中没有内建一种解耦的、高性能的、带粘性能力的通信方式。
- MVP 无法应对横竖屏切换的场景。当横竖屏切换时,一切从头来过。
- MVP 中的 Model 表现为若干 View 层接口中传递的数据。这样的实现导致了“有限内聚的界面绘制”,增加了界面绘制的复杂度。
作者:唐子玄
链接:https://juejin.cn/post/7151808170120183815
来源:稀土掘金
著作权归作者所有。商业转载请联系作者获得授权,非商业转载请注明出处。
MVP 架构最终审判 —— MVP 解决了哪些痛点,又引入了哪些坑?(一)
复杂度
Android 架构演进系列是围绕着复杂度向前推进的。
软件的首要技术使命是“管理复杂度” —— 《代码大全》
因为低复杂度才能降低理解成本和沟通难度,提升应对变更的灵活性,减少重复劳动,最终提高代码质量。
架构的目的在于“将复杂度分层”
复杂度为什么要被分层?
若不分层,复杂度会在同一层次展开,这样就太 ... 复杂了。
举一个复杂度不分层的例子:
小李:“你会做什么菜?”
小明:“我会做用土鸡生的土鸡蛋配上切片的番茄,放点油盐,开火翻炒的番茄炒蛋。”
听了小明的回答,你还会和他做朋友吗?
小明把不同层次的复杂度以不恰当的方式揉搓在一起,让人感觉是一种由“没有必要的具体”导致的“难以理解的复杂”。
小李其实并不关心土鸡蛋的来源、番茄的切法、添加的佐料、以及烹饪方式。
这样的回答除了难以理解之外,局限性也很大。因为它太具体了!只要把土鸡蛋换成洋鸡蛋、或是番茄片换成块、或是加点糖、或是换成电磁炉,其中任一因素发生变化,小明就不会做番茄炒蛋了。
再举个正面的例子,TCP/IP 协议分层模型自下到上定义了五层:
- 物理层
- 数据链路成
- 网络层
- 传输层
- 应用层
其中每一层的功能都独立且明确,这样设计的好处是缩小影响面,即单层的变动不会影响其他层。
这样设计的另一个好处是当专注于一层协议时,其余层的技术细节可以不予关注,同一时间只需要关注有限的复杂度,比如传输层不需要知道自己传输的是 HTTP 还是 FTP,传输层只需要专注于端到端的传输方式,是建立连接,还是无连接。
有限复杂度的另一面是“下层的可重用性”。当应用层的协议从 HTTP 换成 FTP 时,其下层的内容不需要做任何更改。
引子
该系列的前三篇结合“搜索”这个业务场景,讲述了不使用架构写业务代码会产生的痛点:
- 低内聚高耦合的绘制:控件的绘制逻辑散落在各处,散落在各种 Activity 的子程序中(子程序间相互耦合),分散在现在和将来的逻辑中。这样的设计增加了界面刷新的复杂度,导致代码难以理解、容易改出 Bug、难排查问题、无法复用。
- 耦合的非粘性通信:Activity 和 Fragment 通过获取对方引用并互调方法的方式完成通信。这种通信方式使得 Fragment 和 Activity 耦合,从而降低了界面的复用度。并且没有一种内建的机制来轻松的实现粘性通信。
- 上帝类:所有细节都在界面被铺开。比如数据存取,网络访问这些和界面无关的细节都在 Activity 被铺开。导致 Activity 代码不单纯、高耦合、代码量大、复杂度高、变化源不单一、改动影响范围大。
- 界面 & 业务:界面展示和业务逻辑耦合在一起。“界面该长什么样?”和“哪些事件会触发界面重绘?”这两个独立的变化源没有做到关注点分离。导致 Activity 代码不单纯、高耦合、代码量大、复杂度高、变化源不单一、改动影响范围大、易改出 Bug、界面和业务无法单独被复用。
详细分析过程可以点击下面的链接:
这一篇试着引入 MVP 架构(Model-View-Presenter)进行重构,看能不能解决这些痛点。
在重构之前,先介绍下搜索的业务场景,该功能示意图如下:
业务流程如下:在搜索条中输入关键词并同步展示联想词,点联想词跳转搜索结果页,若无匹配结果则展示推荐流,返回时搜索历史以标签形式横向铺开。点击历史可直接发起搜索跳转到结果页。
将搜索业务场景的界面做了如下设计:
搜索页用Activity来承载,它被分成两个部分,头部是常驻在 Activity 的搜索条。下面的“搜索体”用Fragment承载,它可能出现三种状态 1.搜索历史页 2.搜索联想页 3.搜索结果页。
Fragment 之间的切换采用 Jetpack 的Navigation。关于 Navigation 详细的介绍可以点击关于 Navigation 更详细的介绍可以点击Navigation 组件使用入门 | Android 开发者 | Android Developers
高耦合+低内聚
MVP 能否成为高耦合低内聚的终结者?
先来看看高耦合低内聚的代码长什么样。以搜索条为例,它的交互如下:
当输入框键入内容后,显示X按钮并高亮搜索按钮。点击搜索跳转到搜索结果页,同时搜索条拉长并隐藏搜索按钮。点击X时清空输入框并从搜索结果页返回,搜索条还原。
引用上一篇无架构的实现代码:
class TemplateSearchActivity : AppCompatActivity() {

    private fun initView() {

        // 搜索按钮初始状态

        tvSearch.apply {

            isEnabled = false

            textColor = "#484951"

        }

        // 初始状态下,清空按钮不展示

        ivClear.visibility = gone

        // 初始状态下,弹出搜索框

        KeyboardUtils.showSoftInputWithDelay(etSearch, 300)

        // 监听输入框,当有内容时更新搜索和X按钮状态

        etSearch.addTextChangedListener(object :TextWatcher{

            override fun beforeTextChanged(s: CharSequence?, start: Int, count: Int, after: Int) {}

            override fun onTextChanged(char: CharSequence?, start: Int, before: Int, count: Int) {

                val input = char?.toString() ?: ""

                if(input.isNotEmpty()) {

                    ivClear.visibility = visible

                    tvSearch.apply {

                        textColor = "#F2F4FF"

                        isEnabled = true

                    }

                }else {

                    ivClear.visibility = gone

                    tvSearch.apply {

                        textColor = "#484951"

                        isEnabled = false

                    }

                }

            }

            override fun afterTextChanged(s: Editable?) { }

        })

        // 监听键盘搜索按钮

        etSearch.setOnEditorActionListener { v, actionId, event ->

            if (actionId == EditorInfo.IME_ACTION_SEARCH) {

                val input = etSearch.text.toString() ?: ""

                if(input.isNotEmpty()) { searchAndHideKeyboard() }

                true

            } else false

        }

        // 监听搜索条搜索按钮

        tvSearch.setOnClickListener { searchAndHideKeyboard() }

    }

    // 跳转到搜索页 + 拉长搜索条 + 隐藏搜索按钮 + 隐藏键盘

    private fun searchAndHideKeyboard() {

        vInputBg.end_toEndOf = parent_id // 拉长搜索框(与父亲右边对齐)

        // 跳转到搜索结果页

        findNavController(NAV_HOST_ID.toLayoutId()).navigate(

            R.id.action_history_to_result,

            bundleOf("keywords" to etSearch?.text.toString())

        )

        tvSearch.visibility = gone

        KeyboardUtils.hideSoftInput(etSearch)

    }

}
这样写的坏处如下:
1. 业务 & 界面耦合
- “界面长什么样”和“哪些事件会触发界面重绘”是两个不同的关注点,它们可以独立变化,前者由 UI 设计发起变更,后者由产品发起变更。
- 耦合增加代码量以及复杂度,高复杂度增加理解难度且容易出错。比如当别人接手该模块看着 1000+ 的 Activity 无所适从时。再比如你修改了界面展示,而另一个同学修改了业务逻辑,合代码时,你俩可能发生冲突,冲突解决不好就会产生 Bug。
- 高耦合还降低了复用性。界面和业务耦合在一起,使得它们都无法单独被复用。即界面无法复用于另一个业务,而业务也无法复用于另一个界面。
2. 低内聚的界面绘制
- 同一个控件的绘制逻辑散落在各个地方,分散在不同的方法中,分散在现在和将来的逻辑中(回调)。
- 低内聚同样也增加了复杂度。就好比玩剧本杀,线索散落在场地的各个角落,你得先搜出线索,然后再将他们拼凑起来,才能形成完整的认知。再比如 y=f(x),唯一x决定唯一y,而低内聚的代码就好比y=f(a,b,c,d),任意一个变化源的改变的都会影响界面状态。当UI变更时极易产生“没改全”的 Bug,对于一个小的 UI 改动,不得不搜索整段代码,找出所有对控件的引用,漏掉一个就是 Bug。
搜索条的业务相对简单,initView()看上去也没那么复杂。如果延续“高业务耦合+低绘制内聚”的写法,当界面越来越复杂之后,1000+ 行的 Activity 不是梦。
用一张图来表达所有的复杂度在 Activity 层铺开:
业务和界面分离
业务逻辑和界面绘制是两个不同的关注点,它们本可以不在一个层次中被铺开。
MVP 架构引入了 P(Presenter)层用于承载业务逻辑,实现了复杂度分层:
interface SearchPresenter {

    // 初始化

    fun init()

    // 返回

    fun backPress()

    // 清空关键词

    fun clearKeyword()

    // 发起搜索

    fun search(keyword: String, from: SearchFrom)

    // 输入关键词

    fun inputKeyword(keyword: String)

}
Presenter 称为业务接口,它将所有界面可以发出的动作都表达成接口中的方法。接口是编程语言中表达“抽象”的手段。这是个了不起的发明,因为它把“做什么”和“怎么做”隔离。
界面会持有一个 Presenter 的实例,把业务逻辑委托给它,这使得界面只需要关注“做什么”,而不需要关注“怎么做”。所以业务接口做到了界面绘制和业务逻辑的解耦。
业务逻辑最终会指导界面如何绘制,在 MVP 中通过View 层界面来表达:
interface SearchView {

    fun onInit(keyword: String)

    fun onBackPress()

    fun onClearKeyword()

    fun onSearch()

    fun onInputKeyword(keyword:String)

}
Presenter 的实现者会持有一个 View 层接口实例:
class SearchPresenterImpl(private val searchView: SearchView) :SearchPresenter{

    override fun init() {

        searchView.onInit("")

    }

    override fun backPress() {

        searchView.onBackPress()

    }

    override fun clearKeyword() {

        searchView.onClearKeyword()

    }

    override fun search(keyword: String, from: SearchFrom) {

        searchView.onSearch()

    }

    override fun inputKeyword(keyword: String) {

        searchView.onInputKeyword(keyword)

    }

}
Presenter 调用 View 层接口指导界面绘制,界面通过实现 View 层接口实现绘制:
class TemplateSearchActivity : AppCompatActivity(), SearchView {

    private val searchPresenter: SearchPresenter = SearchPresenterImpl(this)

    override fun onCreate(savedInstanceState: Bundle?) {

        super.onCreate(savedInstanceState)

        searchPresenter.init()

    }

    override fun onBackPressed() {

        super.onBackPressed()

        searchPresenter.backPress()

    }

    // 实现 View 层接口进行界面绘制

    override fun onInit(keyword: String) {...}

    override fun onBackPress() {...}

    override fun onClearKeyword() {...}

    override fun onSearch() {...}

    override fun onInputKeyword(keyword:String) {...}

}
分离了个寂寞?
这样的实现太脱裤子放屁了。就好比三楼同事想给五楼同事一样东西,非得叫顺丰快递,然后顺丰又托运给了申通快递。
非也!当持有一个“抽象”而不是“具体实现”时,好事就会发生!
Activity 和抽象的 SearchPresenter 接口互动,就能发生多态,即动态地替换业务逻辑的实现。
比如产品希望做一个实验,把用户分成A/B两组,A组在进入搜索页的同时把上一次用户搜索的历史直接展示在输入框中,B组则是展示今天的搜索热词。
同样的初始化动作,同样的在输入框中键入内容,不同的是获取数据的方式,A组从本地磁盘获取搜索历史,而B组从网络获取搜索热词。
初始化动作对应“做什么”,输入框中键入内容对应“展示什么”,获取数据的方式对应“怎么做”。如果这些逻辑没有分层而都写在一起,那只能通过在 Activity 中的 if-else 实现:
class TemplateSearchActivity : AppCompatActivity() {

    val abtest by lazy { intent.getStringExtra("ab-test") }

    fun initView() {

        if(abTest == "A"){

            // 输入框展示搜索历史

        } else {

            // 输入框展示搜索热词

        }

    }

}
若这种分类讨论用上瘾,Activity 代码会以极快的速度膨胀,可读性骤降,最糟糕的是一改就容易出 Bug。因为界面绘制没有内聚在一点,而是散落在各种逻辑分支中,不同分支之间的逻辑可能是互斥,或是协同。。。等等总之极其复杂。
有了抽象的 SearchPresenter 就好办了,抽象意味着可以发生多态。
多态是编程语言支持的一种特性,这种特性使得静态的代码运行时可能产生动态的行为,这样一来编程时不需要为类型所烦恼,可以编写统一的处理逻辑而不是依赖特定的类型。”
可见使用多态可以解耦,通过语言内建的机制实现 if-else 的效果:
class TemplateSearchActivity : AppCompatActivity(), SearchView {

    private val abtest by lazy { intent.getStringExtra("ab-test") }

    // 根据命中实验组构建 SearchPresenter 实例

    private val searchPresenter:SearchPresenter by lazy {

        when(type){

            "A" -> SearchPresenterImplA(this)

            "B" -> SearchPresenterImplB(this)

            else -> SearchPresenterImplA(this) // 默认进A实验组

        }

    }


    override fun onCreate(savedInstanceState: Bundle?) {

        super.onCreate(savedInstanceState)

        searchPresenter.init() // 不用做任何修改,也没有 if-else

    }


    override fun onInit(keyword: String){

        etSearch.setText(keyword, TextView.BufferType.EDITABLE)// 不用做任何修改,也没有 if-else

    }

}
然后只要实现两个不同的 SearchPresenter 即可:
class SearchPresenterImplA(private val searchView: SearchView) :SearchPresenter{

    override fun init() {

        val keyword = loadFromLocal()// 拉取持久化的搜索历史

        searchView.onInit(keyword)

    }

}


class SearchPresenterImplB(private val searchView: SearchView) :SearchPresenter{

    override fun init() {

        val keyword = loadFromRemote()// 从网络拉取搜索热词

        searchView.onInit(keyword)

    }

}
若使用依赖注入框架,比如 Dagger2 或 Hilt,还能把根据AB测实验组分类讨论构建 Presenter 实例的逻辑简化,真正做到业务代码中无分类讨论。
如果 SearchPresenter 中只有 init() 的逻辑在 AB 测场景下不同,那上述方案中其余相同的逻辑需要实现两份?
不需要,用装饰者模式就可以复用剩余的行为:
class SearchPresenterImplA(

    private val searchView: SearchView,

    private val presenter: SearchPresenter // 自己持有自己

) :SearchPresenter{

    override fun init() {

        val keyword = loadFromLocal()// 拉取持久化的搜索历史

        searchView.onInit(keyword)

    }

    override fun backPress() {

        presenter.backPress()// 实现委托给presenter

    }

    override fun touchSearchBar(text: String, isUserInput: Boolean) {

        presenter.touchSearchBar(text, isUserInput)// 实现委托给presenter

    }

    override fun clearKeyword() {

        presenter.clearKeyword()// 实现委托给presenter

    }

    override fun search(keyword: String, from: SearchFrom) {

        presenter.search(keyword, from)// 实现委托给presenter

    }

    override fun inputKeyword(keyword: String) {

        presenter.search(keyword)// 实现委托给presenter

    }

}


// 像这样构建 SearchPresenterImplA

class TemplateSearchActivity : AppCompatActivity(), SearchView {

    val presenter = SearchPresenterImplA(this, SearchPresenterImplB(this))

}
SearchPresenterImplA 持有另一个 SearchPresenter,并且把剩余方法的实现委托给它。
关于装饰者模式更详细的介绍可以点击使用组合的设计模式 | 美颜相机中的装饰者模式。
这样一来,就把“界面长什么样”和“AB测试”解耦,它们分处于不同的层次,前者在 Activity 属于 View 层,后者属于 Presenter 层。解耦的同时也发生了内聚,关于界面绘制的知识都内聚在 Activity,关于业务逻辑的知识都内聚在 Presenter。
假设界面和业务耦合在一起,后果不堪设想。因为业务的变化是飞快的,今天是 AB 测,明天可能是从不同入口进入搜索页,上报不同的埋点。类似这种情况 Activity 的逻辑会被成堆的 if-else 玩坏。
阶段性总结:
界面和业务分层之后(复杂度被分层),它们就能独立变化(高扩展性),独立复用(高复用性),再配合上“面向抽象编程”,使得业务的逻辑分支被巧妙的隐藏起来(复杂度被隐藏)。
有限的内聚
这样的 View 层接口定义会产生一个问题:
class TemplateSearchActivity : AppCompatActivity() {

    override fun onBackPress() {

        vInputBg.end_toStartOf = ID_SEARCH // 搜索框右侧对齐搜索按钮

        ivClear.visibility = visible

    }


    override fun onClearKeyword() {

        vInputBg.end_toStartOf = ID_SEARCH // 搜索框右侧对齐搜索按钮

        ivClear.visibility = gone

    }


    override fun onSearch() {

        vInputBg.end_toStartOf = parent_id // 搜索框右侧对齐父容器

    }


    override fun onInputKeyword(keyword: String) {

        ivClear.visibility = if(keyword.isNotEmpty()) visible else gone

    }

}

复制代码一个控件应该长成什么样的代码依然散落在不同方法中,就像上一篇描述的一样。
这样容易发生“改不全”或“功能衰退”的 Bug,比如搜索页新增了一个业务逻辑,一个新的 View 层接口被实现,该接口的实现需要非常小心,因为它修改的控件也会在其他 View 层接口被修改,你得确保它们不会发生冲突。
之所以会这样,是因为“View 层接口面向业务进行抽象”,其实从接口的命名就可以看出。
更好的做法是“在 View 层接口屏蔽业务动作,只关心做怎么样的绘制”:
interface SearchView {

    fun initView() // 初始化

    fun showClearButton(show: Boolean)// 展示X

    fun highlightSearchButton(show: Boolean) // 高亮搜索按钮

    fun gotoSearchPage(keyword: String, from: SearchFrom) // 跳转到搜索结果页

    fun stretchSearchBar(stretch: Boolean) // 拉伸搜索框

    fun showSearchButton(highlight: Boolean, show: Boolean) // 展示搜索按钮

    fun clearKeyword(clear:Boolean) // 清空关键词

    fun gotoHistoryPage()// 返回历史页

}
这下 View 层接口描述的都是展示怎么样的界面,Presenter 和 Activity 的代码得做相应的修改:
class SearchPresenterImpl(private val searchView: SearchView) :SearchPresenter{

    override fun init() {

        searchView.initView()

    }

    override fun backPress() {

        searchView.stretchSearchBar(false)

        searchView.showSearchButton(true)

        searchView.clearKeyword(true)

    }

    override fun clearKeyword() {

        searchView.highlightSearchButton(false)

        searchView.showClearButton(false)

        searchView.showSearchButton(true)

        searchView.stretchSearchBar(false)

        searchView.clearKeyword(true)

        searchView.gotoHistoryPage()

    }

    override fun search(keyword: String, from: SearchFrom) {

        searchView.gotoSearchPage(keyword, from)

        searchView.stretchSearchBar(true)

        searchView.showSearchButton(false)

    }

    override fun inputKeyword(keyword: String) {

        if (keyword.isNotEmpty()) {

            searchView.showClearButton(true)

            searchView.highlightSearchButton(true)

        } else {

            searchView.showClearButton(false)

            searchView.highlightSearchButton(false)

        }

    }

}
这样的 Presenter 看上去就没那么“脱裤子放屁”了,它不仅仅是一个界面动作的转发者,它包含了一点业务逻辑。
对应的 Activity 修改如下:
class TemplateSearchActivity : AppCompatActivity(), SearchView {

    private val searchPresenter: SearchPresenter = SearchPresenterImpl(this)


    override fun onCreate(savedInstanceState: Bundle?) {

        super.onCreate(savedInstanceState)

        searchPresenter.init()

    }


    override fun onBackPressed() {

        super.onBackPressed()

        searchPresenter.backPress()

    }


    override fun initView() {

        etSearch.setOnTouchListener { v, event ->

            if (event.action == MotionEvent.ACTION_DOWN) {

                if (etSearch.text.toString().isNotEmpty())

                    searchPresenter.onSearchBarTouch(etSearch.text.toString(), true)

            }

            false

        }


        tvSearch.onClick = {

            searchPresenter.search(etSearch.text.toString(), SearchFrom.BUTTON)

        }


        etSearch.addTextChangedListener(object : TextWatcher {

            override fun beforeTextChanged(s: CharSequence?, start: Int, count: Int, after: Int) {

            }


            override fun onTextChanged(char: CharSequence?, start: Int, before: Int, count: Int) {

                val input = char?.toString() ?: ""

                searchPresenter.inputKeyword(input)

            }


            override fun afterTextChanged(s: Editable?) {

            }

        })

        etSearch.requestFocus()

        KeyboardUtils.showSoftInput(etSearch)

    }


    override fun showClearButton(show: Boolean) {

        ivClear.visibility = if (show) visible else gone

    }


    override fun gotoSearchPage(keyword: String, from: SearchFrom) {

        runCatching {

            findNavController(NAV_HOST_ID.toLayoutId()).navigate(

                R.id.action_to_result,

                bundleOf("keywords" to keyword)

            )

        }

        KeyboardUtils.hideSoftInput(etSearch)

        StudioReport.reportSearchButtonClick(keyword, from.typeInt)

    }


    override fun stretchSearchBar(stretch: Boolean) {

        vInputBg.apply {

            if (stretch) end_toEndOf = parent_id

            else end_toStartOf = ID_SEARCH

        }

    }


    override fun showSearchButton(highlight: Boolean, show: Boolean) {

        tvSearch.apply {

            visibility = if(show) visible else gone

            textColor = if(highlight) "#F2F4FF" else "#484951"

            isEnable = highlight

        }

    }


    override fun clearKeyword(clear: Boolean) {

        etSearch.apply {

            text = null

            requestFocus()

            KeyboardUtils.showSoftInputWithDelay(etSearch, 300)

        }

    }


    override fun gotoHistoryPage(clear: Boolean) {

        findNavController(NAV_HOST_ID.toLayoutId()).popBackStack()

    }

}
同一控件的绘制逻辑总算内聚到一个方法中了,但不同控件的绘制逻辑还是散落在不同的方法。
不同控件的显示是有协同或互斥关系的,比如搜索条拉长时,搜索按钮得隐藏。但拉长搜索条和搜索按钮的绘制分处于不同的 View 层接口,这里就有一个潜规则:“在调拉长搜索条方法的同时,必须同时调用隐藏搜索按钮方法”。当 Presenter 中充斥着这种潜规则时,就会发生界面状态不一致的问题。(最常见的比如,列表加载成功后,loading 还在转圈圈)
之所以会这样是因为 MVP 只是在“低内聚的界面绘制”基础上往前进了一小步,做到了单个控件绘制逻辑的内聚。而 MVI 又进了一步,做到了整个界面绘制逻辑的内聚。(实现细节在后面的篇章展开)
经过 MVP 的重构,现在架构如下图所示:
为啥看上去,比无架构方案还要复杂一点?
没错,MVP 架构引入了新的复杂度。首先是新增一个 Presenter 类,接着还引入了两个接口:业务接口+ View 层接口。这是实现解耦的必要代价。
引入 Presenter 层也有收益,与“复杂度在 View 层被铺开”相比,现在的 View 层要精简得多,也单纯的多。但复杂度被不是凭空消失了,而是被分层,被转移。从图中可以看出现在的复杂度聚集在 Presenter 中业务接口和 View 层接口的交互。MVI 用了一种新的思想方法来化解这个复杂度。(后续篇章会展开分析)
总结
- MVP 引入了业务逻辑层 P(Presenter),使得界面绘制和业务逻辑分开,降低了它们的耦合,形成相互独立的界面层 V 和业务逻辑层 P。界面代码的复杂度得以降低也变得更加单纯。
- MVP 通过接口实现界面层和业务逻辑层的双向通信,界面层通过业务接口向业务逻辑层发起请求。业务逻辑层通过 View 层接口指导界面绘制。接口是一种抽象手段,它把做什么和怎么做分离,为发生多态提供了便利。
- MVP 中 View 层接口的抽象应该面向“界面绘制”而不是“面向业务”。这样做不仅可以让界面绘制逻辑变得内聚,也让增加了代码的复用性。
作者:唐子玄
链接:https://juejin.cn/post/7151809622586687524
来源:稀土掘金
著作权归作者所有。商业转载请联系作者获得授权,非商业转载请注明出处。 收起阅读 »
用 Jetpack Compose 写一个 BottomSheetDialog
BottomSheetDialog 是 Android Material 库中提供的一个弹窗类,其特点就是会从屏幕底部弹出,支持拖拽回弹效果,以及拖拽关闭弹窗,在 Android 应用开发中广泛应用
Jetpack Compose 也提供了一个同样的弹窗效果,即 Compose Material 库中的 BottomSheetScaffold,其将整体页面分为了 content 和 sheetContent 两个区域,content 代表的是常驻状态的主屏幕布局,sheetContent 代表的是想从底部弹出的布局
import androidx.compose.material.BottomSheetScaffold


@Composable

private fun BottomSheetScaffoldDemo() {

    BottomSheetScaffold(sheetContent = {


    }, content = {


    })

}
BottomSheetScaffold 完全足以拿来实现 BottomSheetDialog 的效果了,但目前 Google 已经推出了 Material 设计的最新版本,也即 Compose Material 3,而 Material 3 目前并没有提供 BottomSheetScaffold,因此在只想要使用 Material 3 的情况下,我只能自己来实现一个 Compose 版本的 BottomSheetDialog 了
最终的效果如下所示
此 Compose 版本的 BottomSheetDialog 和原生的 Dialog 一样,也支持 cancelable、canceledOnTouchOutside 两个属性,用于控制:是否允许通过点击返回键关闭弹窗、是否允许拖拽关闭弹窗、是否允许通过点击弹窗外部区域来关闭弹窗。此外,此弹窗也无需强制嵌套在某个布局以内,相对 BottomSheetScaffold 来说使用上会更加灵活
来讲下具体的实现思路
先定义好所有需要的参数。visible 属性用于控制弹窗当前是否可见,根据声明式 UI 的特点,该属性就需要交由外部来维护,BottomSheetDialog 再通过 onDismissRequest 方法将关闭弹窗的请求交由外部处理。content 代表的就是弹窗的具体布局
@Composable

fun BottomSheetDialog(

    modifier: Modifier = Modifier,

    visible: Boolean,

    cancelable: Boolean = true,

    canceledOnTouchOutside: Boolean = true,

    onDismissRequest: () -> Unit,

    content: @Composable () -> Unit

)
BottomSheetDialog 通过 BackHandler 来拦截点击返回键的事件,BackHandler 内部是通过原生的 OnBackPressedDispatcher 来实现的,这里设置其只在弹窗可见时才进行拦截,在 cancelable 为 true 时才将拦截的事件转交由外部处理
BackHandler(enabled = visible, onBack = {

    if (cancelable) {

        onDismissRequest()

    }

})
之后需要为弹窗设置一个淡入淡出的半透明背景色,通过 AnimatedVisibility 来实现即可。再通过 clickableNoRipple 拦截页面整体的点击事件,在 canceledOnTouchOutside 为 true 时才将拦截的事件转交由外部处理
AnimatedVisibility(

    visible = visible,

    enter = fadeIn(animationSpec = tween(durationMillis = 400, easing = LinearEasing)),

    exit = fadeOut(animationSpec = tween(durationMillis = 400, easing = LinearEasing))

) {

    Box(

        modifier = Modifier

            .fillMaxSize()

            .background(color = Color(0x99000000))

            .clickableNoRipple {

                if (canceledOnTouchOutside) {

                    onDismissRequest()

                }

            }

    )

}
由于 Compose 提供的 clickable 方法默认会带上水波纹的效果,点击弹窗背景时并不需要,因此我通过自定义的 clickable 方法去掉了水波纹
private fun Modifier.clickableNoRipple(onClick: () -> Unit): Modifier =

    composed {

        clickable(

            indication = null,

            interactionSource = remember { MutableInteractionSource() }) {

            onClick()

        }

    }
由于弹窗的背景色和弹窗内容区域 InnerDialog 应该是上下层叠的关系,所以两者应该位于同个 Box 下,Box 的 Modifier 开放给外部使用者
@Composable

fun BottomSheetDialog(

    modifier: Modifier = Modifier,

    visible: Boolean,

    cancelable: Boolean = true,

    canceledOnTouchOutside: Boolean = true,

    onDismissRequest: () -> Unit,

    content: @Composable () -> Unit

) {

    BackHandler(enabled = visible, onBack = {

        if (cancelable) {

            onDismissRequest()

        }

    })

    Box(modifier = modifier) {

        AnimatedVisibility(

            visible = visible,

            enter = fadeIn(animationSpec = tween(durationMillis = 400, easing = LinearEasing)),

            exit = fadeOut(animationSpec = tween(durationMillis = 400, easing = LinearEasing))

        ) {

            Box(

                modifier = Modifier

                    .fillMaxSize()

                    .background(color = Color(0x99000000))

                    .clickableNoRipple {

                        if (canceledOnTouchOutside) {

                            onDismissRequest()

                        }

                    }

            )

        }

        InnerDialog()

    }

}
InnerDialog 需要有从下往上弹出,并从上往下消失的效果,通过自定义 AnimatedVisibility 的 enter 和 exit 动画即可实现
@Composable

private fun BoxScope.InnerDialog(

    visible: Boolean,

    cancelable: Boolean,

    onDismissRequest: () -> Unit,

    content: @Composable () -> Unit

) {

    AnimatedVisibility(

        modifier = Modifier

            .clickableNoRipple {


            }

            .align(alignment = Alignment.BottomCenter),

        visible = visible,

        enter = slideInVertically(

            animationSpec = tween(durationMillis = 400, easing = LinearOutSlowInEasing),

            initialOffsetY = { 2 * it }

        ),

        exit = slideOutVertically(

            animationSpec = tween(durationMillis = 400, easing = LinearOutSlowInEasing),

            targetOffsetY = { it }

        ),

    ) {

        content()

    }

}
为了能够拖拽弹窗上下移动,这里通过 draggable 方法来检测拖拽手势,用 offsetY 来记录弹窗的 Y 坐标偏移量,同时通过 animateFloatAsState 以动画的形式平滑过度不同的 offsetY 值并触发重组,从而实现弹窗随用户的手势而上下滑动。此外,当用户松手 onDragStopped 时,再将 offsetY 重置为 0,从而实现弹窗拖拽回调的效果
@Composable

private fun BoxScope.InnerDialog(

    visible: Boolean,

    cancelable: Boolean,

    onDismissRequest: () -> Unit,

    content: @Composable () -> Unit

) {

    var offsetY by remember {

        mutableStateOf(0f)

    }

    val offsetYAnimate by animateFloatAsState(targetValue = offsetY)

    AnimatedVisibility(

        modifier = Modifier

            .clickableNoRipple {


            }

            .align(alignment = Alignment.BottomCenter)

            .offset(offset = {

                IntOffset(0, offsetYAnimate.roundToInt())

            })

            .draggable(

                state = rememberDraggableState(

                    onDelta = {

                        offsetY = (offsetY + it.toInt()).coerceAtLeast(0f)

                    }

                ),

                orientation = Orientation.Vertical,

                onDragStarted = {


                },

                onDragStopped = {

                    offsetY = 0f

                }

            ),

        visible = visible,

        enter = slideInVertically(

            animationSpec = tween(durationMillis = 400, easing = LinearOutSlowInEasing),

            initialOffsetY = { 2 * it }

        ),

        exit = slideOutVertically(

            animationSpec = tween(durationMillis = 400, easing = LinearOutSlowInEasing),

            targetOffsetY = { it }

        ),

    ) {

        content()

    }

}
此外,原生的 BottomSheetDialog 还有个特点:当用户向下拖拽的距离不超出某个界限值时,弹窗会有向上回弹恢复的效果;当超出界限值时,则会直接关闭整个弹窗。为了实现这个效果,我们可以定义当用户向下拖拽的偏移量大于弹窗的一半高度时就直接关闭弹窗,否则就让其回弹
通过查看 BottomSheetScaffold 的源码,可以看到其是通过 onGloballyPositioned 方法来拿到整个 sheetContent 的高度,这里可以仿照其思路拿到整个 InnerDialog 的高度 bottomSheetHeight ,在 onDragStopped 方法对比拖拽距离即可
@Composable

private fun BoxScope.InnerDialog(

    visible: Boolean,

    cancelable: Boolean,

    onDismissRequest: () -> Unit,

    content: @Composable () -> Unit

) {

    var offsetY by remember {

        mutableStateOf(0f)

    }

    val offsetYAnimate by animateFloatAsState(targetValue = offsetY)

    var bottomSheetHeight by remember { mutableStateOf(0f) }

    AnimatedVisibility(

        modifier = Modifier

            .clickableNoRipple {


            }

            .align(alignment = Alignment.BottomCenter)

            .onGloballyPositioned {

                bottomSheetHeight = it.size.height.toFloat()

            }

            .offset(offset = {

                IntOffset(0, offsetYAnimate.roundToInt())

            })

            .draggable(

                state = rememberDraggableState(

                    onDelta = {

                        offsetY = (offsetY + it.toInt()).coerceAtLeast(0f)

                    }

                ),

                orientation = Orientation.Vertical,

                onDragStarted = {


                },

                onDragStopped = {

                    if (cancelable && offsetY > bottomSheetHeight / 2) {

                        onDismissRequest()

                    } else {

                        offsetY = 0f

                    }

                }

            ),

        visible = visible,

        enter = slideInVertically(

            animationSpec = tween(durationMillis = 400, easing = LinearOutSlowInEasing),

            initialOffsetY = { 2 * it }

        ),

        exit = slideOutVertically(

            animationSpec = tween(durationMillis = 400, easing = LinearOutSlowInEasing),

            targetOffsetY = { it }

        ),

    ) {

        content()

    }

}
此外,还有个小细节需要注意。当用户向下拖拽关闭了弹窗时,offsetY 可能还不等于 0,这就会导致下次弹出时弹窗还会保持该偏移量,导致弹窗只展示了部分。因此需要当 InnerDialog 退出重组时,手动将 offsetY 重置为 0
DisposableEffect(key1 = null) {

    onDispose {

        offsetY = 0f

    }

}
至此,BottomSheetDialog 就完成了,向 BottomSheetDialog 传入想要展示的布局即可
BottomSheetDialog(

    modifier = Modifier,

    visible = viewState.visible,

    cancelable = true,

    canceledOnTouchOutside = true,

    onDismissRequest = viewState.onDismissRequest

) {

    DialogContent()

}


@Composable

private fun DialogContent(onDismissRequest: () -> Unit) {

    Column(

        modifier = Modifier

            .fillMaxWidth()

            .fillMaxHeight(fraction = 0.7f)

            .clip(shape = RoundedCornerShape(topStart = 24.dp, topEnd = 24.dp))

            .background(color = Color(0xFF009688)),

        verticalArrangement = Arrangement.Center

    ) {

        Button(

            modifier = Modifier

                .align(alignment = Alignment.CenterHorizontally),

            onClick = {

                onDismissRequest()

            }) {

            Text(

                modifier = Modifier.padding(all = 4.dp),

                text = "dismissDialog",

                fontSize = 16.sp

            )

        }

    }

}这里给出完整的源码:ComposeBottomSheetDialog
作者:业志陈
链接:https://juejin.cn/post/7151792921698631717
来源:稀土掘金
著作权归作者所有。商业转载请联系作者获得授权,非商业转载请注明出处。 收起阅读 »
分析了1011个程序员的裁员情况后得出的启示
大家应该能明显感觉到最近几个月求职环境不太好,但究竟有多不好,具体的情况是什么样的?
为了分析程序员职场现状,我进行了裁员情况调查,一共有1011位程序员朋友参与。
本文会根据调查结果,为大家带来一些启示(如果不想看分析过程,可以直接跳到文末看结论)。
裁员真的多么?
按工作职级来看,受访者中初级工程师的裁员比例最少(可能是因为工资相对最低,裁员收益不大),而专家及以上最多,但整体差别不大。
平均来看,受访者中有19%经历了裁员。
按公司中技术团队人数来定义公司规模,技术团队只有几人的小公司裁员最严重,其他更大些的企业差距则不大。
可能是因为太小的企业还没有跑通业务变现的逻辑,老板抗风险能力也更差。
对我们的启示是 —— 为了工作稳定,不一定要去大厂(毕竟裁员比例也不低),而应该尽量选择有稳定业务的企业。
你觉得这个裁员比例高吗?
大家都从事什么工作?
很多做业务的程序员会觉得做架构比较高大上。从工作职级来看看,随着职级与能力的提升,确实有越来越多的程序员从事架构工作:
从技术团队规模来看,一线大厂(技术团队千人以上)从事架构工作的程序员比例最高,但整体差别不大。
平均来看,约有17%的程序员从事架构工作。
给我们的启示是 —— 在求职架构岗位时,可以打听下公司从事架构岗位的程序员比例,如果高于17%,可能没有多少让你施展拳脚的地方。
同时,从上述两个分析看,架构工作既有难度(职级越高,从事架构工作的比例越高),又有稀缺性(公司平均只有17%的程序员从事架构工作)。
那程序员推崇架构工作就不难理解了 —— 因为更难,也更少。
如果业务不赚钱,那么业务线被砍,做业务的程序员被裁,这个逻辑是很好理解的。而做架构一般有通用性。
那么,面对裁员的浪潮,做架构真的比做业务有更高的抗风险能力么?
做架构还是做业务?
按工作职级来看从事架构工作的裁员比例,会发现 —— 随着职级上升,架构工作的裁员比例显著提升。
对于立志在架构方面长期发展的程序员,肯定不想随着自己职级提升,被裁的风险越来越高吧。
相对应的,随着职级提升,做业务的程序员被裁的比例会逐渐降低。
虽然不同职级做架构的裁员比例都低于做业务,但诚如上文提到,公司平均只有17%的程序员从事架构工作。显然做业务的工作机会远远多于做架构。
这对我们的启示是 —— 经济下行时期,程序员规划职业发展时,尽量向离钱近(做业务)的领域发展。
大厂是救命稻草?
尽量往大厂卷是不是可以减少被裁的风险?
按公司规模来看架构、业务工作的裁员比例,在技术团队只有几人的公司被裁的风险确实是最大的。但是一线大厂(技术团队千人以上)裁员比例也很高。
风险相对较小的,是技术团队几十人的公司。这样的公司可能自身有稳定的业务,也不盲目扩张,所以裁员规模相对较小。
从表中还发现个有趣的情况 —— 随着公司规模变大,架构岗被裁的比例显著增大。
大家都想去大厂做架构,但大厂架构是被裁的最多的。这是不是侧面印证了,很多大厂搞的高大上的轮子,并没有什么价值?
大家心里也这么想?
上面的很多分析结果,都对架构的同学不友好(尤其是大厂)。那么,大家听到的情况也是这样么?
我统计了你听说你司被裁程序员都是做什么的,其中从事架构岗位的比例如下:
可见,不仅参与调查的当事人的数据汇总后显示 —— 不要去大厂做架构。
大家听说的公司的情况汇总后也在印证这一观点。
那么大家意识到在大厂做架构可能并不是个好选择了么?下面是没有被裁员,且认为自己发展前景好的程序员中从事业务、架构的比例:
先不管这样的认知是否正确(觉得自己前景好)。单从比例看,不管是小厂大厂,做业务的同学们的认知比例趋于一致。
而大厂做架构的同学显然对自己的前景有极高的预期(不知道他们知不知道,他们也是被裁的比例最高的?)
为什么对于在大厂做架构的同学来说,预期会与实际有这么大差距呢?都是什么职级的同学会觉得公司架构岗被裁的比例更多呢?
下面是按工作职级划分的,谁听说的公司中架构岗被裁的比较多:
没有初级工程师觉得公司架构岗被裁的更多,而有56%的专家及以上认为架构岗裁员更多。
年轻人还是太年轻,不愿相信事实。专家们早已看穿了现实。
总结
本次调查为我们带来了几条启示:
大厂裁员比例也不低。为了工作稳定,应该尽量选择有稳定业务的企业
在求职架构岗位时,可以打听下公司从事架构岗位的程序员比例,最好低于17%
不要迷信技术。在经济下行时期,应该尽量选择离钱近的业务
不要去大厂做架构。实际情况与大部分程序员预期完全不符
不管是做架构还是做业务,我们都要明白 —— 技术是为了创造价值。那么什么是价值?
对于好的年景,能够为业务赋能的架构是有价值的。而在不好的年景,价值直接与能赚多少钱划等号,离钱越近的业务,价值就越大。
而这一切,都与技术本身的难度无关。
所以,为了稳定的职业发展,更应该着眼于业务本身,而不是深究技术。
作者:魔术师卡颂
来源:juejin.cn/post/7142674429649109000
uniapp热更新
为什么要热更新
热更新主要是针对app上线之后页面出现bug,修改之后又得打包,上线,每次用户都得在应用市场去下载很影响用户体验,如果用户不愿意更新,一直提示都不愿意更新,这个bug就会一直存在。 可能你一不小心写错了代码,整个团队的努力都会付之东流,苦不苦,冤不冤,想想都苦,所以这个时候热更新就显得很重要了。
首先你需要在manifest.json 中修改版本号
如果之前是1.0.0那么修改之后比如是1.0.1或者1.1.0这样
然后你需要在HBuilderX中打一个wgt包
在顶部>发行>原生App-制作移动App资源升级包
包的位置会在控制台里面输出
你需要和后端约定一下接口,传递参数
然后你就可以在app.vue的onLaunch里面编写热更新的代码了,如果你有其他需求,你可以在其他页面的onLoad里面编写。
    // #ifdef APP-PLUS  //APP上面才会执行
plus.runtime.getProperty(plus.runtime.appid, function(widgetInfo) {
                uni.request({
                                        url:'请求url写你自己的',
                    method: "POST",
                    data: {
                        version: widgetInfo.version, //app版本号
                        name: widgetInfo.name    //app名称
                    },
                    success: (result) => {
                        console.log(result)  //请求成功的数据
                        var data = result.data.data
                        if (data.update && data.wgtUrl) {
                        var uploadTask = uni.downloadFile({ //下载
                            url: data.wgtUrl, //后端传的wgt文件
                                    success: (downloadResult) => { //下载成功执行
                          if (downloadResult.statusCode === 200) {
           plus.runtime.install(downloadResult.tempFilePath, {
                                                force: flase
                                        }, function() {
                                    plus.runtime.restart();
                                                    }, function(e) {});
                                                   }
                                                },
                                               })
                          uploadTask.onProgressUpdate((res) => {
                // 测试条件,取消上传任务。
                if (res.progress == 100) { //res.progress 上传进度
                    uploadTask.abort();
                        }
                        });
                         }
                                       }
                                    });
                                });
            // #endif
不支持的情况
SDK 部分有调整,比如新增了 Maps 模块等,不可通过此方式升级,必须通过整包的方式升级。
原生插件的增改,同样不能使用此方式。
对于老的非自定义组件编译模式,这种模式已经被淘汰下线。但以防万一也需要说明下,老的非自定义组件编译模式,如果之前工程没有 nvue 文件,但更新中新增了 nvue 文件,不能使用此方式。因为非自定义组件编译模式如果没有nvue文件是不会打包weex引擎进去的,原生引擎无法动态添加。自定义组件模式默认就含着weex引擎,不管工程下有没有nvue文件。
注意事项
条件编译,仅在 App 平台执行此升级逻辑。
appid 以及版本信息等,在 HBuilderX 真机运行开发期间,均为 HBuilder 这个应用的信息,因此需要打包自定义基座或正式包测试升级功能。
plus.runtime.version 或者 uni.getSystemInfo() 读取到的是 apk/ipa 包的版本号,而非 manifest.json 资源中的版本信息,所以这里用 plus.runtime.getProperty() 来获取相关信息。
安装 wgt 资源包成功后,必须执行 plus.runtime.restart(),否则新的内容并不会生效。
如果App的原生引擎不升级,只升级wgt包时需要注意测试wgt资源和原生基座的兼容性。平台默认会对不匹配的版本进行提醒,如果自测没问题,可以在manifest中配置忽略提示,详见ask.dcloud.net.cn/article/356…
http://www.example.com 是一个仅用做示例说明的地址,实际应用中应该是真实的 IP 或有效域名,请勿直接复制粘贴使用。
关于热更新是否影响应用上架
应用市场为了防止开发者不经市场审核许可,给用户提供违法内容,对热更新大多持排斥态度。
但实际上热更新使用非常普遍,不管是原生开发中还是跨平台开发。
Apple曾经禁止过jspatch,但没有打击其他的热更新方案,包括cordovar、react native、DCloud。封杀jspatch其实是因为jspatch有严重安全漏洞,可以被黑客利用,造成三方黑客可篡改其他App的数据。
使用热更新需要注意:
上架审核期间不要弹出热更新提示
热更新内容使用https下载,避免被三方网络劫持
不要更新违法内容、不要通过热更新破坏应用市场的利益,比如iOS的虚拟支付要老老实实给Apple分钱
如果你的应用没有犯这些错误,应用市场是不会管的。
作者:是一个秃头
来源:juejin.cn/post/7039273141901721608
用video.js和H5实现一个漂亮的 收看M3U8直播的网站
国庆节快到了,在这里祝大家节日快乐
长假七天乐确实很爽,只是疫情不稳定,还是呆在家里安全些,
在这宅在家的七天里,何不找点有趣的小demo耍耍
本期教大家制作一个 能播放M3U8直播源的在线电视台网站,
既能学到知识技术,又可以方便在家看看电视节目,直播节目,何乐而不为
以下是实现的效果图:
这个小demo完成时间快两年了,所以里面有一些m3u8直播地址用不了
而且直播源的地址经常崩,所以会出现视频播放不了的情况
有需要直接百度搜 m3u8电视直播
具体实现
m3u8 以及 video.js介绍
为什么要介绍这两个东西呢?
因为我们大部分的电视直播在网络上都是m3u8格式的
m3u8准确来说是一种索引文件,使用m3u8文件实际上是通过它来解析对应的放在服务器上的视频网络地址,从而实现在线播放。
我不喜欢太过于术语的解释。
简单来讲,我们看到的直播都是服务器把视频切片,然后一段一段给你发过来,客户端自己处理,整成视频给我们看
这就是 m3u8
但是浏览器并不支持video直接播放m3u8格式的视频
所以我们需要video.js来帮助我们,把这些切片的音视频给整成可以看的东西
Video.js 是一个通用的在网页上嵌入视频播放器的 JS 库
Video.js 可以自动检测浏览器对 HTML5 的支持情况,如果不支持 HTML5 则自动使用 Flash 播放器
咋解决这个问题呢,很简单,在html导入我们的video.js就可以了
<!DOCTYPE html>
<html lang="zn">
<head>
    <meta charset="UTF-8">
    <meta http-equiv="X-UA-Compatible" content="IE=edge">
    <meta name="viewport" content="width=device-width, initial-scale=1.0">
    <!-- 引用video.js -->
    <link href="https://cdn.bootcdn.net/ajax/libs/video.js/5.18.4/video-js.css" rel="stylesheet">
    <script src="https://cdn.bootcdn.net/ajax/libs/video.js/5.18.4/video.min.js"></script>
    <script src="https://cdnjs.cloudflare.com/ajax/libs/videojs-contrib-hls/5.15.0/videojs-contrib-hls.min.js" type="text/javascript"></script>
引入之后呢,咋用?
在html标签上写上我们的元素,然后在js里面获取我们的播放器,
之后就可以自由用代码控制播放地址源,还有控制播放暂停等等功能
<video id="my-player" class="video-js" controls style="width: 800px;height: 500px;">
               <source src="http://amdlive.ctnd.com.edgesuite.net/arirang_1ch/smil:arirang_1ch.smil/playlist.m3u8" type="application/x-mpegURL">
               <p class="vjs-no-js">not support</p>
           </video>
// video.js
    var player = videojs('my-player', {

        });

function play_show(TV_m3u8){
        // alert("正在播放:"+TV_m3u8);
        document.getElementById("my_vedio_fixed").style.display="block";

        player.src([{
                type: "application/x-mpegURL",
                src: TV_m3u8
            }])
            player.play()
    }
具体学习video.js可以去 GitHub上去看
传送门:GitHub - 视频.js:视频.js - 开源HTML5视频播放器)
看不懂英文,右键翻译成中文就可以
以上的代码,我只是粗略的从我写的小demo中抓取出来,完整代码在下方。

是的,两年前的我甚至不会把数据保存到js中
傻傻的丢在div里面,傻傻的把div隐藏了起来
最后居然傻傻的去切割字符串成数组
沃德天,果然兴趣是最好的老师,野路子有够猛
然后小demo里面
用到了一些字体图标
还有一些图片
当然,这些素材没有都无伤大雅
作者:冰镇生鲜
来源:https://juejin.cn/post/7149152825409273870
Gradle 缓存那些事儿~
前言
Gradle是Android的构建工具,它的主要目标就是实现快速的编译构建,而这主要就是通过缓存实现的。本文主要介绍Gradle的缓存机制,具体包括以下内容
Gradle缓存机制Gradle内存缓存Gradle项目缓存Gradle本机缓存Gradle远程缓存
Gradle缓存机制
说起Gradle缓存,我们首先想到的可能就是build-cache,但是Gradle缓存机制远没有这么简单,如下图所示:
纵向来划分的话,Gradle缓存可以划分为配置阶段缓存,执行阶段缓存与依赖缓存三部分
横向来划分的话,Gradle缓存可以划分为内存缓存,项目缓存,本机缓存,远程缓存四个级别
下面我们就按照横向划分的方式来详细介绍一下Gradle的缓存机制
Gradle内存缓存
Gradle内存缓存主要是通过Gradle Daemon进程(即守护进程)实现的
那么Gradle守护进程是什么呢?起什么作用?
守护进程是作为后台进程运行的计算机程序,而不是在交互式用户的直接控制之下
Gradle 在 Java 虚拟机 (JVM) 上运行,并使用多个需要大量初始化时间的支持库。因此,有时启动起来似乎有点慢。
而这个问题的解决方案就是 Gradle Daemon:一个长期存在的后台进程,它可以更快地执行构建。主要是通过避免耗时的初始化操作,以及将有关的项目数据保存在内存中来实现
同时是否使用Daemon来执行构建对于使用都是透明的,它们使用起来基本一致,用户只需要配置是否使用它
获取守护进程状态
由于守护进程对用户来说几乎是透明的,因此我们在平常几乎不会接触到Daemon进程,但是当我们执行构建时可能会看到以下提示:
Starting a Gradle Daemon, 1 busy and 6 stopped Daemons could not be reused, use --status for details
这是说目前有6个已经终止的守护进程与一个忙碌的守护进程,因此需要重新启动一个守护进程,我们可以使用./gradlew --status命令来获取守护进程状态,可以获取以下输出
   PID STATUS   INFO

 82904 IDLE     7.3.3

 81804 STOPPED  (stop command received)

 50304 STOPPED  (by user or operating system)

 59118 STOPPED  (by user or operating system)
你可能会好奇,为什么我们的机器上会有多个守护进程?
Gradle 将创建一个新的守护进程而不是使用一个已经在运行的守护进程有几个原因。基本规则是,如果没有现有的空闲或兼容的守护程序可用,Gradle 将启动一个新的守护程序。Gradle 将杀死任何闲置 3 小时或更长时间的守护进程,因此您不必担心手动清理它们。
如何停止现有守护进程
如前所述,守护进程是一个后台进程。每个守护进程都会监控其内存使用量与系统总内存的比较,如果可用系统内存不足,则会在空闲时自行停止。如果您出于任何原因想明确停止运行守护进程,只需使用命令./gradlew --stop。
或者如果你想直接禁用守护程序的话,您可以通过命令行选项添加--no-daemon,或者在gradle.properties中添加org.gradle.daemon=false。
Gradle 3.0之后守护进程默认开启,构建速度得到了很大的提升,因此在通常情况下不建议关闭守护进程
守护进程如何使构建更快?
Gradle 守护进程是一个长期存在的进程。在多次构建之间,它将空闲地等待下一个构建。这有一个明显的好处,即多个构建只需要初始化一次,而不是每个构建一次。
同时现代 JVM 性能优化的一个重要部分是运行时代码优化(即JIT)。例如,HotSpot(Oracle 提供的 JVM 实现)在代码运行时将对其进行优化。优化是渐进的而不是瞬时的。也就是说,代码在执行过程中逐渐优化,这意味着后续构建可以更快的执行。使用 HotSpot 的实验表明,JIT优化通常需要 5 到 10 次构建才能稳定。因此守护进程的第一次构建和第十次构建之间的构建时间差异可能非常大。
守护进程还允许在多次构建之间进行内存缓存。例如,构建所需的类(例如插件、构建脚本)可以在构建之间保存在内存中。同样,Gradle 可以维护构建数据的内存缓存,例如任务输入和输出的哈希值,用于增量构建。
为了检测文件系统的变化并计算需要重新构建建的内容,Gradle 会在每次构建期间收集有关文件系统状态的大量信息。守护进程可以重用从上次构建中收集的信息并计算出需要重新构建的文件。这可以为增量构建节省大量时间,其中两次构建之间对文件系统的更改次数通常很少
总得来说,守护进程主要做了以下工作:
- 在多次构建之间重用,只需初始化一次,节省初始化时间
- 虚拟机
JIT优化,代码越执行越快,因此在同一个守护进程中构建,后续构建也将越快 - 多次构建之中可以对构建脚本,构建插件,构建数据等进行内存缓存,以加快构建速度
- 可以检测两次构建之间的文件系统的变化,并计算出需要重新构建的文件,方便增量构建
Gradle项目缓存
在内存缓存之后,就是项目级别的缓存,项目级别的缓存主要存储在根目录的.gradle与各个模块的build目录中,其中configuration-cache存储在.gradle目录中,而各个Task的执行结果存储在我们熟悉的build目录中
配置阶段缓存
我们知道,Gradle 的生命周期可以分为大的三个部分:初始化阶段(Initialization Phase),配置阶段(Configuration Phase),执行阶段(Execution Phase)。
其中任务执行的部分只要处理恰当,已经能够很好的进行缓存和重用——重用已有的缓存是加快编译速度十分关键的一环,如果把这个机制运用到其他阶段当然也能带来一些收益。
仅次于执行阶段耗时的一般是配置阶段, AGP现在也支持了配置阶段缓存 Configuration Cache ,它使得配置阶段的主要产出物:Task Graph 可以被重用
在越大的项目中配置阶段缓存的收益越大,module比较多的项目可能每次执行都要先配置20到30秒,尤其是增量编译时,配置的耗时可能都跟执行的耗时差不多了,而这正是configuration-cache的用武之地
目前configuration-cache还是实验特性,如果你想要开启的话可以在gradle.properties中添加以下代码
# configuration cache

org.gradle.unsafe.configuration-cache=true

org.gradle.unsafe.configuration-cache-problems=warn
第一次使用时会看到计算 Task Graph 的提示:
Calculating task graph as no configuration cache is available for tasks:
成功后会在 Build 结束时提示:
Configuration cache entry stored.
之后 Cache 就可以被下一次构建复用(如果没有构建脚本修改):
Reusing configuration cache.


...


51 actionable tasks: 2 executed, 49 up-to-date


Configuration cache entry reused.
当然打开Configuration Cache之后可能会有一些适配问题,如果是第三方插件,发现常用插件出现不支持的情况,可先搜索是否有相同的问题已经出现并修复
如果是项目中自定义Task不支持的话,还需要适配一下Configuration Cache,适配Configuration Cache的核心思路其实很简单:不要在Task执行阶段调用外部不可序列化的对象(比如Project与Variant)
android {

    applicationVariants.all { variant ->

        def mergeAssetTask = variant.getMergeAssetsProvider().get()

        mergeAssetTask.doLast {

           project.logger(variant.buildType.name)

        }

    }

}
如上所示,在doLast阶段调用了project与variant对象,这两个对象是在配置阶段生成的,但是又无法序列化,因此这段代码无法适配Configuration Cache,需要修改如下:
android {

    applicationVariants.all { variant ->

    	def buildTypeName = variant.buildType.name

        def mergeAssetTask = variant.getMergeAssetsProvider().get()

        mergeAssetTask.doLast {

           logger(buildTypeName)

        }

    }

}
如上所示,提前读取出buildTypeName,因为它是String类型,可以被序列化,后续在执行阶段调用也没有问题了
总得来说,Configuration Cache适配并不复杂,但如果你的项目中自定义Task比较多的等方面,那可能就是个体力活了,比如 AGP 兼容 Configuration Cache 就修了 400 多个 ISSUE
Task输出缓存
Task输出缓存即我们最熟悉的各模块build目录,当我们调用./gradlew clean时清理的也是这部分缓存
任何构建工具的一个重要部分是避免重复工作。在编译过程中,就是在编译源文件后,除非发生了影响输出的更改(例如源文件的修改或输出文件的删除),无需重新编译它们。因为编译可能会花费大量时间,因此在不需要时跳过该步骤可以节省大量时间。
如上图所示,Task最基本的功能就是接受一些输入,进行一系列运算后生成输出。比如在编译过程中,Java源文件是输入,生成的classes文件是输出。Task的输出通常在build目录
当Task的输入没有发生变化,则理论上它的输出也没有发生变化,那么此时该Task就可以标记up-to-date,跳过执行阶段,直接复用上次执行的输出,相信你在多次执行构建的时候看到过这个标记
当然,自定义Task要支持up-to-date需要明确输入与输出,关于具体的细节可以查看:Gradle 进阶(一):深入了解 Tasks
Gradle本机缓存
Gradle本机缓存即Gradle User Home路径下的caches目录,有时当我们运行./gradlew clean之后,重新编译项目还是很快,这是因为还有本机Build Cache的原因
本质上Build Cache与项目内up-to-date检查类似,都是在判断输入没有发生变化时可以直接跳过Task,不同之处在于,Build Cache可以在多个项目间复用
Build Cache开启
默认情况下,Build Cache并未启用。您可以通过以下几种方式启用Build Cache:
- 在命令行添加
--build-cache,Gradle将只为此构建使用Build Cache。 gradle.properties中添加org.gradle.caching=true,Gradle将尝试为所有构建重用以前构建的输出,除非通过--no-build-cache明确禁用.
启用构建缓存后,它将在 Gradle 用户主目录中存储构建输出。
可缓存Task
由于Task描述了它的所有输入和输出,Gradle 可以计算一个构建缓存Key,Key基于其输入唯一地定义任务的输出。该构建缓存Key用于从构建缓存请求先前的输出或将新输出存储在构建缓存中。如果之前的构建输出已经被其他人存储在缓存中,那你就可以直接复用之前的结果
构建缓存Key由以下属性组成,与up-to-date检查类似:
Task类型及其classpath- 输出属性的名称
DSL通过TaskInputs添加的属性的名称和值Gradle发行版、buildSrc和插件的类路径- 构建脚本影响任务执行时的内容
同时Task还需要添加@CacheableTask注解以支持构建缓存,需要注意的是@CacheableTask注解不会被子类继承
如果查看源码的话,可以发现JavaCompile,KotlinCompile等Task都添加了@CacheableTask注解
总得来说,支持构建缓存的Task与支持up-to-date的Task基本一致,只需要添加一个@CacheableTask注解,当up-to-date检查失效时(比如项目内缓存被清除),则会尝试使用构建缓存,如下所示:
> gradle --build-cache assemble

:compileJava FROM-CACHE

:processResources

:classes

:jar

:assemble


BUILD SUCCESSFUL
如上所示,当build cache命中时,该Task会被标记为FROM-CACHE
本地依赖缓存
除了Build Cache之外,Gradle User Home目录还包括本地依赖缓存,所有远程下载的aar都在cache/modules-2目录下
这些aar可以在本地所有项目间共享,通过这种方式可以有效避免不同项目之间相同依赖的反复下载
需要注意的是,我们应该尽量使用稳定依赖,避免使用动态(Dynamic) 或者快照(SNAPSHOT) 版本依赖
当我们使用稳定依赖版本,当下载成功后,后续再有引用该依赖的地方都可以从缓存读取, 避免缓慢的网络下载
而动态和快照这两种版本引用会迫使 Gradle 链接远程仓库检查是否有更新的依赖可用, 如果有则下载后缓存到本地.默认情况下,这种缓存有效期为 24 小时. 可以通过以下方式调整缓存有效期:
configurations.all {

    resolutionStrategy.cacheDynamicVersionsFor(10, "minutes")     // 动态版本缓存时效

    resolutionStrategy.cacheChangingModulesFor(4, "hours")        // 快照版本缓存时效

}
动态版本和快照版本会影响编译速度, 尤其在网络状况不佳的情况下以及该依赖仅仅出现在内部repo的情况下. 因为Gradle会串行查询所有repo, 直到找到该依赖才会下载并缓存. 然而这两种依赖方式失效后就需要重新查询和下载.
同时这动态版本与快照版本也会导致Configuration Cache失效,因此应该尽量使用稳定版本
Gradle远程缓存
镜像repo
Gradle下载aar有时非常耗时,一种常见的操作时添加镜像repo,比如公开的阿里镜像等。或者部署公司内部的镜像repo,以加快在公司网络的访问速度,也是很常见的操作。
关于Gradle仓库配置还有一些小技巧:Gradle 在查找远程依赖的时候, 会串行查询所有repo中的maven地址, 直到找到可用的aar后下载. 因此把最快和最高命中率的仓库放在前面, 会有效减少configuration阶段所需的时间.
除了顺序以外, 并不是所有的仓库都提供所有的依赖, 尤其是有些公司会将业务aar放在内部搭建的仓库上. 这种情况下如果盲目增加repository会让Configuration时间变得难以接受. 我们通常需要将内部仓库放在最前, 同时明确指定哪些依赖可以去这里下载:
repositories {

    maven {

        url = uri("http://repo.mycompany.com/maven2")

        content {

            includeGroup("com.test")

        }

    }

    ...

}
如上所示,指定了com.test的group可以去指定的仓库下载
远程Build Cache
上面介绍了本地的Build Cache,Build Cache 可以把之前构建过的 task 结果缓存起来, 一旦后面需要执行该 task 的时候直接使用缓存结果. 与增量编译不同的是, cache 是全局的, 对所有构建都生效.
Build Cache 不仅可以保存在本地($GRADLE_USER_HOME/caches), 也可以使用网络路径。
在 settings.gradle 中加入如下代码:
// settings.gradle.kts

buildCache {

    local<DirectoryBuildCache> {

        directory = File(rootDir, "build-cache")


        // 编译结果是否同步到本地缓存. local cache 默认 true

        push = true


        // 无用缓存清理时间

        removeUnusedEntriesAfterDays = 30

    }


    remote<HttpBuildCache> {

        url = uri("https://example.com:8123/cache/")


        // 编译结果是否同步到远程缓存服务器. remote cache 默认 false

        push = false


        credentials {

            username = "build-cache-user"

            password = "some-complicated-password"

        }


        // 如果遇到 https 不授信问题, 可以关闭校验. 默认 false

        isAllowUntrustedServer = true

    }

}
通常我们在 CI 编译脚本中 push = true, 而开发人员的机器上 push = false 避免缓存被污染.
当然,要实现Build Cache在多个机器上的共享,需要一个缓存服务器,官方提供了两种方式搭建缓存服务器: Docker镜像和jar包,详情可参考Build Cache Node User Manual,这里就不缀述了
总得来说,远程Build Cache应该也是一个可行的方案,试想如果我们有一个高性能的打包机,当每次打码提交时,都自动编译生成Build Cache,那么开发人员都可以高效地复用同一份Build Cache,以加快编译速度,而不是每次更新代码都需要在本机重新编译
总结
本文主要从内存缓存,项目缓存,本机缓存,远程缓存四个级别详细介绍了Gradle的缓存机制,以及如何使用与配置它们。如果使用得当,相信可以有效地加快你的编译速度。如果本文对你有所帮助,欢迎点赞~
作者:程序员江同学
链接:https://juejin.cn/post/7151931374784479263
来源:稀土掘金
著作权归作者所有。商业转载请联系作者获得授权,非商业转载请注明出处。 收起阅读 »
新来个技术总监,把限流实现的那叫一个优雅,佩服!
大家好,我是楼仔!
在电商高并发场景下,我们经常会使用一些常用方法,去应对流量高峰,比如限流、熔断、降级,今天我们聊聊限流。
什么是限流呢?限流是限制到达系统的并发请求数量,保证系统能够正常响应部分用户请求,而对于超过限制的流量,则通过拒绝服务的方式保证整体系统的可用性。
根据限流作用范围,可以分为单机限流和分布式限流;根据限流方式,又分为计数器、滑动窗口、漏桶限令牌桶限流,下面我们对这块详细进行讲解。
常用限流方式
计数器
计数器是一种最简单限流算法,其原理就是:在一段时间间隔内,对请求进行计数,与阀值进行比较判断是否需要限流,一旦到了时间临界点,将计数器清零。
这个就像你去坐车一样,车厢规定了多少个位置,满了就不让上车了,不然就是超载了,被交警叔叔抓到了就要罚款的,如果我们的系统那就不是罚款的事情了,可能直接崩掉了。
程序执行逻辑:
- 可以在程序中设置一个变量 count,当过来一个请求我就将这个数 +1,同时记录请求时间。
- 当下一个请求来的时候判断 count 的计数值是否超过设定的频次,以及当前请求的时间和第一次请求时间是否在 1 分钟内。
- 如果在 1 分钟内并且超过设定的频次则证明请求过多,后面的请求就拒绝掉。
- 如果该请求与第一个请求的间隔时间大于计数周期,且 count 值还在限流范围内,就重置 count。
那么问题来了,如果有个需求对于某个接口 /query 每分钟最多允许访问 200 次,假设有个用户在第 59 秒的最后几毫秒瞬间发送 200 个请求,当 59 秒结束后 Counter 清零了,他在下一秒的时候又发送 200 个请求。
那么在 1 秒钟内这个用户发送了 2 倍的请求,这个是符合我们的设计逻辑的,这也是计数器方法的设计缺陷,系统可能会承受恶意用户的大量请求,甚至击穿系统。这种方法虽然简单,但也有个大问题就是没有很好的处理单位时间的边界。
不过说实话,这个计数引用了锁,在高并发场景,这个方式可能不太实用,我建议将锁去掉,然后将 l.count++ 的逻辑通过原子计数处理,这样就可以保证 l.count 自增时不会被多个线程同时执行,即通过原子计数的方式实现限流。
为了不影响阅读,代码详见:github.com/lml20070115…
滑动窗口
滑动窗口是针对计数器存在的临界点缺陷,所谓滑动窗口(Sliding window)是一种流量控制技术,这个词出现在 TCP 协议中。滑动窗口把固定时间片进行划分,并且随着时间的流逝,进行移动,固定数量的可以移动的格子,进行计数并判断阀值。
上图中我们用红色的虚线代表一个时间窗口(一分钟),每个时间窗口有 6 个格子,每个格子是 10 秒钟。每过 10 秒钟时间窗口向右移动一格,可以看红色箭头的方向。我们为每个格子都设置一个独立的计数器 Counter,假如一个请求在 0:45 访问了那么我们将第五个格子的计数器 +1(也是就是 0:40~0:50),在判断限流的时候需要把所有格子的计数加起来和设定的频次进行比较即可。
那么滑动窗口如何解决我们上面遇到的问题呢?来看下面的图:
当用户在 0:59 秒钟发送了 200 个请求就会被第六个格子的计数器记录 +200,当下一秒的时候时间窗口向右移动了一个,此时计数器已经记录了该用户发送的 200 个请求,所以再发送的话就会触发限流,则拒绝新的请求。
其实计数器就是滑动窗口啊,只不过只有一个格子而已,所以想让限流做的更精确只需要划分更多的格子就可以了,为了更精确我们也不知道到底该设置多少个格子,格子的数量影响着滑动窗口算法的精度,依然有时间片的概念,无法根本解决临界点问题。
为了不影响阅读,代码详见:github.com/RussellLuo/…
漏桶
漏桶算法(Leaky Bucket),原理就是一个固定容量的漏桶,按照固定速率流出水滴。
用过水龙头都知道,打开龙头开关水就会流下滴到水桶里,而漏桶指的是水桶下面有个漏洞可以出水,如果水龙头开的特别大那么水流速就会过大,这样就可能导致水桶的水满了然后溢出。
图片如果看不清,可单击图片并放大。
一个固定容量的桶,有水流进来,也有水流出去。对于流进来的水来说,我们无法预计一共有多少水会流进来,也无法预计水流的速度。但是对于流出去的水来说,这个桶可以固定水流出的速率(处理速度),从而达到流量整形和流量控制的效果。
漏桶算法有以下特点:
- 漏桶具有固定容量,出水速率是固定常量(流出请求)
- 如果桶是空的,则不需流出水滴
- 可以以任意速率流入水滴到漏桶(流入请求)
- 如果流入水滴超出了桶的容量,则流入的水滴溢出(新请求被拒绝)
漏桶限制的是常量流出速率(即流出速率是一个固定常量值),所以最大的速率就是出水的速率,不能出现突发流量。
为了不影响阅读,代码详见:github.com/lml20070115…
令牌桶
令牌桶算法(Token Bucket)是网络流量整形(Traffic Shaping)和速率限制(Rate Limiting)中最常使用的一种算法。典型情况下,令牌桶算法用来控制发送到网络上的数据的数目,并允许突发数据的发送。
图片如果看不清,可单击图片并放大。
我们有一个固定的桶,桶里存放着令牌(token)。一开始桶是空的,系统按固定的时间(rate)往桶里添加令牌,直到桶里的令牌数满,多余的请求会被丢弃。当请求来的时候,从桶里移除一个令牌,如果桶是空的则拒绝请求或者阻塞。
令牌桶有以下特点:
- 令牌按固定的速率被放入令牌桶中
- 桶中最多存放 B 个令牌,当桶满时,新添加的令牌被丢弃或拒绝
- 如果桶中的令牌不足 N 个,则不会删除令牌,且请求将被限流(丢弃或阻塞等待)
令牌桶限制的是平均流入速率(允许突发请求,只要有令牌就可以处理,支持一次拿3个令牌,4个令牌...),并允许一定程度突发流量,所以也是非常常用的限流算法。
为了不影响阅读,代码详见:github.com/lml20070115…
Redis + Lua 分布式限流
单机版限流仅能保护自身节点,但无法保护应用依赖的各种服务,并且在进行节点扩容、缩容时也无法准确控制整个服务的请求限制。
而分布式限流,以集群为维度,可以方便的控制这个集群的请求限制,从而保护下游依赖的各种服务资源。
分布式限流最关键的是要将限流服务做成原子化,我们可以借助 Redis 的计数器,Lua 执行的原子性,进行分布式限流,大致的 Lua 脚本代码如下:
local key = "rate.limit:" .. KEYS[1] --限流KEY

local limit = tonumber(ARGV[1])        --限流大小

local current = tonumber(redis.call('get', key) or "0")

if current + 1 > limit then --如果超出限流大小

  return 0

else  --请求数+1,并设置1秒过期

  redis.call("INCRBY", key,"1")

   redis.call("expire", key,"1")

   return current + 1

end
限流逻辑(Java 语言):
public static boolean accquire() throws IOException, URISyntaxException {

    Jedis jedis = new Jedis("127.0.0.1");

    File luaFile = new File(RedisLimitRateWithLUA.class.getResource("/").toURI().getPath() + "limit.lua");

    String luaScript = FileUtils.readFileToString(luaFile);


    String key = "ip:" + System.currentTimeMillis()/1000; // 当前秒

    String limit = "5"; // 最大限制

    List<String> keys = new ArrayList<String>();

    keys.add(key);

    List<String> args = new ArrayList<String>();

    args.add(limit);

    Long result = (Long)(jedis.eval(luaScript, keys, args)); // 执行lua脚本,传入参数

    return result == 1;

}
聊聊其它
上面的限流方式,主要是针对服务器进行限流,我们也可以对容器进行限流,比如 Tomcat、Nginx 等限流手段。
Tomcat 可以设置最大线程数(maxThreads),当并发超过最大线程数会排队等待执行;而 Nginx 提供了两种限流手段:一是控制速率,二是控制并发连接数。
对于 Java 语言,我们其实有相关的限流组件,比如大家常用的 RateLimiter,其实就是基于令牌桶算法,大家知道为什么唯独选用令牌桶么?
对于 Go 语言,也有该语言特定的限流方式,比如可以通过 channel 实现并发控制限流,也支持第三方库 httpserver 实现限流,详见这篇 《Go 限流的常见方法》。
在实际的限流场景中,我们也可以控制单个 IP、城市、渠道、设备 id、用户 id 等在一定时间内发送的请求数;如果是开放平台,需要为每个 appkey 设置独立的访问速率规则。
限流对比
下面我们就对常用的线程策略,总结它们的优缺点,便于以后选型。
计数器:
- 优点:固定时间段计数,实现简单,适用不太精准的场景;
- 缺点:对边界没有很好处理,导致限流不能精准控制。
滑动窗口:
- 优点:将固定时间段分块,时间比“计数器”复杂,适用于稍微精准的场景;
- 缺点:实现稍微复杂,还是不能彻底解决“计数器”存在的边界问题。
漏桶:
- 优点:可以很好的控制消费频率;
- 缺点:实现稍微复杂,单位时间内,不能多消费,感觉不太灵活。
令牌桶:
- 优点:可以解决“漏桶”不能灵活消费的问题,又能避免过渡消费,强烈推荐;
- 缺点:实现稍微复杂,其它缺点没有想到。
Redis + Lua 分布式限流:
- 优点:支持分布式限流,有效保护下游依赖的服务资源;
- 缺点:依赖 Redis,对边界没有很好处理,导致限流不能精准控制。
作者:楼仔
链接:https://juejin.cn/post/7145435951899574302
来源:稀土掘金
著作权归作者所有。商业转载请联系作者获得授权,非商业转载请注明出处。 收起阅读 »
动态规划之打家劫舍二
动态规划(Dynamic Programming)是一种分阶段求解决策问题的数学思想,它通过把原问题分解为简单的子问题来解决复杂问题。
打家劫舍 II
你是一个专业的小偷,计划偷窃沿街的房屋,每间房内都藏有一定的现金。这个地方所有的房屋都 围成一圈 ,这意味着第一个房屋和最后一个房屋是紧挨着的。同时,相邻的房屋装有相互连通的防盗系统,如果两间相邻的房屋在同一晚上被小偷闯入,系统会自动报警 。
给定一个代表每个房屋存放金额的非负整数数组,计算你 在不触动警报装置的情况下 ,今晚能够偷窃到的最高金额。
示例 1:
输入:nums = [2,3,2]
输出:3
解释:你不能先偷窃 1 号房屋(金额 = 2),然后偷窃 3 号房屋(金额 = 2), 因为他们是相邻的。
示例 2:
输入:nums = [1,2,3,1]
输出:4
解释:你可以先偷窃 1 号房屋(金额 = 1),然后偷窃 3 号房屋(金额 = 3)。
偷窃到的最高金额 = 1 + 3 = 4 。
示例 3:
输入:nums = [1,2,3]
输出:3
思路
与上一篇打家劫舍类似,只不过这里的房屋是环形的,首尾相连,所以第一间房屋和最后一间房屋相邻,因此不能在同一晚上偷窃,那么我们只需要保证不同时偷窃第一间和最后一件就可以了,即:
- 偷窃第一间,那么就不能偷窃最后一间,能偷窃的房屋范围就是[0-(n-2)],n为房屋总数。
- 不偷窃第一间,那么就可以偷窃最后一件,能偷窃的房屋范围就是[1-(n-1)]。
最后根绝这两种情况下各自偷到的最高金额取出一个最大值,即为全局最高金额。
代码如下:
fun rob(nums: IntArray): Int {

    if (nums.isEmpty()) return 0

    return if (nums.size == 1) nums[0] else Math.max(

        rob198(nums.copyOfRange(0, nums.size - 1)),

        rob198(nums.copyOfRange(1, nums.size))

    )

}

//上一篇[打家劫舍] https://juejin.cn/post/7150957966324301832

fun rob198(nums: IntArray): Int {

    if (nums.isEmpty()) {

        return 0

    }

    val length = nums.size

    if (length == 1) {

        return nums[0]

    }

    val dp = IntArray(length)

    dp[0] = nums[0]

    dp[1] = Math.max(nums[0], nums[1])

    for (i in 2 until length) {

        dp[i] = Math.max(dp[i - 2] + nums[i], dp[i - 1])

    }

    return dp[length - 1]

}
作者:晚来天欲雪_
链接:https://juejin.cn/post/7151303139973890078
来源:稀土掘金
著作权归作者所有。商业转载请联系作者获得授权,非商业转载请注明出处。
动态规划之打家劫舍
动态规划(Dynamic Programming)是一种分阶段求解决策问题的数学思想,它通过把原问题分解为简单的子问题来解决复杂问题。
打家劫舍
你是一个专业的小偷,计划偷窃沿街的房屋。每间房内都藏有一定的现金,影响你偷窃的唯一制约因素就是相邻的房屋装有相互连通的防盗系统,如果两间相邻的房屋在同一晚上被小偷闯入,系统会自动报警。
给定一个代表每个房屋存放金额的非负整数数组,计算你 不触动警报装置的情况下 ,一夜之内能够偷窃到的最高金额。
示例 1:
输入:[1,2,3,1]
输出:4
解释:偷窃 1 号房屋 (金额 = 1) ,然后偷窃 3 号房屋 (金额 = 3)。
偷窃到的最高金额 = 1 + 3 = 4 。
示例 2:
输入:[2,7,9,3,1]
输出:12
解释:偷窃 1 号房屋 (金额 = 2), 偷窃 3 号房屋 (金额 = 9),接着偷窃 5 号房屋 (金额 = 1)。
偷窃到的最高金额 = 2 + 9 + 1 = 12 。
思路
根据题意我们知道不能不同偷窃相邻的两个房间,即:
- 如果偷窃第
i间房屋,那么就不能偷窃第i-1间房屋,一夜之内能够偷窃到的最高金额为前i-2间房屋的最高总金额与第i间房屋的金额之和。 - 如果不偷窃第
i间房屋,那么能够偷窃到的最高金额为前i-1间房屋的最高总金额。
所以如果房间总数为i,那么一晚上能偷到的最大金额为dp[i]=max(dp[i−2]+house[i],dp[i−1])。
考虑3种特殊情况:
- 没有房间,偷无可偷,最大金额为0。
- 只有一间房,那么直接偷窃该房屋。即dp[0]=house[0]。
- 总共有2间房,因为不能偷窃相邻的,所以只能选金额最大的偷窃,即dp[1]=math(house[0],house[1])。
代码如下:
fun rob(nums: IntArray): Int {

    if (nums.isEmpty()) {

        return 0

    }

    val length = nums.size

    if (length == 1) {

        return nums[0]

    }

    val dp = IntArray(length)

    dp[0] = nums[0]

    dp[1] = Math.max(nums[0], nums[1])

    for (i in 2 until length) {

        dp[i] = Math.max(dp[i - 2] + nums[i], dp[i - 1])

    }

    return dp[length - 1]

}
复杂度分析
- 时间复杂度:O(n),只需跑一遍房屋即可。
- 空间复杂度:O(n)。使用数组存储了房屋的最高总金额。
作者:晚来天欲雪_
链接:https://juejin.cn/post/7150957966324301832
来源:稀土掘金
著作权归作者所有。商业转载请联系作者获得授权,非商业转载请注明出处。 收起阅读 »
App如何防止抓包
前言
App安全非常重要,尤其是数据安全。但是我们知道通过Charles等工具可以对App的网络请求进行抓包,如果我们的数据没有进行加密,这样这些信息就会被清楚的提取出来,会被不法分子进行利用。保证数据安全有很多种方法,今天简单聊一聊如何通过简单几步防止抓包。
正文
当我们进行网络请求的时候,一般通过URL的openConnection来建立连接,代码如下:
URLConnection conn = url.openConnection()其实openConnection这个函数还有一个版本,可以传入一个proxy对象,代码如下:
public URLConnection openConnection(Proxy proxy)
    throws java.io.IOException
这样我们通过这个函数建立连接时传入一个Proxy.NO_PROXY,即可达到防止抓包的效果,如Charles等抓包工具就无法看到我们的链接信息了,代码如下
URLConnection conn = url.openConnection(Proxy.NO_PROXY)官方对于Proxy.NO_PROXY描述如下:
/**
 * A proxy setting that represents a {@code DIRECT} connection,
 * basically telling the protocol handler not to use any proxying.
 * Used, for instance, to create sockets bypassing any other global
 * proxy settings (like SOCKS):
 * <P>
 * {@code Socket s = new Socket(Proxy.NO_PROXY);}
 *
 */
public final static Proxy NO_PROXY = new Proxy();

// Creates the proxy that represents a {@code DIRECT} connection.
private Proxy() {
    type = Type.DIRECT;
    sa = null;
}
我么可以看到NO_PROXY实际上就是type属性为DIRECT的一个Proxy对象,这个type有三种:
DIRECT
HTTP
SOCKS
官方描述如下:
public enum Type {
    /**
     * Represents a direct connection, or the absence of a proxy.
     */
    DIRECT,
    /**
     * Represents proxy for high level protocols such as HTTP or http://FTP.
     */
    HTTP,
    /**
     * Represents a SOCKS (V4 or V5) proxy.
     */
    SOCKS
};
这样因为是直连,所以不走代理。所以Charles等工具就抓不到包了,这样一定程度上保证了数据的安全。
当然这种方式只是通过代理抓不到包,如果直接通过路由还是可以抓包的。
作者:BennuCTech
来源:juejin.cn/post/7078077090506997767
我也写了个低仿网易云音乐播放器,这是我的感受
开发一个基于Vue的低仿mac网易云音乐web播放器及开后感
前言
感谢大佬提供的api
项目简介
技术栈
webpack4(打包工具, 这个项目中我并没有用vue-cli, 因为想体验下自己搭建webpack有多痛苦:( )
element-ui (用到了其中轮播图, 表格等部分组件)
sass (css预处理器)
Vue全家桶
辅助工具 & 插件
better-scroll(歌词滚动)
xgplayer (西瓜视频播放器)]
postcss-pxtorem (px转rem工具, 自己搭webpack 加这玩意儿实在太费劲了)
charles (抓包工具)
axios
项目功能
登录(账号密码 & 网易云Id)
音乐播放
视频播放
歌单 & 专辑页
搜索结果, 搜索面板
播放记录 & 播放列表
排行榜 & 最新音乐 & 个性推荐
我的收藏歌单列表
歌词, 评论, 相关推荐
有些功能相较于网易云音乐是残疾版, 因为提供的接口是2年前的, 所以有些不支持现在的业务逻辑
项目预览
跑一下
cnpm i

npm run start 本地预览

npm run build 打包

npm run analyz 打包文件分析

npm run release 部署到服务器
webpack
这个项目写到目前为止, 我花费精力最多是webpack相关以及打包优化相关的内容(这里的精力 = 花费时间 / 代码量). 脚手架 很方便, 但是我还是想体验下从0搭建一个小项目的webpack配置
个人觉得自己配置webpack起手式, 就是碰到问题去搜, 逐个击破, 像我这样的小白千万不要代码还没开始写就想撘出个脚手架级别的配置, 像这样...
搜着搜着 就这样了
简述打包优化历程
先上一张啥也没有优化时的图片
呵呵呵呵... 一个破音乐播放器 6.1M 48.9s
开始优化
在生产环境的配置文件中, 加上(
mode: production), 有了这句话, webpack会自动帮你压缩代码, 且效果非常显著
2. 使用gzip, 这一步需要在webpack使用compression-webpack-plugin插件
plugins: [
    ...
    new CompressionWebpackPlugin({
      algorithm: 'gzip',
      test: /\.js(\?.*)?$/i,
      threshold: 10240,
      minRatio: 0.8
    }),
以及nginx配置文件中配置
 http{
  ....
    gzip on;
    gzip_comp_level 6;
    gzip_types text/xml text/plain text/css application/javascript application/x-javascript application/rss+xml;
    gzip_disable "MSIE[1-6]\.";
使用过程中我发现webpack不配置gzip压缩仅配置nginx, 在最终访问项目时, 拿到的文件也是gzip格式的. 查阅后,才知道 gzip 服务端也能进行压缩, 但是如果客户端直接把压缩好的gzip文件传到服务端 可以节省服务端在收到请求后对文件进行的压缩的性能损耗
webpack端配置gzip压缩
webpack端不配置gzip压缩
使用
ParallelUglifyPlugin, 开启多个子进程并行压缩 节省压缩时间, 并且去除调试日志
plugins:[
    ...
    new ParallelUglifyPlugin({
      cacheDir: '.cache/',
      uglifyJS:{
        output: {
          comments: false
        },
        warnings: false,
        compress: {
          drop_debugger: true, // 去除生产环境的 debugger 和 console.log
          drop_console: true
        }
      }
    }),
将一些依赖 用cdn链接引入, 并且使用dns预解析
// webpack.prod.conf.js
    externals:{
        vue: 'Vue',
        'vue-router': 'VueRouter',
        vuex: 'Vuex',
        axios: 'axios',
    },

// index.html
    <head>
    //使用dns预解析(将域名解析成ip是很耗时的)
      <link rel="dns-prefetch" href="//cdn.bootcss.com">
      <link rel="dns-prefetch" href="//cdnjs.cloudflare.com">
    </head>
    ...
    <body>
    //这串奇怪的代码html-webpack-plugin插件会解析的
        <% if ( process.env.NODE_ENV === 'production' ) { %>
            <script src="https://cdn.bootcss.com/vue/2.6.10/vue.runtime.min.js"></script>
            <script src="https://cdn.bootcss.com/vue-router/3.1.3/vue-router.min.js"></script>
            <script src="https://cdnjs.cloudflare.com/ajax/libs/axios/0.19.0/axios.min.js"></script>
            <script src="https://cdnjs.cloudflare.com/ajax/libs/vuex/3.1.2/vuex.min.js"></script>
        <%} %>
使用
splitChunks, 这个插件不需要install, 直接使用即可, 它的作用是将公共依赖单独提取出来,避免被重复打包, 具体细节可以看这
splitChunks: {
  chunks: 'all',
  cacheGroups: {
    xgplayer: {
      test: /xgplayer/,
      priority: 0,
      name: 'xgplayer'
    },
    vendor: {
      test: /[\\/]node_modules[\\/]/,
      priority: -10,
      name: 'vendors',
      minChunks: 10
    }
  }
}
注意下
'xgplayer', 这是个视频播放器库, 我这里单独配置也是为了优化打包, 第7点会说
至此, 我的初步优化已经完成了, 那还有没有优化空间呢, 这里可以先用下打包分析工具
webpack-bundle-analyzer
const BundleAnalyzerPlugin = require('webpack-bundle-analyzer').BundleAnalyzerPlugin;
 plugins: [
    // 打包分析
    new BundleAnalyzerPlugin(
      {
        analyzerMode: 'server',
        analyzerHost: '127.0.0.1',
        analyzerPort: 8888,
        reportFilename: 'report.html',
        defaultSizes: 'parsed',
        openAnalyzer: true,
        generateStatsFile: false,
        statsFilename: 'stats.json',
        statsOptions: null,
        logLevel: 'info'
      }
    ),
  ],
从图中可以清晰的看到打包后代码的结构,
moment这个库中有很多的语言包, 可以用webpack自带的ContextReplacementPlugin插件进行过滤
    //过滤moment其他语言包 打包体积缩小200kb
    new webpack.ContextReplacementPlugin(
      /moment[/\\]locale$/,
      /zh-cn/,
),xgplayer也占用了很大的体积, 那如何优化呢? 这里引入一个'prefetching'概念, 其思想就是将一些文件在浏览器资源空闲时去分配资源下载, 从业务逻辑考虑, 在用户初次访问项目时, 是不需要用到视频库的资源的, 所以可以把浏览器资源分配给首屏需要的文件. 在业务逻辑中这样配置
watch: {
    url: {
      handler(newV, oldV) {
        if (newV && newV !== oldV) {
          if (!this.player) {
            import(/* webpackPrefetch:true */'xgplayer').then((module) => {
              xyPlayer = module.default;
              this.initVideo()
              //这里这样写的目的是,如果有用户通过url直接打开视频页, 那我也可以同步加载完视频库文件后, 再初始化视频组件
            })
          } else {
            this.player.src = newV
            this.player.reload()
          }
        }
      },
      immediate: !0
    }
  }
至至至此, 我的第二步优化已经完成了, 那还有没有优化空间呢, 这里可以用下chrome浏览器的调试工具
coverage, 这个工具可以帮你分析出文件利用率(即加载的文件中, 真正用到的代码有哪些), 附上一张我优化好的截图
首屏加载的文件利用率只有35%,该部分优化的核心思想就是将首屏看不见的资源全部异步导入, 例如采用component: () => import('xxxx')路由懒加载, 将需要用户交互才会用到的逻辑代码单独封装,按需加载,例如
//click.js
function click() {
    ....
}
export default click
//main.js
document.addEventListener('click', () => {
    import('./click').then(({ default: click }) => {
        click()
    })
})
当然这样做会很繁琐, 不过对于追求极致体验的应用来说, 也是个路子...
附上两张优化完状态, 当然 这不是还不是最佳的状态...
总结
不用脚手架从0搭webpack及优化打包能让自己接触到很多业务代码以外的东西, 这些东西也是前端职责中很重要的但也常常被忽视的模块, 过程很艰难但也充满意义.
作者:stormsprit
来源:juejin.cn/post/6844904045765722125
看完这篇HTTP,跟面试官扯皮就没问题了
我是一名程序员,我的主要编程语言是 Java,我更是一名 Web 开发人员,所以我必须要了解 HTTP,所以本篇文章就来带你从 HTTP 入门到进阶,看完让你有一种恍然大悟、醍醐灌顶的感觉。
最初在有网络之前,我们的电脑都是单机的,单机系统是孤立的,我还记得 05 年前那会儿家里有个电脑,想打电脑游戏还得两个人在一个电脑上玩儿,及其不方便。我就想为什么家里人不让上网,我的同学 xxx 家里有网,每次一提这个就落一通批评:xxx上xxx什xxxx么xxxx网xxxx看xxxx你xxxx考xxxx的xxxx那xxxx点xxxx分。虽然我家里没有上网,但是此时互联网已经在高速发展了,HTTP 就是高速发展的一个产物。
认识 HTTP
首先你听的最多的应该就是 HTTP 是一种 超文本传输协议(Hypertext Transfer Protocol),这你一定能说出来,但是这样还不够,假如你是大厂面试官,这不可能是他想要的最终结果,我们在面试的时候往往把自己知道的尽可能多的说出来,才有和面试官谈价钱的资本。那么什么是超文本传输协议?
超文本传输协议可以进行文字分割:超文本(Hypertext)、传输(Transfer)、协议(Protocol),它们之间的关系如下
按照范围的大小 协议 > 传输 > 超文本。下面就分别对这三个名次做一个解释。
什么是超文本
在互联网早期的时候,我们输入的信息只能保存在本地,无法和其他电脑进行交互。我们保存的信息通常都以文本即简单字符的形式存在,文本是一种能够被计算机解析的有意义的二进制数据包。而随着互联网的高速发展,两台电脑之间能够进行数据的传输后,人们不满足只能在两台电脑之间传输文字,还想要传输图片、音频、视频,甚至点击文字或图片能够进行超链接的跳转,那么文本的语义就被扩大了,这种语义扩大后的文本就被称为超文本(Hypertext)。
什么是传输
那么我们上面说到,两台计算机之间会形成互联关系进行通信,我们存储的超文本会被解析成为二进制数据包,由传输载体(例如同轴电缆,电话线,光缆)负责把二进制数据包由计算机终端传输到另一个终端的过程(对终端的详细解释可以参考 你说你懂互联网,那这些你知道么?这篇文章)称为传输(transfer)。
通常我们把传输数据包的一方称为请求方,把接到二进制数据包的一方称为应答方。请求方和应答方可以进行互换,请求方也可以作为应答方接受数据,应答方也可以作为请求方请求数据,它们之间的关系如下
如图所示,A 和 B 是两个不同的端系统,它们之间可以作为信息交换的载体存在,刚开始的时候是 A 作为请求方请求与 B 交换信息,B 作为响应的一方提供信息;随着时间的推移,B 也可以作为请求方请求 A 交换信息,那么 A 也可以作为响应方响应 B 请求的信息。
什么是协议
协议这个名词不仅局限于互联网范畴,也体现在日常生活中,比如情侣双方约定好在哪个地点吃饭,这个约定也是一种协议,比如你应聘成功了,企业会和你签订劳动合同,这种双方的雇佣关系也是一种 协议。注意自己一个人对自己的约定不能成为协议,协议的前提条件必须是多人约定。
那么网络协议是什么呢?
网络协议就是网络中(包括互联网)传递、管理信息的一些规范。如同人与人之间相互交流是需要遵循一定的规矩一样,计算机之间的相互通信需要共同遵守一定的规则,这些规则就称为网络协议。
没有网络协议的互联网是混乱的,就和人类社会一样,人不能想怎么样就怎么样,你的行为约束是受到法律的约束的;那么互联网中的端系统也不能自己想发什么发什么,也是需要受到通信协议约束的。
那么我们就可以总结一下,什么是 HTTP?可以用下面这个经典的总结回答一下: HTTP 是一个在计算机世界里专门在两点之间传输文字、图片、音频、视频等超文本数据的约定和规范
与 HTTP 有关的组件
随着网络世界演进,HTTP 协议已经几乎成为不可替代的一种协议,在了解了 HTTP 的基本组成后,下面再来带你进一步认识一下 HTTP 协议。
网络模型
网络是一个复杂的系统,不仅包括大量的应用程序、端系统、通信链路、分组交换机等,还有各种各样的协议组成,那么现在我们就来聊一下网络中的协议层次。
为了给网络协议的设计提供一个结构,网络设计者以分层(layer)的方式组织协议,每个协议属于层次模型之一。每一层都是向它的上一层提供服务(service),即所谓的服务模型(service model)。每个分层中所有的协议称为 协议栈(protocol stack)。因特网的协议栈由五个部分组成:物理层、链路层、网络层、运输层和应用层。我们采用自上而下的方法研究其原理,也就是应用层 -> 物理层的方式。
应用层
应用层是网络应用程序和网络协议存放的分层,因特网的应用层包括许多协议,例如我们学 web 离不开的 HTTP,电子邮件传送协议 SMTP、端系统文件上传协议 FTP、还有为我们进行域名解析的 DNS 协议。应用层协议分布在多个端系统上,一个端系统应用程序与另外一个端系统应用程序交换信息分组,我们把位于应用层的信息分组称为 报文(message)。
运输层
因特网的运输层在应用程序断点之间传送应用程序报文,在这一层主要有两种传输协议 TCP和 UDP,利用这两者中的任何一个都能够传输报文,不过这两种协议有巨大的不同。
TCP 向它的应用程序提供了面向连接的服务,它能够控制并确认报文是否到达,并提供了拥塞机制来控制网络传输,因此当网络拥塞时,会抑制其传输速率。
UDP 协议向它的应用程序提供了无连接服务。它不具备可靠性的特征,没有流量控制,也没有拥塞控制。我们把运输层的分组称为 报文段(segment)
网络层
因特网的网络层负责将称为 数据报(datagram) 的网络分层从一台主机移动到另一台主机。网络层一个非常重要的协议是 IP 协议,所有具有网络层的因特网组件都必须运行 IP 协议,IP 协议是一种网际协议,除了 IP 协议外,网络层还包括一些其他网际协议和路由选择协议,一般把网络层就称为 IP 层,由此可知 IP 协议的重要性。
链路层
现在我们有应用程序通信的协议,有了给应用程序提供运输的协议,还有了用于约定发送位置的 IP 协议,那么如何才能真正的发送数据呢?为了将分组从一个节点(主机或路由器)运输到另一个节点,网络层必须依靠链路层提供服务。链路层的例子包括以太网、WiFi 和电缆接入的 DOCSIS 协议,因为数据从源目的地传送通常需要经过几条链路,一个数据包可能被沿途不同的链路层协议处理,我们把链路层的分组称为 帧(frame)
物理层
虽然链路层的作用是将帧从一个端系统运输到另一个端系统,而物理层的作用是将帧中的一个个 比特 从一个节点运输到另一个节点,物理层的协议仍然使用链路层协议,这些协议与实际的物理传输介质有关,例如,以太网有很多物理层协议:关于双绞铜线、关于同轴电缆、关于光纤等等。
五层网络协议的示意图如下
OSI 模型
我们上面讨论的计算网络协议模型不是唯一的 协议栈,ISO(国际标准化组织)提出来计算机网络应该按照7层来组织,那么7层网络协议栈与5层的区别在哪里?
从图中可以一眼看出,OSI 要比上面的网络模型多了 表示层 和 会话层,其他层基本一致。表示层主要包括数据压缩和数据加密以及数据描述,数据描述使得应用程序不必担心计算机内部存储格式的问题,而会话层提供了数据交换的定界和同步功能,包括建立检查点和恢复方案。
浏览器
就如同各大邮箱使用电子邮件传送协议 SMTP 一样,浏览器是使用 HTTP 协议的主要载体,说到浏览器,你能想起来几种?是的,随着网景大战结束后,浏览器迅速发展,至今已经出现过的浏览器主要有
浏览器正式的名字叫做 Web Broser,顾名思义,就是检索、查看互联网上网页资源的应用程序,名字里的 Web,实际上指的就是 World Wide Web,也就是万维网。
我们在地址栏输入URL(即网址),浏览器会向DNS(域名服务器,后面会说)提供网址,由它来完成 URL 到 IP 地址的映射。然后将请求你的请求提交给具体的服务器,在由服务器返回我们要的结果(以HTML编码格式返回给浏览器),浏览器执行HTML编码,将结果显示在浏览器的正文。这就是一个浏览器发起请求和接受响应的过程。
Web 服务器
Web 服务器的正式名称叫做 Web Server,Web 服务器一般指的是网站服务器,上面说到浏览器是 HTTP 请求的发起方,那么 Web 服务器就是 HTTP 请求的应答方,Web 服务器可以向浏览器等 Web 客户端提供文档,也可以放置网站文件,让全世界浏览;可以放置数据文件,让全世界下载。目前最主流的三个Web服务器是Apache、 Nginx 、IIS。
CDN
CDN的全称是Content Delivery Network,即内容分发网络,它应用了 HTTP 协议里的缓存和代理技术,代替源站响应客户端的请求。CDN 是构建在现有网络基础之上的网络,它依靠部署在各地的边缘服务器,通过中心平台的负载均衡、内容分发、调度等功能模块,使用户就近获取所需内容,降低网络拥塞,提高用户访问响应速度和命中率。CDN的关键技术主要有内容存储和分发技术。
打比方说你要去亚马逊上买书,之前你只能通过购物网站购买后从美国发货过海关等重重关卡送到你的家里,现在在中国建立一个亚马逊分基地,你就不用通过美国进行邮寄,从中国就能把书尽快给你送到。
WAF
WAF 是一种 Web 应用程序防护系统(Web Application Firewall,简称 WAF),它是一种通过执行一系列针对HTTP / HTTPS的安全策略来专门为Web应用提供保护的一款产品,它是应用层面的防火墙,专门检测 HTTP 流量,是防护 Web 应用的安全技术。
WAF 通常位于 Web 服务器之前,可以阻止如 SQL 注入、跨站脚本等攻击,目前应用较多的一个开源项目是 ModSecurity,它能够完全集成进 Apache 或 Nginx。
WebService
WebService 是一种 Web 应用程序,WebService是一种跨编程语言和跨操作系统平台的远程调用技术。
Web Service 是一种由 W3C 定义的应用服务开发规范,使用 client-server 主从架构,通常使用 WSDL 定义服务接口,使用 HTTP 协议传输 XML 或 SOAP 消息,它是一个基于 Web(HTTP)的服务架构技术,既可以运行在内网,也可以在适当保护后运行在外网。
HTML
HTML 称为超文本标记语言,是一种标识性的语言。它包括一系列标签.通过这些标签可以将网络上的文档格式统一,使分散的 Internet 资源连接为一个逻辑整体。HTML 文本是由 HTML 命令组成的描述性文本,HTML 命令可以说明文字,图形、动画、声音、表格、链接等。
Web 页面构成
Web 页面(Web page)也叫做文档,是由一个个对象组成的。一个对象(Objecy) 只是一个文件,比如一个 HTML 文件、一个 JPEG 图形、一个 Java 小程序或一个视频片段,它们在网络中可以通过 URL 地址寻址。多数的 Web 页面含有一个 HTML 基本文件 以及几个引用对象。
举个例子,如果一个 Web 页面包含 HTML 文件和5个 JPEG 图形,那么这个 Web 页面就有6个对象:一个 HTML 文件和5个 JPEG 图形。HTML 基本文件通过 URL 地址引用页面中的其他对象。
与 HTTP 有关的协议
在互联网中,任何协议都不会单独的完成信息交换,HTTP 也一样。虽然 HTTP 属于应用层的协议,但是它仍然需要其他层次协议的配合完成信息的交换,那么在完成一次 HTTP 请求和响应的过程中,需要哪些协议的配合呢?一起来看一下
TCP/IP
TCP/IP 协议你一定听过,TCP/IP 我们一般称之为协议簇,什么意思呢?就是 TCP/IP 协议簇中不仅仅只有 TCP 协议和 IP 协议,它是一系列网络通信协议的统称。而其中最核心的两个协议就是 TCP / IP 协议,其他的还有 UDP、ICMP、ARP 等等,共同构成了一个复杂但有层次的协议栈。
TCP 协议的全称是 Transmission Control Protocol 的缩写,意思是传输控制协议,HTTP 使用 TCP 作为通信协议,这是因为 TCP 是一种可靠的协议,而可靠能保证数据不丢失。
IP 协议的全称是 Internet Protocol 的缩写,它主要解决的是通信双方寻址的问题。IP 协议使用 IP 地址 来标识互联网上的每一台计算机,可以把 IP 地址想象成为你手机的电话号码,你要与他人通话必须先要知道他人的手机号码,计算机网络中信息交换必须先要知道对方的 IP 地址。(关于 TCP 和 IP 更多的讨论我们会在后面详解)
DNS
你有没有想过为什么你可以通过键入 http://www.google.com 就能够获取你想要的网站?我们上面说到,计算机网络中的每个端系统都有一个 IP 地址存在,而把 IP 地址转换为便于人类记忆的协议就是 DNS 协议。
DNS 的全称是域名系统(Domain Name System,缩写:DNS),它作为将域名和 IP 地址相互映射的一个分布式数据库,能够使人更方便地访问互联网。
URI / URL
我们上面提到,你可以通过输入 http://www.google.com 地址来访问谷歌的官网,那么这个地址有什么规定吗?我怎么输都可以?AAA.BBB.CCC 是不是也行?当然不是的,你输入的地址格式必须要满足 URI 的规范。
URI的全称是(Uniform Resource Identifier),中文名称是统一资源标识符,使用它就能够唯一地标记互联网上资源。
URL的全称是(Uniform Resource Locator),中文名称是统一资源定位符,也就是我们俗称的网址,它实际上是 URI 的一个子集。
URI 不仅包括 URL,还包括 URN(统一资源名称),它们之间的关系如下
HTTPS
HTTP 一般是明文传输,很容易被攻击者窃取重要信息,鉴于此,HTTPS 应运而生。HTTPS 的全称为 (Hyper Text Transfer Protocol over SecureSocket Layer),全称有点长,HTTPS 和 HTTP 有很大的不同在于 HTTPS 是以安全为目标的 HTTP 通道,在 HTTP 的基础上通过传输加密和身份认证保证了传输过程的安全性。HTTPS 在 HTTP 的基础上增加了 SSL 层,也就是说 HTTPS = HTTP + SSL。(这块我们后面也会详谈 HTTPS)
HTTP 请求响应过程
你是不是很好奇,当你在浏览器中输入网址后,到底发生了什么事情?你想要的内容是如何展现出来的?让我们通过一个例子来探讨一下,我们假设访问的 URL 地址为 http://www.someSchool.edu/someDepartment/home.index,当我们输入网址并点击回车时,浏览器内部会进行如下操作
DNS服务器会首先进行域名的映射,找到访问
http://www.someSchool.edu所在的地址,然后HTTP 客户端进程在 80 端口发起一个到服务器http://www.someSchool.edu的 TCP 连接(80 端口是 HTTP 的默认端口)。在客户和服务器进程中都会有一个套接字与其相连。HTTP 客户端通过它的套接字向服务器发送一个 HTTP 请求报文。该报文中包含了路径
someDepartment/home.index的资源,我们后面会详细讨论 HTTP 请求报文。HTTP 服务器通过它的套接字接受该报文,进行请求的解析工作,并从其
存储器(RAM 或磁盘)中检索出对象 http://www.someSchool.edu/someDepartment/home.index,然后把检索出来的对象进行封装,封装到 HTTP 响应报文中,并通过套接字向客户进行发送。HTTP 服务器随即通知 TCP 断开 TCP 连接,实际上是需要等到客户接受完响应报文后才会断开 TCP 连接。
HTTP 客户端接受完响应报文后,TCP 连接会关闭。HTTP 客户端从响应中提取出报文中是一个 HTML 响应文件,并检查该 HTML 文件,然后循环检查报文中其他内部对象。
检查完成后,HTTP 客户端会把对应的资源通过显示器呈现给用户。
至此,键入网址再按下回车的全过程就结束了。上述过程描述的是一种简单的请求-响应全过程,真实的请求-响应情况可能要比上面描述的过程复杂很多。
HTTP 请求特征
从上面整个过程中我们可以总结出 HTTP 进行分组传输是具有以下特征
支持客户-服务器模式
简单快速:客户向服务器请求服务时,只需传送请求方法和路径。请求方法常用的有 GET、HEAD、POST。每种方法规定了客户与服务器联系的类型不同。由于 HTTP 协议简单,使得 HTTP 服务器的程序规模小,因而通信速度很快。
灵活:HTTP 允许传输任意类型的数据对象。正在传输的类型由 Content-Type 加以标记。
无连接:无连接的含义是限制每次连接只处理一个请求。服务器处理完客户的请求,并收到客户的应答后,即断开连接。采用这种方式可以节省传输时间。
无状态:HTTP 协议是无状态协议。无状态是指协议对于事务处理没有记忆能力。缺少状态意味着如果后续处理需要前面的信息,则它必须重传,这样可能导致每次连接传送的数据量增大。另一方面,在服务器不需要先前信息时它的应答就较快。
详解 HTTP 报文
我们上面描述了一下 HTTP 的请求响应过程,流程比较简单,但是凡事就怕认真,你这一认真,就能拓展出很多东西,比如 HTTP 报文是什么样的,它的组成格式是什么? 下面就来探讨一下
HTTP 协议主要由三大部分组成:
起始行(start line):描述请求或响应的基本信息;头部字段(header):使用 key-value 形式更详细地说明报文;消息正文(entity):实际传输的数据,它不一定是纯文本,可以是图片、视频等二进制数据。
其中起始行和头部字段并成为 请求头 或者 响应头,统称为 Header;消息正文也叫做实体,称为 body。HTTP 协议规定每次发送的报文必须要有 Header,但是可以没有 body,也就是说头信息是必须的,实体信息可以没有。而且在 header 和 body 之间必须要有一个空行(CRLF),如果用一幅图来表示一下的话,我觉得应该是下面这样
我们使用上面的那个例子来看一下 http 的请求报文
如图,这是 http://www.someSchool.edu/someDepartment/home.index 请求的请求头,通过观察这个 HTTP 报文我们就能够学到很多东西,首先,我们看到报文是用普通 ASCII 文本书写的,这样保证人能够可以看懂。然后,我们可以看到每一行和下一行之间都会有换行,而且最后一行(请求头部后)再加上一个回车换行符。
每个报文的起始行都是由三个字段组成:方法、URL 字段和 HTTP 版本字段。
HTTP 请求方法
HTTP 请求方法一般分为 8 种,它们分别是
GET 获取资源,GET 方法用来请求访问已被 URI 识别的资源。指定的资源经服务器端解析后返回响应内容。也就是说,如果请求的资源是文本,那就保持原样返回;POST 传输实体,虽然 GET 方法也可以传输主体信息,但是便于区分,我们一般不用 GET 传输实体信息,反而使用 POST 传输实体信息,PUT 传输文件,PUT 方法用来传输文件。就像 FTP 协议的文件上传一样,要求在请求报文的主体中包含文件内容,然后保存到请求 URI 指定的位置。
但是,鉴于 HTTP 的 PUT 方法自身不带验证机制,任何人都可以上传文件 , 存在安全性问题,因此一般的 W eb 网站不使用该方法。若配合 W eb 应用程序的验证机制,或架构设计采用
REST(REpresentational State Transfer,表征状态转移)标准的同类 Web 网站,就可能会开放使用 PUT 方法。HEAD 获得响应首部,HEAD 方法和 GET 方法一样,只是不返回报文主体部分。用于确认 URI 的有效性及资源更新的日期时间等。
DELETE 删除文件,DELETE 方法用来删除文件,是与 PUT 相反的方法。DELETE 方法按请求 URI 删除指定的资源。
OPTIONS 询问支持的方法,OPTIONS 方法用来查询针对请求 URI 指定的资源支持的方法。
TRACE 追踪路径,TRACE 方法是让 Web 服务器端将之前的请求通信环回给客户端的方法。
CONNECT 要求用隧道协议连接代理,CONNECT 方法要求在与代理服务器通信时建立隧道,实现用隧道协议进行 TCP 通信。主要使用
SSL(Secure Sockets Layer,安全套接层)和 TLS(Transport Layer Security,传输层安全)协议把通信内容加 密后经网络隧道传输。
我们一般最常用的方法也就是 GET 方法和 POST 方法,其他方法暂时了解即可。下面是 HTTP1.0 和 HTTP1.1 支持的方法清单
HTTP 请求 URL
HTTP 协议使用 URI 定位互联网上的资源。正是因为 URI 的特定功能,在互联网上任意位置的资源都能访问到。URL 带有请求对象的标识符。在上面的例子中,浏览器正在请求对象 /somedir/page.html 的资源。
我们再通过一个完整的域名解析一下 URL
比如 http://www.example.com:80/path/to/myfile.html?key1=value1&key2=value2#SomewhereInTheDocument 这个 URL 比较繁琐了吧,你把这个 URL 搞懂了其他的 URL 也就不成问题了。
首先出场的是 http
http://告诉浏览器使用何种协议。对于大部分 Web 资源,通常使用 HTTP 协议或其安全版本,HTTPS 协议。另外,浏览器也知道如何处理其他协议。例如, mailto: 协议指示浏览器打开邮件客户端;ftp:协议指示浏览器处理文件传输。
第二个出场的是 主机
http://www.example.com 既是一个域名,也代表管理该域名的机构。它指示了需要向网络上的哪一台主机发起请求。当然,也可以直接向主机的 IP address 地址发起请求。但直接使用 IP 地址的场景并不常见。
第三个出场的是 端口
我们前面说到,两个主机之间要发起 TCP 连接需要两个条件,主机 + 端口。它表示用于访问 Web 服务器上资源的入口。如果访问的该 Web 服务器使用HTTP协议的标准端口(HTTP为80,HTTPS为443)授予对其资源的访问权限,则通常省略此部分。否则端口就是 URI 必须的部分。
上面是请求 URL 所必须包含的部分,下面就是 URL 具体请求资源路径
第四个出场的是 路径
/path/to/myfile.html 是 Web 服务器上资源的路径。以端口后面的第一个 / 开始,到 ? 号之前结束,中间的 每一个/ 都代表了层级(上下级)关系。这个 URL 的请求资源是一个 html 页面。
紧跟着路径后面的是 查询参数
?key1=value1&key2=value2 是提供给 Web 服务器的额外参数。如果是 GET 请求,一般带有请求 URL 参数,如果是 POST 请求,则不会在路径后面直接加参数。这些参数是用 & 符号分隔的键/值对列表。key1 = value1 是第一对,key2 = value2 是第二对参数
紧跟着参数的是锚点
#SomewhereInTheDocument 是资源本身的某一部分的一个锚点。锚点代表资源内的一种“书签”,它给予浏览器显示位于该“加书签”点的内容的指示。 例如,在HTML文档上,浏览器将滚动到定义锚点的那个点上;在视频或音频文档上,浏览器将转到锚点代表的那个时间。值得注意的是 # 号后面的部分,也称为片段标识符,永远不会与请求一起发送到服务器。
HTTP 版本
表示报文使用的 HTTP 协议版本。
请求头部
这部分内容只是大致介绍一下,内容较多,后面会再以一篇文章详述
在表述完了起始行之后我们再来看一下请求头部,现在我们向上找,找到http://www.someSchool.edu/someDepartment/home.index,来看一下它的请求头部
Host: http://www.someschool.edu
Connection: close
User-agent: Mozilla/5.0
Accept-language: fr
复制代码
这个请求头信息比较少,首先 Host 表示的是对象所在的主机。你也许认为这个 Host 是不需要的,因为 URL 不是已经指明了请求对象的路径了吗?这个首部行提供的信息是 Web 代理高速缓存所需要的。Connection: close 表示的是浏览器需要告诉服务器使用的是非持久连接。它要求服务器在发送完响应的对象后就关闭连接。User-agent: 这是请求头用来告诉 Web 服务器,浏览器使用的类型是 Mozilla/5.0,即 Firefox 浏览器。Accept-language 告诉 Web 服务器,浏览器想要得到对象的法语版本,前提是服务器需要支持法语类型,否则将会发送服务器的默认版本。下面我们针对主要的实体字段进行介绍(具体的可以参考 developer.mozilla.org/zh-CN/docs/… MDN 官网学习)
HTTP 的请求标头分为四种: 通用标头、请求标头、响应标头 和 实体标头,依次来进行详解。
通用标头
通用标头主要有三个,分别是 Date、Cache-Control 和 Connection
Date
Date 是一个通用标头,它可以出现在请求标头和响应标头中,它的基本表示如下
Date: Wed, 21 Oct 2015 07:28:00 GMT
复制代码
表示的是格林威治标准时间,这个时间要比北京时间慢八个小时
Cache-Control
Cache-Control 是一个通用标头,他可以出现在请求标头和响应标头中,Cache-Control 的种类比较多,虽然说这是一个通用标头,但是又一些特性是请求标头具有的,有一些是响应标头才有的。主要大类有 可缓存性、阈值性、 重新验证并重新加载 和其他特性
可缓存性是唯一响应标头才具有的特性,我们会在响应标头中详述。
阈值性,这个我翻译可能不准确,它的原英文是 Expiration,我是根据它的值来翻译的,你看到这些值可能会觉得我翻译的有点道理
max-age: 资源被认为仍然有效的最长时间,与Expires不同,这个请求是相对于 request标头的时间,而 Expires 是相对于响应标头。(请求标头)s-maxage: 重写了 max-age 和 Expires 请求头,仅仅适用于共享缓存,被私有缓存所忽略(这块不理解,看完响应头的 Cache-Control 再进行理解)(请求标头)max-stale:表示客户端将接受的最大响应时间,以秒为单位。(响应标头)min-fresh: 表示客户端希望响应在指定的最小时间内有效。(响应标头)
Connection
Connection 决定当前事务(一次三次握手和四次挥手)完成后,是否会关闭网络连接。Connection 有两种,一种是持久性连接,即一次事务完成后不关闭网络连接
Connection: keep-alive
复制代码另一种是非持久性连接,即一次事务完成后关闭网络连接
Connection: close
复制代码
HTTP1.1 其他通用标头如下
实体标头
实体标头是描述消息正文内容的 HTTP 标头。实体标头用于 HTTP 请求和响应中。头部Content-Length、 Content-Language、 Content-Encoding 是实体头。
Content-Length 实体报头指示实体主体的大小,以字节为单位,发送到接收方。
Content-Language 实体报头描述了客户端或者服务端能够接受的语言,例如
Content-Language: de-DE
Content-Language: en-US
Content-Language: de-DE, en-CA
复制代码
Content-Encoding 这又是一个比较麻烦的属性,这个实体报头用来压缩媒体类型。Content-Encoding 指示对实体应用了何种编码。
常见的内容编码有这几种: gzip、compress、deflate、identity ,这个属性可以应用在请求报文和响应报文中
Accept-Encoding: gzip, deflate //请求头
Content-Encoding: gzip  //响应头
复制代码
下面是一些实体标头字段
请求标头
上面给出的例子请求报文的属性比较少,下面给出一个 MDN 官网的例子
GET /home.html HTTP/1.1
Host: developer.mozilla.org
User-Agent: Mozilla/5.0 (Macintosh; Intel Mac OS X 10.9; rv:50.0) Gecko/20100101 Firefox/50.0
Accept: text/html,application/xhtml+xml,application/xml;q=0.9,*/*;q=0.8
Accept-Language: en-US,en;q=0.5
Accept-Encoding: gzip, deflate, br
Referer: https://developer.mozilla.org/testpage.html
Connection: keep-alive
Upgrade-Insecure-Requests: 1
If-Modified-Since: Mon, 18 Jul 2016 02:36:04 GMT
If-None-Match: "c561c68d0ba92bbeb8b0fff2a9199f722e3a621a"
Cache-Control: max-age=0
复制代码
Host
Host 请求头指明了服务器的域名(对于虚拟主机来说),以及(可选的)服务器监听的TCP端口号。如果没有给定端口号,会自动使用被请求服务的默认端口(比如请求一个 HTTP 的 URL 会自动使用80作为端口)。
Host: developer.mozilla.org
复制代码
上面的 Accpet、 Accept-Language、Accept-Encoding 都是属于内容协商的请求标头,我们会在下面说明
Referer
HTTP Referer 属性是请求标头的一部分,当浏览器向 web 服务器发送请求的时候,一般会带上 Referer,告诉服务器该网页是从哪个页面链接过来的,服务器因此可以获得一些信息用于处理。
Referer: https://developer.mozilla.org/testpage.html

复制代码
Upgrade-Insecure-Requests
Upgrade-Insecure-Requests 是一个请求标头,用来向服务器端发送信号,表示客户端优先选择加密及带有身份验证的响应。
Upgrade-Insecure-Requests: 1

复制代码
If-Modified-Since
HTTP 的 If-Modified-Since 使其成为条件请求:
返回200,只有在给定日期的最后一次修改资源后,服务器才会以200状态发送回请求的资源。
如果请求从开始以来没有被修改过,响应会返回304并且没有任何响应体
If-Modified-Since 通常会与 If-None-Match 搭配使用,If-Modified-Since 用于确认代理或客户端拥有的本地资源的有效性。获取资源的更新日期时间,可通过确认首部字段 Last-Modified 来确定。
大白话说就是如果在 Last-Modified 之后更新了服务器资源,那么服务器会响应200,如果在 Last-Modified 之后没有更新过资源,则返回 304。
If-Modified-Since: Mon, 18 Jul 2016 02:36:04 GMT

复制代码
If-None-Match
If-None-Match HTTP请求标头使请求成为条件请求。 对于 GET 和 HEAD 方法,仅当服务器没有与给定资源匹配的 ETag 时,服务器才会以200状态发送回请求的资源。 对于其他方法,仅当最终现有资源的ETag与列出的任何值都不匹配时,才会处理请求。
If-None-Match: "c561c68d0ba92bbeb8b0fff2a9199f722e3a621a"

复制代码
ETag 属于响应标头,后面进行介绍。
内容协商
内容协商机制是指客户端和服务器端就响应的资源内容进行交涉,然后提供给客户端最为适合的资源。内容协商会以响应资源的语言、字符集、编码方式等作为判断的标准。
内容协商主要有以下3种类型:
服务器驱动协商(Server-driven Negotiation)
这种协商方式是由服务器端进行内容协商。服务器端会根据请求首部字段进行自动处理
客户端驱动协商(Agent-driven Negotiation)
这种协商方式是由客户端来进行内容协商。
透明协商(Transparent Negotiation)
是服务器驱动和客户端驱动的结合体,是由服务器端和客户端各自进行内容协商的一种方法。
内容协商的分类有很多种,主要的几种类型是 Accept、Accept-Charset、Accept-Encoding、Accept-Language、Content-Language。
Accept
接受请求 HTTP 标头会通告客户端其能够理解的 MIME 类型
那么什么是 MIME 类型呢?在回答这个问题前你应该先了解一下什么是 MIME
MIME: MIME (Multipurpose Internet Mail Extensions) 是描述消息内容类型的因特网标准。MIME 消息能包含文本、图像、音频、视频以及其他应用程序专用的数据。
也就是说,MIME 类型其实就是一系列消息内容类型的集合。那么 MIME 类型都有哪些呢?
文本文件: text/html、text/plain、text/css、application/xhtml+xml、application/xml
图片文件: image/jpeg、image/gif、image/png
视频文件: video/mpeg、video/quicktime
应用程序二进制文件: application/octet-stream、application/zip
比如,如果浏览器不支持 PNG 图片的显示,那 Accept 就不指定image/png,而指定可处理的 image/gif 和 image/jpeg 等图片类型。
一般 MIME 类型也会和 q 这个属性一起使用,q 是什么?q 表示的是权重,来看一个例子
Accept: text/html,application/xhtml+xml,application/xml;q=0.9,*/*;q=0.8

复制代码这是什么意思呢?若想要给显示的媒体类型增加优先级,则使用 q= 来额外表示权重值,没有显示权重的时候默认值是1.0 ,我给你列个表格你就明白了
| q | MIME |
|---|---|
| 1.0 | text/html |
| 1.0 | application/xhtml+xml |
| 0.9 | application/xml |
| 0.8 | * / * |
也就是说,这是一个放置顺序,权重高的在前,低的在后,application/xml;q=0.9 是不可分割的整体。
Accept-Charset
accept-charset 属性规定服务器处理表单数据所接受的字符集。
accept-charset 属性允许您指定一系列字符集,服务器必须支持这些字符集,从而得以正确解释表单中的数据。
该属性的值是用引号包含字符集名称列表。如果可接受字符集与用户所使用的字符即不相匹配的话,浏览器可以选择忽略表单或是将该表单区别对待。
此属性的默认值是 unknown,表示表单的字符集与包含表单的文档的字符集相同。
常用的字符集有: UTF-8 - Unicode 字符编码 ; ISO-8859-1 - 拉丁字母表的字符编码
Accept-Language
首部字段 Accept-Language 用来告知服务器用户代理能够处理的自然语言集(指中文或英文等),以及自然语言集的相对优先级。可一次指定多种自然语言集。 和 Accept 首部字段一样,按权重值 q来表示相对优先级。
Accept-Language: en-US,en;q=0.5

复制代码
请求标头我们大概就介绍这几种,后面会有一篇文章详细深挖所有的响应头的,下面是一个响应头的汇总,基于 HTTP 1.1
响应标头
响应标头是可以在 HTTP 响应种使用的 HTTP 标头,这听起来是像一句废话,不过确实是这样解释。并不是所有出现在响应中的标头都是响应标头。还有一些特殊的我们上面说过,有通用标头和实体标头也会出现在响应标头中,比如 Content-Length 就是一个实体标头,但是,在这种情况下,这些实体请求通常称为响应头。下面以一个例子为例和你探讨一下响应头
200 OK

Access-Control-Allow-Origin: *

Connection: Keep-Alive

Content-Encoding: gzip

Content-Type: text/html; charset=utf-8

Date: Mon, 18 Jul 2016 16:06:00 GMT

Etag: "c561c68d0ba92bbeb8b0f612a9199f722e3a621a"

Keep-Alive: timeout=5, max=997

Last-Modified: Mon, 18 Jul 2016 02:36:04 GMT

Server: Apache

Set-Cookie: mykey=myvalue; expires=Mon, 17-Jul-2017 16:06:00 GMT; Max-Age=31449600; Path=/; secure

Transfer-Encoding: chunked

Vary: Cookie, Accept-Encoding

x-frame-options: DENY

复制代码
响应状态码
首先出现的应该就是 200 OK,这是 HTTP 响应标头的状态码,它表示着响应成功完成。HTTP 响应标头的状态码有很多,并做了如下规定
以 2xx 为开头的都表示请求成功响应。
| 状态码 | 含义 |
|---|---|
| 200 | 成功响应 |
| 204 | 请求处理成功,但是没有资源可以返回 |
| 206 | 对资源某一部分进行响应,由Content-Range 指定范围的实体内容。 |
以 3xx 为开头的都表示需要进行附加操作以完成请求
| 状态码 | 含义 |
|---|---|
| 301 | 永久性重定向,该状态码表示请求的资源已经重新分配 URI,以后应该使用资源现有的 URI |
| 302 | 临时性重定向。该状态码表示请求的资源已被分配了新的 URI,希望用户(本次)能使用新的 URI 访问。 |
| 303 | 该状态码表示由于请求对应的资源存在着另一个 URI,应使用 GET 方法定向获取请求的资源。 |
| 304 | 该状态码表示客户端发送附带条件的请求时,服务器端允许请求访问资源,但未满足条件的情况。 |
| 307 | 临时重定向。该状态码与 302 Found 有着相同的含义。 |
以 4xx 的响应结果表明客户端是发生错误的原因所在。
| 状态码 | 含义 |
|---|---|
| 400 | 该状态码表示请求报文中存在语法错误。当错误发生时,需修改请求的内容后再次发送请求。 |
| 401 | 该状态码表示发送的请求需要有通过 HTTP 认证(BASIC 认证、DIGEST 认证)的认证信息。 |
| 403 | 该状态码表明对请求资源的访问被服务器拒绝了。 |
| 404 | 该状态码表明服务器上无法找到请求的资源。 |
以 5xx 为开头的响应标头都表示服务器本身发生错误
| 状态码 | 含义 |
|---|---|
| 500 | 该状态码表明服务器端在执行请求时发生了错误。 |
| 503 | 该状态码表明服务器暂时处于超负载或正在进行停机维护,现在无法处理请求。 |
Access-Control-Allow-Origin
一个返回的 HTTP 标头可能会具有 Access-Control-Allow-Origin ,Access-Control-Allow-Origin 指定一个来源,它告诉浏览器允许该来源进行资源访问。 否则-对于没有凭据的请求 *通配符,告诉浏览器允许任何源访问资源。例如,要允许源 https://mozilla.org 的代码访问资源,可以指定:
Access-Control-Allow-Origin: https://mozilla.org

Vary: Origin

复制代码
如果服务器指定单个来源而不是 *通配符的话 ,则服务器还应在 Vary 响应标头中包含 Origin ,以向客户端指示 服务器响应将根据原始请求标头的值而有所不同。
Keep-Alive
上面我们提到,HTTP 报文标头会分为四种,这其实是按着上下文来分类的
还有一种分类是根据代理进行分类,根据代理会分为端到端头 和 逐跳标头
而 Keep-Alive 表示的是 Connection 非持续连接的存活时间,如下
Connection: Keep-Alive

Keep-Alive: timeout=5, max=997

复制代码
Keep-Alive 有两个参数,它们是以逗号分隔的参数列表,每个参数由一个标识符和一个由等号 = 分隔的值组成。
timeout:指示空闲连接必须保持打开状态的最短时间(以秒为单位)。
max:指示在关闭连接之前可以在此连接上发送的最大请求数。
上述 HTTP 代码的意思就是限制最大的超时时间是 5s 和 最大的连接请求是 997 个。
Server
服务器标头包含有关原始服务器用来处理请求的软件的信息。
应该避免使用过于冗长和详细的 Server 值,因为它们可能会泄露内部实施细节,这可能会使攻击者容易地发现并利用已知的安全漏洞。例如下面这种写法
Server: Apache/2.4.1 (Unix)

复制代码
Set-Cookie
Cookie 又是另外一个领域的内容了,我们后面文章会说道 Cookie,这里需要记住 Cookie、Set-Cookie 和 Content-Disposition 等在其他 RFC 中定义的首部字段,它们不是属于 HTTP 1.1 的首部字段,但是使用率仍然很高。
Transfer-Encoding
首部字段 Transfer-Encoding 规定了传输报文主体时采用的编码方式。
Transfer-Encoding: chunked

复制代码
HTTP /1.1 的传输编码方式仅对分块传输编码有效。
X-Frame-Options
HTTP 首部字段是可以自行扩展的。所以在 Web 服务器和浏览器的应用上,会出现各种非标准的首部字段。
首部字段 X-Frame-Options 属于 HTTP 响应首部,用于控制网站内容在其他 Web 网站的 Frame 标签内的显示问题。其主要目的是为了防止点击劫持(clickjacking)攻击。
下面是一个响应头的汇总,基于 HTTP 1.1
非 HTTP/1.1 首部字段
在 HTTP 协议通信交互中使用到的首部字段,不限于 RFC2616 中定义的 47 种首部字段。还有 Cookie、Set-Cookie 和 Content-Disposition 等在其他 RFC 中定义的首部字段,它们的使用频率也很高。 这些非正式的首部字段统一归纳在 RFC4229 HTTP Header Field Registrations 中。
End-to-end 首部和 Hop-by-hop 首部
HTTP 首部字段将定义成缓存代理和非缓存代理的行为,分成 2 种类型。
一种是 End-to-end 首部 和 Hop-by-hop 首部
End-to-end(端到端) 首部
这些标头必须发送给消息的最终接收者 : 请求的服务器,或响应的客户端。中间代理必须重新传输未经修改的标头,并且缓存必须存储这些信息
Hop-by-hop(逐跳) 首部
分在此类别中的首部只对单次转发有效,会因通过缓存或代理而不再转发。
下面列举了 HTTP/1.1 中的逐跳首部字段。除这 8 个首部字段之外,其他所有字段都属于端到端首部。
Connection、Keep-Alive、Proxy-Authenticate、Proxy-Authorization、Trailer、TE、Transfer-Encoding、Upgrade
HTTP 的优点和缺点
HTTP 的优点
简单灵活易扩展
HTTP 最重要也是最突出的优点是 简单、灵活、易于扩展。
HTTP 的协议比较简单,它的主要组成就是 header + body,头部信息也是简单的文本格式,而且 HTTP 的请求报文根据英文也能猜出来个大概的意思,降低学习门槛,能够让更多的人研究和开发 HTTP 应用。
所以,在简单的基础上,HTTP 协议又多了灵活 和 易扩展 的优点。
HTTP 协议里的请求方法、URI、状态码、原因短语、头字段等每一个核心组成要素都没有被制定死,允许开发者任意定制、扩充或解释,给予了浏览器和服务器最大程度的信任和自由。
应用广泛、环境成熟
因为过于简单,普及,因此应用很广泛。因为 HTTP 协议本身不属于一种语言,它并不限定某种编程语言或者操作系统,所以天然具有跨语言、跨平台的优越性。而且,因为本身的简单特性很容易实现,所以几乎所有的编程语言都有 HTTP 调用库和外围的开发测试工具。
随着移动互联网的发展, HTTP 的触角已经延伸到了世界的每一个角落,从简单的 Web 页面到复杂的 JSON、XML 数据,从台式机上的浏览器到手机上的各种 APP、新闻、论坛、购物、手机游戏,你很难找到一个没有使用 HTTP 的地方。
无状态
无状态其实既是优点又是缺点。因为服务器没有记忆能力,所以就不需要额外的资源来记录状态信息,不仅实现上会简单一些,而且还能减轻服务器的负担,能够把更多的 CPU 和内存用来对外提供服务。
HTTP 的缺点
无状态
既然服务器没有记忆能力,它就无法支持需要连续多个步骤的事务操作。每次都得问一遍身份信息,不仅麻烦,而且还增加了不必要的数据传输量。由此出现了 Cookie 技术。
明文
HTTP 协议里还有一把优缺点一体的双刃剑,就是明文传输。明文意思就是协议里的报文(准确地说是 header 部分)不使用二进制数据,而是用简单可阅读的文本形式。
对比 TCP、UDP 这样的二进制协议,它的优点显而易见,不需要借助任何外部工具,用浏览器、Wireshark 或者 tcpdump 抓包后,直接用肉眼就可以很容易地查看或者修改,为我们的开发调试工作带来极大的便利。
当然缺点也是显而易见的,就是不安全,可以被监听和被窥探。因为无法判断通信双方的身份,不能判断报文是否被更改过。
性能
HTTP 的性能不算差,但不完全适应现在的互联网,还有很大的提升空间。
参考资料:
《极客时间》- 透视 HTTP 协议
developer.mozilla.org/en-US/docs/…
http://www.jianshu.com/p/3dd8f1879…
《计算机网络-自顶向下方法》
《图解 HTTP》
http://www.w3school.com.cn/tags/att_fo…
作者:程序员cxuan
来源:juejin.cn/post/6844904045572800525
又一款知名APP宣布停运:上线12年,全国2亿人在用
日前,#百度糯米APP停运#的话题突然引发热议。
近日,百度糯米官网发布公告称,因公司业务调整,百度糯米APP将停止服务与运营,预计将于2022年12月正式停止相关服务。
目前在苹果应用商店和大部分安卓应用商店均已搜索不到百度糯米APP。
据联商网报道,百度客服人员表示:“百度糯米已经没有商家了,已下线并停止服务。”

对于年轻一代来说,百度糯米是一个陌生的名字,有不少“00后”网友表示:“听都没听说过”。
但对于不少经历过团购网大战的网友而言,百度糯米承载着他们不少记忆。

作为多年前“千团大战”中的一大巨头,百度糯米曾一度与美团网、大众点评形成三足鼎立的格局。
有网友评论称:“那时候每周六有6.6的电影票,都是在糯米买的”。

时间回到2010年,那时候是团购业务发展最巅峰的时期,全网至少有5000家网站在做团购服务。
百度糯米,前身为人人旗下的糯米网。糯米网是国内最早的一批团购网站,比现在的“巨无霸”美团,也就晚上线3个月而已。
2011年,人人公司纽交所上市后,糯米网甚至还成了国内首家“上市”的团购网站。
2014年,百度全资收购糯米网,并在2014年3月6日将其更名为百度糯米。
服务覆盖美食、电影、酒店、旅游、充值、外卖等,合作本地商户超过200万家。

这时候的千团大战也愈演愈烈,百度、美团、大众点评三家公司占据九成左右的市场份额。
多家团购平台轮番进行补贴轰炸,市场价格越来越卷。
以至于经历过当年千团大战的小伙伴们,可能对天天吃霸王餐的日子都记忆犹新。

2015年,百度集团宣布将200亿投入百度糯米,李彦宏曾放下豪言:“砸200亿也得把糯米做好”。
当年还有报道称,百度糯米单日流水冲破3.5亿大关,一时间风光无两。
然而令人没想到的是,就在同一年,美团和大众点评宣布合并,合并之后的美团与大众点评一举占领了超过八成的市场份额。
千团大战就此逐渐落幕。
直到2016年,人工智能技术迎来大爆发,国内外的巨头们纷纷入场。
2017年,百度战略转向“All in AI”,百度糯米等也陷入沉寂。

七年后的今天,本地生活服务领域已然被美团和饿了么占据了几乎全部市场,后起之秀如抖音和快手也在虎视眈眈。
不过,百度糯米最终关停,并不代表百度放弃布局本地生活服务。
目前在百度app页面,“惠生活”入口已经汇集了大量本地生活服务,包括美团外卖、电影票、机票酒店等。
业内相关人士表示,对百度糯米关停并不意外,“百度现在的重心是人工智能,百度APP、百度地图都在承接本地生活服务,没有再单独运营一个APP的必要了”。
来源:扩展迷Extfans
收起阅读 »情绪宣泄App:十年前IT男编程撩妹纪实
阅读本文,你将收获以下内容:
1、通过观察11年前的Android代码,了解安卓开发生态近十年间的演进。
2、通过了解这款创意App的功能,对IT男该如何运用技术做出反思。
3、不幸看到作者大学时期的照片,形象极其猥琐、狼狈、不堪……够了,谁在动键盘?!
前言
因为在掘金的创作者群里比嘻哈,有人觉得我经常信口开河,尤其我写了那篇《我裁完兄弟们辞职了,转行做了一名小职员》后,有掘友评论:“这篇文章艺术成分很高”、“感觉是编故事”等等。
其中,我文章里提到过一句:我大学期间搞过Android的APP去运作。
今天,就说说这件事,一来展现下创意作品,二来给自己挽回一些微信……违心……维新……不要了。
女朋友
回到2010年,那时我上大二,谈了一个女朋友,她现在是我孩子的妈妈。
女朋友哪里都好,漂亮、温柔、大方,唯一一点就是脾气太大。
因为我不会制造浪漫,所以女朋友经常对我发脾气,一发脾气就不理我。
我一想,如果她不理我的时间设为N,如果N值无限大,那就相当于分手了,这感情不就黄了吗?
情侣在吵架冷战期间,如何才能不见面也能如同见面一般宣泄情绪,从而刷存在感呢?
可以做一款App来解决这个问题。
冷战红娘App
这款App我取名叫“冷战红娘”,意思是情侣在冷战期间调和关系的红娘媒介,并且我还亲自设计了LOGO和启动页。
一个安卓小机器人,手里拿着玫瑰花,表示示好,头顶两个触角间发出电波,表示科技和智能。
那一年,我才19岁。不行了,我膨胀得快要爆掉了。
功能简介
本软件主要有三大功能:涂鸦对方照片、写情绪日记、告知情绪结果。
下面是首页的效果:
下面是实现代码的目录结构:
女朋友名字中带“冰”,我名字中带“磊”,因此项目名是LoveBing,包名是com.lei.lovebing01。
有安卓小伙伴看到目录结构可能会发现少文件,说我在糊弄你,起码你的build.gradle得有吧。
朋友,这是2010年的安卓项目,那时的版本号是SdkVersion="8",也就是Android 2.2,现在最新版本已经到了API 32, Android 12了。从互联网时代来看,就好像是现在和清朝的区别。
那时还没有动态权限请求,存取文件也不用
FileProvider,你可以随意读取其他程序的内部数据,应用层就可以静默发送短信和获取定位,开发者可以更好地实现自己的想法,不必受到很多限制。当然,这在现在看来是不安全的。所以,任何事物的成熟都是有周期的。
那时候也没有现在这么多的第三方框架,基本都是调用Android原生的API,操作数据库需要直接使用android.database.sqlite.SQLiteDatabase,SQL语句要自己写,操作异常要自己处理。
下面,就让我们跟随功能,结合代码,一起去剖析一下这款App吧。
涂鸦
女朋友生气不理我了,短信不回,电话不接,女生宿舍我又进不去。但是,她又有怨气没地方宣泄。这时,她就会打开这个功能,可以把我的头像摆出来,然后进行各种攻击,支持花色涂抹,支持往我的照片上放小虫子、扔臭鸡蛋、使用炸弹爆破效果等等。天啊,我这是怎么了……不但有这种想法,而且还开发出了功能。
其实,要实现这个功能,非常简单。
首先,整个页面的数据,是通过配置完成的,各种颜色,工具,以及图标,需要事先声明好。
//信手涂鸦里的数据=====================================================
//工具的名字
public final static String[] colortext={"红色", "黄色","绿色",
    "粉色", "黑色", "紫色", "蓝色", "浅绿", "棕色"};
//工具的图片
public final static int[] colorpic = {
    R.drawable.color1, R.drawable.color2,
    R.drawable.color3, R.drawable.color4,
    R.drawable.color5, R.drawable.color6,
    R.drawable.color7, R.drawable.color8,
    R.drawable.color9 };

//信手涂鸦颜色选择
public  static final int red = 0;
public  static final int yellow = 1;
public  static final int green = 2;
public  static final int pink = 3;
public  static final int black = 4;
public  static final int purple = 5;
public  static final int blackblue = 6;
public  static final int lightgreen = 7;
public  static final int orange = 8;

//使用工具里的数据=====================================================
public final static String[] toolstext={"鸡蛋", "炸弹","生物","喷溅"};//工具的名字
public final static int[] toolspic = {//工具的图片
    R.drawable.dao, R.drawable.zhadan01,R.drawable.tool,R.drawable.penjian
};

public final static int[][] toolspic_01 = {//工具的图片使用后
     {R.drawable.dao_01, R.drawable.dao_02, R.drawable.dao_03,R.drawable.dao_01}
    ,{ R.drawable.baozha01, R.drawable.baozha02, R.drawable.baozha03, R.drawable.baozha04}
    ,{R.drawable.tools_01, R.drawable.tools_02, R.drawable.tools_03, R.drawable.tools_04}
    ,{R.drawable.penjian01, R.drawable.penjian02, R.drawable.penjian03, R.drawable.penjian04}
};
通过配置的方式,有一个极大的好处,那就是以后你增加新的工具,不用修改代码,直接修改配置文件即可。
下面一步就是使用一个Canvas画板,把上面的配置画到画布上,并响应用户的交互,为此我新建了一个CanvasView,它继承了View。
public class CanvasView extends View{

    public Bitmap[][] bitmapArray;
    private Canvas  mCanvas;

    public CanvasView(Context context) {
        super(context);
        bitmapArray=new Bitmap[MyData.toolspic.length][4];//实例化工具数组
        //载入工具需要的图像
        InputStream bitmapis;
        for(int i=0; i<MyData.toolspic_01.length; i++){
            for(int j=0; j<MyData.toolspic_01[i].length; j++){
                bitmapis = getResources().openRawResource(MyData.toolspic_01[i][j]);
                bitmapArray[i][j] = BitmapFactory.decodeStream(bitmapis);
            }
        }
        // 使用mBitmap创建一个画布
        mCanvas = new Canvas(mBitmap);
        mCanvas.drawColor(0xFFFFFFFF);//背景为白色
    }

    //在用户点击的地方画使用的工具
    public void drawTools(int bitmapID){
        Random rand = new Random();
        int myrand = rand.nextInt(bitmapArray[bitmapID].length);
        mCanvas.drawBitmap(bitmapArray[bitmapID][myrand], mX-bitmapArray[bitmapID]
            [myrand].getWidth()/2, mY-juli-bitmapArray[bitmapID][myrand].getHeight()/2, null);
    }
    ……
}
上面只是部分关键代码,主要展示了如何加载图片,以及如何响应用户的操作,基本无难点。
女朋友毕竟花费了一番功夫,作品肯定要给她保留,因为她可能要展示给我看:你看,昨天你惹我多严重,我把你画成这样!
涂鸦完成之后,文件保存到SD卡目录即可。权限管理方面,在AndroidManifest.xml中注册一下就行,除此之外,再无其他操作。
<!--  向SD卡写入数据的权限  -->
<uses-permission android:name="android.permission.WRITE_EXTERNAL_STORAGE" />当然,现在不可以了,Android 6.0以后,你得动态申请权限了。
值得一说的是,上面的图片浏览控件叫ImageSwitcher,这是个老控件了,很简单就可以实现幻灯片浏览的效果。
日记
如果涂鸦无法完全解气,为了能让女朋友把生气的原因表述明白,我特意增加了这个生气日记的功能。效果等同于她面对面骂我,期望她写完了气也就消了。
你觉得数据应该保存到哪里?我首选的是Android内嵌的Sqlite3数据库。
Android中最原始的sqlite数据库操作是这样的,先利用官方的SQLiteOpenHelper创建数据库和数据表。
import android.content.Context;
import android.database.sqlite.SQLiteDatabase;
import android.database.sqlite.SQLiteOpenHelper;

public class DBOpenHelper extends SQLiteOpenHelper {

    private static final String DATABASENAME = "angrydiary.db"; //数据库名称
    private static final int DATABASEVERSION = 1;//数据库版本

    public DBOpenHelper(Context context) {
        super(context, DATABASENAME, null, DATABASEVERSION);
    }

    public void onCreate(SQLiteDatabase db) {
        //建数据表 message  日记
        db.execSQL("CREATE TABLE message (message_id integer primary key autoincrement,
                    message_title varchar(50), message_text varchar(500), message_state integer)");
    }

    public void onUpgrade(SQLiteDatabase db, int oldVersion, int newVersion) {
        db.execSQL("DROP TABLE IF EXISTS message");
        onCreate(db);
    }
}
然后再写上操作数据表数据的方法。就拿生气日记信息的数据处理举例子。
import android.content.ContentValues;
import android.content.Context;
import android.database.Cursor;
import android.database.sqlite.SQLiteDatabase;

public class MessageServiceDB {

    private DBOpenHelper dbOpenHelper;
    //构造函数
    public MessageServiceDb(Context context) {
        this.dbOpenHelper = new DBOpenHelper(context);
    }
    //保存数据
    public void save(Message message){
        SQLiteDatabase db = dbOpenHelper.getWritableDatabase();
        ContentValues values = new ContentValues();
        values.put("message_title", message.getTitle());
        values.put("message_text", message.getText());
        db.insert("message", null, values);
        db.close();
    }
    //获得数据
    public List<Message> getScrollData(Integer offset, Integer maxResult){
        List<Message> messageList = new ArrayList<Message>();
        SQLiteDatabase db = dbOpenHelper.getReadableDatabase();
        Cursor cursor = db.query("message", null, null, null, null, null, "message_id desc", offset+","+ maxResult);
        while(cursor.moveToNext()){
            Integer message_id = cursor.getInt(cursor.getColumnIndex("message_id"));
            String message_title = cursor.getString(cursor.getColumnIndex("message_title"));
            String message_text = cursor.getString(cursor.getColumnIndex("message_text"));
            Message message = new TvMessage(message_id,message_title, message_text);
            messageList.add(message);
        }
        cursor.close();
        db.close();
        return messageList;
    }
    //删除一项数据
    public void delete(Integer id){
        SQLiteDatabase db = dbOpenHelper.getWritableDatabase();
        db.delete("message", "message_id=?", new String[]{id.toString()});
        db.close();
    }
}利用之前构造好的数据库帮助类dbOpenHelper,然后调用增删改查进行数据处理。这里面的增删改查,有两种方式实现,一种直接写Sql语句,另一种支持对象操作。我基本上都是用的对象操作,比如删除直接就是db.delete(xx)。
日志列表我也是煞费苦心,为了便于了解女朋友还对哪些事情生气,我特意开发了生气事件黑白名单功能。一个事件可以反复标记是否原谅我了。这样可以了解女朋友心中还有哪些心结,可以让我逐个攻破。
此处调用一个修改方法就可以了,其实就是取出message对象后重新setState一个新值就可以了。
//修改信息状态
public void update(Message message){
    SQLiteDatabase db = dbOpenHelper.getWritableDatabase();
    ContentValues values = new ContentValues();
    values.put("message_state", message.getState());
    db.update("message", values, "message_id=?", new String[]{message.getId().toString()});
    db.close();
}需要注意的是,对于每次打开数据库或者Cursor,都要记得关闭,不关闭不会影响功能,但是会带来风险。现在你使用各种框架的话,完全不用考虑这些操作,因为他们都帮你做了。
安卓开发,以前和现在,用SDK和用第三方框架,就像是汽车的手动挡和自动挡,其中的优劣,自己体会。虽然我是从老手动挡过来的,但是我站自动挡这边,因为我不会傻到逆着发展趋势去行走。
反馈
女朋友也涂鸦了,也写了生气日记,最后应该也累了。为了缓解她的疲劳,我特意开发了一个看图发愣的功能。只需要点开看图发愣,就会随机出现一个唯美的动态图,并且伴随着唰唰的雨声,可以让她看上几个小时,仔细思考人生,思考我这个男朋友值不值得交往。
对于如何展示gif动态图,前端可能要骂人了,因为gif还需要动代码吗?浏览器不全给解释了。但是,当时我需要自己去解析,安卓原生的图片控件是无法展示动图的。所以,你看老一辈的程序员面临多少困难,新一代的程序员完全不用考虑这些。所以,你们应该把更多精力放在更高级的研究上,因为我相信你们也有你们的困难点。
这个图很美,我单独拿出来了,朋友们可以保存下来,自己看。或者,你试试自己去解析一下。
好了,现在总该不生气了吧。针对于此时的场景,我又开发了一个快捷短信功能,女朋友可以选择短信模板,快速给我发送短信息,给我一个台阶,让我及时去哄她。她可以说不是她发的,是我开发的软件发的,这样可以避免“她先联系的我”这类不利立场的产生。
我一贯执行配置策略,短信模板也是写到value文件夹下的xml文件中的。
<string-array name="message_ex">
    <item>不要生气了,我错了!</item>
    <item>我不生气了,你快点陪我逛街!</item>
    <item>讨厌,还不给我打电话!</item>
    <item>我错了,我不该对你发火的!</item>
    <item>三个小时内给我打电话!</item>
    <item>快给我给我买爆米花!</item>
</string-array>
关于发送短信,这里面有两点细节。
SmsManager smsManager = SmsManager.getDefault();
PendingIntent sentIntent = PendingIntent.getBroadcast(DuanxinActivity.this, 0, new Intent(), 0);
//如果字数超过70,需拆分成多条短信发送
if (text.length() > 70) {
    List<String> msgs = smsManager.divideMessage(text);
    for (String msg : msgs) {
    smsManager.sendTextMessage(phone, null, msg, sentIntent, null);
    }
} else {
    smsManager.sendTextMessage(phone, null, text, sentIntent, null);
}第一,为什么不调用Intent(Intent.ACTION_SEND)让系统去发送短信?一开始确实是这样的。但是,后来改良为调用代码应用内发送了。因为我不想让女朋友离开我的软件,跳到第三方系统应用,避免用户跳出场景,因为有时候女朋友会夺命连环发短信(告知对方问题很严重,提高优先级),需要来回切程序,这样用着不爽,就更生气了。而且自己发送我还能捕获到发送结果,给出“发送成功”的温馨提示,但是交给第三方应用发送你是获取不到的。
第二,关于字数超过70,需要拆成多条短信,这也是经过实践得来的。满满的都是痛。
有同学不明白为什么要发短信,因为那时候还没有微信,微信是2011年才出来的。
后记
后来,经过不断反馈和改良,这款App越来越完善。
最后,女朋友看我这么用心地对待这份感情,尤其对于她反馈的软件问题,我询问地非常仔细(复现场景、发生时间、前后操作流程),修改地也非常及时(改完了就让她再试试看),她感觉我是一个靠谱和细心的人,于是她也慢慢地不再那么容易生气了。
再后来,有一个全国高校的大学生IT技能比赛,我的老师就让我拿这个作品参赛了,最后去了北京大学进行了决赛。
虽然这款App技术含量不高,但它是一款身经百战的App,它经过了多次迭代,因为用户体验和创意比较好,我最终获得全国第七名的成绩,荣获二等奖。
下面是证书,教育部的证书我是不敢造假的,我用Photoshop(是的,我也会做UI设计)做了简单的遮挡和放大,主要想让大家看一下日期确实是2011年,和我文章里描述的一样(我没有编故事)。
这款App真的没有任何技术含量,无外乎控件的罗列、画板的绘制、数据的存储。我想现在的每一个大学生都能做的到。但是不夸张地讲,它看起来却是很强大的样子。而究其根源,我想应该就是它运用技术手段尝试去解决生活中的问题,让效果得到了放大,使它具备了生命力。
直至今天,我依然在做类似(用技术解决生活中的问题)的事情。
最后,我想借助掘金App的标语结束本文,这也是我每天都会看到的一句话:
相信技术,传递价值。
作者:TF男孩
来源:juejin.cn/post/7123985353878274056
《羊了个羊》创始人被母校制成展牌
《羊了个羊》全网爆火,创始人张佳旭顺带着也大火了一把。
就连他的母校长治学院也开始整花活儿了——
在最近的迎新日上,把张佳旭的履历制成2米 x 1.5米的大型展牌。
可以说是very very的显眼,引发了无数学生的围观。

△图源:网络
然后随着这事的曝光,相关话题又双叒叕成了热议焦点。

母校如此花活儿,被网友直呼“招生的活广告啊”!
“活广告”再引争议
在这张大型展牌中,张佳旭的头像和个人简历格外醒目。
从图片中的信息来看,张佳旭此前就读于长治学院计算机系网络工程1101班。
在2017年至2021年期间,他在北京豪腾嘉科科技有限公司担任游戏制作人。
2021年,张佳旭创业成立了北京简游科技有限公司,并于2022年推出游戏《羊了个羊》。
而占据展牌另一半的内容,便都是与《羊了个羊》相关的了。
但也正是张佳旭母校这一波“活广告”的操作,让相关话题再次被热议了起来。
虽然从流露出来的视频中,长治学院的学生有表示“为学长感到骄傲”的,但话题之下舆论风向却并非如此:

网友们如此评论,直接原因便是认为校方在蹭张佳旭的热度。
但根本上是认为“《羊了个羊》这款游戏‘德不配位’,不适合当做‘校园榜样’”。
甚至还有网友直言道:这算是招生“减”章了吧!

除了被吐槽得最厉害的“就是为了赚广告费”之外,大家普遍觉得这个游戏有抄袭的嫌疑。
其一,不少人指出:“羊”的画风和模式都很像3Tiles,不过3Tiles有多重关卡,难度是层层递进的那种。
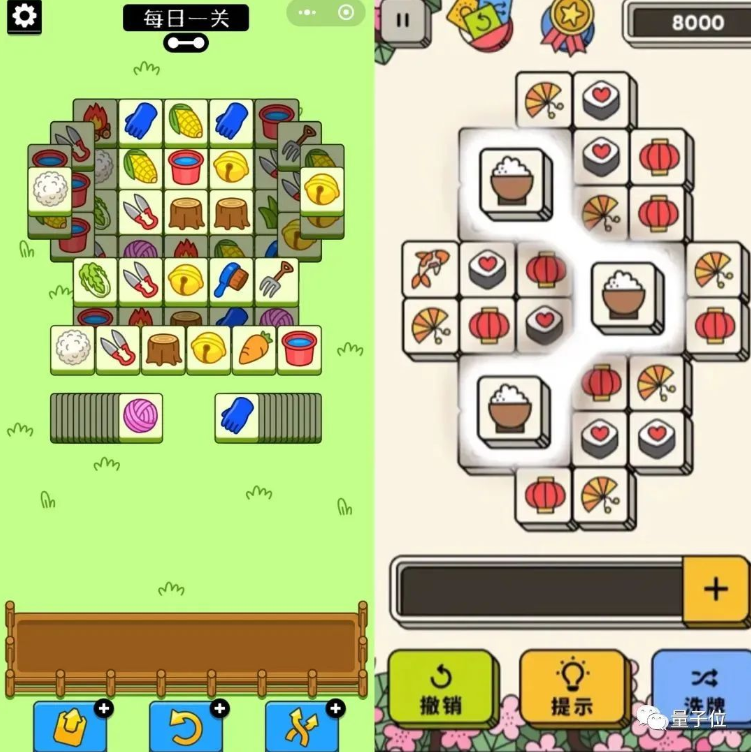
△左为《羊了个羊“截图,右为《3 Tiles》截图
不过张佳旭否认了这种说法,并表示他们采用的就是最基础的“三消”玩法,类似的游戏非常多。
其二,不光是游戏模式和界面,“羊”的背景音乐也颇受争议——
很多人在玩这个游戏的时候觉得这个BGM怎么这么耳熟,结果一搜才发现:这不就是洛天依和言和的《普通Disco》吗?(没有人声罢了)
除了批评这个游戏本身,有人甚至从《羊了个羊》上升到我国的游戏产业,觉得这种粗糙的换皮游戏屡屡出现居然还屡屡成功,打击了不少精细做游戏者的雄心。
在网友们纷纷表达不满的同时,一位长治校友却指出,其实在“羊”蹿红之前,学校每年迎新都会为张佳旭做版面,因为他自己创业做公司。
所以,这次张佳旭登上迎新牌子其实是学校的常规操作而已,并不是有意炒作。
这位校友还提到同样毕业于长治学院的“七一勋章”获得者、“时代楷模”黄文秀。

黄文秀本科就读于长治学院,后以北京师范大学哲学学院读研究生的身份毕业,并到广西壮族自治区百色市乐业县新化镇百坭村担任驻村第一书记。可惜黄在2019年遭遇山洪因公殉职,年仅30岁。
对于这所二本院校而言,他们的优秀校友本来就比不上985、211那般灿若繁星。所以从某种角度来看,张佳旭和黄文秀都算学校的“名人”了,这些可能确实有助于学校宣传。
当然话说回来,《羊了个羊》,似乎从爆火的当天开始,就没有摆脱过舆论的压力。
而面对种种质疑,张佳旭也给出了他的说法。
走红的背后:3个人3个月
最初,《羊了个羊》的研发团队仅有3人,总共开发的时长也只有3个月之久;其它组的人员构成也是颇有意思。
例如有从行政转到游戏策划的;有从Android、IOS转的creator开发;甚至还有自学服务器搭建的。

但在此之前,成立于2021年1月的简游科技并不是说没经历过大日活(DAU)的产品。
像《海盗来了》的DAU最高达到了2500万,《成语小秀才》也有过900万的DAU。
但《羊了个羊》能火成这样,用张佳旭在与北青报交流时的话说就是“(DAU)数据已经完全超出我的认知了”。
至于走红的原因,张佳旭表示前期并没有在社交平台上进行宣发。
主要还是因为其第二关难以突破,还有诸如“有任何一个人不玩《羊了个羊》我都会伤心的”等话题的出现,“口口相传”效应就开始了。
于是乎大批玩家便陆陆续续涌入并发起挑战。
而正所谓树大招风,随着《羊了个羊》的走红,一张“营收数据”首当其冲地在网络上也传了起来。

对此,张佳旭表示:
那些都是假的。我们在这个项目上没有开放banner窗口。正常来说banner收入可以占到运营收入的很大一部分。
这一点上,网上众多消息称马化腾也出来辟谣——“是PS伪造的”。

除了营收之外,“招聘技术人员”也成了相关热议话题。
但张佳旭对此是这么解释的:
我们一直在招人,只是出名之前没有人看得上。
“游戏寒冬”嘛,小公司随时可能关门。
甚至张佳旭还自嘲回忆说,之前有人来面试发出感慨“啊!这么小的公司啊!”
而在《羊了个羊》火了之后,通宵工作成了团队技术人员的常态。
他们的主要工作内容现在就是抵御攻击:
这几天我们一直被攻击,因为有很多盗版游戏已经上线了,它们想把我们攻击掉,自己蹭这波热度。
除此之外,张佳旭表示现在最希望看到的结果,就是“热度能降下来”。
One More Thing
就在最近,《羊了个羊》通关截图在朋友圈刷屏。
不仅是卡片的堆叠方式发生了改变,相同卡片的出现率也大幅提高。
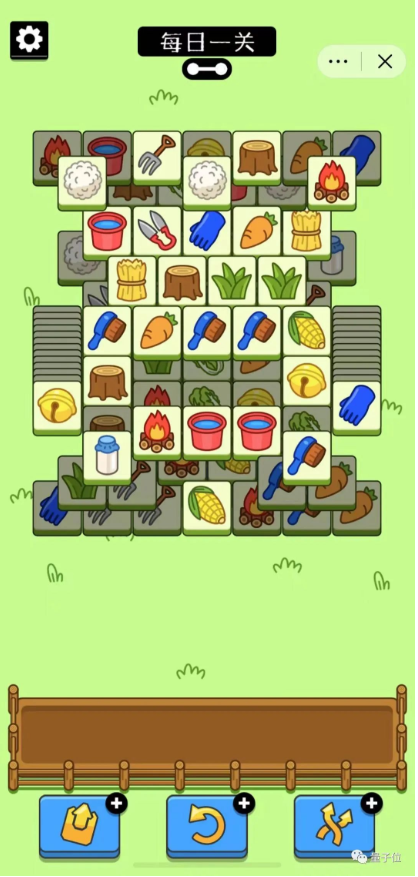
而在体验过后,不少玩家纷纷表示“难度降低了”;从各省“羊群”通关人数上来看,也是比此前要高出不少。
但除此之外,还有个比较有意思的现象。
在一款名叫《三国哈哈哈》的游戏里,第48关内嵌了一个叫《马了个马》的小游戏。
虽然玩法和《羊了个羊》一模一样,都是三消游戏,但它却提供了一个硬核消除大法——
选个炸弹,洗一次牌,再依次选木桩、2个轮子和一个炮筒,然后就会升级成一个大炮。
“轰的一下”,过关……
然后在“羊”、“马”之后,这不“牛了个牛”又来了……
据这位博主表示,他是被《羊了个羊》气到了,所以“亲手花了8小时开发了自己的小游戏”……
啊这……打不赢就自己造的节奏啊。
参考链接:
[1]http://weibo.com/7575030448/M7m0yECN4?type=comment
[2]http://www.zhihu.com/question/555490265
[3]http://baijiahao.baidu.com/s?id=1744942269985078514&wfr=spider&for=pc
[4]http://mp.weixin.qq.com/s/lu2xN3IjGY_zKzlfWje2pg
[5]http://mp.weixin.qq.com/s/y_oMa4WJRsythUNtweQa4Q
来源:来源:量子位 | 公众号 QbitAI
收起阅读 »什么时候要用到本地缓存,比Redis还要快?怎么用?
导言
试想一下这么一个场景,一用户想要把他看了好长时间的极速版视频积攒的余额提现,于是他点击了提现按钮,哗啦声一响,他的钱就到银行卡了。这样一个对于用户很简单的动作但是对于后台往往牵扯到十几个服务(公司规模越大、规范性要求越高,整个调用链路的服务就越多),而你负责了一个交叉验证的服务,主要负责校验上游传递给你的记账标识、资金流标识、付款方账号、收款方账号是否和最初申请配置的一样。
为了产品的良好体验,大老板要求请求耗时最多1s要让用户看到结果,于是各个服务的负责人battle了一圈,给你的这个服务只预留了50ms的时间。你一想,这还不简单,直接Redis缓存走起来。Redis那一套霹雳啪撒一顿输出,测试环境也没有一点问题,结果上线后傻眼了,由于网络波动等原因你的服务经常超时,组长责令你尽快解决,再因为你的服务超时导致他被大老板骂,你的绩效就别想了。这种时候,你该怎么优化呢?
理论
要想做到比Redis还要快,首先要知道Redis为什么快,最直接的原因就是Redis所有的数据都在内存中,从内存中取数据库比从硬盘中取数据要快几个数量级。
那么想比Redis还要快,只能在数据传输上下功夫,把不同服务器之间、甚至不同进程之间的数据传输都省略掉,直接把数据放在JVM中,写个ConcurrentMap用于保存数据,但是既然是缓存,肯定还要整一套删除策略、最大空间限制、刷新策略等等。自己手撸一套代价太大了,肯定有大公司有类似的场景把这样的工作已经给做了,而且他还想赚个好名声,github里搜一搜,肯定有现成的解决方案。于是今天我们的主角就出场了,Guava Cache.
实践
首先用一段代码整体介绍一下Guava Cache的使用方式,Cache整体分为CacheBuilder和CacheLoader两个部分,CacheBuilder负责创建缓存对象,再创建的时候配置最大容量、过期方式、移除监听器,CacheLoader负责根据key来加载value。
LoadingCache<Key, Config> configs = CacheBuilder.newBuilder()

       .maximumSize(5000)

       .expireAfterWrite(30, TimeUnit.MINUTES)

       .removalListener(MY_LISTENER)

       .build(

           new CacheLoader<Key, Config>() {

             @Override

             public Graph load(Key key) throws AnyException {

               return loadFromRedis(key);

             }

           });
适用场景
- 凡事都是有代价的,你愿意接受占用内存空间的代价来提升速度
- 存储占据的数据量不至于太大,太大会导致
Out of Memory异常 - 同一个Key会被访问很多次。
CacheLoader
CacheLoader并不是一定要在build的指定,如果你的数据有多种加载方式,可以使用callable的方式。
  cache.get(key, new Callable<Value>() {

    @Override

    public Value call() throws AnyException {

      return doThingsTheHardWay(key);

    }

  });
过期策略
过期策略分为大小基准和时间基准,大小基准可以通过CacheBuilder.maximumSize(long)和CacheBuilder.maximumWeight(long).指定,maximumSize(long)适用于每个值占用的空间基本上相等或者差异可以忽略不计,只看key的数量,而maximumWeight(long)则会计算出每个值所占据的权重,并保证总权重不大于设置值,其中每个值的计算方式可以通过weigher(Weigher)进行设置。
时间基础就很好理解,分为expireAfterAccess(long, TimeUnit)和expireAfterWrite(long, TimeUnit),分别是读多久后失效和写入缓存后多久失效,读失效事每次读缓存都会为该值续命。
刷新策略
CacheBuilder.refreshAfterWrite(long, TimeUnit) 方法提供了自动刷新的能力,需要注意的是,如果没有重写reload方法,那么只有当重新查到该key的时候,才会进行刷新操作。
总结
抛出了问题总要给出答案,不然就太监了,那么导言中的问题我是如何做的呢,我通过guava cache和redis整了一套二级缓存,并且在服务启动时进行了扫表操作,将所有的配置内容都预先放到guava cache中。guava的刷新时间设置为五分钟,并重写了刷新操作强制进行刷新,redis的过期时间设置为一天,并且在数据库内容更新后,删除对应Redis缓存中的值。如此便可以保证,绝大多数情况下都能命中本地中的guava 缓存,且最多有5分钟的数据不一致(业务可以接受)。 凡事必有代价,作为一名后端开发就是要在各种选择之间进行选择,选出一条代价可接受、业务能接受的方案。
作者:日暮与星辰之间
链接:https://juejin.cn/post/7146946847465013278
来源:稀土掘金
著作权归作者所有。商业转载请联系作者获得授权,非商业转载请注明出处。
连你家电器的算力都不放过,新发现Linux恶意软件用IoT设备挖矿,大小仅376字节
继电脑和手机后,挖矿病毒也盯上了IoT设备。
无论是智能冰箱、彩电还是洗衣机,但凡有点算力的(物联网和端侧)设备都可能被这种病毒感染,用于挖掘加密货币等。

AT&T Alien Labs新发现的Linux恶意软件Shikitega就是一例。
相比之前的一些IoT设备,Shikitega更加隐蔽,总共只有376字节,其中代码占了300字节。
那么,这个新型恶意软件究竟是如何感染设备的?
利用加壳技术“隐身”
具体来说,Shikitega核心是一个很小的ELF文件(Linux系统可执行文件格式)。

这个ELF文件加了动态壳,以规避一些安全防护软件的查杀。
加壳,指利用特殊算法压缩可执行文件中的资源,但压缩后的文件可以独立运行,且解压过程完全隐蔽,全部在内存中完成。
动态壳则是加壳里面更加强力的一种手段。
从整体过程来看,Shikitega会对端侧和IoT设备实施多阶段感染,控制系统并执行其他恶意活动,包括加密货币的挖掘(这里Shikitega的目标是门罗币):

通过漏洞利用框架Metasploit中最流行的编码器Shikata Ga Nai(SGN),Shikitega会运行多个解码循环,每一个循环解码下一层。

最终,Shikitega中的有效载荷(恶意软件的核心部分,如执行恶意行为的蠕虫或病毒、删除数据、发送垃圾邮件等的代码)会被完全解码并执行。
这个恶意软件利用的是CVE-2021-4034和CVE-2021-3493两个Linux漏洞,虽然目前已经有修复补丁,但如果IoT设备上的旧版Linux系统没更新,就可能被感染。
事实上,像Shikitega这样感染IoT设备的恶意软件已经很常见了。
例如在今年三月,AT&T Alien Labs同样发现了一个用Go编写的恶意软件BotenaGo,用于创建在各种设备上运行的僵尸网络(Botnets)。
对此有不少网友吐槽,IoT设备的安全性堪忧:

也有网友认为,IoT设备应该搞WiFi隔离,不然就会给病毒“可乘之机”:

而除了IoT设备,更多人的关注点则放在了Linux系统的安全上。
Linux恶意软件数量飙升650%
这几年来,Linux恶意软件的多样性和数量都上升了。
根据AV-ATLAS团队提供的数据,新的Linux恶意软件的数量在2022年上半年达到了历史新高,发现了近170万个。
与去年同期(226324个恶意软件)相比,新的Linux恶意软件数量飙升了近650%。
除了Shikitega,近来发现的流行Linux恶意软件也变得更加多样,已知的包括BPFDoor、Symbiote、Syslogk、OrBit和Lightning Framework等。

△图源AV-ATLAS
对此有网友提出疑惑,正因为Linux开源,它似乎无论如何都会面临病毒和恶意软件的泛滥?

有网友回应称,一方面,虽然旧的Linux系统可能充满漏洞、成为病毒的“温床”,但它在经过升级、打了补丁之后就会变好。
另一方面,开发恶意软件本身也不是“有手就能做”的事情。
毕竟安全研究人员会不断修复并堵上所有漏洞,而恶意软件开发者必须在他们修复前找到漏洞、开发出恶意软件,还得让它们“大流行”,最终实现自己的目的。

要是你家还有在用老旧Linux系统的设备,要注意及时升级or做好网络隔离等安全措施~
参考链接:
[1]https://cybersecurity.att.com/blogs/labs-research/shikitega-new-stealthy-malware-targeting-linux
[2]https://arstechnica.com/information-technology/2022/09/new-linux-malware-combines-unusual-stealth-with-a-full-suite-of-capabilities/
[3]https://www.reddit.com/r/technews/comments/xc6nrn/new_linux_malware_combines_unusual_stealth_with_a/
来源:萧箫 发自 凹非寺
收起阅读 »Android实现定时任务的几种方案汇总
前言
相比Android倒计时的常用场景,定时任务相对来说使用的场景相对没那么多,除非一些特殊的设备或者一些特殊的场景我们会用到。
关于定时任务其实是分为2中作用范围,App内部范围和App外部范围,也就是说你是否需要App杀死了还能执行定时任务,需求不同实现的方式也不同,我们来看看都如何实现。
一、App内部范围
其实App内部范围的定时任务,我们可以使用倒计时的方案,Handler天然就支持。其实我们并不是需要每一次都使用一些系统服务让App外部范围生效。
比如场景如下,机器放在公司前台常亮并且一直运行在前台的,我需要没间隔60秒去查询当前设备是否在线,顺便更新一下当前的时间,显示早上好,中午好,下午好。
这样的场景我不需要使用一些系统服务,使用App内部范围的一些定时任务即可,因为就算App崩溃了,就算有系统级别的定时任务,我App不在了也没有用了,所以使用内部范围的定时任务即可,杀鸡焉用牛刀。
之前的倒计时方案改造一番几乎都能实现这样的定时任务,例如:
    private var mThread: Thread = Thread(this)

    private var mflag = false

    private var mThreadNum = 60


    override fun run() {

        while (mflag && mThreadNum >= 0) {

            try {

                Thread.sleep(1000 * 60)

            } catch (e: InterruptedException) {

                e.printStackTrace()

            }


            val message = Message.obtain()

            message.what = 1

            message.arg1 = mThreadNum

            handler.sendMessage(message)


            mThreadNum--

        }

    }


    private val handler = Handler(Looper.getMainLooper()) { msg ->


        if (msg.what == 1) {

            val num = msg.arg1

            //由于需要主线程显示UI,这里使用Handler通信

            YYLogUtils.w("当时计数:" + num)

        }


        true

    }


      //定时任务

      fun backgroundTask() {


            if (!mThread.isAlive) {


                mflag = true


                if (mThread.state == Thread.State.TERMINATED) {

                    mThread = Thread(this@DemoCountDwonActivity)

                    if (mThreadNum == -1) mThreadNum = 60

                    mThread.start()

                } else {

                    mThread.start()

                }

            } else {


                mflag = false


            }


        }
这样每60秒就能执行一次任务,并且不受到系统的限制,简单明了。(只能在App范围内使用)
倒计时的一些的一些方案我们都能改造为定时任务的逻辑,比如上面的Handler,还有Timer的方式,Thread的方式等。
除了倒计时的一些方案,我们额外的还能使用Java的线程池Api也能快速的实现定时任务,周期性的执行逻辑,例如:
val executorService: ScheduledExecutorService = Executors.newScheduledThreadPool(3)

val command = Runnable {

    //dosth

}

executorService.scheduleAtFixedRate(command, 0, 3, TimeUnit.SECONDS)


// executorService.shutdown() //如果想取消可以随时停止线程池
定时执行任务在平常的开发中相对不是那么多,比如特殊场景下,我们需要轮询请求。
比如我做过一款应用放在公司前台,我就需要轮询请求每180秒调用服务器接口,告诉服务器当前设备是否在线。便于后台统计,这个是当前App内部生命周期执行的,用在这里刚刚好。
又比如我们使用DownloadManager来下载文件,因为不能直接回调进度,需要我们手动的调用Query去查询当前下载的消息,和文件的总大小,计算当前的下载进度,我们就可以使用轮询的方案,每一秒钟调用一次Query获取进度,模拟了下载进度的展示。
二、App外部范围
有内部范围的定时任务了,那么哪一种情况下我们需要使用外部范围的定时任务呢?又如何使用外部范围的定时任务呢?
还是上面的场景,机器放在公司前台常亮并且一直运行在前台的,这个App我们需要自动更新,并且检查是否崩溃了或者在前台,不管App是否存在我们都需要自行的定时任务,超过App的生命周期了,我们需要使用系统服务的定时任务来做这些事情。
都有哪些系统服务可以完成这样的功能呢?
2.1 系统服务的简单对比与原理
AlarmManager JobSchedule WorkManager !三者又有哪些不同呢?
AlarmManager 和 JobSchedule 虽然都是系统服务,但是方向又不同,AlarmManager 是通过 AlarmManagerService 控制RTC芯片。
说起Alar就需要说到RTC,说到RTC就需要讲到WakeLock机制。
都是一些比较底层的原理,我不会具体展开,大家有兴趣可以自行搜索,或者参考
话说回来,AlarmManage有一个 AlarmManagerService ,该服务程序主要维护 app 注册下来的各类Alarm, 并且一直监听 Alarm 设备, 一旦有 Alarm 触发,或者是 Alarm 事件发生,AlarmManagerService 就会遍历 Alarm 列表,找到相应的注册 Alarm 并发出广播. 首先, Alarm 是基于 RTC 实时时钟计时, 而不是CPU计时; 其次, Alarm 会维持一个 CPU 的 wake lock, 确保 Alarm 广播能被处理。
JobSchedule则是完全Android系统级别的定时任务,如有感兴趣的可以参考文章
他们之间的区别是,AlarmManager 最终是操作硬件,设备开机通电和关机就会丢失Alarm任务,而 JobSchedule 是系统级别的任务,就算重启设备也会继续执行。并且相较来说 AlarmManager 可以做到精准度可以比 JobSchedule 更加好点。
而 WorkManager 则是对JobSchedule的封装与兼容处理,6.0以上版本内部实现JobSchedule,一下的版本提供 AlarmManager 。提供的统一的Api实现相同的功能。
所以在2022年的今天,系统级别的定时任务就只推荐用 AlarmManager(短时间) 或者 WorkManager(长时间)了。
2.2 AlarmManager实现定时任务
由于不是基础教程,如果要这里要讲一下基本使用,我估计这一篇文章都讲不完,如果想看AlarmManager的使用教程,可以看这里
由于各版本的不同使用的方式不同
API > 19的时候不能设置为循环 需要设置为单次的发送 然后在广播中再次设置单次的发送。
当API >23 当前手机版本为6.0的时候有待机模式的省点优化 需要重新设置。
当设备为Android 12,如果使用到了AlarmManager来设置定时任务,并且设置的是精准的闹钟(使用了setAlarmClock()、setExact()、setExactAndAllowWhileIdle()这几种方法),则需要确保SCHEDULE_EXACT_ALARM权限声明且打开,否则App将崩溃。
需要在AndroidManifest.xml清单文件中声明 SCHEDULE_EXACT_ALARM 权限
最终我们兼容所有的做法是,只开启一个定时任务,然后触发到广播,然后再广播中再次启动一个定时任务,依次循环,嗯,很有Handler的味道。
例如我们设置一个 AlarmManager ,每180秒检查一下 App 是否存活,如果 App 不在了就拉起 App 跳转MainActivity。(需求是当App杀死了也能启动首页,所以不适用于App内的定时执行方案)
    //定时任务

        fun backgroundTask() {


            //开启3分钟的闹钟广播服务,检测是否运行了首页,如果退出了应用,那么重启应用

            val alarmManager = applicationContext.getSystemService(ALARM_SERVICE) as AlarmManager


            val intent1 = Intent(CommUtils.getContext(), AlarmReceiver::class.java)

            val pendingIntent = PendingIntent.getBroadcast(CommUtils.getContext(), 0, intent1, PendingIntent.FLAG_UPDATE_CURRENT)


            //先取消一次

            alarmManager.cancel(pendingIntent)


            //再次启动,这里不延时,直接发送

            if (Build.VERSION.SDK_INT >= Build.VERSION_CODES.M) {

                alarmManager.setExactAndAllowWhileIdle(AlarmManager.ELAPSED_REALTIME_WAKEUP, SystemClock.elapsedRealtime(), pendingIntent)

            } else if (Build.VERSION.SDK_INT >= Build.VERSION_CODES.KITKAT) {

                alarmManager.setExact(AlarmManager.ELAPSED_REALTIME_WAKEUP, SystemClock.elapsedRealtime(), pendingIntent)

            } else {

                alarmManager.setRepeating(AlarmManager.ELAPSED_REALTIME_WAKEUP, SystemClock.elapsedRealtime(), 18000, pendingIntent)

            }


            YYLogUtils.w("点击按钮-开启 alarmManager 定时任务啦")


        }
点击按钮就发送一个立即生效的闹钟,逻辑走到广播中,然后再广播中再次开启闹钟。
class AlarmReceiver : BroadcastReceiver() {


    override fun onReceive(context: Context, intent: Intent?) {


        val alarmManager = context.getSystemService(ALARM_SERVICE) as AlarmManager


        //执行的任务

        val intent1 = Intent(CommUtils.getContext(), AlarmReceiver::class.java)

        val pendingIntent: PendingIntent = PendingIntent.getBroadcast(context, 0, intent1, PendingIntent.FLAG_UPDATE_CURRENT)


        // 重复定时任务,延时180秒发送

        if (Build.VERSION.SDK_INT >= Build.VERSION_CODES.M) {

            alarmManager.setExactAndAllowWhileIdle(AlarmManager.ELAPSED_REALTIME_WAKEUP, SystemClock.elapsedRealtime() + 180000, pendingIntent)

        } else if (Build.VERSION.SDK_INT >= Build.VERSION_CODES.KITKAT) {

            alarmManager.setExact(AlarmManager.ELAPSED_REALTIME_WAKEUP, SystemClock.elapsedRealtime() + 180000, pendingIntent)

        } else {

            alarmManager.setRepeating(AlarmManager.ELAPSED_REALTIME_WAKEUP, SystemClock.elapsedRealtime(), 180000, pendingIntent);

        }


        YYLogUtils.w("AlarmReceiver接受广播事件 ====> 开启循环动作")


        //检测Activity栈里面是否有MainActivity

        if (ActivityManage.getActivityStack() == null || ActivityManage.getActivityStack().size == 0) {

            //重启首页

           // context.gotoActivity<DemoMainActivity>()

        } else {

            YYLogUtils.w("不需要重启,已经有栈在运行了 Size:" + ActivityManage.getActivityStack().size)

        }

    }


}
打印日志,由于间隔时间太长,我手机放者,直接把Log保持到Log文件,导出出来,截图如下:
最后是杀死App之后收到的广播。
杀死App手机放了一会,我去个洗手间回来,看看打印日志情况。
2.3 WorkManager实现定时任务
同样的如果不清楚WorkManager的基础使用,推荐大家看看教程
WorkManager的使用相对来说也比较简单, WorkManager组件库里面提供了一个专门做周期性任务的类PeriodicWorkRequest。但是PeriodicWorkRequest类有一个限制条件最小的周期时间是15分钟。
WorkManager 比较适合一些比较长时间的任务。还能设置一些约束条件,比如我们每24小时,在设备充电的时候我们就上传这一整天的Log文件到服务器,比如我们每隔12小时就检查应用是否需要更新,如果需要更新则自动下载安装(需要指定Root设备)。
场景如下,还是那个放在公司前台常亮并且一直运行在前台的平板,我们每12小时就检查自动更新,并自动安装,由于之前写了 AlarmManager 所以安装成功之后App会自动打开。
伪代码如下:
        Data inputData2 = new Data.Builder().putString("version", "1.0.0").build();

        PeriodicWorkRequest checkVersionRequest =

                new PeriodicWorkRequest.Builder(CheckVersionWork.class, 12, TimeUnit.HOURS)

                        .setInputData(inputData2).build();


        WorkManager.getInstance().enqueue(checkVersionRequest);

        WorkManager.getInstance().getWorkInfoByIdLiveData(checkVersionRequest.getId()).observe(this, workInfo -> {

            assert workInfo != null;

            WorkInfo.State state = workInfo.getState();


            Data data = workInfo.getOutputData();

            String url = data.getString("download_url", "");

             //去下载并静默安装Apk

            downLoadingApkInstall(url)

        });
/**

 * 间隔12个小时的定时任务,检测版本的更新

 */

public class CheckVersionWork extends Worker {


    public CheckVersionWork(@NonNull Context context, @NonNull WorkerParameters workerParams) {

        super(context, workerParams);

    }


    @Override

    public void onStopped() {

        super.onStopped();

    }


    @NonNull

    @Override

    public Result doWork() {

        Data inputData = getInputData();

        String version = inputData.getString("version");


        //接口获取当前最新的信息


       //对比当前版本与服务器版本,是否需要更新


       //如果需要更新,返回更新下载的url


       Data outputData = new Data.Builder().putString("key_name", inputData.getString("download_url", "xxxxxx")).build();

      //设置输出数据

        setOutputData(outputData);


        return Result.success();

    }

}
这个时间太长了不好测试,不过是我之前自用的代码,没什么问题,哪天有时间做个Demo把日志文件导出来看看才能看出效果。
那除此之外我们一些Log的上传,图片的更新,资源或插件的下载等,我们都可以通过WorkManager来实现一些后台的操作,使用起来也是很简单。
总结
这里我直接给出了一些特定的场景应该使用哪一种定时任务,如果大家的应用场景适合App内部的定时任务,应该优先选择内部的定时任务。
App外的定时任务,都是系统服务的定时任务,不一定保险,毕竟是和厂商(特别是国内的厂商)作对,厂商会想方设法杀死我们的定时任务,毕竟有风险。
关于系统服务的定时任务我感觉自己讲的不是很好,好在给出了一些方案和一些文章,大家如果对一些基础的使用或者底层原理感兴趣,可以自行了解一下。
关于系统服务的周期任务的使用如果有错误,或者版本兼容的问题,又或者有更多或更好的方法,也可以在评论区交流讨论。
如果感觉本文对你有一点点点的启发,还望你能点赞支持一下,你的支持是我最大的动力。
Ok,这一期就此完结。
作者:newki
链接:https://juejin.cn/post/7130793502933254180
来源:稀土掘金
著作权归作者所有。商业转载请联系作者获得授权,非商业转载请注明出处。 收起阅读 »
给你的 Android App 添加自定义表情
原理
添加自定义表情的原理其实很简单,就是使用 ImageSpan 对文字进行替换。代码如下:
ImageSpan imageSpan = new ImageSpan(this, R.drawable.emoji_kelian);

SpannableStringBuilder spannableStringBuilder = new SpannableStringBuilder("哈哈哈哈[可怜]");

spannableStringBuilder.setSpan(imageSpan, 4, spannableStringBuilder.length(), Spannable.SPAN_EXCLUSIVE_EXCLUSIVE);

textView.setText(spannableStringBuilder);
上面的代码把 [可怜] 文字替换成了对应的表情图片。效果如下图,可以看到图片的大小不符合预期,这是因为 ImageSpan 会显示成图片原来的大小。
ImageSpan 的继承关系图如下,出现了 ReplacementSpan 和 DynamicDrawableSpan 两个新的类,先来看一下它们。MetricAffectingSpan 和 CharacterStyle 接口在 Android Span 原理解析 介绍了,这里就不赘述了。
ReplacementSpan 接口
ReplacementSpan 是一个接口,看名字是用来替换文字的。它里面定义了两个方法,如下所示。
public abstract int getSize(@NonNull Paint paint,

                                    CharSequence text,

                                    @IntRange(from = 0) int start,

                                    @IntRange(from = 0) int end,

                                    @Nullable Paint.FontMetricsInt fm);
返回替换后 Span 的宽,上面的例子中就是返回图片的宽度,参数作用如下:
- paint: Paint 的实例
- text: 当前文本,上面的例子中它的值是是 哈哈哈哈[可怜]
- start: Span 的开始位置,这里是 4
- end: Span 的结束位置,这里是 8
- fm: FontMetricsInt 的实例
FontMetricsInt 是描述给定文本大小的字体的各种度量的类。内部属性代表的含义如下图:
- Top:图中紫线的位置
- Ascent: 图中绿线的位置
- Descent: 图中蓝线的位置
- Bottom: 图中黄线的位置
- Leading: 未在图中标出,是指上一行的 Bottom 与下一行的 Top 之间的距离。
图片来源 Meaning of top, ascent, baseline, descent, bottom, and leading in Android's FontMetrics
Baseline 是文字绘制的基准线。它不定义在 FontMetricsInt 中,但可以通过 FontMetricsInt 的属性获取。
上面讲到 getSize 方法只返回宽度,那高度是怎么确定的呢?其实它是通过 FontMetricsInt 来控制,不过这里有个坑,后面会说到。
public abstract void draw(@NonNull Canvas canvas,

                                    CharSequence text,

                                    @IntRange(from = 0) int start,

                                    @IntRange(from = 0) int end,

                                    float x,

                                    int top,

                                    int y,

                                    int bottom,

                                    @NonNull Paint paint);
在 Canvas 中绘制 Span。参数如下:
- canvas:Canvas 实例
- text:当前文本
- start:Span 的开始位置
- end:Span 的结束位置
- x:[可怜] 的 x 坐标位置
- top:当前行的 “Top“ 属性值
- y:当前行的 Baseline
- bottom: 当前行的 ”Bottom“ 属性值
- paint:Paint 实例,可能为 null
这里需要特殊注意 Top 和 Bottom,跟上面说的有点不同这里先记住,后面会一起介绍。
DynamicDrawableSpan
DynamicDrawableSpan 实现了 ReplacementSpan 接口的方法。同时它是一个抽象类,定义了 getDrawable 抽象方法,由 ImageSpan 实现来获取 Drawable 实例。源码如下:
@Override


public int getSize(@NonNull Paint paint, CharSequence text,

    @IntRange(from = 0) int start, @IntRange(from = 0) int end,

    @Nullable Paint.FontMetricsInt fm) {


    Drawable d = getCachedDrawable();

    Rect rect = d.getBounds();


    //设置图片的高

    if (fm != null) {

    fm.ascent = -rect.bottom;

    fm.descent = 0;

    fm.top = fm.ascent;

    fm.bottom = 0;

    }

    return rect.right;

}


@Override


public void draw(@NonNull Canvas canvas, CharSequence text,

    @IntRange(from = 0) int start, @IntRange(from = 0) int end, float x,

    int top, int y, int bottom, @NonNull Paint paint) {


    Drawable b = getCachedDrawable();

    canvas.save();


    int transY = bottom - b.getBounds().bottom;

    //设置对齐方式,有三种分别是

    //ALIGN_BOTTOM 底部对齐,默认

    //ALIGN_BASELINE 基线对齐

    //ALIGN_CENTER 居中对齐

    if (mVerticalAlignment == ALIGN_BASELINE) {

        transY -= paint.getFontMetricsInt().descent;

    } else if (mVerticalAlignment == ALIGN_CENTER) {

        transY = top + (bottom - top) / 2 - b.getBounds().height() / 2;

    }


    canvas.translate(x, transY);

    b.draw(canvas);

    canvas.restore();

}


public abstract Drawable getDrawable();
DynamicDrawableSpan 有两个坑需要特别注意。
第一个坑就是在 getSize 中的 Paint.FontMetricsInt 对象和 draw 方法中通过 paint.getFontMetricsInt() 获取的不是一个对象。也就是说,无论我们在 getSize 的 Paint.FontMetricsInt 中设置什么值,都不会影响到 paint.getFontMetricsInt() 获取对象中的值。它影响的是 top 和 bottom 的值,这也是刚才介绍参数时给 Top 和 Bottom 打引号的原因。
第二个坑是 ALIGN_CENTER 在图片大小超过文字大小时“不起作用”。如下图所示,为了方便显示我加了辅助线,白线是代表参数 top,bottom,但是 bottom 被其它颜色覆盖了。可以看到,图片是居中的,是文字没有居中让我们看上去 ALIGN_CENTER 没有效果一样。
去掉辅助线后,看上去更明显一些。
ImageSpan
ImageSpan 就简单多了,它只实现了 getDrawable() 方法来获取 Drawable 实例,代码如下:
@Override

public Drawable getDrawable() {


    Drawable drawable = null;

    if (mDrawable != null) {


        drawable = mDrawable;


    } else if (mContentUri != null) {


        Bitmap bitmap = null;

        try {

            InputStream is = mContext.getContentResolver().openInputStream(

            mContentUri);

            bitmap = BitmapFactory.decodeStream(is);

            drawable = new BitmapDrawable(mContext.getResources(), bitmap);

            drawable.setBounds(0, 0, drawable.getIntrinsicWidth(),

            drawable.getIntrinsicHeight());

            is.close();

        } catch (Exception e) {

            Log.e("ImageSpan", "Failed to loaded content " + mContentUri, e);

        }


    } else {

        try {

            drawable = mContext.getDrawable(mResourceId);

            drawable.setBounds(0, 0, drawable.getIntrinsicWidth(),

            drawable.getIntrinsicHeight());

        } catch (Exception e) {

            Log.e("ImageSpan", "Unable to find resource: " + mResourceId);

        }

    }

    return drawable;

}
这里代码很简单,我们唯一需要关注的就是获取 Drawable 时,需要设置它的宽高,让它别超过文字的大小。
实现
说完前面的原理后,实现起来就非常简单了。我们只需要继承 DynamicDrawableSpan,实现 getDrawable() 方法,让图片的宽高别超过文字的大小就行了。效果如下图所示:
public class EmojiSpan extends DynamicDrawableSpan {


    @DrawableRes

    private int mResourceId;


    private Context mContext;


    private Drawable mDrawable;


    public EmojiSpan(@NonNull Context context, int resourceId) {

        this.mResourceId = resourceId;

        this.mContext = context;

    }


    @Override


    public Drawable getDrawable() {


        Drawable drawable = null;


        if (mDrawable != null) {


            drawable = mDrawable;


        } else {

            try {

                drawable = mContext.getDrawable(mResourceId);

                drawable.setBounds(0, 0, 48, 48);

            } catch (Exception e) {

                e.printStackTrace();

            }

        }

        return drawable;

    }

}
上面看上去很完美,但是事情没有那么简单。因为我们只是写死了图片的大小,并没有改变图片位置绘制的算法。如果其他地方使用了 EmojiSpan ,但是文字的大小小于图片大小时还是会出问题。如下图,当文字的 textsize 为 10sp 时的情况。
实际上,文字大于图片大小时也有问题。如下图所示,多行的情况下,只有表情的行间距明显小于其他行的间距。
如果大家对这个的解决办法感兴趣的话,点赞+收藏数 >= 40,我就复刻一下B站的自定义表情,加上会动的自定义表情(实际上是 Gif 图)。
作者:新一代螺丝工
链接:https://juejin.cn/post/7144527505394368525
来源:稀土掘金
著作权归作者所有。商业转载请联系作者获得授权,非商业转载请注明出处。 收起阅读 »
如何解决Flutter在Android的适配错乱问题
前言
大家好,我是未央歌,一个默默无闻的移动开发搬砖者~
先给大家说说项目背景,项目原为 Android 原生开发,所用语言为 Java/Kotlin ;后面引入了 Flutter 混编,如果大家有兴趣,评论区留言,后面再单独开一篇文章为大家讲解一下如何实现 Android 和 Flutter 混编。
Android 适配
说到适配,Android 原生端大家通常采用今日头条适配方案:AndroidAutoSize 。而 AndroidAutoSize的使用也非常简单,按照以下步骤填写全局设计图尺寸 (单位 dp),无需另外操作。
step1
dependencies {

    implementation 'com.github.JessYanCoding:AndroidAutoSize:v1.2.1'

}
step2
<manifest>

    <application>

        <meta-data

            android:name="design_width_in_dp"

            android:value="375"/>

        <meta-data

            android:name="design_height_in_dp"

            android:value="667"/>

     </application>

</manifest>
Flutter 适配
而 Flutter 大家常采用的适配方案则是 flutter_screenutil 。传入设计稿的宽度和高度,进行初始化(只需设置一次)即可。
step1
dependencies:

  flutter:

    sdk: flutter

  # add flutter_screenutil

  flutter_screenutil: ^{latest version}
step2
void main() => runApp(MyApp());


class MyApp extends StatelessWidget {

  @override

  Widget build(BuildContext context) {

    //填入设计稿中设备的屏幕尺寸,单位dp

    return ScreenUtilInit(

      designSize: const Size(375, 667),

      minTextAdapt: true,

      splitScreenMode: true,

      builder: (context , child) {

        return MaterialApp(

          debugShowCheckedModeBanner: false,

          title: 'First Method',

          // You can use the library anywhere in the app even in theme

          theme: ThemeData(

            primarySwatch: Colors.blue,

            textTheme: Typography.englishLike2018.apply(fontSizeFactor: 1.sp),

          ),

          home: child,

        );

      },

      child: const HomePage(title: 'First Method'),

    );

  }

}
遇到问题
在做项目需求的时候会遇到如下布局错乱情况,如下图:高空环景、VR、封面图都给距离右边有很大一片空白。每次打开第一次进来都会出现这样的布局错乱问题,第二次进来就恢复正常。
解决问题
当时一度以为是 flutter_screenutil 库在 Android 上的 bug ,后来单独写了一个混编的 demo ,发现不会出现布局错乱情况,于是把矛头对准了原生端的适配 AndroidAutoSize。只要是 Flutter 页面,取消今日头条适配方案(有提供 interface 接口),就不会出现布局错乱问题了。以上问题是两个适配方案相互影响导致!
import me.jessyan.autosize.internal.CancelAdapt


open class BaseFlutterActivity : FlutterActivity(), CancelAdapt {

    ...

}
实现 CancelAdapt 接口就可解决,如下图:布局错乱问题已解决,恢复正常。
总结
大家遇到疑难杂症问题,先思考可能导致这个问题的原因,然后逐个排查试错。 有时候项目太庞大,可以写一个 demo 来快速验证对错,从而得出原因,对症下药解决。
作者:未央歌
链接:https://juejin.cn/post/7147616629164081188
来源:稀土掘金
著作权归作者所有。商业转载请联系作者获得授权,非商业转载请注明出处。
“雪糕刺客”你听说过,Bitmap这个“内存刺客”你也要小心(上)~
写在前面
雪糕刺客是最近被网友们玩坏了的梗,指的是那些以平平无奇的外表混迹于众多平价雪糕之中的贵价雪糕。由于没有明确标明价格,通常要等到结账的时候才会发现,犹如一个潜藏于普通人群中的刺客般,伺机对那些大意的顾客们的钱包刺上一剑,因此得名。
而在Android中,也有这么一个内存刺客,其作为我们日常开发中经常接触的对象之一,却常常因为使用方式的不当,时不时地就会给我们有限的内存来上一个背刺,甚至毫不留情地就给我们抛出一个OOM,它,就是Bitmap。
为了讲好Bitmap这个话题,本系列文章将分为上下两篇,上篇从图像基础知识出发,结合源码讲解Bitmap内存的计算方式;下篇则基于Android系统提供的API,讲解在实际开发中如何管理好Bitmap的内存,包括缩放、缓存、内存复用等,敬请期待。
本文为上篇,开始之前,先奉上的思维导图一张,方便后续复习:
从一个问题出发
假设有这么一张PNG格式的图片,其大小为15.3KB,尺寸为96x96,色深为32 bit,放到xhdpi目录下,并加载到一台dpi为480的Android设备上显示,那么请问,该图片实际会占用多大的内存?
如果你回答不了这个问题,那你就有必要深入往下读了。
压缩格式大小≠占用内存大小
首先我们要明确的是,无论是JPEG还是PNG,它们本质上都是一种压缩格式,压缩的目的是为了降低存储和传输的成本。
区别就在于:
JPEG是一种有损压缩格式,压缩比大,压缩后的体积比较小,但其高压缩率是通过去除冗余的图像数据进行的,因此解压后无法还原出完整的原始图像数据。
PNG则是一种无损压缩格式,不会损失图片质量,解压后能还原出完整的原始图像数据,但也因此压缩比小,压缩后的体积仍然很大。
开篇问题中所特意强调的图片大小,实际指的就是压缩格式文件的大小。而问题最后所问的图片实际占用的内存,指的则是解压缩后显示在设备屏幕上的原始图像数据所占用的内存。
在实际的Android开发中,我们经常直接接触到的原始图像数据,就是通过各种decode方法解码出的Bitmap对象。
Bitmap即位图,它还有另外一个名称叫做点阵图,相对来说,点阵图这个名称更能表述Bitmap的特征。
点指的是像素点,阵指的是阵列。点阵图,就是以像素为最小单位构成的图,缩放会失真。每个像素实则都是一个非常小的正方形,并被分配不同的颜色,然后通过不同的排列来构成像素阵列,最终呈现出完整的图像。
那么每个像素是如何存储自己的颜色信息的呢?这涉及到图片的色深。
色深是什么?
色深,又叫色彩深度(Color Depth)。假设色深的数值为n,代表每个像素会采用n个二进制位来存储颜色信息**,也即2的n次方,表示的是每个像素能显示2^n种颜色。
常见的色深有:
1 bit:只能显示黑与白两个中的一个。因为在色深为1的情况下,每个像素只能存储2^1=2种颜色。
8 bit:可以存储2^8=256种的颜色,典型的如GIF图像的色深就为8 bit。
24 bit:可以存储2^24=16,777,216种的颜色。每个像素的颜色由红(Red)、绿(Green)、蓝(Blue)3个颜色通道合成,每个颜色通道用8bit来表示,其取值范围是:
- 二进制:00000000~11111111
- 十进制:0~255
- 十六进制:00~FF
这里很自然地就让人联想起Android中常用于表示颜色两种形式,即:
Color.rgb(float red, float green, float blue),对应十进制Color.parceColor(String colorString),对应十六进制
32 bit:在24位的基础上,增加多8个位的透明通道。
色深会影响图片的整体质量,我们可以来看同一张图片在不同色深下的表现:
可以看出,色深越大,能表示的颜色越丰富,图片也就越鲜艳,颜色过渡就越平滑。但相对的,图片的体积也会增加,因为每个像素必须存储更多的颜色信息。
Android中与色深配置相关的类是Bitmap.Config,其取值会直接影响位图的质量(色彩深度)以及显示透明/半透明颜色的能力。在Android 2.3(API 级别 9)及更高版本中的默认配置是ARGB_8888,也即32 bit的色深,1 byte = 8 bit,因此该配置下每个像素的大小为4 byte。
位图内存 = 像素数量(分辨率) * 每个像素的大小,想要进一步计算加载位图所需要的内存,我们还需要得知像素的总数量,而描述像素数量的说法就是分辨率。
分辨率是什么?
如果说,色深决定了位图颜色的丰富程度,那么分辨率决定的则是位图图像细节的精细程度。图像的分辨率越高,所包含的像素就越多,图像也就越清晰,同样的,它也会相应增加图片的体积。
通常,我们用每一个方向上的像素数量来表示分辨率,也即水平像素数×垂直像素数,比如320×240,640×480,1280×1024等。
一张分辨率为640x480的图片,其像素数量就达到了307200,也就是我们常说的30万像素。
现在,我们明白了公式中2个变量的含义,就可以代入开篇问题中的例子来计算位图内存:
96 * 96 * 4 byte = 36864 bytes = 36KB
Bitmap提供了两个方法用于获取系统为该Bitmap存储像素所分配的内存大小,分别为:
public int getByteCount ()
public int getAllocationByteCount ()
一般情况下,两个方法返回的值是相同的。但如果我们手动重新配置了Bitmap的属性(宽、高、Bitmap.Config等),或者将BitmapFactory.Options.inBitmap属性设为true以支持其他更小的Bitmap复用其内存时,那么getAllocationByteCount ()返回的值就有可能会大于getByteCount()。
我们暂时不考虑以上两种场景,所以直接选择调用getByteCount方法 ()来获取为Bitmap分配的字节数,得到的结果是:82944 bytes = 81KB。
可以看到,getByteCount方法返回的值与我们的计算结果有差异,是我们的计算公式有问题吗?
探究getByteCount()的计算公式
为了验证我们的计算公式是否准确,我们需要深入getByteCount()方法的源码进行探究。
public final int getByteCount() {

    if (mRecycled) {

        Log.w(TAG, "Called getByteCount() on a recycle()'d bitmap! "

                + "This is undefined behavior!");

        return 0;

    }

    // int result permits bitmaps up to 46,340 x 46,340

    return getRowBytes() * getHeight();

}
可以看到,getByteCount()方法的返回值是每一行的字节数 * 高度,那么每一行的字节数又是怎么计算的呢?
public final int getRowBytes() {

   if (mRecycled) {

          Log.w(TAG, "Called getRowBytes() on a recycle()'d bitmap! This is undefined behavior!");

   }

   return nativeRowBytes(mFinalizer.mNativeBitmap);

}
正如你所见,getRowBytes()方法的实现是在Native层。先别灰心,接下来坐好扶稳了,我们省去一些不重要的步骤,乘坐飞船一路跨越Bitmap.cpp、SkBitmap.h,途径SkBitmap.cpp时稍微停下:
size_t SkBitmap::ComputeRowBytes(Config c, int width) {

    return SkColorTypeMinRowBytes(SkBitmapConfigToColorType(c), width);

}
并最终到达SkImageInfo.h:
static int SkColorTypeBytesPerPixel(SkColorType ct) {

   static const uint8_t gSize[] = {

    0,  // Unknown

    1,  // Alpha_8

    2,  // RGB_565

    2,  // ARGB_4444

    4,  // RGBA_8888

    4,  // BGRA_8888

    1,  // kIndex_8

  };

   SK_COMPILE_ASSERT(SK_ARRAY_COUNT(gSize) == (size_t)(kLastEnum_SkColorType + 1),

                size_mismatch_with_SkColorType_enum);


   SkASSERT((size_t)ct < SK_ARRAY_COUNT(gSize));

   return gSize[ct];

}


static inline size_t SkColorTypeMinRowBytes(SkColorType ct, int width) {

    return width * SkColorTypeBytesPerPixel(ct);

}
都说正确清晰的函数名有替代注释的作用,这就是优秀的典范。
让我们把目光停留在width * SkColorTypeBytesPerPixel(ct)这一行,不难看出,其计算方式是先根据颜色类型获取每个像素对应的字节数,再去乘以其宽度。
那么,结合Bitmap.java的getByteCount()方法的实现,我们最终得出,系统为Bitmap存储像素所分配的内存大小 = 宽度 * 每个像素的大小 * 高度,与我们上面的计算公式一致。
公式没错,那问题究竟出在哪里呢?
其实,如果我们的图片是从磁盘、网络等地方获取的,理论上确实是按照上面的公式那样计算没错。但你还记得吗?我们在开篇的问题中,还特意强调了图片是放在xhdpi目录下的。在Android设备上,这种情况下计算位图内存,还有一个维度要考虑进来,那就是像素密度。
像素密度是什么?
像素密度指的是屏幕单位面积内的像素数,称为dpi(dots per inch,每英寸点数)。当两个设备的尺寸相同而像素密度不同时,图像的效果呈现如下:
是不是感觉跟分辨率的概念有点像?区别就在于,前者是屏幕单位面积内的像素数,后者是屏幕上的总像素数。
由于Android是开源的,任何硬件制造商都可以制造搭载Android系统的设备,因此从手表、手机到平板电脑再到电视,各种屏幕尺寸和屏幕像素密度的设备层出不穷。

为了优化不同屏幕配置下的用户体验,确保图像能在所有屏幕上显示最佳效果,Android建议应针对常见的不同的屏幕尺寸和屏幕像素密度,提供对应的图片资源。于是就有了Android工程res目录下,加上各种配置限定符的drawable/mipmap文件夹。
为了简化不同的配置,Android针对不同像素密度范围进行了归纳分组,如下:
我们通常选取中密度 (mdpi) 作为基准密度(1倍图),并保持ldpi~xxxhdpi这六种主要密度之间 3:4:6:8:12:16 的缩放比,来放置相应尺寸的图片资源。
例如,在创建Android工程时IDE默认为我们添加的ic_launcher图标,就遵循了这个规则。该图标在中密度 (mdpi)目录下的大小为48x48,在其他各种密度的目录下的大小则分别为:
- 36x36 (0.75x) - 低密度 (ldpi)
- 48x48(1.0x 基准)- 中密度 (mdpi)
- 72x72 (1.5x) - 高密度 (hdpi)
- 96x96 (2.0x) - 超高密度 (xhdpi)
- 144x144 (3.0x) - 超超高密度 (xxhdpi)
- 192x192 (4.0x) - 超超超高密度 (xxxhdpi)
当我们引用该图标时,系统就会根据所运行设备屏幕的dpi,与不同密度目录名称中的限定符进行比较,来选取最符合当前设备的图片资源。如果在该密度目录下没有找到合适的图片资源,系统会有对应的规则查找另外一个可能的匹配资源,并对其进行相应的缩放,以适配屏幕,由此可能造成图片有明显的模糊失真。
那么,具体的查找规则是怎样的呢?
Android查找最佳匹配资源的规则
一般来说,Android会更倾向于缩小较大的原始图像,而非放大较小的原始图像。在此前提下:
- 假设最接近设备屏幕密度的目录选项为xhdpi,如果图片资源存在,则匹配成功;
- 如果不存在,系统就会从更高密度的资源目录下查找,依次为xxhdpi、xxxhdpi;
- 如果还不存在,系统就会从像素密度无关的资源目录nodpi下查找;
- 如果还不存在,系统就会向更低密度的资源目录下查找,依次为hdpi、mdpi、ldpi。
那么,当匹配到其他密度目录下的图片资源后,对于原始图像的放大或缩小,Android是怎么实现的呢?又会对加载位图所需要的内存有什么影响呢?
想解决这些疑惑,我们还是得从源码中找寻答案。
decode*方法的猫腻
众所周知,在Android中要读取drawable/mipmap目录下的图片资源,需要用到的是BitmapFactory类下的decodeResource方法:
    public static Bitmap decodeResource(Resources res, int id, Options opts) {

        ...

        final TypedValue value = new TypedValue();

        is = res.openRawResource(id, value);


        bm = decodeResourceStream(res, value, is, null, opts);

        ...

    }
decodeResource方法的主要工作,就只是调用Resource#openRawResource方法读取原始图片资源,同时传递一个TypedValue对象用于持有图片资源的相关信息,并返回一个输入流作为内部继续调用decodeResourceStream方法的参数。
    public static Bitmap decodeResourceStream(Resources res, TypedValue value,InputStream is, Rect pad, Options opts) {

        if (opts == null) {

            opts = new Options();

        }


        if (opts.inDensity == 0 && value != null) {

            final int density = value.density;

            if (density == TypedValue.DENSITY_DEFAULT) {

                opts.inDensity = DisplayMetrics.DENSITY_DEFAULT;

            } else if (density != TypedValue.DENSITY_NONE) {

                opts.inDensity = density;

            }

        }


        if (opts.inTargetDensity == 0 && res != null) {

            opts.inTargetDensity = res.getDisplayMetrics().densityDpi;

        }


        return decodeStream(is, pad, opts);

    }
decodeResourceStream方法的主要工作,则是负责Options(解码选项)类2个重要参数inDensity和inTargetDensity的初始化,其中:
- inDensity代表的是Bitmap的像素密度,取决于原始图片资源所存放的密度目录。
- inTargetDensity代表的是Bitmap将绘制到的目标的像素密度,通常就是指屏幕的像素密度。
这两个参数起什么作用呢,让我们继续往下看:
public static Bitmap decodeStream(InputStream is, Rect outPadding, Options opts) {

    ···

    if (is instanceof AssetManager.AssetInputStream) {

        final long asset = ((AssetManager.AssetInputStream) is).getNativeAsset();

        bm = nativeDecodeAsset(asset, outPadding, opts);

    } else {

        bm = decodeStreamInternal(is, outPadding, opts);

    }

    ···

}
private static Bitmap decodeStreamInternal(InputStream is, Rect outPadding, Options opts) {

    byte [] tempStorage = null;

    if (tempStorage == null) tempStorage = new byte[DECODE_BUFFER_SIZE];

    return nativeDecodeStream(is, tempStorage, outPadding, opts);

}
又见到熟悉的Native层方法了,让我们重新开动星际飞船再次跨越到BitmapFactory.cpp下查看:
static jobject nativeDecodeStream(JNIEnv* env, jobject clazz, jobject is, jbyteArray storage, jobject padding, jobject options) {

    ···

    bitmap = doDecode(env, bufferedStream, padding, options);

    ···

}
static jobject doDecode(JNIEnv* env, SkStreamRewindable* stream, jobject padding, jobject options) {

    ····

    float scale = 1.0f;

    ···

    if (env->GetBooleanField(options, gOptions_scaledFieldID)) {

        const int density = env->GetIntField(options, gOptions_densityFieldID);

        const int targetDensity = env->GetIntField(options, gOptions_targetDensityFieldID);

        const int screenDensity = env->GetIntField(options, gOptions_screenDensityFieldID);

        if (density != 0 && targetDensity != 0 && density != screenDensity) {

            scale = (float) targetDensity / density;

        }

    }

    ···

    const bool willScale = scale != 1.0f;

    ···

    int scaledWidth = decodingBitmap.width();

    int scaledHeight = decodingBitmap.height();


    if (willScale && decodeMode != SkImageDecoder::kDecodeBounds_Mode) {

        scaledWidth = int(scaledWidth * scale + 0.5f);

        scaledHeight = int(scaledHeight * scale + 0.5f);

    }


    if (options != NULL) {

       env->SetIntField(options, gOptions_widthFieldID, scaledWidth);

       env->SetIntField(options, gOptions_heightFieldID, scaledHeight);

       env->SetObjectField(options, gOptions_mimeFieldID,

       getMimeTypeString(env, decoder->getFormat()));

    }

    ...

}
以上节选的doDecode方法的部分源码,就是Android系统如何对其他密度目录下的原始图像进行缩放的具体实现,我们来梳理一下它的执行逻辑:
- 首先,设置scale值也即初始的缩放比为1。
- 取出关键的density值以及targetDensity值,以目标像素密度/位图像素密度重新计算缩放比。
- 如果缩放比不再为1,则说明原始图像需要进行缩放。
- 取出待解码的位图的宽度,按int(scaledWidth * scale + 0.5f)计算缩放后的宽度,高度同理。
- 重新填充缩放后的宽高回Options。
基于以上内容,我们重新调整下我们的计算公式:
位图内存 = (位图宽度 * 缩放比) * 每个像素的大小 * (位图高度 * 缩放比)
= (96 * 1.5) * 4 * (96 * 1.5)
= 82944 bytes = 81KB
可以看到,这样计算得出来的结果则与Bitmap#getByteCount()返回的值一致。
总结
汇总上述的所有内容后,我们可以得出结论,即:
Android系统为Bitmap存储像素所分配的内存大小,取决于以下几个因素:
- 色深,也即每个像素的大小,对应的是Bitmap.Config的配置。
- 分辨率,也即像素的总数量,对应的是Bitmap的高度和宽度
- 像素密度,对应的是图片资源所在的密度目录,以及设备的屏幕像素密度
由此我们还衍生出其他的结论,即:
- 图片资源放到正确的密度目录很重要,否则可能对会较大尺寸的图片进行不合理的缩放,从而加大不必要的内存占用。
- 如果是为了减少包体积而不想提供所有密度目录下不同尺寸的图片,应优先提供更高密度目录下的图片资源,可以避免图片失真。
- ...
作者:椎锋陷陈
链接:https://juejin.cn/post/7123872753463066637
来源:稀土掘金
著作权归作者所有。商业转载请联系作者获得授权,非商业转载请注明出处。 收起阅读 »
带着需求看源码《如何判断 Activity 上是否有弹窗》
今天来看个需求,如何判断 Activity 上面是否有弹窗,当然,简单的方式肯定有,例如在 Dialog show 的时候记录一下,但这种方式不够优雅,我们需要一款更通用的判断方式。
Android 目前的弹窗有如下几种:
- 普通的应用窗口,如 Dialog
- 附加与普通窗口的子窗口,如 PopWindow
- 系统窗口,如 WindowManager type 在 FIRST_SYSTEM_WINDOW 与 LAST_SYSTEM_WINDOW 之间
通过图来简单来了解下 Window 和 View 的关系:
- Activity 在 attach 阶段创建了 PhoneWindow,并将 AppToken 存储到 PhoneWindow 中,然后通过 createLocalWindowManager 创建了一个本地的 WindowManager,该实例是 WindowManagerImpl,构造传入的 parentWindow 为 PhoneWindow。在 onResume 阶段时,从 PhoneWindow 中获取 WindowManager 来 addView
- Dialog 有自己的 PhoneWindow,但 Dialog 并没有从 PhoneWindow 中去 get WindowManager,而是直接使用 getSystemService 拿到 Activity 的 WindowManager 来 addView
- PopWindow 内部是通过 getSystemService 来拿到 Activity WindowManager + 内置子窗口 type 来实现的弹框
方案 1、通过 mView 集合中的 Activity 区间来判断
从上面我们可以简单了解到,当前进程所有窗口 View,最终都会被存储到 WindowManagerGlobal 单例的 mViews 集合中,那我们是不是可以从 mView 这个集合入手?我们来简单画个 mView 的存储图:
WindowManager addView 时,都会往 mView 这个集合中进行添加。所以,我们只需要判断在 mView 集合中,两个 activity 之间是否有存在其他的 View,如果有,那就是有弹窗,开发步骤为:
- registerActivityLifecycleCallbacks 获取所有 Activity 的实例
- 传入想判断是否有弹窗的目标 Activity 实例,并获取该实例的 DecorView
- 拿到所有 Activity 实例的 DecorView 集合
- 遍历 mView 集合,并判断 mView 中的 View 是否与目标 Activity 的 DecorView 一致,是的话,说明找到了activity 的 index 位置
- 接下来从 index +1 的位置开始继续遍历 mView,判断 mView 中的 View 是否是 DecorView 集合中的实例,如果没有,则说明不是 Activity 的 View,继续遍历,直到 View 为 DecorView 集合中的实例为止
部分代码实现如下:
fun hasFloatingWindowByView(activity: Activity): Boolean {

    return getFloatWindowView(activity).isNotEmpty()

}


fun getFloatWindowByView(activity: Activity): List<View> {

    // 对应步骤 2

    val targetDecorView = activity.window.decorView

    // 对应步骤 3

    val acDecorViews = lifecycle.getActivities().map { it.window.decorView }.toList()

    // 对应步骤 4

    val mView = Window.getViews().map { it }.toList()

    val targetIndex = mView.first { it == targetDecorView }

    // 对应步骤 5

    val index = mView.indexOf(targetIndex)

    val floatView = arrayListOf<View>()

    for (i in index + 1 until mView.size) {

        if (acDecorViews.contains(mView[i])) {

            break

        }

        floatView.add(mView[i])

    }

    return floatView

}
具体演示可以参考 Demo,这里说个该方案的缺点,由于 mView 是个 List 集合,每次有新的 View add 进来,都是按 ArrayList.add 来添加 View 的,如果我们在启动第二个 Activity 的时候,触发第一个 Activity 来展示 Dialog,这时候的展示效果如下:
这时候如果拿第一个 Activity 来判断是否有弹窗的话,是存在误判的,因为这时候的两个 Activity 之间没有其他 View。
所以,通过区间来判断还是有缺点的。那有没有一种方法,可以直接遍历 mView 集合就能找到目标 Activity 是否有弹窗呢?还真有,那就是 AppToken。
方案二:通过 AppToken 来判断
在文章开头的概念中,我们了解到,PopWindow、Dialog 使用的都是 Activity 的 WindowManager,并且,该WindowManager 在初次创建时,构造函数传入的 parentWindow 为 PhoneWindow,这个 parentWindow 很重要,因为在 WindowManagerGlobal 的 addView 方法中,他会通过 parentWindow 来拿到 AppToken,然后设置到 WindowManager.LayoutParams 中,并参与最终的界面展示。
我们来看下设置 AppToken 的代码:
parentWindow 为 PhoneWindow,不为空,所以会进入到 PhoneWindow 父类 Window 的adjustLayoutParamsForSubWindow 方法:
- 子窗口判断:取 DecorView 里面的 WindowToken 设置到 wp 参数中。该 DecorView 为 Activity PhoneWindow 里的 DecorView,所以,该 windowToken 可以通过 Activity 的 DecorView 中拿到
- 系统弹窗判断:不设置 token,wp 中的 token 参数为 null
- 普通弹窗判断:将 AppToken 直接设置到 wp 参数中。该 AppToken 为 Activity PhoneWindow 里的 AppToken
通过这个三个判断我们了解到,子窗口的 windowToken 与普通弹窗的 AppToken 都可以与 Activity 挂钩了,这下,通过目标 Activity 就可以找到他们。至于系统弹窗,我们只需要 token 为 null 时即可。
wp 最终会被添加到 mParams 集合中,他与 mView 和 mRoot 的索引是一一对应的:
画个简单的图来概括下:
然后再结合 adjustLayoutParamsForSubWindow 对 token 的设置来描述下开发步骤:
- 传入想判断是否有弹窗的目标 Activity 实例,并获取该实例的 DecorView 与 windowToken
- 拿到 mView 集合,根据目标 Activity 的 DecorView 找到 index 位置
- 由于 mView 与mParams 集合是一一对应的,所以,可以根据该 index 位置去 mParams 集合里面找到目标 Activity 的 AppToken
- 遍历 mParams 集合中的所有 token,判断该 token 是否为目标 windowToken,目标 AppToken 或者是 null,只要能命中,则说明有弹窗
部分代码实现如下:
fun hasFloatWindowByToken(activity: Activity): Boolean {

    // 获取目标 Activity 的 decorView

    val targetDecorView = activity.window.decorView

    // 获取目标 Activity 的 windowToken

    val targetSubToken = targetDecorView.windowToken


    //  拿到 mView 集合,找到目标 Activity 所在的 index 位置

    val mView = Window.getViews().map { it }.toList()

    val targetIndex = mView.indexOfFirst { it == targetDecorView }


    // 获取 mParams 集合

    val mParams = Window.getParams()

    // 根据目标 index 从 mParams 集合中找到目标 token

    val targetToken = mParams[targetIndex].token


    // 遍历判断时,目标 Activity 自己不能包括,所以 size 需要大于 1

    return mParams

        .map { it.token }

        .filter { it == targetSubToken || it == null || it == targetToken }

        .size > 1

}
演示步骤:
- 在第一个 Activity 打开系统弹窗,然后进入第二个 Activity,调用两种方式来获取当前是否有弹窗的结果如下
- 第一种方案会判断失败,因为这时候的弹窗 View 在第一个 Activity 与 第二个 Activity 之间,所以,第二个 Activity 无法通过区间的方式判断到是否有弹窗
- 第二种方案判断成功,因为这时候的弹窗 token 为 null,并通过 getFloatWindowViewByToken 方法,拿到了弹窗 View 对象
总结
本期通过提出需求的方式来探索方案的可行性,对于枯燥的源码来说,针对性的去看确实是个不错的主意
附上 demo 源码:github.com/MRwangqi/Fl…
作者:codelang
链接:https://juejin.cn/post/7136537294005075976
来源:稀土掘金
著作权归作者所有。商业转载请联系作者获得授权,非商业转载请注明出处。 收起阅读 »
最近很火的反调试,你知道它是什么吗?
前言
我们日常开发中,永远离不开debug调试,断点技术一直是我们排查bug的有力手段之一!随着网络安全意识的逐步提高,对app安全的要求就越来越高,反调试 (有朋友不太了解这个概念,这里我解释一下,就是通过调试技术,比如我们可以反编译某个apk,即使apk是release包,同样也可以进行反编译后调试,比如最新版本的jadx)的技术也渐渐深入我们开发者的眼帘,那么我们来具体看看,android中,同时也是linux内核中,是怎么处理调试程序的!
执行跟踪
无论是断点还是其他debug手段,其实都可以总结为一个技术手段,就是执行跟踪,含义就是一个程序监视另一个程序的技术,被跟踪的程序通过一步步执行,知道收到一个信号或者系统调用停止!
在linux内核中,就是通过ptrace系统调用进行的执行跟踪
#include
long ptrace(enum __ptrace_request request, pid_t pid, void *addr, void *data);
随着我们对linux的了解,那么就离不开对权限的讨论!一个程序跟踪另一个程序这种东西,按照linux风格,肯定是具有某种权限才可以执行!这个权限就是设置了CAP_SYS_PTRACE 权限的进程,就可以跟踪系统中除了init进程(linux第一个进程)外的任何进程!当然!就算一个进程没有CAP_SYS_PTRACE权限,也可以跟踪一个与被监视进程有相同属组的进程,比如父进程可以通过ptrace跟踪子进程!执行跟踪还有一个非常重要的特点,就是两个进程不能同时跟踪一个进程!
我们再回到ptrace函数调用,可以看到第一个参数是一个枚举值,其实就是发出ptrace的当前行为,它有以下可选命令(仅部分举例):
其他的参数含义如下: pid参数标识目标进程,addr参数表明执行peek(读操作)和poke(写操作)操作的地址,data参数则对于poke操作,指明存放数据的地址,对于peek操作,指明获取数据的地址。
ptrace设计探讨
我们了解了linux提供的系统api,那么我们还是从设计者角度出发,我们想要跟踪一个进程的话,我们需要干点什么?来来来,我们来想一下,可能就会有以下几个问题吧
被跟踪进程与跟踪进程怎么建立联系
如果使程序停止在我们想要停止的点(比如断点)
跟踪进程与被跟踪进程怎么进行数据交换,又或者我们怎么样看到被跟踪进程中当前的数据
下面我们逐步去探讨一下这几个问题吧!(以PTRACE_ATTACH 作为例子)首先对于问题1,我们怎么建立起被跟踪进程与跟踪进程之间的联系呢?linux中进程存在父子关系,兄弟关系对吧!这些进程就可以通过相对便捷的方式进行通信,同时linux也有定义了特殊的信号提供给父子进程的通信。看到这里,相信大家能够猜到ptrace究竟干了啥!就是通过调用ptrace系统调用,把被跟踪进程(第二个参数pid)的进程描述符号中的p_pptr字段指向了跟踪进程!毕竟linux判断进程的描述,就靠着进程描述符,想要建立父子关系,修改进程描述符即可,就这么简单!这里补充一下部分描述符号:
那么好!我们建立进程之间的联系了,那么当执行跟踪终止的时候,我们就可以调用ptrace 第一个参数为PTRACE_DETACH 命令,把p_pptr恢复到原来的数据即可!(那么有人会问,原来的父进程描述符保存在哪里了,嘿嘿,在p_opptr中,也就是他的祖先中,这里我们不深入讨论)
接下来我们来讨论一下问题2和问题3,怎么使程序停止呢?(这里我们讨论常用的做法,以linux内核2.4版本为准,请注意细微的区别)其实就是被监控进程在读取指令前,就会执行被嵌入的监控代码,如果我想要停止在代码的某一行,这个时候cpu会执行一条“陷阱指令”也称为Debug指令(这里可以采用架构相关的指令或者架构无关的指令实现,比如SIGTRAP或者其他规定信号),一般来说,这条指令作用只是为了使程序停止,然后发出一个SIGCHLD信号给父进程(不了解信号的知识可以看看这篇),嘿嘿,那么这个父进程是谁呢?没错,就是我们刚刚改写的监控进程,这样一来,我们的监控进程就能够收到被监控进程的消息,此时就可以继续调用其他的ptrace调用(第一个参数指定为其他需要的枚举值),查看当前寄存器或者其他的数据
这么说下来可能会有人还是不太懂,我们举个例子,我们的单步调试是怎么样做的: 还是上面的步骤,子进程发送一个SIGCHLD给父进程,此时身为父进程的监控线程就可以再调用ptrace(PTRACE_SINGLESTEP, *, *, * )方法给子进程的下一条指令设置陷阱指令,进行单步调试,此时控制权又会给到子进程,子进程执行完一个指令,就会又发出SIGCHLD给父进程,如此循环下去!
反调试
最近隐私合规与app安全性能被各大app所重视,对于app安全性能来说,反调试肯定是最重要的一环!看到上面的这些介绍,我们应该也明白了ptrace的作用,下面我们介绍一下几种常见的反调试方案:
ptrace占位:利用ptrace的机制,我们知道一个进程只能被一个监控进程所监控,所以我们可以提前初始化一个进程,用这个进程对我们自身app的进程调用一次ptrace即可
轮询进程状态:可以通过轮训的手段,查看进程当前的进程信息:proc/pid/status
Name: test\
Umask: 0022\
State: D (disk sleep)-----------------------表示此时线程处于sleeping,并且是uninterruptible状态的wait。

Tgid: 157-----------------------------------线程组的主pid\
Ngid: 0\
Pid: 159------------------------------------线程自身的pid\
PPid: 1-------------------------------------线程组是由init进程创建的。\
TracerPid: 0\                              **这里是关键**
Uid: 0 0 0 0\
Gid: 0 0 0 0\
FDSize: 256---------------------------------表示到目前为止进程使用过的描述符总数。\
Groups: 0 10 \
VmPeak: 1393220 kB--------------------------虚拟内存峰值大小。\
VmSize: 1390372 kB--------------------------当前使用中的虚拟内存,小于VmPeak。\
VmLck: 0 kB\
VmPin: 0 kB\
VmHWM: 47940 kB-----------------------------RSS峰值。\
VmRSS: 47940 kB-----------------------------RSS实际使用量=RSSAnon+RssFile+RssShmem。\
RssAnon: 38700 kB\
RssFile: 9240 kB\
RssShmem: 0 kB\
VmData: 366648 kB--------------------------进程数据段共366648KB。\
VmStk: 132 kB------------------------------进程栈一共132KB。\
VmExe: 84 kB-------------------------------进程text段大小84KB。\
VmLib: 11488 kB----------------------------进程lib占用11488KB内存。\
VmPTE: 1220 kB\
VmPMD: 0 kB\
VmSwap: 0 kB\
Threads: 40-------------------------------进程中一个40个线程。\
SigQ: 0/3142------------------------------进程信号队列最大3142,当前没有pending
如果TracerPid不为0,那么就存在被监控的进程,此时如果该进程不是我们所信任的进程,就调用我们指定好的程序重启即可!读取这个proc/pid/status文件涉及到的相关处理可以自行google,这里就不再重复列举啦!
总结
看到这里,我们也能够明白debug在linux内核中的处理流程啦!最后,点个赞再走呗!
作者:Pika
来源:juejin.cn/post/7132438417970823176
Android 三行代码实现高斯模糊
设计:有了毛玻璃效果,产品的逼格直接拉满了呀
我:啊,对对对。我去 GayHub 上找找有没有好的解决方案吧
设计:GayHub ???
寻找可行的方案
要实现高斯模糊的方式有很多,StackBlur、RenderScript、Glide 等等都是不错的方式,但最简单直接效率最高的方式,还得是上 Github。
搜索的关键词为 android blur,可以看到有两个库是比较合适的, Blurry 和 BlurView。 这两个库 Star 数比较高,并且也还在维护着。
于是,便尝试了一番,发现 BlurView 比 Blurry 更好用,十分推荐上手 BlurView。

Blurry
优点:API 使用非常简洁,效果也不错,提供同步和异步加载的解决方案
缺点:奇奇怪怪的 Bug 非常多,并且只能作用于 ImageView
BlurView(推荐)
优点:使用的过程中几乎没有遇到 bug,实现时调用的代码较少。并且,可以实现复杂的模糊 View
缺点:需要在 xml 中配置,并且需要花几秒钟的时间理解一下 rootView 的概念
使用方式:
XML:
<androidx.constraintlayout.widget.ConstraintLayout
  ...
  android:id="@+id/rootView"
  android:background="@color/purple_200" >

  <ImageView
    ...
    android:id="@+id/imageView" />

  <eightbitlab.com.blurview.BlurView
    ...
    android:id="@+id/blurView" />

</androidx.constraintlayout.widget.ConstraintLayout>
MainActivity#onCreate:
// 这里的 rootView,只要是 blurView 的任意一个父 View 即可
val rootView = findViewById<ConstraintLayout>(R.id.rootView)
val blurView = findViewById<BlurView>(R.id.blurView)
blurView.setupWith(rootView, RenderScriptBlur(this))
实现的效果
使用前:

使用后:

Tips :
在 BlurView 以下的 View 都会有高斯模糊的效果
rootView 可以选择离 BlurView 最近的 ViewGroup
.setBlurRadius()可以用来设置卷积核的大小,默认是 16F.setOverlayColor()可以用来设置高斯模糊覆盖的颜色值例如如下参数配置时可以达到这样的效果:
blurView.setupWith(rootView, RenderScriptBlur(this))
            .setBlurRadius(5F)
            .setOverlayColor(Color.parseColor("#77000000"))
最后,再补充一下滑动时的效果:

作者:很好奇
来源:juejin.cn/post/7144663860027326494
Android壁纸还是B站玩得花
设置系统壁纸这个功能,对于应用层App来说,场景其实并不多,但在一些场景的周边活动中,确也是一种提升品牌粘性的方式,就好比某个活动中创建的角色的壁纸美图,这些就可以新增一个设置壁纸的功能。
从原始的Android开始,系统就支持设置两种方式的壁纸,一种是静态壁纸,另一种是动态壁纸。
静态壁纸
静态壁纸没什么好说的,通过系统提供的API一行代码就完事了。
最简单代码如下所示。
val wallpaperManager = WallpaperManager.getInstance(this)

try {

    val bitmap = ContextCompat.getDrawable(this, R.drawable.ic_launcher_background)?.toBitmap()

    wallpaperManager.setBitmap(bitmap)

} catch (e: Exception) {

    e.printStackTrace()

}
除了setBitmap之外,系统还提供了setResource、setStream,一共三种方式来设置静态壁纸。
三种方式殊途同归,都是设置一个Bitmap给系统API。
动态壁纸
动态壁纸就有点意思了,很多手机ROM也内置了一些动态壁纸,别以为这些是什么新功能,从Android 1.5开始,就已经支持这种方式了。只不过做的人比较少,为啥呢,主要是没有什么特别合适的场景,而且动态壁纸,会比静态壁纸更加耗电,所以大部分时候,我们都没用这种方式。
壁纸作为一个系统服务,在系统启动时,不管是动态壁纸还是静态壁纸,都会以一个Service的形式运行在后台——WallpaperService,它的Window类型为TYPE_WALLPAPER,WallpaperService提供了一个SurfaceHolder来暴露给外界来对画面进行渲染,这就是设置壁纸的基本原理。
创建一个动态壁纸,需要继承系统的WallpaperService,并提供一个WallpaperService.Engin来进行渲染,下面这个就是一个模板代码。
class MyWallpaperService : WallpaperService() {

    override fun onCreateEngine(): Engine = WallpaperEngine()


    inner class WallpaperEngine : WallpaperService.Engine() {

        lateinit var mediaPlayer: MediaPlayer


        override fun onSurfaceCreated(holder: SurfaceHolder?) {

            super.onSurfaceCreated(holder)

        }


        override fun onCommand(action: String?, x: Int, y: Int, z: Int, extras: Bundle?, resultRequested: Boolean): Bundle {

            try {

                Log.d("xys", "onCommand: $action----$x---$y---$z")

                if ("android.wallpaper.tap" == action) {

                }

            } catch (e: Exception) {

                e.printStackTrace()

            }

            return super.onCommand(action, x, y, z, extras, resultRequested)

        }


        override fun onVisibilityChanged(visible: Boolean) {

            if (visible) {

            } else {

            }

        }


        override fun onDestroy() {

            super.onDestroy()

        }

    }

}
然后在manifest中注册这个Service。
<service

    android:name=".MyWallpaperService"

    android:exported="true"

    android:label="Wallpaper"

    android:permission="android.permission.BIND_WALLPAPER">

    <intent-filter>

        <action android:name="android.service.wallpaper.WallpaperService" />

    </intent-filter>


    <meta-data

        android:name="android.service.wallpaper"

        android:resource="@xml/my_wallpaper" />

</service>
另外,还需要申请相应的权限。
<uses-permission android:name="android.permission.SET_WALLPAPER" />
最后,在xml文件夹中新增一个描述文件,对应上面resource标签的文件。
<?xml version="1.0" encoding="utf-8"?>

<wallpaper xmlns:android="http://schemas.android.com/apk/res/android"

    android:description="@string/app_name"

    android:thumbnail="@mipmap/ic_launcher" />
动态壁纸只能通过系统的壁纸预览界面来进行设置。
val localIntent = Intent()

localIntent.action = WallpaperManager.ACTION_CHANGE_LIVE_WALLPAPER

localIntent.putExtra(

    WallpaperManager.EXTRA_LIVE_WALLPAPER_COMPONENT,

    ComponentName(applicationContext.packageName, MyWallpaperService::class.java.name))

startActivity(localIntent)
这样我们就可以设置一个动态壁纸了。
玩点花
既然是使用提供的SurfaceHolder来进行渲染,那么我们所有能够使用到SurfaceHolder的场景,都可以来进行动态壁纸的创建了。
一般来说,有三种比较常见的使用场景。
- MediaPlayer
- Camera
- SurfaceView
这三种也是SurfaceHolder的常用使用场景。
首先来看下MediaPlayer,这是最简单的方式,可以设置一个视频,在桌面上循环播放。
inner class WallpaperEngine : WallpaperService.Engine() {

    lateinit var mediaPlayer: MediaPlayer


    override fun onSurfaceCreated(holder: SurfaceHolder?) {

        super.onSurfaceCreated(holder)

        mediaPlayer = MediaPlayer.create(applicationContext, R.raw.testwallpaper).also {

            it.setSurface(holder!!.surface)

            it.isLooping = true

        }

    }


    override fun onVisibilityChanged(visible: Boolean) {

        if (visible) {

            mediaPlayer.start()

        } else {

            mediaPlayer.pause()

        }

    }


    override fun onDestroy() {

        super.onDestroy()

        if (mediaPlayer.isPlaying) {

            mediaPlayer.stop()

        }

        mediaPlayer.release()

    }

}
接下来,再来看下使用Camera来刷新Surface的。
inner class WallpaperEngine : WallpaperService.Engine() {
lateinit var camera: Camera
override fun onVisibilityChanged(visible: Boolean) {
if (visible) {
startPreview()
} else {
stopPreview()
}
}
override fun onDestroy() {
super.onDestroy()
stopPreview()
}
private fun startPreview() {
camera = Camera.open()
camera.setDisplayOrientation(90)
try {
camera.setPreviewDisplay(surfaceHolder)
camera.startPreview()
} catch (e: IOException) {
e.printStackTrace()
}
}
private fun stopPreview() {
try {
camera.stopPreview()
camera.release()
} catch (e: Exception) {
e.printStackTrace()
}
}
}
同时需要添加下Camera的权限。
<uses-permission android:name="android.permission.CAMERA" />
<uses-permission android:name="android.permission.SET_WALLPAPER" />
<uses-feature android:name="android.hardware.camera" />
<uses-feature android:name="android.hardware.camera.autofocus" />
由于这里偷懒,没有使用最新的CameraAPI,也没有动态申请权限,所以你需要自己手动去授权。
最后一种,通过Surface来进行自绘渲染。
val holder = surfaceHolder
var canvas: Canvas? = null
try {
canvas = holder.lockCanvas()
if (canvas != null) {
canvas.save()
// Draw Something
}
} finally {
if (canvas != null) holder.unlockCanvasAndPost(canvas)
}
这里就可以完全使用Canvas的API来进行绘制了。
这里有一个比较复杂的绘制Demo,可以给大家参考。
http://www.developer.com/design/buil…
有意思的方法
虽然WallpaperService是一个系统服务,但它也提供了一些比较有用的回调函数来帮助我们做一些有意思的东西。
onOffsetsChanged
当用户在手机桌面滑动时,有的壁纸图片会跟着左右移动,这个功能就是通过这个回调来实现的,在手势滑动的每一帧都会回调这个方法。
xOffset:x轴滑动的百分比
yOffset:y轴滑动百分比
xOffsetStep:x轴桌面Page数进度
yOffsetStep:y轴桌面Page数进度
xPixelOffset:x轴像素偏移量
通过这个函数,就可以拿到手势的移动惯量,从而对图片做出一些修改。
onTouchEvent、onCommand
这两个方法,都可以获取用户的点击行为,通过判断点击类型,就可以针对用户的特殊点击行为来做一些逻辑处理,例如点击某些特定的地方时,唤起App,或者打开某个界面等等。
class MyWallpaperService : WallpaperService() {
override fun onCreateEngine(): Engine = WallpaperEngine()
private inner class WallpaperEngine : WallpaperService.Engine() {
override fun onTouchEvent(event: MotionEvent?) {
// on finder press events
if (event?.action == MotionEvent.ACTION_DOWN) {
// get the canvas from the Engine or leave
val canvas = surfaceHolder?.lockCanvas() ?: return
// TODO
// update the surface
surfaceHolder.unlockCanvasAndPost(canvas)
}
}
}
}
B站怎么玩的呢
不得不说,B站在这方面玩的是真的花,最近B站里面新加了一个异想少女系列,你可以设置一个动态壁纸,同时还带交互,有点意思。
其实类似这样的交互,基本上都是通过OpenGL或者是RenderScript来实现的,通过GLSurfaceView来进行渲染,从而实现了一些复杂的交互,下面这些例子,就是一些实践。
http://www.cnblogs.com/YFEYI/categ…
code.tutsplus.com/tutorials/c…
但是B站的这个效果,显然比上面的方案更加成熟和完整,所以,通过调研可以发现,它们使用的是Live2D的方案。
动态壁纸的Demo如下。
这个东西是小日子的一个SDK,专业做2D可交互纸片人,这个东西已经出来很久了,前端之前用它来做网页的看板娘,现在客户端又拿来做动态壁纸,风水轮流换啊,想要使用的,可以参考它们官方的Demo。
但是官方的动态壁纸Demo在客户端是有Bug的,会存在各种闪的问题,由于我本身不懂OpenGL,所以也无法解决,通过回退Commit,发现可以直接使用这个CommitID : Merge pull request #2 from Live2D/create-new-function ,就没有闪的问题。
a9040ddbf99d9a130495e4a6190592068f2f7a77
好了,B站YYDS,但我觉得这东西的使用场景太有限了,而且特别卡,极端影响功耗,所以,要不要这么卷呢,你看着办吧。
作者:xuyisheng
链接:https://juejin.cn/post/7135998448720936968
来源:稀土掘金
著作权归作者所有。商业转载请联系作者获得授权,非商业转载请注明出处。 收起阅读 »
Flutter性能优化实践
前言
Flutter是谷歌的移动UI框架,可以快速在iOS和Android上构建高质量的原生用户界面。 Flutter可以与现有的代码一起工作。在全世界,Flutter正在被越来越多的开发者和组织使用,并且Flutter是完全免费、开源的,可以用一套代码同时构建Android和iOS应用,性能可以达到原生应用一样的性能。但是,在较为复杂的 App 中,使用 Flutter 开发也很难避免产生各种各样的性能问题。在这篇文章中,我将介绍一些 Flutter 性能优化方面的应用实践。另外Flutter动态化框架已开源:
Github地址:github.com/wuba/fair
一、优化检测工具
Flutter编译模式
Flutter支持Release、Profile、Debug编译模式。
Release模式,使用AOT预编译模式,预编译为机器码,通过编译生成对应架构的代码,在用户设备上直接运行对应的机器码,运行速度快,执行性能好;此模式关闭了所有调试工具,只支持真机。
Profile模式,和Release模式类似,使用AOT预编译模式,此模式最重要的作用是可以用DevTools来检测应用的性能,做性能调试分析。
Debug模式,使用JIT(Just in time)即时编译技术,支持常用的开发调试功能hot reload,在开发调试时使用,包括支持的调试信息、服务扩展、Observatory、DevTools等调试工具,支持模拟器和真机。
通过以上介绍我们可以知道,flutter为我们提供 profile模式启动应用,进行性能分析,profile模式在Release模式的基础之上,为分析工具提供了少量必要的应用追踪信息。
如何开启profile模式?
如果是独立flutter工程可以使用flutter run --profile启动。如果是混合 Flutter 应用,在 flutter/packages/flutter_tools/gradle/flutter.gradle 的 buildModeFor 方法中将 debug 模式改为 profile即可。
检测工具
1、Flutter Inspector (debug模式下)
Flutter Inspector有很多功能,其中有两个功能更值得我们去关注,例如:“Select Widget Mode” 和 “Highlight Repaints”。
Select Widget Mode点击 “Select Widget Mode” 图标,可以在手机上查看当前页面的布局框架与容器类型。
通过“Select Widget Mode”我们可以快速查看陌生页面的布局实现方式。
Select Widget Mode模式下,也可以在app里点击相应的布局控件查看
Highlight Repaints
点击 “Highlight Repaints” 图标,它会 为所有 RenderBox 绘制一层外框,并在它们重绘时会改变颜色。
这样做帮你找到 App 中频繁重绘导致性能消耗过大的部分。
例如:一个小动画可能会导致整个页面重绘,这个时候使用 RepaintBoundary Widget 包裹它,可以将重绘范围缩小至本身所占用的区域,这样就可以减少绘制消耗。
2、Performance Overlay(性能图层)
在完成了应用启动之后,接下来我们就可以利用 Flutter 提供的渲染问题分析工具,即性能图层(Performance Overlay),来分析渲染问题了。
我们可以通过以下方式开启性能图层
性能图层会在当前应用的最上层,以 Flutter 引擎自绘的方式展示 GPU 与 UI 线程的执行图表,而其中每一张图表都代表当前线程最近 300 帧的表现,如果 UI 产生了卡顿,这些图表可以帮助我们分析并找到原因。
下图演示了性能图层的展现样式。其中,GPU 线程的性能情况在上面,UI 线程的情况显示在下面,蓝色垂直的线条表示已执行的正常帧,绿色的线条代表的是当前帧:
如果有一帧处理时间过长,就会导致界面卡顿,图表中就会展示出一个红色竖条。下图演示了应用出现渲染和绘制耗时的情况下,性能图层的展示样式:
如果红色竖条出现在 GPU 线程图表,意味着渲染的图形太复杂,导致无法快速渲染;而如果是出现在了 UI 线程图表,则表示 Dart 代码消耗了大量资源,需要优化代码执行时间。
3、CPU Profiler(UI 线程问题定位)
在视图构建时,在 build 方法中使用了一些复杂的运算,或是在主 Isolate 中进行了同步的 I/O 操作。
我们可以使用 CPU Profiler 进行检测:
你需要手动点击 “Record” 按钮去主动触发,在完成信息的抽样采集后,点击 “Stop” 按钮结束录制。这时,你就可以得到在这期间应用的执行情况了。
其中:
x 轴:表示单位时间,一个函数在 x 轴占据的宽度越宽,就表示它被采样到的次数越多,即执行时间越长。
y 轴:表示调用栈,其每一层都是一个函数。调用栈越深,火焰就越高,底部就是正在执行的函数,上方都是它的父函数。
通过上述CPU帧图我们可以大概分析出哪些方法存在耗时操作,针对性的进行优化
一般的耗时问题,我们通常可以 使用 Isolate(或 compute)将这些耗时的操作挪到并发主 Isolate 之外去完成。
例如:复杂JSON解析子线程化
Flutter的isolate默认是单线程模型,而所有的UI操作又都是在UI线程进行的,想应用多线程的并发优势需新开isolate 或compute。无论如何await,scheduleTask 都只是延后任务的调用时机,仍然会占用“UI线程”, 所以在大Json解析或大量的channel调用时,一定要观测对UI线程的消耗情况。
二、Flutter布局优化
Flutter 使用了声明式的 UI 编写方式,而不是 Android 和 iOS 中的命令式编写方式。
声明式:简单的说,你只需要告诉计算机,你要得到什么样的结果,计算机则会完成你想要的结果,声明式更注重结果。
命令式:用详细的命令机器怎么去处理一件事情以达到你想要的结果,命令式更注重执行过程。
flutter声明式的布局方式通过三棵树去构建布局,如图:
Widget Tree: 控件的配置信息,不涉及渲染,更新代价极低。
Element Tree : Widget树和RenderObject树之间的粘合剂,负责将Widget树的变更以最低的代价映射到RenderObject树上。
RenderObject Tree : 真正的UI渲染树,负责渲染UI,更新代价极大。
1、常规优化
常规优化即针对 build() 进行优化,build() 方法中的性能问题一般有两种:耗时操作和 Widget 层叠。
1)、在 build() 方法中执行了耗时操作
我们应该尽量避免在 build() 中执行耗时操作,因为 build() 会被频繁地调用,尤其是当 Widget 重建的时候。
此外,我们不要在代码中进行阻塞式操作,可以将一般耗时操作等通过 Future 来转换成异步方式来完成。
对于 CPU 计算频繁的操作,例如图片压缩,可以使用 isolate 来充分利用多核心 CPU。
2)、build() 方法中堆叠了大量的 Widget
这将会导致三个问题:
1、代码可读性差:画界面时需要一个 Widget 嵌套一个 Widget,但如果 Widget 嵌套太深,就会导致代码的可读性变差,也不利于后期的维护和扩展。
2、复用难:由于所有的代码都在一个 build(),会导致无法将公共的 UI 代码复用到其它的页面或模块。
3、影响性能:我们在 State 上调用 setState() 时,所有 build() 中的 Widget 都将被重建,因此 build() 中返回的 Widget 树越大,那么需要重建的 Widget 就越多,也就会对性能越不利。
所以,你需要 控制 build 方法耗时,将 Widget 拆小,避免直接返回一个巨大的 Widget,这样 Widget 会享有更细粒度的重建和复用。
3)、尽可能地使用 const 构造器
当构建你自己的 Widget 或者使用 Flutter 的 Widget 时,这将会帮助 Flutter 仅仅去 rebuild 那些应当被更新的 Widget。
因此,你应该尽量多用 const 组件,这样即使父组件更新了,子组件也不会重新进行 rebuild 操作。特别是针对一些长期不修改的组件,例如通用报错组件和通用 loading 组件等。
4)、列表优化
尽量避免使用 ListView默认构造方法
不管列表内容是否可见,会导致列表中所有的数据都会被一次性绘制出来
建议使用 ListView 和 GridView 的 builder 方法
它们只会绘制可见的列表内容,类似于 Android 的 RecyclerView。
其实,本质上,就是对列表采用了懒加载而不是直接一次性创建所有的子 Widget,这样视图的初始化时间就减少了。
2、深入光栅化优化
优化光栅线程
屏幕显示器一般以60Hz的固定频率刷新,每一帧图像绘制完成后,会继续绘制下一帧,这时显示器就会发出一个Vsync信号,按60Hz计算,屏幕每秒会发出60次这样的信号。CPU计算好显示内容提交给GPU,GPU渲染好传递给显示器显示。
Flutter遵循了这种模式,渲染流程如图:
flutter通过native获取屏幕刷新信号通过engine层传递给flutter framework
所有的 Flutter 应用至少都会运行在两个并行的线程上:UI 线程和 Raster 线程。
UI 线程
构建 Widgets 和运行应用逻辑的地方。
Raster 线程
用来光栅化应用。它从 UI 线程获取指令将其转换成为GPU命令并发送到GPU。
我们通常可以使用Flutter DevTools-Performance 进行检测,步骤如下:
在 Performance Overlay 中,查看光栅线程和 UI 线程哪个负载过重。
在 Timeline Events 中,找到那些耗费时间最长的事件,例如常见的 SkCanvas::Flush,它负责解决所有待处理的 GPU 操作。
找到对应的代码区域,通过删除 Widgets 或方法的方式来看对性能的影响。
三、Flutter内存优化
1、const 实例化
const 对象只会创建一个编译时的常量值。在代码被加载进 Dart Vm 时,在编译时会存储在一个特殊的查询表里,仅仅只分配一次内存给当前实例。
我们可以使用 flutter_lints 库对我们的代码进行检测提示
2、检测消耗多余内存的图片
Flutter Inspector:点击 “Highlight Oversizeded Images”,它会识别出那些解码大小超过展示大小的图片,并且系统会将其倒置,这些你就能更容易在 App 页面中找到它。
通过下面两张图可以清晰的看出使用“Highlight Oversizeded Images”的检测效果
| 1 | 2 |
|---|---|
针对这些图片,你可以指定 cacheWidth 和 cacheHeight 为展示大小,这样可以让 flutter 引擎以指定大小解析图片,减少内存消耗。
3、针对 ListView item 中有 image 的情况来优化内存
ListView 不会销毁那些在屏幕可视范围之外的那些 item,如果 item 使用了高分辨率的图片,那么它将会消耗非常多的内存。
ListView 在默认情况下会在整个滑动/不滑动的过程中让子 Widget 保持活动状态,这一点是通过 AutomaticKeepAlive 来保证,在默认情况下,每个子 Widget 都会被这个 Widget 包裹,以使被包裹的子 Widget 保持活跃。
其次,如果用户向后滚动,则不会再次重新绘制子 Widget,这一点是通过 RepaintBoundaries 来保证,在默认情况下,每个子 Widget 都会被这个 Widget 包裹,它会让被包裹的子 Widget 仅仅绘制一次,以此获得更高的性能。
但,这样的问题在于,如果加载大量的图片,则会消耗大量的内存,最终可能使 App 崩溃。
通过将这两个选项置为 false 来禁用它们,这样不可见的子元素就会被自动处理和 GC。
4、多变图层与不变图层分离
在日常开发中,会经常遇到页面中大部分元素不变,某个元素实时变化。如Gif,动画。这时我们就需要RepaintBoundary,不过独立图层合成也是有消耗,这块需实测把握。
这会导致页面同一图层重新Paint。此时可以用RepaintBoundary包裹该多变的Gif组件,让其处在单独的图层,待最终再一块图层合成上屏。
5、降级CustomScrollView,ListView等预渲染区域为合理值
默认情况下,CustomScrollView除了渲染屏幕内的内容,还会渲染上下各250区域的组件内容,例如当前屏幕可显示4个组件,实际仍有上下共4个组件在显示状态,如果setState(),则会进行8个组件重绘。实际用户只看到4个,其实应该也只需渲染4个, 且上下滑动也会触发屏幕外的Widget创建销毁,造成滚动卡顿。高性能的手机可预渲染,在低端机降级该区域距离为0或较小值。
四、总结
Flutter为什么会卡顿、帧率低?总的来说均为以下2个原因:
UI线程慢了-->渲染指令出的慢
GPU线程慢了-->光栅化慢、图层合成慢、像素上屏慢
所以我们一般使用flutter布局尽量按照以下原则
Flutter优化基本原则:
尽量不要为 Widget 设置半透明效果,而是考虑用图片的形式代替,这样被遮挡的 Widget 部分区域就不需要绘制了;
控制 build 方法耗时,将 Widget 拆小,避免直接返回一个巨大的 Widget,这样 Widget 会享有更细粒度的重建和复用;
对列表采用懒加载而不是直接一次性创建所有的子 Widget,这样视图的初始化时间就减少了。
五、其他
如果大家对flutter动态化感兴趣,我们也为大家准备了flutter动态化平台-Fair
欢迎大家使用 Fair,也欢迎大家为我们点亮star
Github地址:github.com/wuba/fair
Fair官网:fair.58.com
作者:王猛猛
链接:https://juejin.cn/post/7146460160699924488
来源:稀土掘金
著作权归作者所有。商业转载请联系作者获得授权,非商业转载请注明出处。
关于 MVI,我想聊的更明白些
前言
谈到 MVI,相信大家略有耳闻,由于该架构有一定门槛,导致开发者要么完全理解,要么完全不理解。
且由于存在门槛,理解的开发者往往受 “知识的诅咒”,很难体会不理解的人困惑之所在,也即容易在分享时遗漏关键点,这也使得该技术点的普及和传播更加困难。
故这期专为 MVI 打磨一篇 “通俗易懂、看完便理解来龙去脉、并能自行判断什么时候适用、是否非用不可”,相信阅读后你会耳目一新。
文章目录一览
- 前言
- 响应式编程
- 响应式编程的好处
- 响应式编程的漏洞
- 响应式编程的困境
- MVI 的存在意义
- MVI 的实现
- 函数式编程思想
- MVI 怎样实现纯函数效果
- 存在哪些副作用
- 整体流程
- 当下开发现状的反思
- 从源头把问题消灭
- 什么是过度设计,如何避免
- 平替方案的探索
- 综上
响应式编程
谈到 MVI,首先要提的是 “响应式编程”,响应式是 Reactive 翻译成中文叫法,对应 Java 语言实现是 RxJava,
ReactiveX 官方对 Rx 框架描述是:使用 “可观察流” 进行异步编程的 API,
翻译成人话即,响应式编程暗示人们 应当总是向数据源请求数据,然后在指定的观察者中响应数据的变化,
常见的 “响应式编程” 流程用伪代码表示如下:
响应式编程的好处
通过上述代码易得,在响应式编程下,业务逻辑在 ViewModel / Presenter 处集中管理,过程中向 UI 回推状态,且 UI 控件在指定的 “粘性观察者” 中响应,该模式下很容易做单元测试,有输入必有回响。
反之如像往常一样,将控件渲染代码分散在观察者以外的各个方法中,便很难做到这一点。
响应式编程的漏洞
随着业务发展,人们开始往 “粘性观察者” 回调中添加各种控件渲染,
如果同一控件实例(比如 textView)出现在不同粘性观察者回调中:
livedata_A.observe(this, dataA ->
textView.setText(dataA.b)
...
}
livedata_B.observe(this, dataB ->
textView.setText(dataB.b)
...
}
假设用户操作使得 textView 先接收到 liveData_B 消息,再接收到 liveData_A 消息,
那么旋屏重建后,由于 liveData_B 的注册晚于 liveData_A,textView 被回推的最后一次数据反而是来自 liveData_B,
给用户的感觉是,旋屏后展示老数据,不符预期。
响应式编程的困境
由此可得,响应式编程存在 1 个不显眼的关键细节:
一个控件应当只在同一个观察者中响应,也即同一控件实例不该出现在多个观察者中。
但如果这么做,又会产生新的问题。由于页面控件往往多达十数个,如此观察者也需配上十数个。
是否存在某种方式,既能杜绝 “一个控件在多个观察者中响应”,又能消除与日俱增的观察者?答案是有 —— 即接下来我们介绍的 MVI。
MVI 的存在意义
MVI 是 在响应式编程的前提下,通过 “将页面状态聚合” 来统一消除上述 2 个问题,
也即原先分散在各个 LiveData 中的 String、Boolean 等状态,现全部聚合到一个 JavaBean / data class 中,由唯一的粘性观察者回推,所有控件都在该观察者中响应数据的变化。
具体该如何实现?业界有个简单粗暴的解法 —— 遵循 “函数式编程思想”。
MVI 的实现
函数式编程思想
函数式编程的核心主要是纯函数,这种函数只有 “参数列表” 这唯一入口来传入初值,只有 “返回值” 这唯一出口来返回结果,且 “运算过程中” 不调用和影响函数作用域外的变量(也即 “无副作用”),
int a
public int calculate(int b){ //纯函数
return b + b
}
public int changeA(){ //非纯函数,因运算过程中调用和影响到外界变量 a
int c = a = calculate(b)
return c
}
public int changeB() { //纯函数
int b = calculate(2)
return b + 1
}
显而易见,纯函数的好处是 “可以闭着眼使用”,有怎样的输入,必有怎样的输出,且过程中不会有预料外的影响发生。
这里贴一张网上盛传的图来说明 Model、View、Intent 三者关系,
笔者认为,MVI 并非真的 “纯函数实现”,而只是 “纯函数思想” 的实现,
也即我们实际上都是以 “面向对象” 方式在编程,从效果上达到 “纯函数” 即可,
反之如钻牛角尖,看什么都 “有副作用、不纯”,则易陷入悲观,忽视本可改善的环节,有点得不偿失。
MVI 怎样实现纯函数效果
Model 通常是继承 Jetpack ViewModel 来实现,负责处理业务逻辑;
Intent 是指发起本次请求的意图,告诉 Model 本次执行哪个业务。它可以携带或不带参数;
View 通常对应 Activity/Fragment,根据 Model 返回的 UiStates 进行渲染。
也即我们让 Model 只暴露一个入口,用于输入 intent;只暴露一个出口,用于回调 UiStates;业务执行过程中不影响 UiStates 以外的结果;且 UiStates 的字段都设置为不可变(final / val)确保线程安全,即可达成 Model 的 “纯”,
Intent 达成 “纯” 比较简单,由于它只是个入参,字段都设置为不可变即可。
View 同样不难,只要确保 View 的入口就是 Model 的出口,也即 View 的控件都集中放置在 Model 的回调中渲染,即可达成 “纯”。
存在哪些副作用
存在争议的副作用
那有人可能会说,“不对啊,View 在入口中调用了控件实例,也即函数作用域外的成员变量,是副作用呀” …… 笔者认为这是误解,
因为 MVI 的 View 事实上就不是一个函数,而是一个类。如上文所述,MVI 实际上是 通过面向对象编程的方式实现 “纯函数” 效果,而非真的纯函数,
故我们可以站在类的角度重新审视 —— 控件是类成员,对应的是纯函数的自动变量,
换言之,控件渲染并没有调用和影响到 View 作用域外的元素,故不算副作用。
公认的副作用
与此同时,UiEvents 属于副作用,也即那些弹窗、页面跳转等 “一次性消费” 的情况,
为什么?笔者认为 “弹窗、页面跳转” 时,在当前 MVI-View 页面之外创建了新的 Window、或是在返回栈添加了新的页面,如此等于调用和影响了外界环境,所以这必是副作用,
不过这是符合预期的副作用,对此官方 Guide 也有介绍 “将 UiEvents 整合到 UiStates” 的方式来改善该副作用:界面事件 | Android 开发者 | Android Developers
与之相对的即 “不符预期的副作用” —— 例如控件实例被分散在观察者外的各个方法中,并在某个方法中被篡改和置空,其他方法并不知情,调用该实例即发生 NullPointException。
整体流程
至此 MVI 的代码实现已呼之欲出:
1.创建一个 UiStates,反映当前页面的所有状态。
data class UiStates {
val weather : Weather,
val isLoading : Boolean,
val error : List<UiEvent>,
}
2.创建一个 Intent,用于发送请求时携带参数,和指明当前想执行的业务。
sealed class MainPageIntent {
data class GetWeather(val cityCode) : MainPageIntent()
}
3.执行业务的过程,总是先从数据层获取数据,然后根据情况分流和回推结果,例如请求成功,便执行 Success 来回推结果,请求失败,则 Error,对此业内普遍的做法是,增设一个 Actions,
并且由于 UiStates 的字段不可变,且控件集中响应 UiStates,也即务必确保 UiStates 的延续,由此每个业务带来局部改变时(partialChange),需通过 copy 等方式,将上一次的 UiStates 拷贝一份,并为对应字段注入 partialChange。这个过程业内称为 reduce。
sealed class MainPageActions {
fun reduce(oldStates : UiStates) : UiStates {
return when(this){
Loading -> oldStates.copy(isLoading = true)
is Success -> oldStates.copy(isLoading = false, weather = this.weather)
is Error -> oldStates.copy(isLoading = false, error = listOf(UiEvent(msg)))
}
}
object Loading : MainPageActions()
data class Success(val weather : Weather) : MainPageActions()
data class Error(val msg : String) : MainPageActions()
}4.创建当前页面使用的 MVI-Model。
class MainPageModel : MVI_Model<UiStates>() {
private val _stateFlow = MutableStateFlow(UiStates())
val stateFlow = _stateFlow.asStateFlow
private fun sendResult(uiStates: S) = _stateFlow.emit(uiStates)
fun input(intent: Intent) = viewModelScope.launch{ onHandle() }
private suspend fun onHandle(intent: Intent) {
when(intent){
is GetWeather -> {
sendResult(MainPageActions.Loading.reduce(oldStates)
val response = api.post()
if(response.isSuccess) sendResult(
MainPageActions.Success(response.data).reduce(oldStates)
else sendResult(
MainPageActions.Error(response.message).reduce(oldStates)
}
}
}
}5.创建 MVI-View,并在 stateFlow 中响应 MVI-Model 数据。
控件集中响应,带来不必要的性能开销,需要做个 diff,只响应发生变化的字段。
笔者通常是通过 DataBinding ObservableField 做防抖。后续如 Jetpack Compose 普及,建议是使用 Jetpack Compose,无需开发者手动 diff,其内部类似前端 DOM ,根据本次注入的声明树自行在内部差分合并渲染新内容。
class MainPageActivity : Android_Activity(){
private val model : MainPageModel
private val views : MainPageViews
fun onCreate(){
lifecycleScope.launch {
repeatOnLifecycle(Lifecycle.State.STARTED) {
model.stateFlow.collect {uiStates ->
views.progress.set(uiStates.isLoading)
views.weatherInfo.set(uiStates.weather.info)
...
}
}
model.input(Intent.GetWeather(BEI_JING))
}
class MainPageViews : Jetpack_ViewModel() {
val progress = ObservableBoolean(false)
val weatherInfo = ObservableField<String>("")
...
}
}整个流程用一张图表示即:
当下开发现状的反思
上文我们追溯了 MVI 来龙去脉,不难发现,MVI 是给 “响应式编程” 填坑的存在,通过状态聚合来消除 “不符预期回推、观察者爆炸” 等问题,
然而 MVI 也有其不便之处,由于它本就是要通过聚合 UiStates 来规避上述问题,故 UiStates 很容易爆炸,特别是字段极多情况下,每次回推都要做数十个 diff ,在高实时场景下,难免有性能影响,
MVI 许多页面和业务都需手写定制,难通过自动生成代码等方式半自动开发,故我们我们不如退一步,反思下为什么要用响应式编程?是否非用不可?
穷举所有可能,笔者觉得最合理的解释是,响应式编程十分便于单元测试 —— 由于控件只在观察者中响应,有输入必有回响,
也是因为这原因,官方出于完备性考虑,以响应式编程作为架构示例。
从源头把问题消灭
现实情况往往复杂。
Android 最初为了站稳脚跟,选择复用已有的 Java 生态和开发者,乃至使用 Java 作为官方语言,后来 Java 越来越难支持现代化移动开发,故而转向 Kotlin,
Kotlin 开发者更容易跟着官方文档走,一开始就是接受 Flow 那一套,且 Kotlin 抹平了语法复杂度,天然适合 “响应式编程” 开发,如此便有机会踩坑,乃至有动力通过 MVI 来改善。
然而 10 个 Android 7 个纯 Java ,其中 6 个从不用 RxJava ,剩下一个还是偶尔用用 RxJava 的线程调度切换,所以响应式编程在 Android Java 开发者中的推行不太理想,领导甚至可能为了照顾多数同事,而要求撤回响应式代码,如此便很难有机会踩坑,更谈不上使用 MVI,
也因此,实际开发中更多考虑的是,如何从根源上避免各种不可预期问题。
对此从软件工程角度出发,笔者在设计模式原则中找到答案 —— 任何框架,只要遵循单一职责原则,便能有效避免各种不可预期问题,反之过度设计则易引发不可预期问题。
什么是过度设计,如何避免
上文提到的 “粘性观察者”,对应的是 BehaviorSubject 实现,强调 “总是有一个状态”,比如门要么是开着,要么是关着,门在订阅 BehaviorSubject 时,会被自动回推最后一次 State 来反映状态。
常见 BehaviorSubject 实现有 ObservableField、LiveData、StateFlow 等。
反之是 PublishSubject 实现,对应的是一次性事件,常见 PublishSubject 实现有 SharedFlow 等。
笔者认为,LiveData/StateFlow 存在过度设计,因为它的观察者是开放式,一旦开了这口子,后续便不可控,一个良好的设计是,不暴露不该暴露的口子,不给用户犯错的机会。
一个正面的案例是 DataBinding observableField,不向开发者暴露观察者,且一个控件只能在 xml 中绑定一个,从根源上杜绝该问题。
平替方案的探索
至此平替方案便也呼之欲出 —— 使用 ObservableField 来承担 BehaviorSubject,
也即直接在 ViewModel 中调用 ObservableField 通知所绑定的控件响应,且每个 ObservableField 都携带原子数据类型(例如 String、Boolean 等类型),
如此便无需声明 UiStates 数据类。由于无 UiStates、无聚合、也无线程安全问题,也就无需再 reduce 和 diff,简单做个 Actions 为结果分流即可。
综上
响应式编程便于单元测试,但其自身存在漏洞,MVI 即是来消除漏洞,
MVI 有一定门槛,实现较繁琐,且存在性能等问题,难免同事撂挑子不干,一夜回到解放前,
综合来说,MVI 适合与 Jetpack Compose 搭配实现 “现代化的开发模式”,
反之如追求 “低成本、复用、稳定”,可通过遵循 “单一职责原则” 从源头把问题消除。
作者:KunMinX
链接:https://juejin.cn/post/7145317979708735496
来源:稀土掘金
著作权归作者所有。商业转载请联系作者获得授权,非商业转载请注明出处。 收起阅读 »
Android 十六进制状态管理实战
背景
最近需要实现一个状态管理类:
- 在多种场景下,控制一系列的按钮是否可操作。
- 不同场景下,在按钮不可操作的时候,点击弹出对应的Toast。
- 随着场景数量的增加,这个管理类的实现,就可能会越来越复杂。
刚好看到大佬的文章,顺便学习和实践一下。
参考学习:就算不去火星种土豆,也请务必掌握的 Android 状态管理最佳实践
示例
还是用大佬那个例子。
例如,存在 3 种模式,和 3个按钮,按钮不可用的时候弹出对应的 Toast。
模式 A 下,要求 按钮1、按钮2 可用,按钮3不可用。点击按钮3,Toast 提示“A3”。
模式 B 下,要求 按钮2 可用,按钮1和按钮3不可用。点击按钮1,Toast 提示“B1”。点击按钮3,Toast 提示“B3”。
模式 C 下,要求 按钮1 可用,按钮2和按钮3不可用。点击按钮2,Toast 提示“C2”。点击按钮3,Toast 提示“C3”。
实现思路
- Kotlin中的位操作
shl(bits) – 左移位
shr(bits) – 右移位
and(bits) – 与
or(bits) – 或
- 定义多个十六进制的状态常量,代表不同的状态。
private const val STATE_IDIE = 1
private const val STATUS_A = 1 shl 1
private const val STATUS_B = 1 shl 2
private const val STATUS_C = 1 shl 3
- 定义一个变量,用于存放当前的状态。
当状态发生变化,需要切换状态的时候,只需要去修改这个变量就行了。
private var currentStatus = STATE_IDIE
//测试代码
private fun changeStateToA(){
changeStateToA = STATUS_A
}
- 定义多个十六进制的标志常量,代表对应的禁用操作。
比如 DISABLE_BTN_1,代表禁用按钮1。
//定义不可操作的一些行为
private const val DISABLE_BTN_1 = 1 shl 4
private const val DISABLE_BTN_2 = 1 shl 5
private const val DISABLE_BTN_3 = 1 shl 6
- 定义模式状态集,由状态+多个禁用标志位组成。
比如 MODE_A,就是在状态为 STATUS_A 的时候,按钮3禁用,那就将这两个数值进行或运算,结果就是 STATUS_A or DISABLE_BTN_3。
private const val MODE_A = STATUS_A or DISABLE_BTN_3
private const val MODE_B = STATUS_B or DISABLE_BTN_1 or DISABLE_BTN_3
private const val MODE_C = STATUS_C or DISABLE_BTN_2 or DISABLE_BTN_3
private val modeList = listOf(MODE_A, MODE_B, MODE_C)
- 定义按钮不可点击时的Toast文案 ,使用 HashMap 进行存储映射关系。
- key 为对应状态+禁用标志位的 或运算 结果。这样的计算结果,是可以保证key是唯一的,不会出现重复的情况。
- value 为对应的 Toast 文案。
- 只需要一个 HashMap 就可以实现所有的配置关系。
- 从代码阅读性来说,使用这样的代码进行配置,看起来也比较通俗易懂。
比如 Pair(STATUS_A or DISABLE_BTN_3, "A3"),就是代表在状态A的时候,禁用按钮3,点击按钮的时候弹的Toast文案为 “A3”。
private val toastMap = hashMapOf(
Pair(STATUS_A or DISABLE_BTN_3, "A3"),
Pair(STATUS_B or DISABLE_BTN_1, "B1"),
Pair(STATUS_B or DISABLE_BTN_3, "B3"),
Pair(STATUS_C or DISABLE_BTN_2, "C2"),
Pair(STATUS_C or DISABLE_BTN_3, "C3")
)
- 核心逻辑:判断在当前模式下,按钮是否可用。
是否可用的判断:判断当前所处的状态,是否包含对应定义的禁用操作。
currentStatus and action !=0
若可操作,返回 true。
若不可操作,通过 currentStatus or action 的运算结果作为key,通过上面配置的 HashMap 集合,拿到对应的 Toast 文案。
/**
* 判断当前某个行为是否可操作
*
* @return true 可操作;false,不可操作。
*/
private fun checkEnable(action: Int): Boolean {
val result = modeList.filter {
(it and currentStatus) != 0
&& (it and action) != 0
}
if (result.isNotEmpty()) {
println("result is false, toast:${toastMap[currentStatus or action]}")
return false
}
println("result is true")
return true
}
复制代码- 完整代码
object SixTeenTest {
//定义状态常量
private const val STATE_IDIE = 1
private const val STATUS_A = 1 shl 1
private const val STATUS_B = 1 shl 2
private const val STATUS_C = 1 shl 3
//定义不可操作的一些行为
private const val DISABLE_BTN_1 = 1 shl 4
private const val DISABLE_BTN_2 = 1 shl 5
private const val DISABLE_BTN_3 = 1 shl 6
//定义模式状态集
private const val MODE_A = STATUS_A or DISABLE_BTN_3
private const val MODE_B = STATUS_B or DISABLE_BTN_1 or DISABLE_BTN_3
private const val MODE_C = STATUS_C or DISABLE_BTN_2 or DISABLE_BTN_3
private val modeList = listOf(MODE_A, MODE_B, MODE_C)
//定义Toast映射关系
private val toastMap = hashMapOf(
Pair(STATUS_A or DISABLE_BTN_3, "A3"),
Pair(STATUS_B or DISABLE_BTN_1, "B1"),
Pair(STATUS_B or DISABLE_BTN_3, "B3"),
Pair(STATUS_C or DISABLE_BTN_2, "C2"),
Pair(STATUS_C or DISABLE_BTN_3, "C3")
)
//当前状态
private var currentStatus = STATE_IDIE
/**
* 判断当前某个行为是否可操作
*
* @return true 可操作;false,不可操作。
*/
private fun checkEnable(action: Int): Boolean {
val result = modeList.filter {
(it and currentStatus) != 0
&& (it and action) != 0
}
if (result.isNotEmpty()) {
println("result is false, toast:${toastMap[currentStatus or action]}")
return false
}
println("result is true")
return true
}
}
代码测试
fun main(args: Array<String>) {
//测试代码
currentStatus = STATUS_A
println("STATUS_A")
checkEnable(DISABLE_BTN_1)
checkEnable(DISABLE_BTN_2)
checkEnable(DISABLE_BTN_3)
currentStatus = STATUS_B
println("STATUS_B")
checkEnable(DISABLE_BTN_1)
checkEnable(DISABLE_BTN_2)
checkEnable(DISABLE_BTN_3)
currentStatus = STATUS_C
println("STATUS_C")
checkEnable(DISABLE_BTN_1)
checkEnable(DISABLE_BTN_2)
checkEnable(DISABLE_BTN_3)
}
输出测试结果
STATUS_A
result is true
result is true
result is false, toast:A3
STATUS_B
result is false, toast:B1
result is true
result is false, toast:B3
STATUS_C
result is true
result is false, toast:C2
result is false, toast:C3
十六进制
- 16进制多状态管理本质上是二进制管理,即‘1’所处的位数。
- 比如上面定义的各种变量,都是通过1左移n位数之后的结果。
- 这样能够保证,多个不同变量的与运算、或运算结果,可以是唯一的。比如上面,用这个特性,用来做一层 Toast 文案的映射关系。
总结
- 确实,像类似的场景,随着业务迭代场景数增加,在没有使用十六进制之前,整体的代码可能是会比较复杂的。
- 使用十六进制之后,可能需要多花一点时间,去理解一下十六进制相关的知识,但是在代码实现上确实简单了很多。
作者:入魔的冬瓜
链接:https://juejin.cn/post/7147860255370641445
来源:稀土掘金
著作权归作者所有。商业转载请联系作者获得授权,非商业转载请注明出处。
乱打日志的男孩运气怎么样我不知道,加班肯定很多!
前言
线上出现问题,你的第一反应是什么?
如果是我的话,第一时间想的应该是查日志:
- if…else 到底进入了哪个分支?
- 关键参数是不是有缺失?
- 入参是不是有问题,没做好校验放进去了?
良好的日志能帮我们快速定位到问题所在,坑你的东西往往最为无形,良好的日志就是要让这些玩意无所遁形!
日志级别
Java应用中,日志一般分为以下5个级别:
- ERROR 错误信息
- WARN 警告信息
- INFO 一般信息
- DEBUG 调试信息
- TRACE 跟踪信息
1)ERROR
ERROR 级别的日志一般在 catch 块里面出现,用于记录影响当前线程正常运行的错误,出现 Exception 的地方就可以考虑打印 ERROR 日志,但不包括业务异常。
需要注意的是,如果你抛出了异常,就不要记录 ERROR 日志了,应该在最终的地方处理,下面这样做就是不对的:
try {
int i = 1 / 0;
} catch (Exception e) {
log.error("出错了,什么错我不知道,啊哈哈哈!", e);
throw new CloudBaseException();
}
2)WARN
不应该出现,但是不会影响当前线程执行的情况可以考虑打印 WARN 级别的日志,这种情况有很多,比如:
- 各种池(线程池、连接池、缓存池)的使用超过阈值,达到告警线
- 记录业务异常
- 出现了错误,但是设计了容错机制,因此程序能正常运行,但需要记录一下
3)INFO
使用最多的日志级别,使用范围很广,用来记录系统的运行信息,比如:
- 重要模块中的逻辑步骤呈现
- 客户端请求参数记录
- 调用第三方时的参数和返回结构
4)DEBUG
Debug 日志用来记录自己想知道的所有信息,常常是某个功能模块运行的详细信息,已经中间的数据变化,以及性能信息。
Debug 信息在生产环境一般是关闭状态的,需要使用开关管理(比如 SpringBoot Admin 可以做到),一直开启会产生大量的 Debug,而 Debug 日志在程序正常运行时大部分时间都没什么用。
if (log.isDebugEnabled()) {
log.debug("开始执行,开始时间:[{}],参数:[{}]", startTime, params);
log.debug("通过计算,得到参数1:[{}],参数2:[{}]", param1, param2);
log.debug("最后处理结果:[{}]", result);
}
5)TRACE
特别详细的系统运行完成信息,业务代码中一般不使用,除非有特殊的意义,不然一般用 DEBUG 代替,事实上,我编码到现在,也没有用过这个级别的日志。
使用正确的格式
如果你是这样打印日志的:
log.info("根据条件id:{}" + id + "查询用户信息");
不要这样做,会产生大量的字符串对象,占用空间的同时也会影响性能。
正确的做法是使用参数化信息的方式:
log.info("根据条件id:[{}],查询用户信息", id);
这样做除了能避免大量创建字符串之外,还能明确的把参数隔离出去,当你需要把参数复制出来的时候,只需要双击鼠标即可,而不是用鼠标慢慢对准再划拉一下。
这样打出来的日志,可读性强,对排查问题的帮助也很大!
小技巧
1)多线程
遇到多个线程一起执行的日志怎么打?
有些系统,涉及到并发执行,定时调度等等,就会出现多次执行的日志混在一起,出问题不好排查,我们可以把线程名打印进去,或者加一个标识用来表明这条日志属于哪一次执行:
if (log.isDebugEnabled()) {
log.debug("执行ID=[{}],处理了ID=[{}]的消息,处理结果:[{}]", execId, id, result);
}
2)使用 SpringBoot Admin 灵活开关日志级别
写在最后
一开始写代码的时候,没有规范日志的意识,不管哪里,都打个 INFO,打印出来的东西也没有思考过,有没有意义,其实让自己踩了不少坑,加了不少班,回过头,我想对学习时期的我说一句:”能让你加班的东西,都藏在各种细节里!写代码之前,先好好学习如何打日志!“
作者:你算哪块小蛋糕
链接:https://juejin.cn/post/7124958610123128839
来源:稀土掘金
著作权归作者所有。商业转载请联系作者获得授权,非商业转载请注明出处。 收起阅读 »
Android性能优化 - 包体积杀手之R文件内联原理与实现
前言&背景
包体积也是性能优化的常客之一了,在包体积简化的历史潮流中,已经涌现了很多包体积杀手级别方案,比如动态so方案,R文件内联等等,由于笔者已经在之前的文章中介绍过动态so方案,那么本次专栏就不重复,于是就介绍另一个包体积杀手方案,从R文件内联的角度出发,看看我们是怎么完成一次华丽的R文件精简
在android 日常开发中,我们对资源的引用都会用到R.xx.xx 去获取,R文件这个贯穿着整个项目周期,从而简化了我们很多工作。R文件带给我们便利的同时,也会带来很多对包体积的负面影响,其中有一个就是R文件过大导致的,一个中型项目的R文件,可能会达到10M,其中资源重复的部分/多余的部分,可能就有4/5M,下面我们从实战角度出发,探索一下R文件的“今生前世”
R文件产生
在Android编译打包的过程中,位于res/目录下的文件,就会通过aapt工具,对里面的资源进行编译压缩,从而生成相应的资源id,且生成R.java文件,用于保存当前的资源信息,同时生成resource.arsc文件,建立id与其对应资源的值,如图
其中R文件中还有几个static final 修饰的子类,比如anim,attr,layout,分别对应着res/目录下相应的子目录,同时资源id用一个16进制的int数值表示。比如0x7f010000,我们来解释一下具体含义
- 第一个字节7f:代表着这个资源属于本应用apk的资源,相应的以01代表开头的话(比如0x01010000)就代表这是一个与应用无关的系统资源。0x7f010000,表明abc_fade_in 属于我们应用的一个资源
- 第二个字节01:是指资源的类型,比如01就代表着这个资源属于anim类型
- 第三,四个字节0000:指资源的编号,在所属资源类型中,一般从0000开始递增
同时我们可以留意到,这个R文件的内部的属性,都是以static final 修饰的,这就意味着是一个常量类型,常量在编译过程中,可以被“内联化”,即R.anim.abc_fade_in 可以用0x7f010000所代表的数值进行直接替换。
正常情况下,即app目录下的R文件的过程就是如此,那么类似lib(子module),aar包的这种,生成的R文件也是这样吗?不是的!如果说lib/aar 也是这样生成R文件的话,那么最终的资源id也会是常量,比如lib中有个R.anim.other,按照默认模式的话,生成的id也应该是0x7f010000,这样一来就会产生了一个问题,就是资源id冲突的问题!因为app模块下R.anim.abc_fade_in 跟子module/aar中有个R.anim.other产生了同一个id。所以gradle给出了一个解决方法,就是在编译子module或者aar中,编译的时候产生一个R.def.txt(只在module有效,不同AGP版本会有不同实现,低版本是R.txt)文件,该文件记录着当前的资源映射关系,比如我在子module中有一个布局layout文件activity_my_test
此时生成的这个映射关系就不包含真正的资源id,而是把其当作一个输入传给app模块一起编译,从而得到最终的资源id,并且生成一个全局的R文件(该R文件包含了所有子module/aar的R文件与自身的R文件)与全局R.txt文件(记录所有id映射,这个大有用途,我们下面会讲),并且此时通过gralde中任务generateDebugRFile,生成一个专属于子module的R文件(此时的R文件就是static final的,因为经过了资源id的重新定位)所以此时子module中也就可以用R.xx.xx去引用到自己的资源,比如上述的activity_my_test所属于的子module生成的R文件如下:
全局的R文件也会包含子R文件的内容
我们再把大致的过程如图展示
R文件过大的原因
通过上述R文件生成的分析,我们可以看到R文件占用多余的原因,下层的module/aar生成的id除了自己会生成一个R文件外,同时也会在全局的R文件生成一个一个同样的属性,比如activity_my_test存在了两份,如果module多的话,R文件的数量同样会膨胀上升!在我们组件化过程中,多module肯定是很正常的,前文我们也说过,app module中的R文件会被内联化替代,所以appmodule 中的R文件内容如果没有被直接引用了,是可以通过proGuard去直接删除掉的,所以release环境下我们可以通过proGuard去移除不必要的R文件,但是被引用到的R文件(module/aar中的R文件)就无法这么做了,同时如果项目中存在(反向引用,比如其他模块依赖了app,情况比较少)那么所有的R文件就都无法被proGuard删除了。
R文件内联方案
R.txt
在上面讲解中,我们留下了一个疑问,就是R.txt,它记录了所有的资源映射关系,那么这个R.txt存放在哪里呢?我们以com.android.tools.build:gradle:3.4.1中的源码为例子:生成R.txt是在
TaskManager中
private void createNonNamespacedResourceTasks(
@NonNull VariantScope scope,
@NonNull File symbolDirectory,
InternalArtifactType packageOutputType,
@NonNull MergeType mergeType,
@NonNull String baseName,
boolean useAaptToGenerateLegacyMultidexMainDexProguardRules) {
File symbolTableWithPackageName =
FileUtils.join(
globalScope.getIntermediatesDir(),
FD_RES,
"symbol-table-with-package",
scope.getVariantConfiguration().getDirName(),
"package-aware-r.txt");
final TaskProvider<? extends ProcessAndroidResources> task;
// 重点
File symbolFile = new File(symbolDirectory, FN_RESOURCE_TEXT);
FN_RESOURCE_TEXT是个常量,代表着 R.txt,同时可以看到symbolDirectory就是路径,而这个赋值在createApkProcessResTask 中
private void createApkProcessResTask(@NonNull VariantScope scope,
InternalArtifactType packageOutputType) {
createProcessResTask(
scope,
new File(
globalScope.getIntermediatesDir(),
"symbols/" + scope.getVariantData().getVariantConfiguration().getDirName()),
packageOutputType,
MergeType.MERGE,
scope.getGlobalScope().getProjectBaseName());
}
所以路径我们一目了然了,就是在build/intermediates/symbols之后的子目录下(这个在4.多的版本有变化,4.多在runtime_symbol_list 子目录下,需要注意)这样一来,我们就得到了R.txt,之后解析的时候有用
R文件字节码替换
了解方案之前,我们看一下平常的R文件是怎么被使用的,我们以setContentView这个举例,当我们在app模块中,调用了
setContentView(R.layout.activity_main)
编译后的字节码是这样的:
LDC 2131427356
INVOKEVIRTUAL com/example/spider/MainActivity.setContentView (I)V
但是当我们在子moudle中
setContentView(R.layout.activity_my_test)
同样看一下字节码
GETSTATIC com/example/test/R$layout.activity_my_test : I
INVOKEVIRTUAL com/example/test/MyTestActivity.setContentView (I)V
看看我们发现了什么!同样是setContentView,入参是int类型情况下,在app模块中,是通过常量引入的方式 LDC 2131427356放入操作数栈,提供给setContentView消费的,那么这个2131427356是什么呢?其实就是资源id,我们可以在R.txt中找到
而7f0b001c换算成10进制,就是2131427356。
既然app模块能这样做,我们又知道了R.txt内容,所以我们能不能把子module的GETSTATIC换成跟app模块一样的实现呢?这样我们就不用依赖了R文件,后期就可以通过proGuard删除了!答案是可以的!这个时候只需要我们从R.txt 找到activity_my_test 对应的id(例子是0x7f0b001d),换算成10进制就是2131427357,我们再把GETSTATIC 指令替换成LDC指令就完事了,代码如下:
ASM tree api
if(node.opcode == Opcodes.GETSTATIC && node.desc == "I" && node.owner.substring(node.owner.lastIndexOf('/') + 1).startsWith('R$')&& !(node.owner.startsWith(COM_ANDROID_INTERNAL_R) || node.owner.startsWith(ANDROID_R))){
println("get node ")
def ldc = new LdcInsnNode(2131427357)
method.instructions.insertBefore(node,ldc)
method.instructions.remove(node)
}
LdcInsnNode(2131427357) 通过指令集替换,我们就实现了R文件内联的操作了,同时这里还有很多小玩法,比如LdcInsnNode(特定的id),我们甚至能够实现编译时替换布局,这里就不过多展开
扩展
看到这里,我们就能明白了R文件内联究竟干了什么,但是实际上我们也只是替换了一个R文件罢了,如果我们想要替换更多的R文件怎么办?没事!这里已经有很多成熟的开源库帮我们做啦!比如bytex booster
当然,R文件内联不一定适用所有场景,比如直接用到R文件id的场景就不适合了
public static int getId(String num){
try {
String name = "drawable" + num;
Field field = R.drawable.class.getField(name);
return field.getInt(null);
} catch (Exception e) {
e.printStackTrace();
}
return 0;
}
因为涉及到了R文件属性的读写,这种情况我们就不能用内联的方式了!同时常见的还有ConstraintLayout中,会涉及到id的直接使用,这部分就要加入Transform转换的白名单,避免被内联化啦!
总结
通过本文的阅读,相信你已经了解到包体积优化中-R文件内联的实现思路啦!我们在实际项目中也用到了R文件内联,收益大概是5M左右。如果你的项目是agp 4.1.0 的话,可以直接开启R 文件的内联,不需要引入三方库即可实现!!官方都引入了这个特性,这个稳定性是可以保证的啦!详细可查看:
developer.android.com/studio/rele…
作者:Pika
链接:https://juejin.cn/post/7146807432755281927
来源:稀土掘金
著作权归作者所有。商业转载请联系作者获得授权,非商业转载请注明出处。 收起阅读 »
依赖反转原则到底反转了什么
问题
SOLID是常用的用来设计类以及类和类之间关系的设计原则,它的主要作用就是告诉我们如何将数据和函数组织为类,以及如何将这些类链接为程序,从而使得软件容易扩展、容易理解以及容易复用。其中D代表的就是依赖反转原则(Dependence Inversion Principle),常见的解释就是高层模块和低层模块都应该依赖抽象,而不应该依赖具体实现,这样就能更好的实现模块间的解耦。但是反转又体现在了哪里呢?
面向对象编程
为了解决这种问题,先看一下面向对象编程,面向对象编程是常见的编程范式之一,同时还有结构化编程与函数式编程,这三种编程范式对程序员的编写模式做了限定,与具体的编程语言关系较小。有时候我们会说Java是面向对象的语言,而C是面向结构的语言,我理解这些是在语言设计之初,设计者就对于语言的语法做了相关范式的选择,但是用C能不能进行面向对象的编程呢?我想也是可以的,只要遵守相应的规范。比如说,面向对象编程的三个特点:封装、继承、多态通过C其实也可以实现。
安全稳定的多态
这里主要对比一下C语言的多态和Java的多态方式,C语言通过函数指针实现多态,Java通过接口或者父类的实现类来复写方法来实现多态。这里以实现屏幕的展示功能为例。
//C
//screen.h
struct Screen{
void (*show)();
}
//huaweiscreen.h
#include "screen.h"
void show(){ //具体实现}
struct Screen huaiWeiScreen={show};
//main.c
include "huaweiscreen.h"
int main(){
struct Screen* screen=&huaiWeiScreen;
screen->show();
return 0;
}
//Java
interface Screen{
void show();
}
class HuaWeiScreen implements Screen{
@Override
public void show(){
//具体实现
}
}
public static void main(String[] args){
Screen screen=new HuaiWeiScreen();
screen.show();
}
Java通过接口实现的多态在语义上同C语言通过函数指针实现多态的对比来看,要清晰的多,同时对比函数指针,也更为安全,毕竟如果函数指针如果指错了实现,那么整个程序就会造成难以跟踪和消除的bug。由此可以看出类似Java这种面向对象的语言为我们提供了一种更加容易理解、更加安全的的多态实现方式。
依赖反转
在安全和易于理解的多态支持出现之前,软件的架构是什么样子呢?
业务逻辑模块依赖数据库模块和UI模块,数据流动的方向和源码依赖的方向是一致的,但是这其实带来一个问题,业务逻辑本身其实并不关心数据库和UI的具体实现,使用MySQL还是SQLite以及是用文字展示UI还是动画展示UI业务逻辑不应该感知,但是因为缺乏一个容易理解、安全的多态方式,导致数据流动的方向和源码依赖方向必需保持一致,也让业务逻辑本身和数据库的具体实现以及UI的具体实现进行了绑定,这是不利于后续功能的扩展和修改的。 看一下使用多态后,架构设计的调整。
业务逻辑模块声明数据库接口类和UI接口类,数据库模块和UI模块通过依赖业务逻辑模块,实现对应的接口,并且在更高层模块注入业务逻辑,这样数据库模块和UI模块成为了业务逻辑的插件,这种插件式的架构方便了插件的替换,业务逻辑模块不再依赖数据库模块以及UI模块,可以进行独立的部署,数据库模块的修改和UI模块的修改也不会对业务逻辑造成影响。可以注意到数据流动的方向和源码依赖的方向不再保持一致了,这就是多态的好处,无论怎样的源代码级别的依赖关系,都可以将其反转。
结论
所谓依赖反转的反转,是指支持多态的语言相对于不支持多态的语言,数据流方向和源码依赖方向不用再保持一致,可以相反,源码依赖的方向完全由开发者控制
作者:滑板上的老砒霜
链接:https://juejin.cn/post/7147285415966277669
来源:稀土掘金
著作权归作者所有。商业转载请联系作者获得授权,非商业转载请注明出处。
Kotlin协程:MutableStateFlow的实现原理
一.MutableStateFlow接口的实现
1.MutableStateFlow方法
在Kotlin协程:StateFlow的设计与使用中,讲到可以通过MutableSharedFlow方法创建一个MutableSharedFlow接口指向的对象,代码如下:
@Suppress("FunctionName")
public fun <T> MutableStateFlow(value: T): MutableStateFlow<T> =
StateFlowImpl(value ?: NULL)
...
@JvmField
@SharedImmutable
internal val NULL = Symbol("NULL")
在MutableStateFlow方法中,根据参数value创建并返回一个类型为StateFlowImpl的对象,如果参数value为空,则传入对应的标识NULL。
二.StateFlowImpl类
StateFlowImpl类是MutableStateFlow接口的核心实现,它的继承关系与SharedFlowImpl类的继承关系类似,如下图所示:
- AbstractSharedFlow类:提供了对订阅者进行管理的方法。
- CancellableFlow接口:用于标记StateFlowImpl类型的Flow对象是可取消的。
- MutableStateFlow接口:表示StateFlowImpl类型的Flow对象是一个单数据更新的热流。
- FusibleFlow接口:表示StateFlowImpl类型的Flow对象是可融合的。
1.发射数据的管理
在StateFlowImpl中,当前的数据被保存在名为_state的全局变量中,_state表示StateFlowImpl类型对象的状态,当前代码如下:
private class StateFlowImpl<T>(
initialState: Any
) : AbstractSharedFlow<StateFlowSlot>(), MutableStateFlow<T>, CancellableFlow<T>, FusibleFlow<T> {
// 当前状态
private val _state = atomic(initialState)
...
}
除此之外,StateFlowImpl不对其他的数据做缓存。
2.订阅者的管理
由于StateFlowImpl类与SharedFLowImpl类都继承自AbstractSharedFlow类,因此二者订阅者管理的核心逻辑相同,这里不再赘述,详情可参考Kotlin协程:MutableSharedFlow的实现原理。
唯一不同的地方在,在SharedFlowImpl类中,订阅者数组中存储的对象类型为SharedFlowSlot,而在StateFlowImpl类中,订阅者数组存储的对象类型为StateFlowSlot。
1)StateFlowSlot类
StateFlowSlot类与SharedFlowSlot类类似,都继承自AbstractSharedFlowSlot类。但相比于SharedFlowImpl类型的对象,StateFlowImpl类型的对象是有状态的。
在StateFlowSlot类中,有一个名为_state的全局变量,代码如下:
@SharedImmutable
private val NONE = Symbol("NONE") // 状态标识
@SharedImmutable
private val PENDING = Symbol("PENDING") // 状态标识
private class StateFlowSlot : AbstractSharedFlowSlot<StateFlowImpl<*>>() {
// _state中默认值为null
private val _state = atomic<Any?>(null)
...
}
根据_state保存对象的不同,可以确定StateFlowSlot类型的对象的状态。StateFlowSlot类型的对象共有四种状态:
null:如果_state保存的对象为空,表示当前StateFlowSlot类型的对象没有被任何订阅者使用。
NONE:如果_state保存的对象为NONE标识,表示当前StateFlowSlot类型的对象已经被对应的订阅者使用,但既没有挂起,也没有在处理当前的数据。
PENDING:如果_state保存的对象为PENDING标识,表示当前StateFlowSlot类型的对象已经被对应的订阅者使用,并且将开始处理当前的数据。
CancellableContinuationImpl<Unit>:如果_state保存的对象为续体,表示当前StateFlowSlot类型的对象已经被对应的订阅者使用,但是订阅者已处理完当前的数据,所在的协程已被挂起,等待新的数据到来。
a)订阅者状态的管理
在StateFlowSlot类中,重写了AbstractSharedFlowSlot类的allocateLocked方法与freeLocked方法,顶用两个方法会对订阅者的初始状态和最终状态进行改变,代码如下:
// 新订阅者申请使用当前的StateFlowSlot类型的对象
override fun allocateLocked(flow: StateFlowImpl<*>): Boolean {
// 如果_state保存的对象不为空,
// 说明当前StateFlowSlot类型的对象已经被其他订阅者使用
// 返回false
if (_state.value != null) return false
// 走到这里,说明没有被其他订阅者使用,分配成功
// 修改状态值为NONE
_state.value = NONE
// 返回true
return true
}
// 订阅者释放已经使用的StateFlowSlot类型的对象
override fun freeLocked(flow: StateFlowImpl<*>): Array<Continuation<Unit>?> {
// 修改状态值为null
_state.value = null
// 返回空数组
return EMPTY_RESUMES
}
@JvmField
@SharedImmutable
internal val EMPTY_RESUMES = arrayOfNulls<Continuation<Unit>?>(0)
为了实现上述对订阅者状态的管理,在StateFlowSlot类中,还额外提供了三个方法用于实现对订阅者的状态的切换,代码如下:
// 当有状态更新成功时,会调用makePending方法,通知订阅者可以开始处理新数据
@Suppress("UNCHECKED_CAST")
fun makePending() {
// 根据当前状态判断
_state.loop { state ->
when {
// 如果未被订阅者使用,则直接返回
state == null -> return
// 如果已经处于PENDING状态,则直接返回
state === PENDING -> return
// 如果当前状态为NONE
state === NONE -> {
// 通过CAS的方式,将状态修改为PENDPENDING,并返回
if (_state.compareAndSet(state, PENDING)) return
}
// 如果为挂起状态
else -> {
// 通过CAS的方法,将状态修改为NONE
if (_state.compareAndSet(state, NONE)) {
// 如果修改成功,则恢复对应续体的执行,并返回
(state as CancellableContinuationImpl<Unit>).resume(Unit)
return
}
}
}
}
}
// 当订阅者每次处理完新数据(不一定处理成功)后,会调用takePending方法,表示完成处理
// 获取当前的状态,并修改新状态为NONE
fun takePending(): Boolean = _state.getAndSet(NONE)!!.let { state ->
assert { state !is CancellableContinuationImpl<*> }
// 如果之前的状态为PENDING,则返回true
return state === PENDING
}
// 当订阅者没有新数据需要处理时,会调用awaitPending方法挂起
@Suppress("UNCHECKED_CAST")
// 直接挂起,获取续体
suspend fun awaitPending(): Unit = suspendCancellableCoroutine sc@ { cont ->
assert { _state.value !is CancellableContinuationImpl<*> }
// 通过CAS的方式,将当前的状态修改为挂起,并返回
if (_state.compareAndSet(NONE, cont)) return@sc
// 走到这里代表状态修改失败,说明又发射了新数据,当前的状态被修改为PENDING
assert { _state.value === PENDING }
// 唤起订阅者续体的执行
cont.resume(Unit)
}
3.数据的接收
当调用StateFlow类型对象的collect方法,会触发订阅过程,接收emit方法发送的数据,这部分在
StateFlowImpl中实现,代码如下:
override suspend fun collect(collector: FlowCollector<T>) {
// 为当前的订阅者分配一个StateFlowSlot类型的对象
val slot = allocateSlot()
try {
// 如果collector类型为SubscribedFlowCollector,
// 说明订阅者监听了订阅过程的启动,则先回调
if (collector is SubscribedFlowCollector) collector.onSubscription()
// 获取订阅者所在的协程
val collectorJob = currentCoroutineContext()[Job]
// 局部变量,保存上一次发射的数据,初始值为null
var oldState: Any? = null
// 死循环
while (true) {
// 获取当前的数据
val newState = _state.value
// 判断订阅者所在协程是否是存活的,如果不是则抛出异常
collectorJob?.ensureActive()
// 如果订阅者是第一次处理数据或者当前数据与上一次数据不同
if (oldState == null || oldState != newState) {
// 将数据发送给下游
collector.emit(NULL.unbox(newState))
// 保存当前发射数据到局部变量
oldState = newState
}
// 修改状态,如果之前不是PENGDING状态
if (!slot.takePending()) {
// 则挂起等待新数据更新
slot.awaitPending()
}
}
} finally {
// 释放已分配的StateFlowSlot类型的对象
freeSlot(slot)
}
}
在上述代码中,假设当前订阅者处于PENGDING状态,并在处理数据后,通过takePending方法,将自身状态修改为NONE,由于之前为PENGDING状态,因此不会执行awaitPending方法进行挂起。因此进行了第二次循环,而在第二次调用takePending方法之前,如果数据没有更新,则订阅者将一直处于NONE状态,当再次调用takePending方法时,会调用awaitPending方法,将订阅者所在协程挂起。
4.数据的发射
在StateFlowImpl类中,当需要发射数据时,可以调用emit方法、tryEmit方法、compareAndSet方法,代码如下:
override fun tryEmit(value: T): Boolean {
this.value = value
return true
}
override suspend fun emit(value: T) {
this.value = value
}
override fun compareAndSet(expect: T, update: T): Boolean =
updateState(expect ?: NULL, update ?: NULL)
compareAndSet方法内部调用updateState方法对数据进行更新,而emit方法与tryEmit方法内部通过value属性对数据进行更新,代码如下:
@Suppress("UNCHECKED_CAST")
public override var value: T
// 拆箱
get() = NULL.unbox(_state.value)
// 更新数据
set(value) { updateState(null, value ?: NULL) }
// 拆箱操作
@Suppress("UNCHECKED_CAST", "NOTHING_TO_INLINE")
inline fun <T> unbox(value: Any?): T = if (value === this) null as T else value as T
可以发现,无论是通过emit方法、tryEmit方法还是compareAndSet方法,最终都是通过updateState方法实现数据的更新,代码如下:
// sequence是一个全局变量,当新的数据更新时,sequence会发生变化
// 当sequence为奇数时,表示当前数据正在更新
private var sequence = 0
// CAS方式更新当前数据的值
private fun updateState(expectedState: Any?, newState: Any): Boolean {
var curSequence = 0
// 获取所有的订阅者
var curSlots: Array<StateFlowSlot?>? = this.slots
// 加锁
synchronized(this) {
// 获取当前数据的值
val oldState = _state.value
// 如果期待数据不为空,同时当前数据不等于期待数据,则返回false
if (expectedState != null && oldState != expectedState) return false
// 如果新数据与老数据相同,即前后数据没有发生变化,则直接返回true
if (oldState == newState) return true
// 更新当前数据
_state.value = newState
// 获取全局变量
curSequence = sequence
// 如果为偶数,说明updateState方法没有被其他协程调用,没有并发
if (curSequence and 1 == 0) {
// 自增加1,表示当前正在更新数据
curSequence++
// 将新值保存到全局变量中
sequence = curSequence
} else { // 如果为奇数,说明updateState方法正在被其他协程调用,处于并发中
// 加2后不改变奇偶性,只是表示当前数据发生了变化
sequence = curSequence + 2
// 返回true
return true
}
// 获取当前所有的订阅者
curSlots = slots
}
// 走到这里,说明上面不是并发调用updateState方法的情况
// 循环,通知订阅者
while (true) {
// 遍历,修改订阅者的状态,通知订阅者
curSlots?.forEach {
it?.makePending()
}
// 加锁,判断在通知订阅者的过程中,数据是否又被更新了
synchronized(this) {
// 如果数据没有被更新
if (sequence == curSequence) {
// 加1,让sequence变成偶数,表示更新完毕
sequence = curSequence + 1
// 返回true
return true
}
// 如果数据有被更新,则获取sequence和订阅者
// 再次循环
curSequence = sequence
curSlots = slots
}
}
}
5.新订阅者获取缓存数据
当新订阅者出现时,StateFlow会将当前最新的数据发送给订阅者。可以通过调用StateFlowImpl类重写的常量replayCache获取当前最新的数据,代码如下:
override val replayCache: List<T>
get() = listOf(value)
在StateFlow中,清除replayCache是无效的,因为StateFlow中必须持有一个数据,因此调用
resetReplayCache方法会抛出异常,代码如下:
@Suppress("UNCHECKED_CAST")
override fun resetReplayCache() {
throw UnsupportedOperationException("MutableStateFlow.resetReplayCache is not supported")
}
6.热流的融合
SharedFlowImpl类实现了FusibleFlow接口,重写了其中的fuse方法,代码如下:
// 内部调用了fuseStateFlow方法
override fun fuse(context: CoroutineContext, capacity: Int, onBufferOverflow: BufferOverflow) =
fuseStateFlow(context, capacity, onBufferOverflow)
...
internal fun <T> StateFlow<T>.fuseStateFlow(
context: CoroutineContext,
capacity: Int,
onBufferOverflow: BufferOverflow
): Flow<T> {
assert { capacity != Channel.CONFLATED }
// 如果容量为0、1、BUFFERED,同时溢出策略为DROP_OLDEST
if ((capacity in 0..1 || capacity == Channel.BUFFERED) && onBufferOverflow == BufferOverflow.DROP_OLDEST) {
// 返回自身
return this
}
// 调用fuseSharedFlow方法
return fuseSharedFlow(context, capacity, onBufferOverflow)
}
7.只读热流
调用MutableStateFlow方法,可以得到一个类型为MutableStateFlow的对象。通过这个对象,我们可以调用它的collect方法来订阅接收,也可以调用它的emit方法来发射数据。但大多数的时候,我们需要统一数据的发射过程,因此需要对外暴露一个只可以调用collect方法订阅而不能调用emit方法发射的对象,而不是直接暴露MutableStateFlow类型的对象。
根据上面代码的介绍,订阅的过程实际上是对数据的获取,而发射的过程实际上是数据的修改,因此如果一个流只能调用collect方法而不能调用emit方法,这种流这是一种只读流。
事实上,在Kotlin协程:StateFlow的设计与使用分析接口的时候可以发现,MutableStateFlow接口继承了MutableSharedFlow接口,MutableSharedFlow接口继承了FlowCollector接口,emit方法定义在FlowCollector中。StateFlow接口继承了Flow接口,collect方法定义在Flow接口中。因此只要将MutableStateFlow接口指向的对象转换为StateFlow接口指向的对象就可以将读写流转换为只读流。
在代码中,对MutableStateFlow类型的对象调用asStateFlow方法恰好可以实现将读写流转换为只读流,代码如下:
// 该方法调用了ReadonlyStateFlow方法,返回一个类型为StateFlow的对象
public fun <T> MutableStateFlow<T>.asStateFlow(): StateFlow<T> =
// 传入当前的MutableStateFlow类型的对象
ReadonlyStateFlow(this)
// 实现了FusibleFlow接口,
// 实现了StateFlow接口,并且使用上一步传入的MutableStateFlow类型的对象作为代理
private class ReadonlyStateFlow<T>(
flow: StateFlow<T>
) : StateFlow<T> by flow, CancellableFlow<T>, FusibleFlow<T> {
override fun fuse(context: CoroutineContext, capacity: Int, onBufferOverflow: BufferOverflow) =
// 用于流融合,也是通过fuseStateFlow方法实现
fuseStateFlow(context, capacity, onBufferOverflow)
}作者:李萧蝶
链接:https://juejin.cn/post/7147236984963432456
来源:稀土掘金
著作权归作者所有。商业转载请联系作者获得授权,非商业转载请注明出处。 收起阅读 »
Kotlin协程:StateFlow的设计与使用
一.StateFlow的设计
StateFlow是一种单数据更新的热流,通过emit方法更新StateFlow的数据,通过value属性可以获取当前的数据。在StateFlow中,核心接口的继承关系如下图所示:
1.StateFlow接口
StateFlow接口继承自SharedFlow接口,代码如下:
public interface StateFlow<out T> : SharedFlow<T> {
// 当前的数据
public val value: T
}
订阅过程:在StateFlow中,每个FlowCollecter类型的对象都被称为订阅者。调用StateFlow类型对象的collect方法会触发订阅。正常情况下,订阅不会自动结束,但订阅者可以取消订阅,当订阅者所在的协程被取消时,订阅过程就会取消。
冷流转换热流:对于一个冷流,可以通过调用stateIn方法,转换为一个单数据更新的热流。
相等判定:在StateFlow中,通过Any#equals方法来判断前后两个数据是否相等。当前后两个数据相等时,数据不会被更新,订阅者也不会处理。
数据缓存:StateFlow必须要有一个初始值。当新订阅者出现时,StateFlow会将最新的数据发射给订阅者。StateFlow只保留最后发射的数据,除此之外不会缓存任何其他的数据。同时,StateFlow不支持resetReplayCache方法。
StateFlow并发: StateFlow中所有的方法都是线程安全的,并且可以在多协程并发的场景中使用且不必额外加锁。
操作符使用:对StateFlow使用flowOn操作符、conflate操作符、参数为CONFLATED或RENDEZVOUS的buffer操作符、cancellable操作符是无效的。
使用场景:使用StateFlow作为数据模型,可以表示任何状态。
StateFlow与SharedFlow的区别:StateFlow是SharedFlow的一种特定方向的、高性能的、高效的实现,广泛的用于单状态变化的场景,所有与SharedFlow相关基本规则、约束、操作符都适用于StateFlow。当使用如下的参数创建SharedFlow对象,并对其使用distinctUntilChanged操作符,可以得到一个与StateFlow行为相同的SharedFlow对象:
// StateFlow
val stateFlow = MutableStateFlow(initialValue)
// 与StateFlow行为相同的SharedFlow
// 注意参数
val sharedFlow = MutableSharedFlow(
replay = 1,
extraBufferCapacity = 0,
onBufferOverflow = BufferOverflow.DROP_OLDEST)
// 设置初始值
sharedFlow.tryEmit(initialValue)
// distinctUntilChanged方法,只有当前后发射的两个数据不同时才会将数据向下游发射
val state = sharedFlow.distinctUntilChanged()
- StateFlow与ConflatedBroadcastChannel的区别:从概念上讲,StateFlow与ConflatedBroadcastChannel很相似,但二者也有很大的差别,推荐使用StateFlow,StateFlow设计的目的就是要在未来替代ConflatedBroadcastChannel:
- StateFlow更简单,不需要实现一堆与Channel相关的接口。
- StateFlow始终持有一个数据,并且无论在任何时间都可以安全的通过value属性获取。
- StateFlow清楚地划分了只读的StateFlow和可读可写的StateFlow。
- StateFlow对前后数据的比较是与distinctUntilChanged操作符类似的,而ConflatedBroadcastChannel对数据进行相等比较是基于标识引用。
- StateFlow不能关闭,也不能表示失败,因此如果需要,所有的错误与完成信号都应该具体化。
2. MutableStateFlow接口
MutableStateFlow接口继承自MutableSharedFlow接口与StateFlow接口,并在此基础上定义了一个新方法compareAndSet,代码如下:
public interface MutableStateFlow<T> : StateFlow<T>, MutableSharedFlow<T> {
// 当前数据
public override var value: T
// 通过CAS的方式,更新value
// 如果except与value相等,则将value更新为update,并返回true
// 如果except与value不相等,不做任何操作,直接返回false
// 如果except、value、update同时相等,不做任何操作,直接返回true
public fun compareAndSet(expect: T, update: T): Boolean
}
二.StateFlow的使用
1.MutableStateFlow方法
在协程中,可以通过调用MutableStateFlow方法创建一个MutableStateFlow接口指向的对象,代码如下:
public fun <T> MutableStateFlow(value: T): MutableStateFlow<T> {
...
}
通过MutableStateFlow方法可以创建一个类型为MutableStateFlow的对象,需要提供一个参数value,作为初始值。
在并发场景下调用emit方法时,会使StateFlow的数据快速更新,对于处理数据慢的订阅者,将会跳过这些快速更新的数据,但当订阅者需要处理数据时,获取的一定是最新更新的数据。
2.使用示例
代码如下:
private suspend fun test() {
// 创建一个热流,初始值为1
val flow = MutableStateFlow(1)
// 将MutableStateFlow对象转换为StateFlow对象
// StateFlow对象不能调用emit方法,因此只能用于接收
val onlyReadFlow = flow.asStateFlow()
// 接收者1
// 启动一个新的协程
GlobalScope.launch {
// 触发并处理接收的数据
onlyReadFlow.collect {
Log.d("liduozuishuai", "test1: $it")
}
}
// 接收者2
// 启动一个新协程
GlobalScope.launch {
// 订阅监听,当collect方法触发订阅时,会首先会调onSubscription方法
onlyReadFlow.onSubscription {
Log.d("liduozuishuai", "test2: ")
// 发射数据:2
// 向下游发射数据:2,其他接收者收不到
emit(2)
}.onEach {
// 处理接收的数据
Log.d("liduozuishuai", "test2: $it")
}.collect()
}
// 发送数据:3,多次发送
GlobalScope.launch {
flow.emit(3)
flow.emit(3)
flow.compareAndSet(3, 3)
}
}
对于上面的示例,接收者1会依次打印出:1、3,接收者2会依次打印出2、3。接收者2由于在处理onSubscription方法发射的数据2时,MutableStateFlow对象内部的数据1变成了数据3,因此在处理完数据2后,直接处理数据3。
作者:李萧蝶
链接:https://juejin.cn/post/7147226015943622687
来源:稀土掘金
著作权归作者所有。商业转载请联系作者获得授权,非商业转载请注明出处。 收起阅读 »


