前言
最近看到一篇文章:
《最新,Vue 中的响应性语法糖已废弃》
本文标题中的 $ 语法糖指的就是上文中的响应式语法糖 (Reactivity Transform),那为什么不写 Reactivity Transform 呢?因为这个名实在是太长了…
看了一圈评论发现大家觉得被废弃是因为分不清是正常变量还是响应式变量的居多:
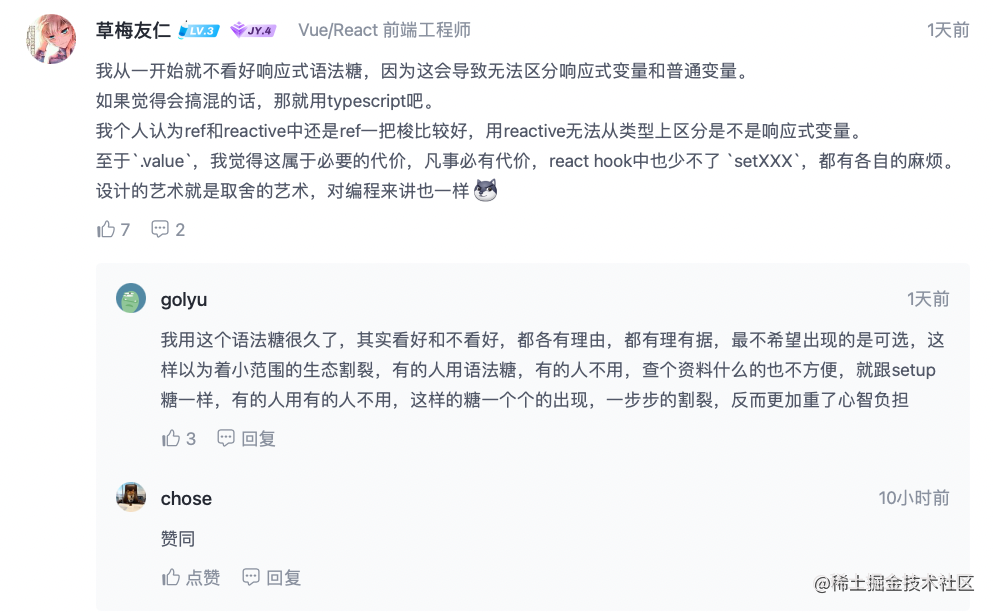
下面这个评论说的有一定道理:
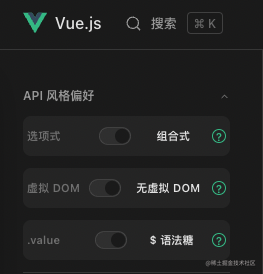
Vue 的官网现在已经变成这样了:
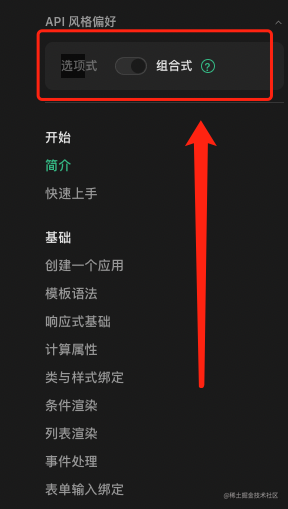
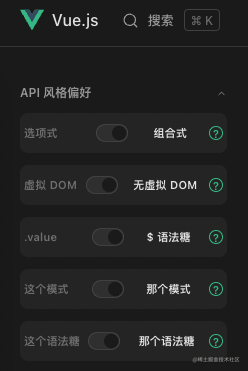
以后会不会变成这样:
2的3次方,一共8种不一样的写法。不对,无虚拟 DOM 模式只能用 Composition API,所以应该不到 8 种写法,你看这不就分裂了嘛!虽说这几种不同的写法也能看懂吧,但每个人都有不同的偏好不同的写法总归不太好。而且你能保证 Vue 不会又改写法吗?Vue 总是受人启发:受 Angular 启发的双向绑定、受 React 启发的虚拟 DOM、受 React Hooks 启发的 Composition API、受 Svelte 启发的语法糖(一开始用的是 Svelte 的 label 写法)、受 Solid 启发的 Vapor Mode(无虚拟 DOM 模式)

开玩笑的哈~ Vue 还是有很多自己的东西的,不过它确实老是抄袭各种框架受各种框架的启发,太杂糅了。今天受这个框架启发做出来这种新 feature、明天又受那个框架启发做出来了另一种新 feature… 估计等 Vue4 出来的时候肯定又是受到了什么其他框架的启发…
我在《无虚拟 DOM 版 Vue 即将到来》这篇文章下看到这样一条评论:

大家觉得这个人说的有没有道理呢?反正我现在感觉 Vue 的各个方案有点太杂糅了,有点像是方案整合商集百家之长,以后指不定就发展成这样了:
当你去网上搜索一些解决方案时,能看到数十种不同的写法是一种什么体验……
不过这条评论真的是高情商:

- 低情商:
Vue 这是啥流行抄啥
- 高情商:只用
Vue 就能体会到各种流行的技术趋势

跑题了,咱们来说一说 $ 语法糖,它可绝不只有分不清到底是不是响应式变量这一个缺点,它的缺点比优点多得多,我们来具体分析一下。
分析
我们也不要一上来就说这个语法糖有多么多么的不好,如果真这么不好的话尤总也不至于费这么大劲来推动这个提案了对不?这个语法糖在某些情况下确实会大幅改善我们的开发体验,但在另一些情况下不仅不会帮助我们改善体验,反而会增加我们的心智负担,我们来看下面这个案例:
let x = $(0)
let y = $(0)
const update = e => {
x = e.x
y = e.y
}
onMounted(() => window.addEventListener('mousemove', update))
onUnmounted(() => window.removeEventListener('mousemove', update))
$watch([x, y], ([x, y]) => console.log(x, y))
看上去很美好是不是,我们终于不用再写 .value 了。
如果看不明白这种写法的话可能是之前没有对其进行过了解
建议先阅读一下这篇《Vue3又出新语法 到底何时才能折腾完?》
不过像这种逻辑我们通常都会提取出去封装成一个函数,因为有可能有很多个组件都用到了获取鼠标位置这个逻辑,你不想在每个用到该逻辑的组件里都复制一遍相同的逻辑吧?那我们就这样:
export const useMouse = (dom = window) => {
let x = $(0)
let y = $(0)
const update = e => {
x = e.x
y = e.y
}
onMounted(() => dom.addEventListener('mousemove', update))
onUnmounted(() => dom.removeEventListener('mousemove', update))
return { x, y }
}
import { useMouse } from './useMouse.js'
let { x, y } = useMouse()
$watch([x, y], ([x, y]) => console.log(x, y))
如果这么写你就会惊讶的发现根本不生效,因为编译过后就相当于:
import { ref } from 'vue'
export const useMouse = (dom = window) => {
let x = ref(0)
let y = ref(0)
const update = e => {
x.value = e.x
y.value = e.y
}
onMounted(() => dom.addEventListener('mousemove', update))
onUnmounted(() => dom.removeEventListener('mousemove', update))
return {
x: x.value,
y: y.value
}
}
这就相当于把一个普通值给 return 出去了,普通值是没法在取值或改值时运行一些其他逻辑的,所以我们还不能把值直接 return 出去,而是把这个响应式变量本身给 return 出去:
import { ref } from 'vue'
export const useMouse = (dom = window) => {
let x = ref(0)
let y = ref(0)
const update = e => {
x.value = e.x
y.value = e.y
}
onMounted(() => dom.addEventListener('mousemove', update))
onUnmounted(() => dom.removeEventListener('mousemove', update))
return { x, y }
}
所以编译必须还要有还原的功能,把响应式的值给还原成响应式变量:
export const useMouse = (dom = window) => {
let x = $(0)
let y = $(0)
const update = e => {
x = e.x
y = e.y
}
onMounted(() => dom.addEventListener('mousemove', update))
onUnmounted(() => dom.removeEventListener('mousemove', update))
return $$({ x, y })
}
但这样又要写 .value 了:
import { useMouse } from './useMouse.js'
let { x, y } = useMouse()
console.log(x.value, y.value)
因为编译器是分析不出来一个函数的返回值到底是不是响应式变量的,所以就又得引入一个 API 来告诉编译器这个函数的返回值有响应式变量:
import { useMouse } from './useMouse.js'
let { x, y } = $fromRefs(useMouse())
console.log(x, y)
大家不觉得这样很麻烦吗?而且搞出那么多莫名其妙的 $ 、$$ 变量。写一堆这玩意真的没感觉比 .value 好到哪去,而且我们还要随时记得某个变量是响应式的,不然在传递的过程中就有可能失去响应性:
export const logValue = arg => {
console.log(arg.value)
let argument = $computed(() => arg.value)
console.log(argument)
$watch(argument, value => console.log(value))
}
import { logValue } from './logValue.js'
let a = $(0)
logValue(a)
logValue($$(a))
let b = 0
logValue($$(a), b, { a: $$(a), b })
还有需要把 ref 变量传给 reactive 字段的情况:
let a = $(0)
const obj = reactive({ a })
console.log(obj.a)
a++
console.log(obj.a)
const obj = reactive({ a: $$(a) })
console.log(obj.a)
a++
console.log(obj.a)
所以说语法糖只能某些情况下改善我们的开发体验,前提就是你不要把响应式变量传来传去的。但 Vue3 的核心卖点之一不就是 Composition API 么?中文官网管这个叫组合式 API,关键词是组合。Vue 还把提取出去的可复用函数叫 Composables,翻译过来就是可组合的,如果不把响应式变量传来传去那还组合个P呀!
这个问题可不是只有 Vue 有,来看下 Solid.js 吧:
import { createSignal } from 'solid'
export const useMouse = (dom = window) => {
const [x, setX] = createSignal(0)
const [y, setY] = createSignal(0)
dom.addEventListener('mousemove', ({ x, y }) => {
setX(x)
setY(y)
})
return {
x: x(),
y: y()
}
}
同样会有响应式值与响应式变量的问题,只不过就是把 .value 变成了 ():
console.log(a.value)
console.log(a())
console.log(a)
是不是看过很多文章说 Solid.js 和 React Hooks 很像、写起来很舒服、什么比 React 还 react 之类的文章?实际上真的就只是 API 设计的相似而已,只要我们想,我们同样也可以把 Vue 的 API 封装成 React 那样:
import { ref } from 'vue'
const useState = value => {
const result = ref(value)
const getter = () => result.value
const setter = newValue => result.value = newValue
return [getter, setter]
}
const [num, setNum] = useState(0)
setNum(1)
那是不是这样封装一下,Vue 也变得比 React 还 react 了?应该不难看出这只是在自欺欺人罢了,我们传值时照样还得区分到底应该传的是响应式变量本身还是响应式变量的值。
Vue2 为何没这个问题
不知大家有没有思考过:为什么 Vue2 时代大家从来就没听说过丢失响应性、没听过要出什么语法糖之类的问题呢?听过最多有关于语法糖的可能就是 v-model 的双向绑定功能其实就是 @input="xxx" + :value="xxx" 的语法糖。
这是因为 Vue2 时代用的都是 this.xxx,咱们所有的响应式变量全都挂载到了 this 上。取值时 this.xxx 会触发 getter、改值时 this.xxx = xxx 会触发 setter。
你可以简单的理解成这样:
import { reactive, watchEffect } from 'vue'
const this = reactive({
a: 1,
b: 2,
c: 3
})
watchEffect(() => console.log(this.a))
this.a++
当然这只是一段伪代码,真这么写是会报错的:

因为 this 是一个关键字,正因为它是一个关键字所以咱们用 this.xxx 才会显得这么的自然。而我们现在的响应式变量都需要自己起名,自己起的名不是关键字,所以用 xx.xxx 就老觉得麻烦,就老想给它解构:
import { reactive, watchEffect, toRefs } from 'vue'
const user = reactive({
name: 'AngularBaby',
age: 34,
beautiful: true
})
console.log(user.name)
const { name } = user
console.log(name)
const { name } = toRefs(user)
console.log(name.value)
而且之前用 this 还有一个显著的好处就是只要写法正确,操作 this 上的属性就不用担心响应式的问题,没有那么多心智负担。甚至有人会简单的理解为只要是 this.xxx 就一定会有响应:
export default {
data () {
return { a: 1 }
},
mounted () {
this.a = 2
this.a++
let b = 2
b++
}
}
这样很容易区分哪些是响应式变量而哪些不是,即使有人真的写成了这样:
export default {
data () {
return { a: 1 }
},
mounted () {
let { a } = this
a++
}
}
这里也很容易能够看出来我们这样并没有修改 this 上的属性,所以并不会正确响应也是理所应当的一件事。
还有复用逻辑,Vue2 时代有很多人用 Mixins 来复用逻辑:
import mouse from 'mouse.mixin.js'
import position from 'position.mixin.js'
export default {
mixins: [mouse, position],
mounted () {
this.x
this.y
}
}
可以看到 Mixins 存在很多的弊端,比方说数据来源不清晰、容易产生冲突变量之类的。如果不去看源码的话谁能知道 this.x 到底是 mouse 中的 x 还是 position 的 x 呢?正是由于 Vue2 没有一个完美的复用机制,所以尤大才下定决心将 Vue3 改造成函数式。但函数式没了 this 就又失去了 Vue2 时期的那种… 我不知该怎么形容 Vue2时期的 this.xxx 哈,舒服?自然?反正我是比较喜欢 this.xxx 这种写法的,虽然这种写法是受 Angular 启发(集百家之长)
而且我还比较喜欢的一点就是一些全局挂载的属性:
this.$el
this.$refs
this.$nextTick(() => { })
直接 this.$xxx 就出来了,不用引,既方便又快捷。当然这种方式也有不少坏处,比方说容易被覆盖、不利于 Tree Shaking 之类的…
但我还真的蛮喜欢这种写法的:
import Vue from 'vue'
Vue.prototype.$toast = msg => { }
this.$toast('Success!')
如今就会变得就稍麻烦一些:
import toast from './toast.js'


toast('Success!')
虽说后者其实更好,但有没有这样一种可能:既恢复到 Vue2 时期用 this 的便捷、又能享受到 Vue3 组合式的好处:
this.$data.a = 1
this.$computed.b = () => this.a * 2
this.$watch.b = value => console.log(value)
let timer
this.$mounted = () => {
timer = setInterval(() => this.a++, 1000)
}
this.$unMounted = () => clearInterval(timer)
复用逻辑:
import useMouse from './useMouse.js'
({ x: this.$computed.x, y: this.$computed.y } = useMouse())
this.$effect = () => console.log(this.x, this.y)
[this.$computed.x, this.$computed.y] = useMouse()
this.$effect = () => console.log(this.x, this.y)
这样我们的心智负担就又能回到 this 时期了:只要改变 this 属性就会存在响应,否则就无响应,那这个方案有实现的可能吗?在 ES5 时代无可能,但在 ES6 Proxy 的加持下我认为还是可以实现的,那么接下来我们就来试一下。
实验
首先我们回顾一下 Vue3.0 没有 setup 语法糖时期的写法:
<template></template>
<script>
import { defineComponent } from 'vue'
export default defineComponent({
setup () {
console.log(this)
}
})
</script>
原版的 this 指向为 undefined,那我们怎么改变它的指向呢?我们可以自己写一个 defineComponent:
import { defineComponent, reactive } from 'vue'
export default options => {
const { setup } = options
if (typeof setup === 'function') {
options.setup = setup.bind(reactive({}))
}
return defineComponent(options)
}
这样 setup 的指向就变成了 reactive({}),当我们在操作 this 的时候就相当于在操作 reactive({})。但这样并不能满足我们的需求,我们想要的是当我们 this.$data.a 的时候会在 this 上挂载个 a 属性,所以我们要把 reactive 换成一个 Proxy:
import { defineComponent, reactive } from 'vue'
const createData = target => new Proxy({}, {
get: (_, key) => Reflect.get(target, key),
set (_, key, value) {
if (Reflect.getOwnPropertyDescriptor(target, key)) {
console.error(`this.$data.${key} is already defined!`)
return false
}
return Reflect.set(target, key, value)
}
})
export default () => {
const that = reactive({})
const $data = createData(that)
return new Proxy(that, {
get (target, key) {
if (key === '$data') {
return $data
}
return Reflect.get(target, key)
},
set (target, key, value) {
if (key === '$data') {
return console.warn('this.$data is readonly!')
}
return Reflect.set(target, key, value)
}
})
}
import { defineComponent } from 'vue'
import createThis from './createThis.js'
export default options => {
const { setup } = options
if (typeof setup === 'function') {
const that = createThis()
options.setup = (...args) => {
setup.apply(that, args)
return that
}
}
return defineComponent(options)
}
也就是说我们利用 Proxy 来把 $data 给代理出去了,当我们访问 $data 的时候其实已经是另一个代理对象了,在这个代理对象上设置的属性全部都设置到 this 上。this 现在就相当于 reactive({}),所以 this.$data.a = 1就相当于 reactive({ a: 1 }),我们来试一下:

完美运行,只要你能搞懂上面的那段代码,那么接下来的 $computed、$watch、$watchEffect、$readonly、$shallow、$nextTick、$mounted、$unMounted 等一大堆 API 相信你也知道该怎么做了,我就不在这里占用过多的篇幅了。这里直接用码上掘金贴上源码及用法,向大家展示一下可行性:
当然这源码并不是把所有 API 都实现了,目前只实现了 this.$data、this.$computed、this.$watch、this.$mounted 等几个常用的 API 供大家参考,感兴趣的可以去把全部的 API 都实现一下,我这里犯懒就先不实现那么全乎了。

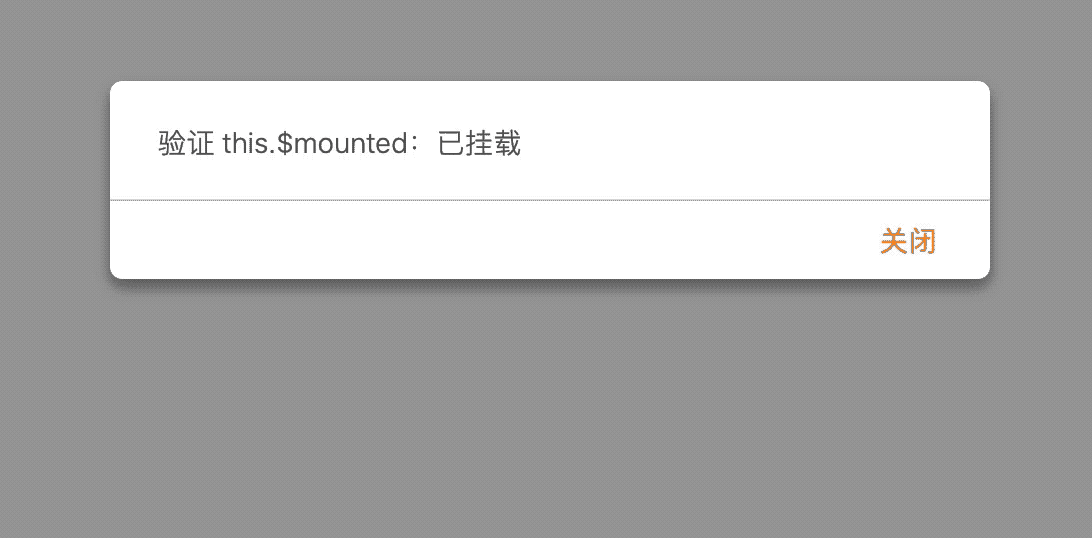
这么好的东西为啥犯懒不实现呢?因为这玩意有一定的弊端。对了,掘金好像在文章中屏蔽了来自码上掘金的 alert,必须点查看详情才能看到。为了防止大家也犯懒不点进去看,这里直接给大家贴上动图:
我们的写法类似于下面这样:
export default defineComponent({

  setup () {

    this.$data.count = 0

    this.$watch.count = (value, oldValue) => alert(`验证 this.$watch:按钮上的值将会从 ${oldValue} 变为 ${value}`)


    this.$computed.doubleCount = () => this.count * 2

    this.$watch.doubleCount = value => alert(`验证 this.$computed:${this.count} 的双倍是 ${value}`


    this.$mounted = () => alert('验证 this.$mounted:已挂载')

  }

})
怎么样,是不是很好玩?我是蛮喜欢这种 this 混合着函数式的写法。但刚刚说了这玩意有一定的弊端,只能拿来当玩具玩玩所以我才懒得实现的那么全乎。那么它究竟有多大的弊端呢?
弊端
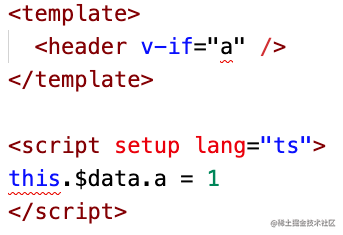
Vue3 比 Vue2 更优秀的一个点是支持 tree shaking,在你仅仅只用了 Vue 的某几项功能的情况下打包体积会小很多。但我们刚刚的做法无疑是开了历史的倒车,又回去了!并且随着 Vue3.2 的崛起,setup 语法糖得到了大多数人的认可,因为它确实很方便。但这样我们就无法修改 this 指向了:
<template>
<h1>{{ a }}</h1>
</template>
<script setup>
this.$data.a = 1
</script>
有人可能会说加个函数不就得了:
<template>

  <h1>{{ a }}</h1>

</template>


<script setup>

import setup from './setup.js'


setup(() => {

  this.$data.a = 1

})

</script>
这样虽然可以修改 this 指向,但随之而来的就是 <template> 模板里面访问不到 a 这个变量了,除非我们写成这样:
<template>

  <h1>{{ a }}</h1>

</template>


<script setup>

import { toRefs } from 'vue'

import setup from './setup.js'


const { a, b, c, d, e, f } = toRefs(setup(() => {

  this.$data.a = 1

  this.$data.b = 2

  this.$data.c = 3

  this.$data.d = 4

  this.$data.e = 5

  this.$data.f = 6

}))

</script>
我相信没人会愿意写成这样,所以我们必须借助 babel 插件来完成编译,思路是把 this 编译成 reactive({}),类似于下面这样:
this.$data.a = 1
this.$data.b = 2
this.$data.c = 3
this.$data.d = 4
this.$data.e = 5
this.$data.f = 6
import { reactive } from 'vue'
import createThis from 'createThis.js'
import createData from 'createData.js'
const that = createThis(reactive({}))
createData(that)
that.$data.a = 1
that.$data.b = 2
that.$data.c = 3
that.$data.d = 4
that.$data.e = 5
that.$data.f = 6
不过这样还是会引入我们刚刚写的那些代码,虽然代码量并不高,但如果压根就不引入任何额外的代码才好,所以如果能编译成这样才是最完美的:
this.$data.a = 1
this.$data.b = 2
this.$data.c = 3
this.$data.d = 4
this.$data.e = 5
this.$data.f = 6
console.log(this.a)
import { reactive } from 'vue'
const that = reactive({
a: 1,
b: 2,
c: 3,
d: 4,
e: 5,
f: 6
})
console.log(that.a)
但如果这样编译的话又有可能发生如下情况:
import useXxx from './useXxx'


this.$data.a = 1


useXxx.call(this)
这样会被编译成:
import { reactive } from 'vue'

import useXxx from './useXxx'


const that = reactive({ a: 1 })


useXxx.call(that)
万一这个 useXxx 里写了这样一段逻辑:
expurt default function () {
this.$watch.a = value => console.log(value)
}
这样就不会按照我们所期待方式去运行了,因为在编译后就相当于:
const obj = reactive({ a: 1 })
useXxx.call(obj)
function useXxx () {
this.$watch.a = value => console.log(value)
}
这样会直接报错,因为 reactive({ a: 1 }).$watch 是 undefined,undefined.a 会报错,所以并没有特别完美的解决方案。最好是检测如果没把 this 作为参数传走或者没有哪个函数用了 fn.call(this) 来把 this 指向当前上下文的话,就按照最完美的方式(不引入任何杂七杂八的代码)编译。否则就引入一点运行时,反正也没多少:
import useMouse from 'useMouse'
this.$data.a = 1
this.$watch.a = value => console.log(value)
this.$mounted = () => window.addEventListener(...)
this.$unmounted = () => window.removeEventListener(...)
[this.$computed.x, this.$computed.y] = useMouse.call(this)
import { reactive } from 'vue'
import createThis from 'createThis'
import createData from 'createData'
import createWatch from 'createWatch'
import createMounted from 'createMounted'
import createUnmounted from 'createUnmounted'
const that = createThis(reactive({
a: 1
}))
createData(that)
createWatch(that)
createMounted(that)
createUnmounted(that)
that.$data.a = 1
that.$watch.a = value => console.log(value)
that.$mounted = () => window.addEventListener(...)
that.$unmounted = () => window.removeEventListener(...)
[that.$computed.x, that.$computed.y] = useMouse.call(that)
但仔细一想还是有可能有 bug,比方说你这个组件里没用到 this.$readonly,但 useMouse 用了的话,那岂不是又要报错。那就在 Vue 组件之外也编译,如果在外面有用到 this.$xxx,那就在相应的位置:
export default function useMouse () {
this.$readonly.a = 1
}
import createReadonly from 'createReadonly'
export default function useMouse () {
createReadonly(this)
this.$readonly.a = 1
}
缺陷
这种写法不仅仅是有弊端,还有一个非常严重的缺陷。虽然刚刚我们设想了一下用编译的方案来解决弊端的可能,但有个最大的缺陷是连编译都无法解决的。这个最大的缺陷就是对 TS 的支持,如果不用 TS 还好,但如果你的项目里有用 TS,那么这种写法就完全没法用:
不知怎么才能让 TS 也支持这种想法,查了国内外很多资料,最后找到了这两篇文章:
《TypeScript plugin 实践 —— 类型,编辑器与业务价值》
《基于 TypeScript 的开发者体验增强 - 朝夕相处却始终被忽视的领域》
也不知道这个 TS Language Service 有没有可能能够实现我们这种语法,感兴趣的小伙伴可以好好研究一下。我们目前只实现了运行时方案,但编译方案才是未来。写这篇文章的目的是希望给大家提供一个思路,看看大家觉得这个想法怎么样。万一大家觉得这个想法非常好,把它推给官方,官方实现了呢?
当然上述的那些话也可能仅仅只是过于美好的想象,现实很有可能是压根儿就没有人对这个想法感兴趣,官方也认为这是在开历史的倒车并且对 TS 支持不好不予实现。
往期精彩文章
作者:Veev
来源:juejin.cn/post/7222874734185922597