概览
HTTP 缓存会存储与请求关联的响应,并将存储的响应复用于后续请求。
可复用性有几个优点。首先,由于不需要将请求传递到源服务器,因此客户端和缓存越近,响应速度就越快。最典型的例子是浏览器本身为浏览器请求存储缓存。
此外,当响应可复用时,源服务器不需要处理请求——因为它不需要解析和路由请求、根据 cookie 恢复会话、查询数据库以获取结果或渲染模板引擎。这减少了服务器上的负载。
缓存的正确操作对系统的稳定运行至关重要。
不同种类的缓存
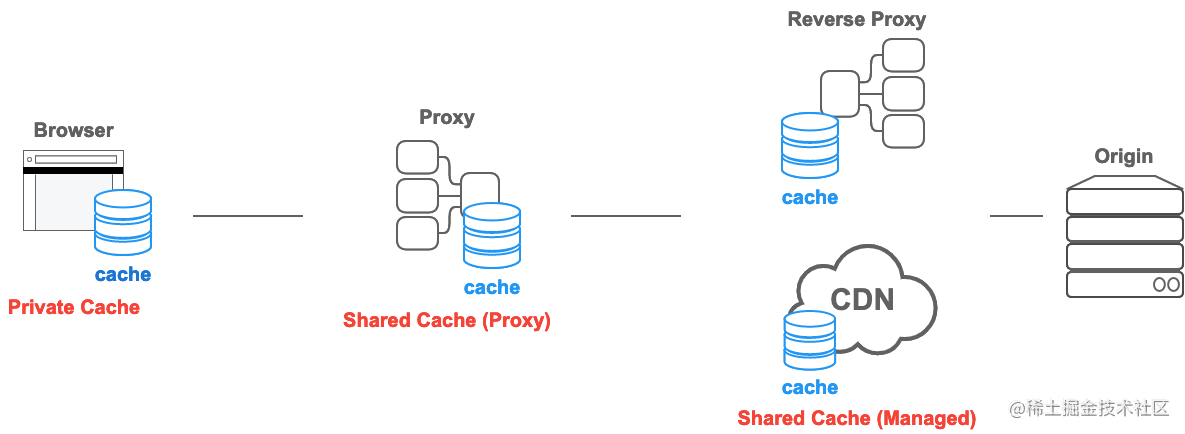
在 HTTP Caching 标准中,有两种不同类型的缓存:私有缓存和共享缓存。
私有缓存
私有缓存是绑定到特定客户端的缓存——通常是浏览器缓存。由于存储的响应不与其他客户端共享,因此私有缓存可以存储该用户的个性化响应。
另一方面,如果个性化内容存储在私有缓存以外的缓存中,那么其他用户可能能够检索到这些内容——这可能会导致无意的信息泄露。
如果响应包含个性化内容并且你只想将响应存储在私有缓存中,则必须指定 private 指令。
Cache-Control: private
个性化内容通常由 cookie 控制,但 cookie 的存在并不能表明它是私有的,因此单独的 cookie 不会使响应成为私有的。
请注意,如果响应具有 Authorization 标头,则不能将其存储在私有缓存(或共享缓存,除非 Cache-Control 指定的是 public)中。
共享缓存
共享缓存位于客户端和服务器之间,可以存储能在用户之间共享的响应。共享缓存可以进一步细分为代理缓存和托管缓存。
代理缓存
除了访问控制的功能外,一些代理还实现了缓存以减少网络流量。这通常不由服务开发人员管理,因此必须由恰当的 HTTP 标头等控制。然而,在过去,过时的代理缓存实现——例如没有正确理解 HTTP 缓存标准的实现——经常给开发人员带来问题。
Kitchen-sink 标头如下所示,用于尝试解决不理解当前 HTTP 缓存规范指令(如 no-store)的“旧且未更新的代理缓存”的实现。
Cache-Control: no-store, no-cache, max-age=0, must-revalidate, proxy-revalidate
然而,近年来,随着 HTTPS 变得越来越普遍,客户端/服务器通信变得加密,在许多情况下,路径中的代理缓存只能传输响应而不能充当缓存。因此,在这种情况下,无需担心甚至无法看到响应的过时代理缓存的实现。
另一方面,如果 TLS 桥接代理通过在 PC 上安装来自组织管理的 CA 证书,以中间人方式解密所有通信,并执行访问控制等,则可以查看响应的内容并将其缓存。但是,由于证书透明度(certificate transparency)在最近几年变得很普遍,并且一些浏览器只允许使用证书签署时间戳(signed certificate timestamp)颁发的证书,因此这种方法需要应用于企业策略。在这样的受控环境中,无需担心代理缓存“已过时且未更新”。
托管缓存
托管缓存由服务开发人员明确部署,以降低源服务器负载并有效地交付内容。示例包括反向代理、CDN 和 service worker 与缓存 API 的组合。
托管缓存的特性因部署的产品而异。在大多数情况下,你可以通过 Cache-Control 标头和你自己的配置文件或仪表板来控制缓存的行为。
例如,HTTP 缓存规范本质上没有定义显式删除缓存的方法——但是使用托管缓存,可以通过仪表板操作、API 调用、重新启动等实时删除已经存储的响应。这允许更主动的缓存策略。
也可以忽略标准 HTTP 缓存规范协议以支持显式操作。例如,可以指定以下内容以选择退出私有缓存或代理缓存,同时使用你自己的策略仅在托管缓存中进行缓存。
Cache-Control: no-store
例如,Varnish Cache 使用 VCL(Varnish Configuration Language,一种 DSL逻辑来处理缓存存储,而 service worker 结合缓存 API 允许你在 JavaScript 中创建该逻辑。
这意味着如果托管缓存故意忽略 no-store 指令,则无需将其视为“不符合”标准。你应该做的是,避免使用 kitchen-sink 标头,但请仔细阅读你正在使用的任何托管缓存机制的文档,并确保你选择的方式可以正确的控制缓存。
请注意,某些 CDN 提供自己的标头,这些标头仅对该 CDN 有效(例如,Surrogate-Control)。目前,正在努力定义一个 CDN-Cache-Control 标头来标准化这些标头。
启发式缓存
HTTP 旨在尽可能多地缓存,因此即使没有给出 Cache-Control,如果满足某些条件,响应也会被存储和重用。这称为启发式缓存。
例如,采取以下响应。此回复最后一次更新是在 1 年前。
HTTP/1.1 200 OK
Content-Type: text/html
Content-Length: 1024
Date: Tue, 22 Feb 2022 22:22:22 GMT
Last-Modified: Tue, 22 Feb 2021 22:22:22 GMT
<!doctype html>
…
试探性地知道,整整一年没有更新的内容在那之后的一段时间内不会更新。因此,客户端存储此响应(尽管缺少 max-age)并重用它一段时间。复用多长时间取决于实现,但规范建议存储后大约 10%(在本例中为 0.1 年)的时间。
启发式缓存是在 Cache-Control 被广泛采用之前出现的一种解决方法,基本上所有响应都应明确指定 Cache-Control 标头。
基于 age 的缓存策略
存储的 HTTP 响应有两种状态:fresh 和 stale。fresh 状态通常表示响应仍然有效,可以重复使用,而 stale 状态表示缓存的响应已经过期。
确定响应何时是 fresh 的和何时是 stale 的标准是 age。在 HTTP 中,age 是自响应生成以来经过的时间。这类似于其他缓存机制中的 TTL。
以下面的示例响应为例(604800 秒是一周):
HTTP/1.1 200 OK
Content-Type: text/html
Content-Length: 1024
Date: Tue, 22 Feb 2022 22:22:22 GMT
Cache-Control: max-age=604800
<!doctype html>
…
存储示例响应的缓存会计算响应生成后经过的时间,并将结果用作响应的 age。
对于该示例的响应,max-age 的含义如下:
- 如果响应的 age 小于一周,则响应为 fresh。
- 如果响应的 age 超过一周,则响应为 stale。
只要存储的响应保持新鲜(fresh),它将用于兑现客户端请求。
当响应存储在共享缓存中时,有必要通知客户端响应的 age。继续看示例,如果共享缓存将响应存储了一天,则共享缓存将向后续客户端请求发送以下响应。
HTTP/1.1 200 OK
Content-Type: text/html
Content-Length: 1024
Date: Tue, 22 Feb 2022 22:22:22 GMT
Cache-Control: max-age=604800
Age: 86400
<!doctype html>
…
收到该响应的客户端会发现它在剩余的 518400 秒内是新鲜(fresh)的,这是响应的 max-age 和 Age 之间的差异。
Expires 或 max-age
在 HTTP/1.0 中,新鲜度过去由 Expires 标头指定。
Expires 标头使用明确的时间而不是通过指定经过的时间来指定缓存的生命周期。
Expires: Tue, 28 Feb 2022 22:22:22 GMT
但是时间格式难以解析,也发现了很多实现的错误,有可能通过故意偏移系统时钟来诱发问题;因此,在 HTTP/1.1 中,Cache-Control 采用了 max-age——用于指定经过的时间。
如果 Expires 和 Cache-Control: max-age 都可用,则将 max-age 定义为首选。因此,由于 HTTP/1.1 已被广泛使用,无需特地提供 Expires。
Vary 响应
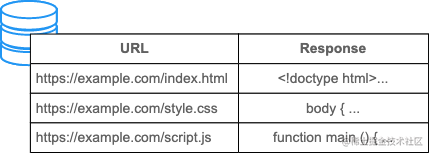
区分响应的方式本质上是基于它们的 URL:
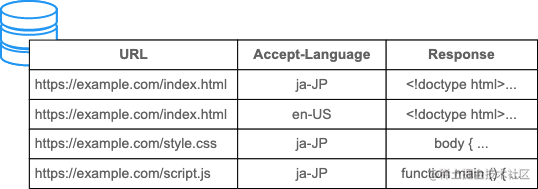
但是响应的内容并不总是相同的,即使它们具有相同的 URL。特别是在执行内容协商时,来自服务器的响应可能取决于 Accept、Accept-Language 和 Accept-Encoding 请求标头的值。
例如,对于带有 Accept-Language: en 标头并已缓存的英语内容,不希望再对具有 Accept-Language: ja 请求标头的请求重用该缓存响应。在这种情况下,你可以通过在 Vary 标头的值中添加“Accept-Language”,根据语言单独缓存响应。
Vary: Accept-Language
这会导致缓存基于响应 URL 和 Accept-Language请求标头的组合进行键控——而不是仅仅基于响应 URL。
此外,如果你基于用户代理提供内容优化(例如,响应式设计),你可能会想在 Vary 标头的值中包含“User-Agent”。但是,User-Agent 请求标头通常具有非常多的变体,这大大降低了缓存被重用的机会。因此,如果可能,请考虑一种基于特征检测而不是基于 User-Agent 请求标头来改变行为的方法。
对于使用 cookie 来防止其他人重复使用缓存的个性化内容的应用程序,你应该指定 Cache-Control: private 而不是为 Vary 指定 cookie。
验证响应
过时的响应不会立即被丢弃。HTTP 有一种机制,可以通过询问源服务器将陈旧的响应转换为新的响应。这称为验证,有时也称为重新验证。
验证是通过使用包含 If-Modified-Since 或 If--Match 请求标头的条件请求完成的。
If-Modified-Since
以下响应在 22:22:22 生成,max-age 为 1 小时,因此你知道它在 23:22:22 之前是新鲜的。
HTTP/1.1 200 OK

Content-Type: text/html

Content-Length: 1024

Date: Tue, 22 Feb 2022 22:22:22 GMT

Last-Modified: Tue, 22 Feb 2022 22:00:00 GMT

Cache-Control: max-age=3600


<!doctype html>

…
到 23:22:22 时,响应会过时并且不能重用缓存。因此,下面的请求显示客户端发送带有 If-Modified-Since 请求标头的请求,以询问服务器自指定时间以来是否有任何的改变。
GET /index.html HTTP/1.1

Host: example.com

Accept: text/html

If-Modified-Since: Tue, 22 Feb 2022 22:00:00 GMT
如果内容自指定时间以来没有更改,服务器将响应 304 Not Modified。
由于此响应仅表示“没有变化”,因此没有响应主体——只有一个状态码——因此传输大小非常小。
HTTP/1.1 304 Not Modified

Content-Type: text/html

Date: Tue, 22 Feb 2022 23:22:22 GMT

Last-Modified: Tue, 22 Feb 2022 22:00:00 GMT

Cache-Control: max-age=3600
收到该响应后,客户端将存储的陈旧响应恢复为新鲜的,并可以在剩余的 1 小时内重复使用它。
服务器可以从操作系统的文件系统中获取修改时间,这对于提供静态文件的情况来说是比较容易做到的。但是,也存在一些问题;例如,时间格式复杂且难以解析,分布式服务器难以同步文件更新时间。
为了解决这些问题,ETag 响应标头被标准化作为替代方案。
ETag/If--Match
ETag 响应标头的值是服务器生成的任意值。服务器对于生成值没有任何限制,因此服务器可以根据他们选择的任何方式自由设置值——例如主体内容的哈希或版本号。
举个例子,如果 ETag 标头使用了 hash 值,index.html 资源的 hash 值是 deadbeef,响应如下:
HTTP/1.1 200 OK

Content-Type: text/html

Content-Length: 1024

Date: Tue, 22 Feb 2022 22:22:22 GMT

ETag: "deadbeef"

Cache-Control: max-age=3600


<!doctype html>

…
如果该响应是陈旧的,则客户端获取缓存响应的 ETag 响应标头的值,并将其放入 If--Match 请求标头中,以询问服务器资源是否已被修改:
GET /index.html HTTP/1.1

Host: example.com

Accept: text/html

If--Match: "deadbeef"
如果服务器为请求的资源确定的 ETag 标头的值与请求中的 If--Match 值相同,则服务器将返回 304 Not Modified。
但是,如果服务器确定请求的资源现在应该具有不同的 ETag 值,则服务器将其改为 200 OK 和资源的最新版本进行响应。
备注: 在评估如何使用 ETag 和 Last-Modified 时,请考虑以下几点:在缓存重新验证期间,如果 ETag 和 Last-Modified 都存在,则 ETag 优先。因此,如果你只考虑缓存,你可能会认为 Last-Modified 是不必要的。然而,Last-Modified 不仅仅对缓存有用;相反,它是一个标准的 HTTP 标头,内容管理 (CMS) 系统也使用它来显示上次修改时间,由爬虫调整爬取频率,以及用于其他各种目的。所以考虑到整个 HTTP 生态系统,最好同时提供 ETag 和 Last-Modified。
强制重新验证
如果你不希望重复使用响应,而是希望始终从服务器获取最新内容,则可以使用 no-cache 指令强制验证。
通过在响应中添加 Cache-Control: no-cache 以及 Last-Modified 和 ETag——如下所示——如果请求的资源已更新,客户端将收到 200 OK 响应,否则,如果请求的资源尚未更新,则会收到 304 Not Modified 响应。
HTTP/1.1 200 OK

Content-Type: text/html

Content-Length: 1024

Date: Tue, 22 Feb 2022 22:22:22 GMT

Last-Modified: Tue, 22 Feb 2022 22:00:00 GMT

ETag: deadbeef

Cache-Control: no-cache


<!doctype html>

…
max-age=0 和 must-revalidate 的组合与 no-cache 具有相同的含义。
Cache-Control: max-age=0, must-revalidate
max-age=0 意味着响应立即过时,而 must-revalidate 意味着一旦过时就不得在没有重新验证的情况下重用它——因此,结合起来,语义似乎与 no-cache 相同。
然而,max-age=0 的使用是解决 HTTP/1.1 之前的许多实现无法处理 no-cache 这一指令——因此为了解决这个限制,max-age=0 被用作解决方法。
但是现在符合 HTTP/1.1 的服务器已经广泛部署,没有理由使用 max-age=0 和 must-revalidate 组合——你应该只使用 no-cache。
不使用缓存
no-cache 指令不会阻止响应的存储,而是阻止在没有重新验证的情况下重用响应。
如果你不希望将响应存储在任何缓存中,请使用 no-store。
Cache-Control: no-store
但是,一般来说,实践中“不缓存”的原因满足以下情况:
- 出于隐私原因,不希望特定客户以外的任何人存储响应。
- 希望始终提供最新信息。
- 不知道在过时的实现中会发生什么。
在这种情况下,no-store 并不总是最合适的指令。
以下部分更详细地介绍了这些情况。
不与其他用户共享
如果具有个性化内容的响应意外地对缓存的其他用户可见,那将是有问题的。
在这种情况下,使用 private 指令将导致个性化响应仅与特定客户端一起存储,而不会泄露给缓存的任何其他用户。
Cache-Control: private
在这种情况下,即使设置了 no-store,也必须设置 private。
每次都提供最新的内容
no-store 指令阻止存储响应,但不会删除相同 URL 的任何已存储响应。
换句话说,如果已经为特定 URL 存储了旧响应,则返回 no-store 不会阻止旧响应被重用。
但是,no-cache 指令将强制客户端在重用任何存储的响应之前发送验证请求。
Cache-Control: no-cache
如果服务端不支持条件请求,你可以强制客户端每次都访问服务端,总是得到最新的 200 OK 响应。
兼容过时的实现
作为忽略 no-store 的过时实现的解决方法,你可能会看到使用了诸如以下内容的 kitchen-sink 标头:
Cache-Control: no-store, no-cache, max-age=0, must-revalidate, proxy-revalidate
推荐使用 no-cache 作为处理这种过时的实现的替代方案,如果从一开始就设置 no-cache 就没问题,因为服务器总是会收到请求。
如果你关心的是共享缓存,你可以通过添加 private 来防止意外缓存:
Cache-Control: no-cache, private
no-store 丢失了什么
你可能认为添加 no-store 是选择退出缓存的正确方法。
但是,不建议随意授予 no-store,因为你失去了 HTTP 和浏览器所拥有的许多优势,包括浏览器的后退/前进缓存。
因此,要获得 Web 平台的全部功能集的优势,最好将 no-cache 与 private 结合使用。
重新加载和强制重新加载
可以对请求和响应执行验证。
重新加载和强制重新加载操作是从浏览器端执行验证的常见示例。
重新加载
为了从页面错误中恢复或更新到最新版本的资源,浏览器为用户提供了重新加载功能。
在浏览器重新加载期间发送的 HTTP 请求的简化视图如下所示:
GET / HTTP/1.1

Host: example.com

Cache-Control: max-age=0

If--Match: "deadbeef"

If-Modified-Since: Tue, 22 Feb 2022 20:20:20 GMT
请求中的 max-age=0 指令指定“重用 age 为 0 或更少的响应”——因此,中间存储的响应不会被重用。
请求通过 If--Match 和 If-Modified-Since 进行验证。
该行为也在 Fetch 标准中定义,并且可以通过在缓存模式设置为 no-cache 的情况下,在 JavaScript 中调用 fetch() 来重现(注意 reload 不是这种情况下的正确模式):
fetch("/", { cache: "no-cache" });
强制重新加载
出于向后兼容的原因,浏览器在重新加载期间使用 max-age=0——因为在 HTTP/1.1 之前的许多过时的实现中不理解 no-cache。但是在这个用例中,no-cache 已被支持,并且强制重新加载是绕过缓存响应的另一种方法。
浏览器强制重新加载期间的 HTTP 请求如下所示:
GET / HTTP/1.1

Host: example.com

Pragma: no-cache

Cache-Control: no-cache
由于这不是带有 no-cache 的条件请求,因此你可以确定你会从源服务器获得 200 OK。
该行为也在 Fetch 标准中定义,并且可以通过在缓存模式设置为 reload 的情况下,在 JavaScript 中调用 fetch() 来重现(注意它不是 force-reload):
fetch("/", { cache: "reload" });
避免重新验证
永远不会改变的内容应该被赋予一个较长的 max-age,方法是使用缓存破坏——也就是说,在请求 URL 中包含版本号、哈希值等。
但是,当用户重新加载时,即使服务器知道内容是不可变的,也会发送重新验证请求。
为了防止这种情况,immutable 指令可用于明确指示不需要重新验证,因为内容永远不会改变。
Cache-Control: max-age=31536000, immutable
这可以防止在重新加载期间进行不必要的重新验证。
删除存储的响应
基本上没有办法删除用很长的 max-age 存储的响应。
想象一下,来自 https://example.com/ 的以下响应已被存储。
HTTP/1.1 200 OK

Content-Type: text/html

Content-Length: 1024

Cache-Control: max-age=31536000


<!doctype html>

…
一旦响应在服务器上过期,你可能希望覆盖该响应,但是一旦存储响应,服务器就无法执行任何操作——因为由于缓存,不再有请求到达服务器。
规范中提到的方法之一是使用不安全的方法(例如 POST)发送对同一 URL 的请求,但对于许多客户端而言,通常很难故意这样做。
还有一个 Clear-Site-Data: cache 标头和值的规范,但并非所有浏览器都支持它——即使使用它,它也只会影响浏览器缓存,而不会影响中间缓存。
因此,除非用户手动执行重新加载、强制重新加载或清除历史操作,否则应该假设任何存储的响应都将保留其 max-age 期间。
缓存减少了对服务器的访问,这意味着服务器失去了对该 URL 的控制。如果服务器不想失去对 URL 的控制——例如,在资源被频繁更新的情况下——你应该添加 no-cache,以便服务器始终接收请求并发送预期的响应。
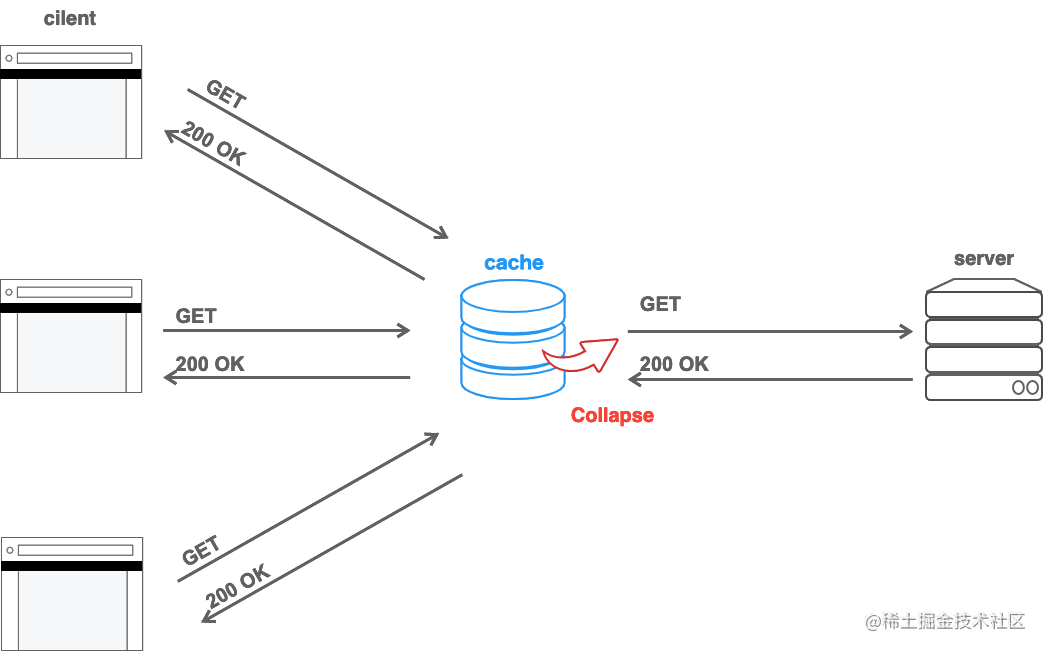
请求折叠
共享缓存主要位于源服务器之前,旨在减少到源服务器的流量。
因此,如果多个相同的请求同时到达共享缓存,中间缓存将代表自己将单个请求转发到源,然后源可以将结果重用于所有客户端。这称为请求折叠。
当请求同时到达时会发生请求折叠,因此即使响应中给出了 max-age=0 或 no-cache,它也会被重用。
如果响应是针对特定用户个性化的,并且你不希望它在折叠中共享,则应添加 private 指令:
常见的缓存模式
Cache-Control 规范中有很多指令,可能很难全部理解。但是大多数网站都可以通过几种模式的组合来覆盖。
本节介绍设计缓存的常见模式。
默认设置
如上所述,缓存的默认行为(即对于没有 Cache-Control 的响应)不是简单的“不缓存”,而是根据所谓的“启发式缓存”进行隐式缓存。
为了避免这种启发式缓存,最好显式地为所有响应提供一个默认的 Cache-Control 标头。
为确保默认情况下始终传输最新版本的资源,通常的做法是让默认的 Cache-Control 值包含 no-cache:
Cache-Control: no-cache
另外,如果服务实现了 cookie 或其他登录方式,并且内容是为每个用户个性化的,那么也必须提供 private,以防止与其他用户共享:
Cache-Control: no-cache, private
缓存破坏
最适合缓存的资源是静态不可变文件,其内容永远不会改变。而对于会变化的资源,通常的最佳实践是每次内容变化时都改变 URL,这样 URL 单元可以被缓存更长的时间。
例如,考虑以下 HTML:
<script src="bundle.js"></script>

<link rel="stylesheet" href="build.css" />

<body>

  hello

</body>
在现代 Web 开发中,JavaScript 和 CSS 资源会随着开发的进展而频繁更新。此外,如果客户端使用的 JavaScript 和 CSS 资源的版本不同步,则显示将中断。
所以上面的 HTML 用 max-age 缓存 bundle.js 和 build.css 变得很困难。
因此,你可以使用包含基于版本号或哈希值的更改部分的 URL 来提供 JavaScript 和 CSS。一些方法如下所示。
bundle.v123.js
bundle.js?v=123
bundle.YsAIAAAA-QG4G6kCMAMBAAAAAAAoK.js
bundle.js?v=YsAIAAAA-QG4G6kCMAMBAAAAAAAoK
由于缓存根据它们的 URL 来区分资源,因此如果在更新资源时 URL 发生变化,缓存将不会再次被重用。
<script src="bundle.v123.js"></script>

<link rel="stylesheet" href="build.v123.css" />

<body>

  hello

</body>
通过这种设计,JavaScript 和 CSS 资源都可以被缓存很长时间。那么 max-age 应该设置多长时间呢?QPACK 规范提供了该问题的答案。
QPACK 是一种用于压缩 HTTP 标头字段的标准,其中定义了常用字段值表。
一些常用的缓存头值如下所示。
36 cache-control max-age=0

37 cache-control max-age=604800

38 cache-control max-age=2592000

39 cache-control no-cache

40 cache-control no-store

41 cache-control public, max-age=31536000
如果你选择其中一个编号选项,则可以在通过 HTTP3 传输时将值压缩为 1 个字节。
数字“37”、“38”和“41”分别代表一周、一个月和一年。
因为缓存会在保存新条目时删除旧条目,所以一周后存储的响应仍然存在的可能性并不高——即使 max-age 设置为 1 周。因此,在实践中,你选择哪一种并没有太大的区别。
请注意,数字“41”具有最长的 max-age(1 年),但具有 public。
public 值具有使响应可存储的效果,即使存在 Authorization 标头。
备注: 只有在设置了 Authorization 标头时需要存储响应时才应使用 public 指令。否则不需要,因为只要给出了 max-age,响应就会存储在共享缓存中。
因此,如果响应是使用基本身份验证进行个性化的,public 的存在可能会导致问题。如果你对此感到担忧,你可以选择第二长的值 38(1 个月)。
Cache-Control: public, max-age=31536000
Cache-Control: max-age=2592000
验证响应
不要忘记设置 Last-Modified 和 ETag 标头,以便在重新加载时不必重新传输资源。对于预构建的静态文件生成这些标头很容易。
这里的 ETag 值可能是文件的哈希值。
Last-Modified: Tue, 22 Feb 2022 20:20:20 GMT
ETag: YsAIAAAA-QG4G6kCMAMBAAAAAAAoK
此外,可以添加 immutable 以防止重新加载时验证。
组合结果如下所示。
200 OK HTTP/1.1
Content-Type: application/javascript
Content-Length: 1024
Cache-Control: public, max-age=31536000, immutable
Last-Modified: Tue, 22 Feb 2022 20:20:20 GMT
ETag: YsAIAAAA-QG4G6kCMAMBAAAAAAAoK
缓存破坏是一种通过在内容更改时更改 URL 来使响应在很长一段时间内可缓存的技术。该技术可以应用于所有子资源,例如图像。
备注: 在评估 immutable 和 QPACK 的使用时:如果你担心 immutable 会更改 QPACK 提供的预定义值,请考虑在这种情况下,immutable 部分可以通过将 Cache-Control 值分成两行来单独编码——尽管这取决于特定 QPACK 实现使用的编码算法。
Cache-Control: public, max-age=31536000

Cache-Control: immutable
主要资源
与子资源不同,主资源不能使用缓存破坏,因为它们的 URL 不能像子资源 URL 一样被修饰。
如果存储以下 HTML 本身,即使在服务器端更新内容,也无法显示最新版本。
<script src="bundle.v123.js"></script>

<link rel="stylesheet" href="build.v123.css" />

<body>

  hello

</body>
对于这种情况,no-cache 将是合适的——而不是 no-store——因为我们不想存储 HTML,而只是希望它始终是最新的。
此外,添加 Last-Modified 和 ETag 将允许客户端发送条件请求,如果 HTML 没有更新,则可以返回 304 Not Modified:
200 OK HTTP/1.1

Content-Type: text/html

Content-Length: 1024

Cache-Control: no-cache

Last-Modified: Tue, 22 Feb 2022 20:20:20 GMT

ETag: AAPuIbAOdvAGEETbgAAAAAAABAAE
该设置适用于非个性化 HTML,但对于使用 cookie 进行个性化的响应(例如,在登录后),不要忘记同时指定 private:
200 OK HTTP/1.1

Content-Type: text/html

Content-Length: 1024

Cache-Control: no-cache, private

Last-Modified: Tue, 22 Feb 2022 20:20:20 GMT

ETag: AAPuIbAOdvAGEETbgAAAAAAABAAE

Set-Cookie: __Host-SID=AHNtAyt3fvJrUL5g5tnGwER; Secure; Path=/; HttpOnly
favicon.ico、manifest.json、.well-known 和无法使用缓存破坏更改 URL 的 API 端点也是如此。
大多数 Web 内容都可以通过上述两种模式的组合来覆盖。
有关托管缓存的更多信息
使用前面章节描述的方法,子资源可以通过缓存破坏来缓存很长时间,但主资源(通常是 HTML 文档)不能。
缓存主要资源很困难,因为仅使用 HTTP 缓存规范中的标准指令,在服务器上更新内容时无法主动删除缓存内容。
但是,可以通过部署托管缓存(例如 CDN 或 service worker)来实现。
例如,允许通过 API 或仪表板操作清除缓存的 CDN 将通过存储主要资源并仅在服务器上发生更新时显式清除相关缓存来实现更积极的缓存策略。
如果 service worker 可以在服务器上发生更新时删除缓存 API 中的内容,它也可以这样做。
作者:demo007x
来源:juejin.cn/post/7237022394790281271


