○ 背景
知道的大佬请轻锤😂。
这篇是作者在公司做了活动架构升级后,产出的主文的前导篇,考虑到本文相对独立,因此抽离出单独成文。
题目为动态组件,但为了好理解可以叫做远程加载动态组件,后面统一简化称为“远程组件”。
具体是怎么玩呢?别着急,听我慢慢道来,看完后会感慨Vue组件还能这么玩🐶,还会学会一个Stylelint插件,配有DEMO,以及隐藏在最后的彩蛋。
作者曾所在我司广告事业部,广告承载方式是以刮刮卡、大转盘等活动页进行展示,然后用户参与出广告券弹层。
旁白说:远程组件其实在可视化低代码平台也有类似应用,而我们这里也是利用了类似思路实现解耦了活动页和券弹层。继续主题...

遗留系统早先版本是一个活动就绑定一个弹层,1对1的绑定关系。

现在的场景是一个活动可能出不同样式的弹层,这得把绑定关系解除。我们需要多对多,就是一个活动页面可以对应多个广告券弹层,也可以一个广告券弹层对应多个活动页面。
我们可以在本地预先写好几个弹层,根据条件选择不同的弹层,可以满足一个活动对多个弹层。
而我们的需求是让活动页面对应无数种弹层,而不是多种,所以不可能把所有弹层都写在本地。因此怎么办呢?

因此我们要根据所需,然后通过判断所需的弹层,远端返回对应的代码。其实就是我们主题要讲到的远程组件。
讲得容易,该怎么做呢?
○ 远程组件核心
Pure版本
如果是Pure JS、CSS组成的弹层,很自然的我们想到,通过动态的插入JS脚本和CSS,就能组成一个弹层。因此把编译好的JS、CSS文件可以存放在远端CDN。
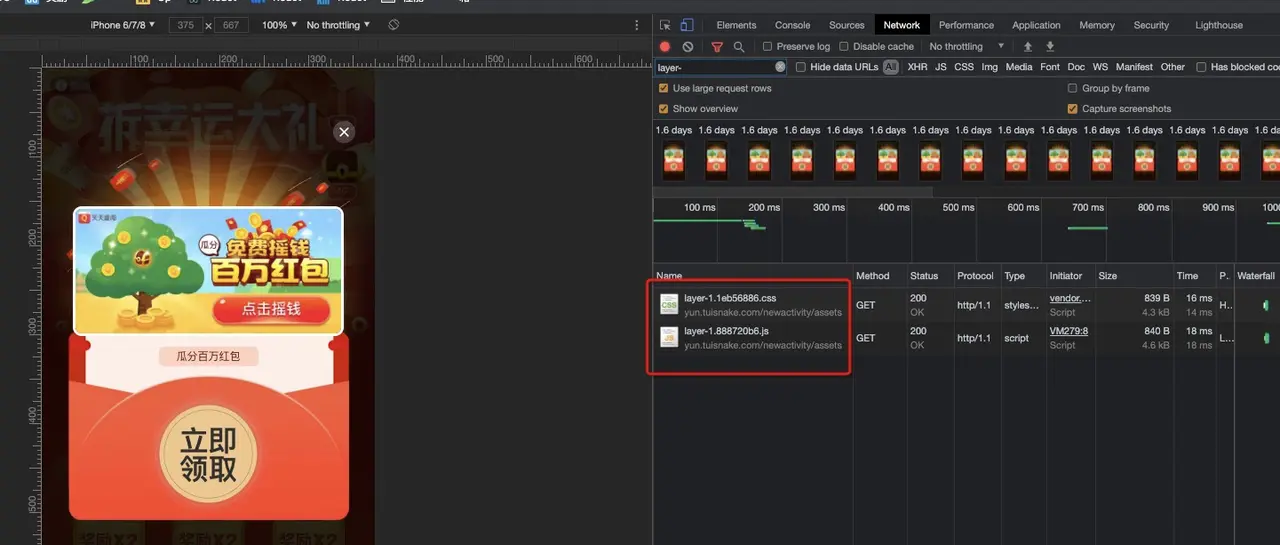
看上图,我们可以看到弹窗出来之前,浏览器把CSS、JS下载下来了,然后根据既定代码拼装成一个弹层。
// CSS插入
<link rel="stylesheet" href="//yun.xxx.com/xxx.css">
// JS的动态插入
<script type="text/javascript">
var oHead = document.querySelector('.modal-group');
var oScript = document.createElement('script');
oScript.type = "text/javascript";
oScript.src = "//yun.xxx.com/xxx.js";
oHead.appendChild(oScript);
</script>
通过上面可知,JS、CSS方式能实现Pure版本的远程组件,而在Vue环境下能实现吗。如果按照Pure JS、CSS动态插入到Vue活动下,也是可以很粗糙的实现的。
但有没有更优雅的方式呢?

Vue版本
选型这篇不细讨论了,后续的主篇会讲为什么选择Vue。
上述是遗留系统的方式,如果我们要技术栈迁移到Vue,也需要对远程组件迁移,我们需要改造它。
让我们来回顾下Vue的一些概念。
组件形式
「对象组件」
一个弹窗,其实我们可以通过一个Vue组件表示,我们想把这个组件放到CDN,直接下载这个文件,然后在浏览器环境运行它可行吗?我们来尝试下。
基于Vue官方文档,我们可以把如下的选项对象传入Vue,通过new Vue来创建一个组件。
{
mounted: () => {
console.log('加载')
},
template: "<div v-bind:style=\"{ color: 'red', fontSize: '12' + 'px' }\">Home component</div>"
}
借助于包含编译器的运行时版本,我们可以处理字符串形式的Template。
-- 运行时-编译器-vs-只包含运行时
如果你需要在客户端编译模板 (比如传入一个字符串给Template选项,或挂载到一个元素上并以其 DOM 内部的 HTML 作为模板),就将需要加上编译器,即完整版
似乎找到了新世界的大门。

我们确实是可以通过这种形式实现Template、Script、CSS了,但对于开发同学,字符串形式的Template、内嵌的CSS,开发体验不友好。

「单文件组件」
这个时候很自然地想到SFC - 单文件组件。
文件扩展名为.vue的**single-file components (单文件组件)**为以上所有问题提供了解决方法 -- Vue文档。
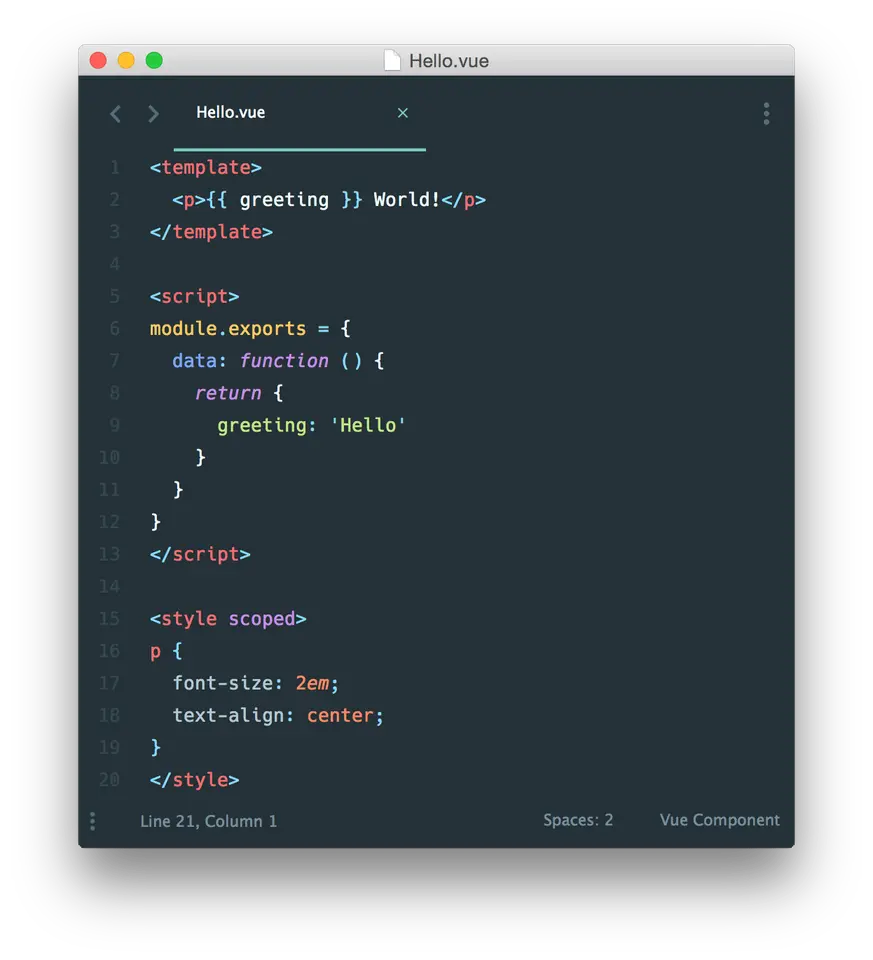
但怎么样才能让一个.vue组件从远端下载下来,然后在当前活动Vue环境下运行呢?这是个问题,由于.vue文件浏览器是识别不了的,但.js文件是可以的。
我们先想一下,.vue文件是最终被转换成了什么?
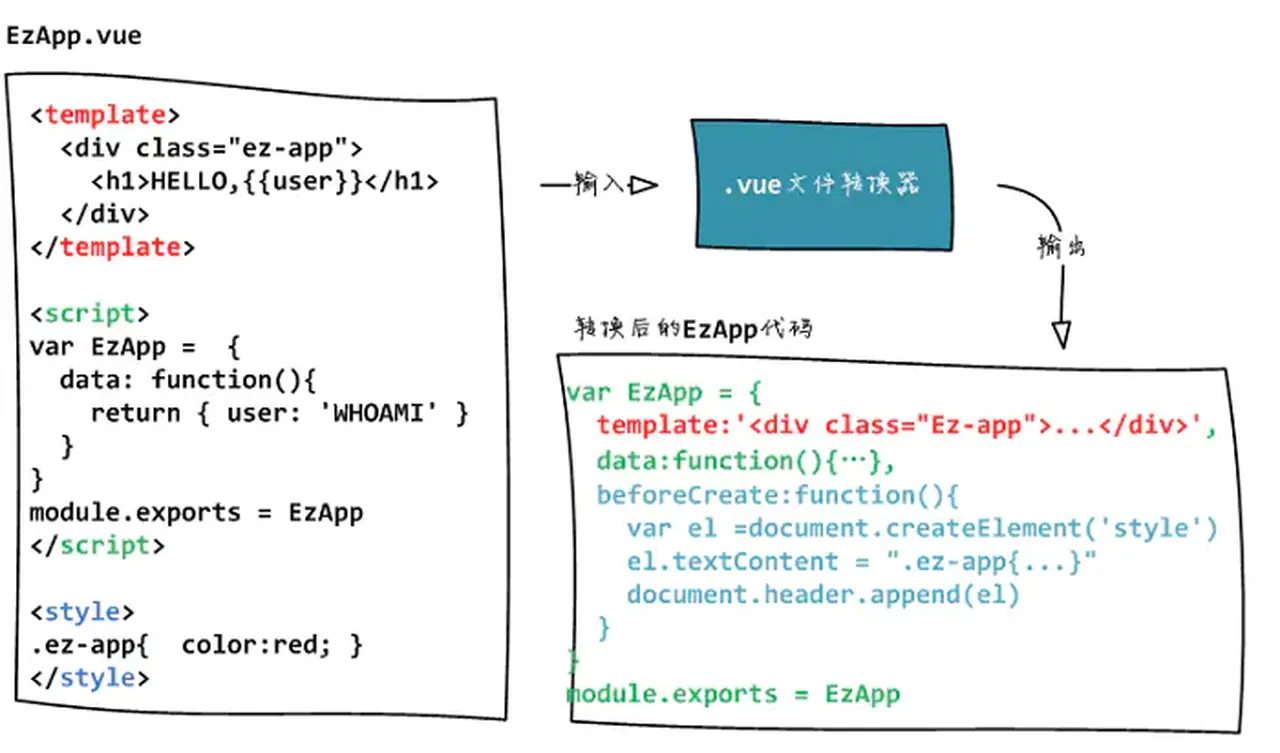
(图片来源:1.03-vue文件的转换 - 简书)
通过转换,实际变成了一个JS对象。所以怎么才能把.vue转换成.js呢?
有两种方式,一种通过运行时转换,我们找到了http-vue-loader。通过Ajax获取内容,解析Template、CSS、Script,输出一个JS对象。

而考虑到性能和兼容性,我们选择预编译,通过CSS预处理器、HTML模版预编译器。
Vue的官方提供了vue-loader,它会解析文件,提取每个语言块,如有必要会通过其它 loader 处理,最后将他们组装成一个 ES Module,它的默认导出是一个 Vue.js 组件选项的对象。这指的是什么意思呢?官方提供选项对象形式的组件DEMO。
有了理论支持,现在需要考虑下实践啦,用什么编译?

怎么构建
由于webpack编译后会带了很多关于模块化相关的无用代码,所以一般小型的库会选择rollup,这里我们也选择rollup。
// rollup.config.js
import vue from 'rollup-plugin-vue'
import commonjs from 'rollup-plugin-commonjs'
export default {
input: './skin/SkinDemo.vue',
output: {
format: 'iife',
file: './dist/rollup.js',
name: 'MyComponent'
},
plugins: [
commonjs(),
vue()
]
}
通过rollup-plugin-vue,我们可以把.vue文件转成.js,
rollup编译输出的iife形式js。
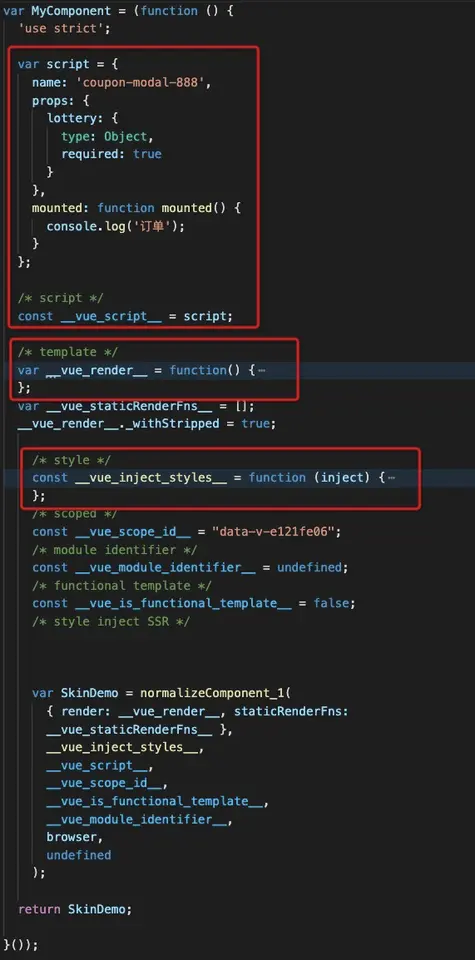
可以看到script、style、template分别被处理成对应的片段,通过整合计算,这些片段会生成一个JS对象,保存为.js文件。下图就是一个组件选项的对象。
可以通过项目:github.com/fly0o0/remo…,尝试下rollup文件夹下的构建,具体看README说明。
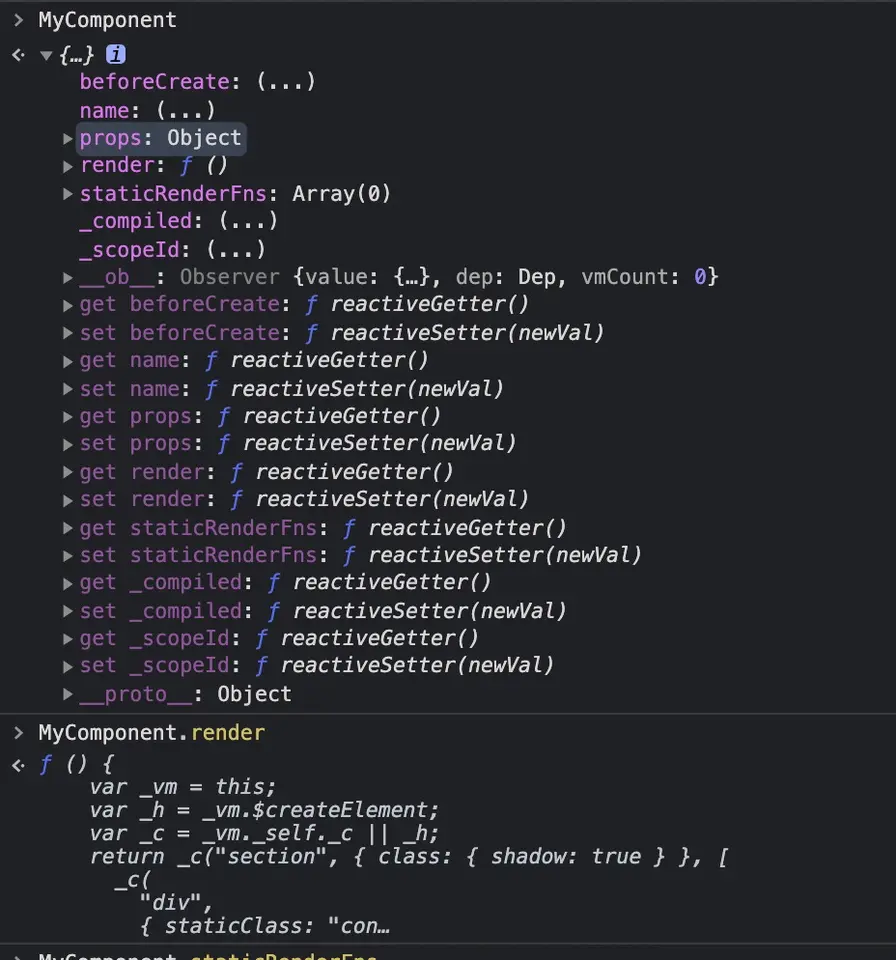
我们已经有了一个 Vue.js 组件选项的对象,怎么去让它挂载到对应的Vue App上呢?

挂载方式
回想之前通读Vue入门文档,遇到一个动态组件的概念,但当时并不太理解它的使用场景。
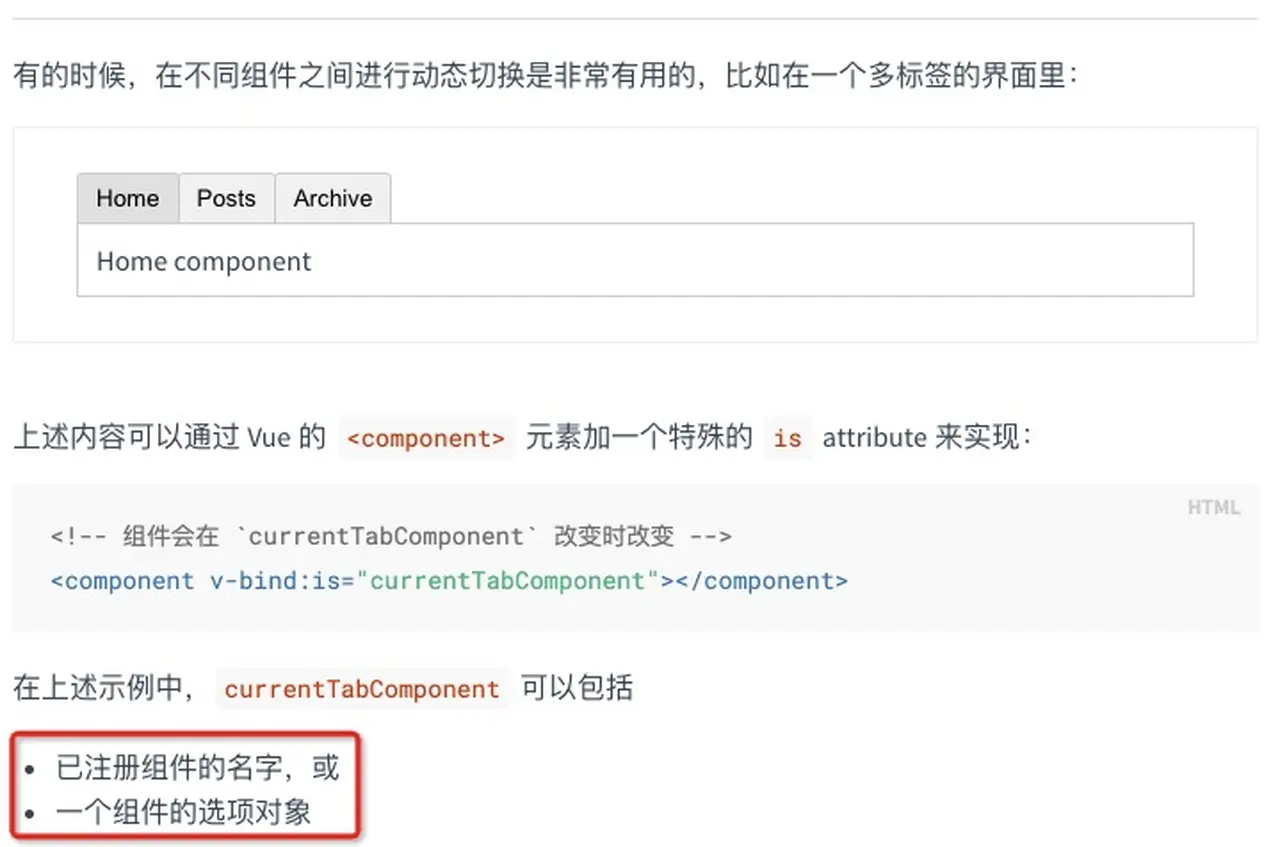
动态组件是可以不固定具体的组件,根据规则替换不同的组件。从文档上看出,支持一个组件的选项对象。
最终实现
首先需要构建.vue文件,然后通过Ajax或动态Script去加载远端JS。由于Ajax会有跨域限制,所以这里我们选择动态Script形式去加载。
而我们刚才使用Rollup导出的方式是把内容挂载在一个全局变量上。那就知道了,通过动态Script插入后,就有一个全局变量MyComponent,把它挂载在动态组件,最终就能把组件显示在页面上了。
具体怎么操作?欠缺哪些步骤,首先我们需要一个加载远程.js组件的函数。
// 加载远程组件js
function cleanup(script){
if (script.parentNode) script.parentNode.removeChild(script)
script.onload = null
script.onerror = null
script = null
}
function scriptLoad(url) {
const target = document.getElementsByTagName('script')[0] || document.head
let script = document.createElement('script')
script.src = url
target.parentNode.insertBefore(script, target)
return new Promise((resolve, reject) => {
script.onload = function () {
resolve()
cleanup(script)
}
script.onerror = function () {
reject(new Error('script load failed'))
cleanup(script)
}
})
}
export default scriptLoad
然后把加载下来的组件,挂载在对应的动态组件上。
<!-- 挂载远程组件 -->
<template>
<component
:is="mode">
</component>
</template>
<script>
import scriptLoad from "./scriptLoad"
export default {
name: "Remote",
data() {
return {
mode: "",
};
},
mounted() {
this.mountCom(this.url)
},
methods: {
async mountCom(url) {
// 下载远程js
await scriptLoad(url)
// 挂载在mode
this.mode = window.MyComponent
// 清除MyComponent
window.MyComponent = null
},
}
}
</script>
基本一个Vue的远程组件就实现了,但发现还存在一个问题。

全局变量MyComponent需要约定好,但要实现比较好的开发体验来说,应该尽量减少约定。
导出方式
怎么解决呢?由于我们导出是使用的IIFE方式,其实Rollup还支持UMD方式,包含了Common JS和AMD两种方式。
我们通过配置Rollup支持UMD。
// rollup.config.js
import vue from 'rollup-plugin-vue'
import commonjs from 'rollup-plugin-commonjs'
export default {
input: './skin/SkinDemo.vue',
output: {
format: 'umd',
file: './dist/rollup.js',
name: 'MyComponent'
},
plugins: [
commonjs(),
vue()
]
}
可以看到构建完毕后,支持三种方式导出。
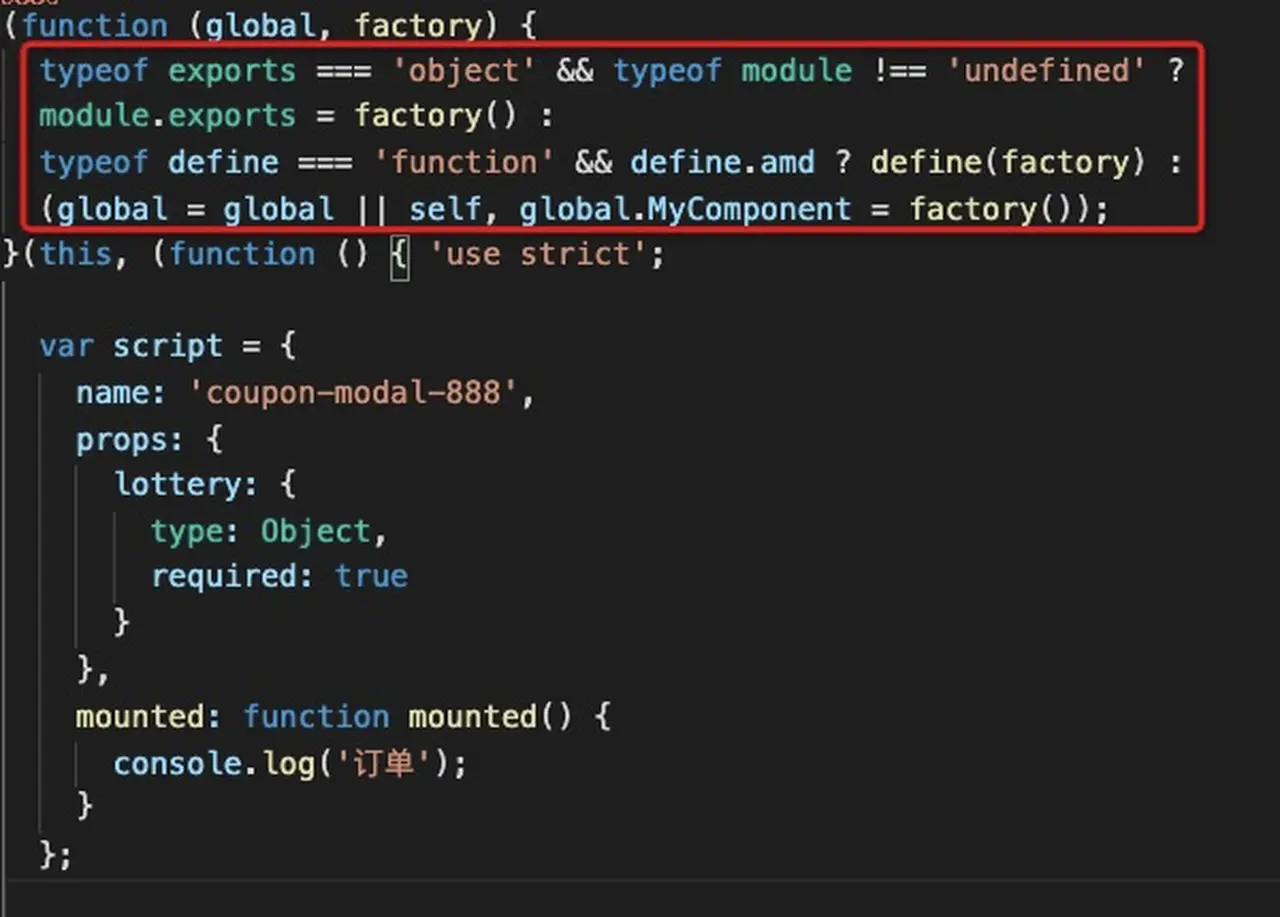
我们可以模拟node环境,命名全局变量exports、module,就可以在module.exports变量上拿到导出的组件。

具体实现核心代码如下。
<!-- 挂载远程组件 -->
<template>
<component
:is="mode">
</component>
</template>
<script>
import scriptLoad from "./scriptLoad"
export default {
name: "Remote",
data() {
return {
mode: "",
};
},
mounted() {
this.mountCom(this.url)
},
methods: {
async mountCom(url) {
// 模拟node环境
window.module = {}
window.exports = {}
// 下载远程js
await scriptLoad(url)
// 挂载在mode
this.mode = window.module.exports
// 清除
delete window.module
delete window.exports
},
}
}
</script>
终于搞定了Vue版本的远程组件加载的方式。

接下来得想一想,怎么处理远程组件(弹层)的设计了。
小结
通过使用Vue动态组件实现了远程组件功能,取代了老架构。
可以通过以下地址去尝试一下远程组件弹层,按照项目的README操作一下。会得到以下远程组件弹层。
项目地址:github.com/fly0o0/remo…

○ 远程组件(弹层)设计
远程组件已达成,这部分主要是对远程弹层组件的一些设计。
对于远程单组件本身来说,只需要根据数据渲染视图,根据用户行为触发业务逻辑,整个代码逻辑是这样的。
需要考虑组件复用、组件通讯、组件封装、样式层级等方向。
首先我们先看看组件复用。
为了方便统一管理和减少冗余代码,我们一般写一些类似的组件会抽取一部分可以公共的组件,例如按钮等。
但远程单组件代码和页面端代码是分离的啊(可以理解为两个webpack入口打包出的产物),我们得想想公共组件需要放在哪里了。

组件复用
现在可以发现有三种情况,我们利用枚举法尝试想一遍。
打包 📦
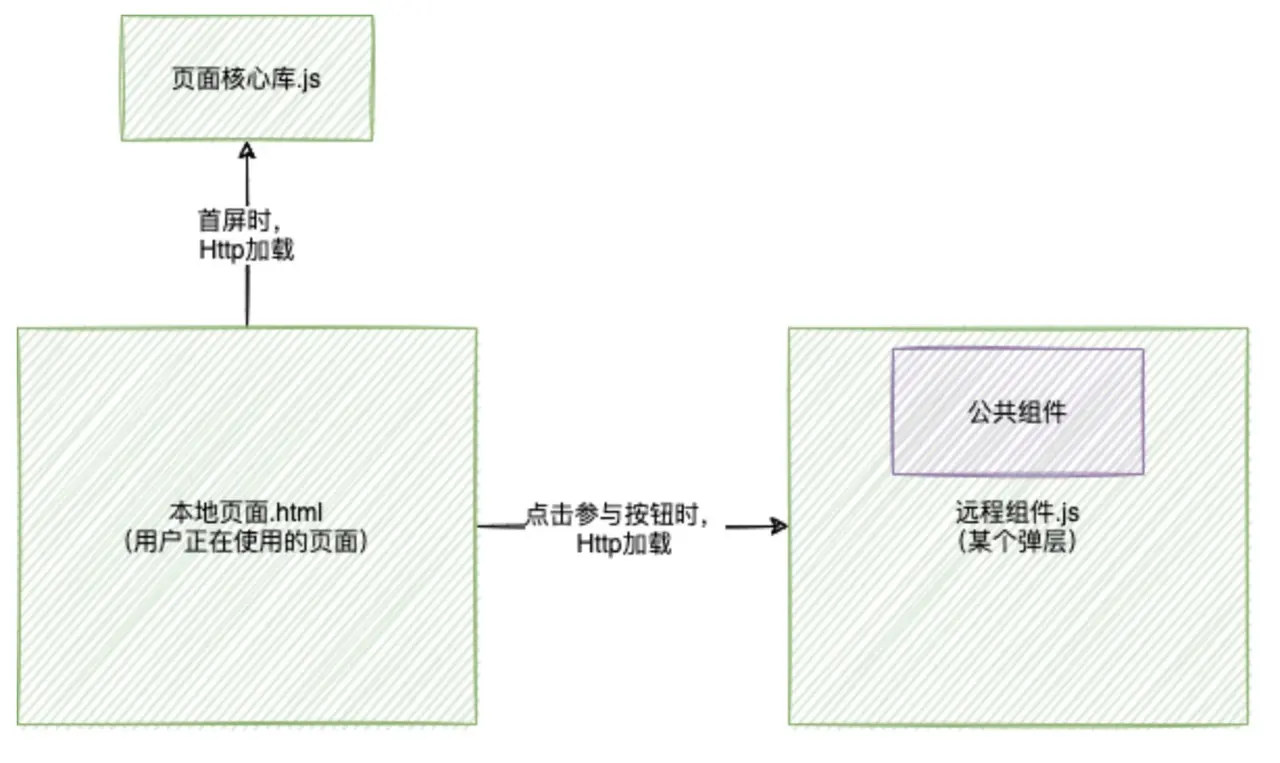
公共组件和远程组件打包一起
放在一起肯定不合适,不仅会引起远程组件变大,还不能让其他远程组件复用。往下考虑再看看。
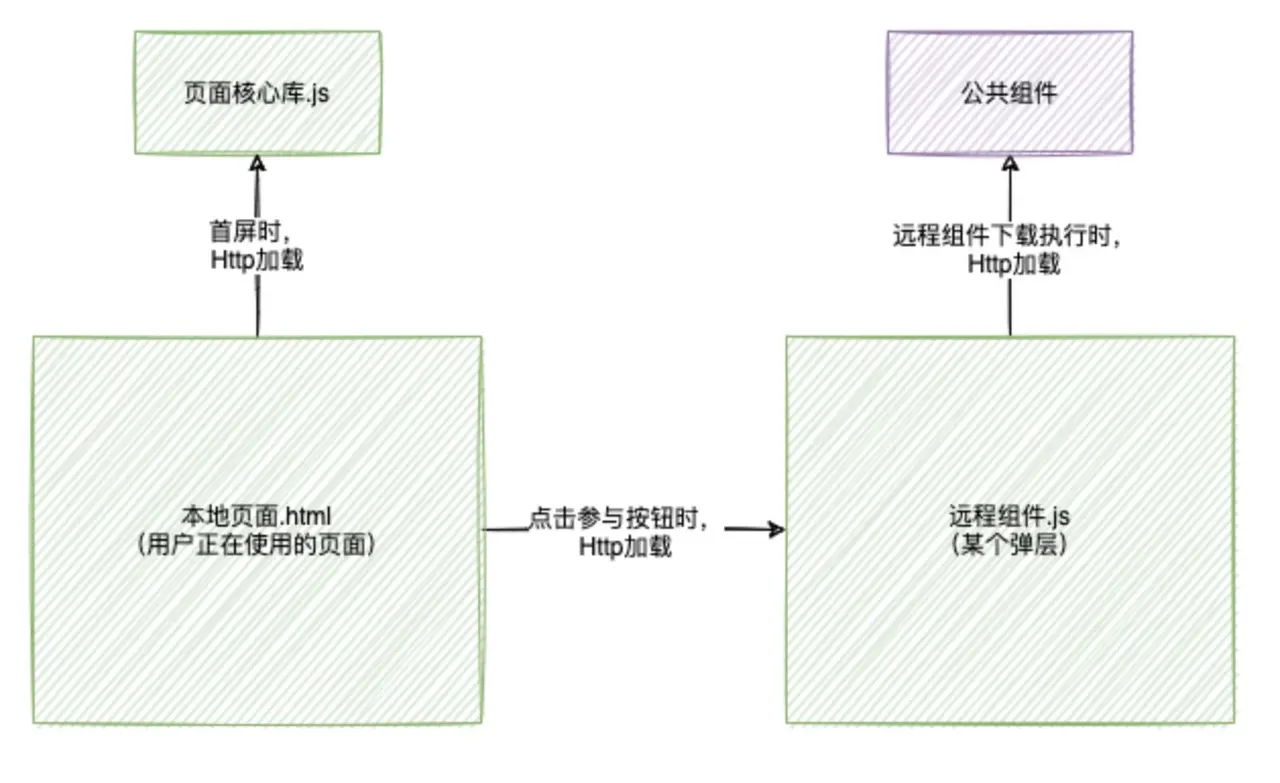
公共组件单独打包
远程组件、公共组件分别单独打包,这样也是不利的,由于远程组件抽离的公共组件少于5个,而且代码量较少,单独作为一层打包,会多一个后置请求,影响远程组件的第一时间展示。
继续考虑再看看。
公共组件和页面核心库打包一起
把公共组件和页面核心库打包到一起,避免后面远程组件用到时候再加载,可以提升远程组件的展示速度。
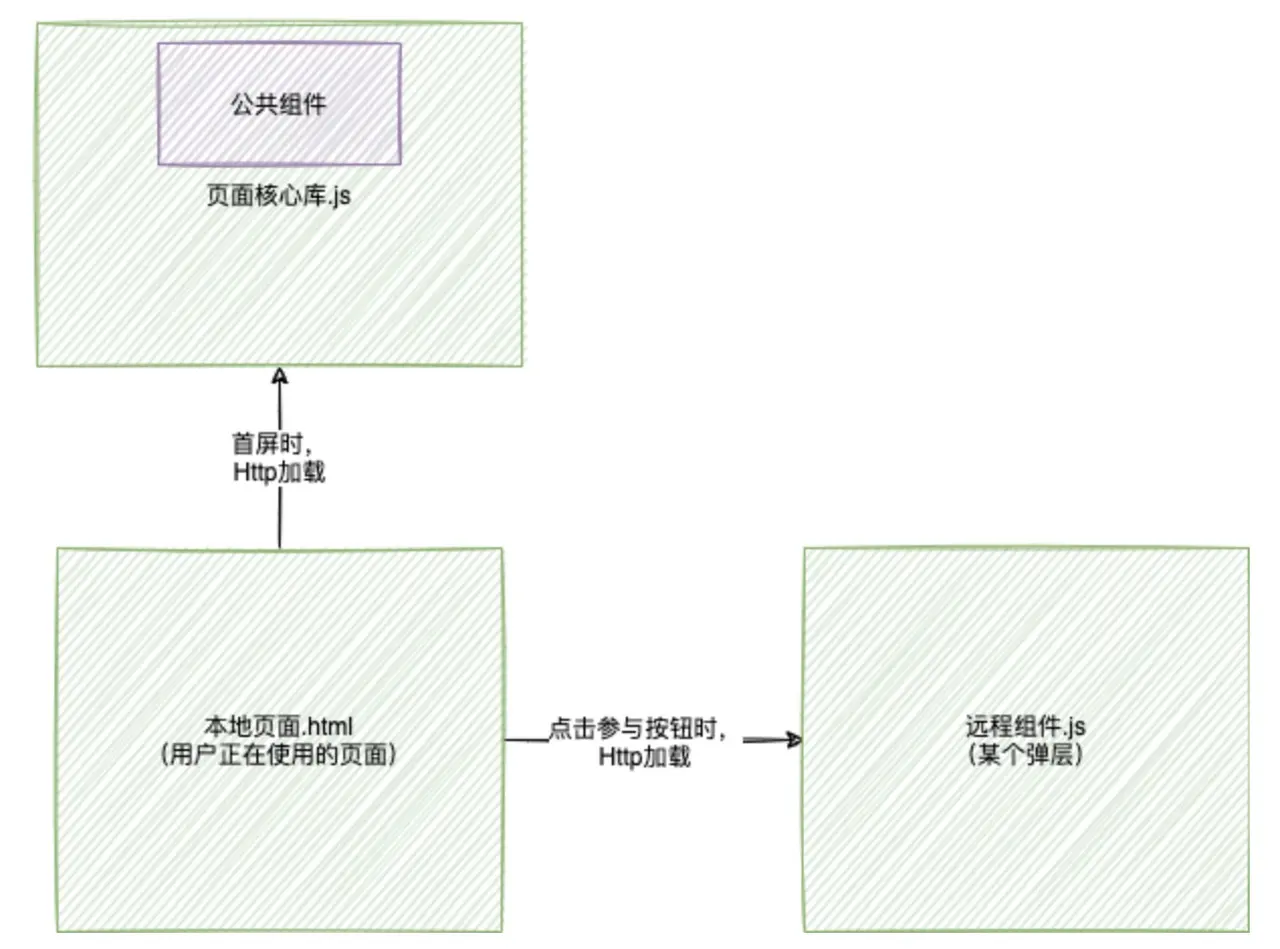
因此最终敲定选择最后种,把公共组件和页面核心库打包在一起。
如果把远程组件.js和公共组件分开了,那我们该怎么才能使用公共组件啊?😂

注册 🔑
回顾下Vue官方文档,Vue.component它可以提供注册组件的能力,然后在全局能引用到。我们来试试吧。
公共组件例如按钮、关闭等,需要通过以下途径去注册。
一个按钮组件
// 本地页面端(本地是相较于在远端CDN)
<!-- 按钮组件 -->
<template>
<button type="button" @click="use">
</button>
</template>
<script>
export default {
name: 'Button',
inject: ['couponUseCallback'],
methods: {
use() {
this.couponUseCallback && this.couponUseCallback()
}
}
}
</script>
一个关闭组件
// 本地页面端(本地是相较于在远端CDN)
<!-- 关闭组件 -->
<template>
<span @click="close"></span>
</template>
<script>
export default {
name: "CouponClose",
inject: ["couponCloseCallback"],
methods: {
close() {
this.couponCloseCallback && this.couponCloseCallback();
},
},
};
</script>
<style lang="less" scoped>
.close {
&.gg {
background-image: url("//yun.tuisnake.com/h5-mami/dist/close-gg.png") !important;
background-size: 100% !important;
width: 92px !important;
height: 60px !important;
}
}
</style>
通过Vue.component全局注册公共组件,这样在远程组件中我们就可以直接调用了。
// 本地页面端(本地是相较于在远端CDN)
<script>
Vue.component("CpButton", Button);
Vue.component("CpClose", Close);
</script>
解决了公共组件复用的问题,后面需要考虑下远程组件和页面容器,还有不同类型的远程组件之间的通讯问题。

组件通讯
可以把页面容器理解为父亲、远程组件理解为儿子,两者存在父子组件跨级双向通讯,这里的父子也包含了爷孙和爷爷孙的情况,因此非props可以支持。那怎么处理?
可以通过在页面核心库中向远程组件 provide 自身,远程组件中 inject 活动实例,实现事件的触发及回调。
那不同类型的远程组件之间怎么办呢,使用Event Bus,可以利用顶层页面实例作为事件中心,利用 on 和 emit 进行沟通,降低不同类别远程组件之间的耦合度。

组件封装
现在有个组件封装的问题,先看个例子,基本就大概有了解了。
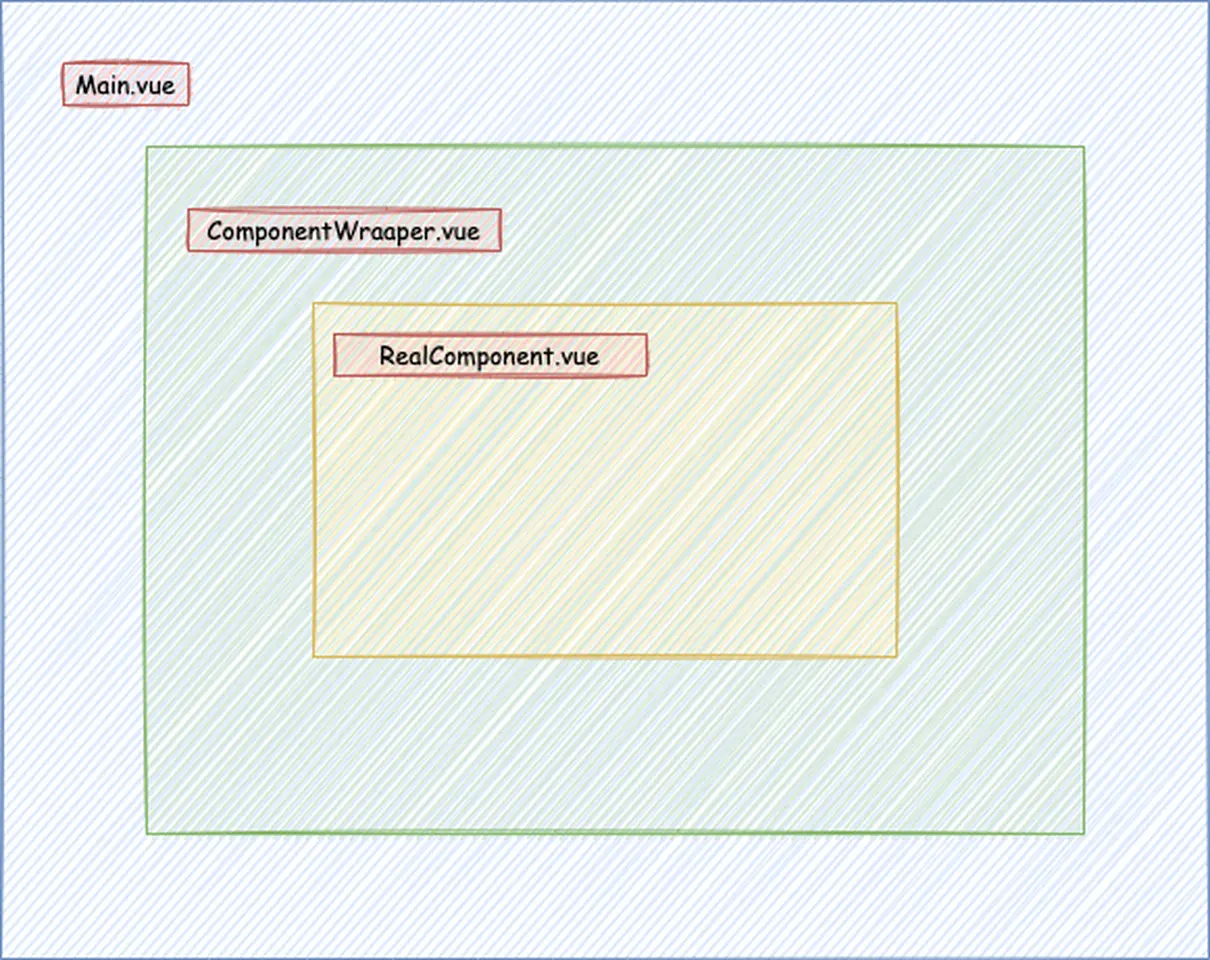
现有3个嵌套组件,如下图。** **现在需要从顶层组件Main.vue给底层组件RealComponent的一个count赋值,然后监听RealComponent的input组件的事件,如果有改变通知Main.vue里的方法。怎么做呢?
跨层级通信,有多少种方案可以选择?
- 我们使用vuex来进行数据管理,对于这个需求过重。
- 自定义vue bus事件总线(如上面提到的),无明显依赖关系的消息传递,如果传递组件所需的props不太合适。
- 通过props一层一层传递,但需要传递的事件和属性较多,增加维护成本。
而还有一种方式可以通过attrs和listeners,实现跨层级属性和事件“透传”。
主组件
// Main.vue
<template>
<div>
<h2>组件Main 数据项:{{count}}</h2>
<ComponentWrapper @changeCount="changeCount" :count="count">
</ComponentWrapper>
</div>
</template>
<script>
import ComponentWrapper from "./ComponentWrapper";
export default {
data() {
return {
count: 100
};
},
components: {
ComponentWrapper
},
methods: {
changeCount(val) {
console.log('Top count', val)
this.count = val;
}
}
};
</script>
包装用的组件
有的时候我们为了对真实组件进行一些功能增加,这时候就需要用到包装组件(特别是对第三方组件库进行封装的时候)。
// ComponentWrapper.vue
<template>
<div>
<h3>组件包裹层</h3>
<RealComponent v-bind="$attrs" v-on="$listeners"></RealComponent>
</div>
</template>
<script>
import RealComponent from "./RealComponent";
export default {
inheritAttrs: false, // 默认就是true
components: {
RealComponent
}
};
</script>
真正的组件
// RealComponent.vue
<template>
<div>
<h3>真实组件</h3>
<input v-model="myCount" @input="inputHanlder" />
</div>
</template>
<script>
export default {
data() {
return {
myCount: 0
}
},
created() {
this.myCount = this.$attrs.count; // 在组件Main中传递过来的属性
console.info(this.$attrs, this.$listeners);
},
methods: {
inputHanlder() {
console.log('Bottom count', this.myCount)
this.$emit("changeCount", this.myCount); // 在组件Main中传递过来的事件,通过emit调用顶层的事件
// this.$listeners.changeCount(this.myCount) // 或者通过回调的方式
}
}
};
</script>
从例子中回归本文里来,我们要面对的场景是如下这样。
远程组件其实有两层,一层是本地(页面内),一层是远端(CDN)。本地这层只是做封装用的,可以理解为只是包装了一层,没有实际功能。这时候可以理解为本地这一层组件就是包装层,包装层主要做了导入远程组件的功能没办法去除,需要利用上面的特性去传递信息给远程组件。
样式层级
远程组件在本文可以简单理解为远端的弹层组件,公司业务又涉及到不同的弹层类别,每种弹层类别可能会重叠。
约定z-index
因此划分 0~90 为划分十层,后续可根据实际情况增加数值,设定各远程组件容器只能在规定层级内指定 z-index。
// const.js
const FLOOR = {
MAIN: 0, // 主页面容器
COUPON_MODAL: 20, // 广告弹层
OTHER_MODAL: 30, // 其他弹层
ERROR_MODAL: 90,
...
}
设置每种远程组件即弹层的包裹层。
// CouponModalWrapper.vue
<script>
<template>
<div :style="{'z-index': FLOOR.COUPON_MODAL}" @touchmove.prevent>
<slot></slot>
</div>
</template>
// OtherModalWrapper.vue
<template>
<div :style="{'z-index': FLOOR.OTHER_MODAL}" @touchmove.prevent>
<slot></slot>
</div>
</template>
// 这里只是为了表意简单,实际上两个Wrapper.vue可以合并
然后每类别各自引入对应的弹层包裹层。
// 每类别公共组件有一个
// CouponModal2.vue
<template>
<CouponModalWrapper>
...
</CouponModalWrapper>
</template>
// OtherModal2.vue
<template>
<OtherModalWrapper>
...
</OtherModalWrapper>
</template>
通过这种约定的方式,可以避免一些问题,但假如真的有人想捣乱怎么办?

别着急,有办法的。
借助stylelint
思路是这样的,每类别的远程组件是单独有对应的主文件夹,可以为这个文件夹定义最高和最小可允许的z-index,那该怎么做呢?
不知道大家有使用过自动加-webkit等前缀的插件 - autoprefixer没有,它其实是基于一款postcss工具做的。而我们经常用作css校验格式的工具stylelint也是基于它开发的。
这时候我们想到,能不能通过stylelint的能力,进行约束呢,我们发现找了官方文档并没有我们想要的API。
我们需要自己开发一个stylelint插件,来看看一个基本的stylelint插件的插件。

stylelint通过stylelint.createPlugin方法,接受一个函数,返回一个函数。
const stylelint = require('stylelint');
const ruleName = 'plugin/z-index-range-plugin';
function rule(options) {
// options传入的配置
return (cssRoot, result) => {
// cssRoot即为postcss对象
};
}
module.exports = stylelint.createPlugin(
ruleName,
rule
);
函数中可以拿到PostCSS对象,可以利用PostCSS对代码进行解析成AST、遍历、修改、AST变代码等操作。
有一些我们可用的概念。
- rule,选择器,比如.class { z-index: 99 }。
- decl,属性,比如z-index: 99。
我们需要检查z-index的值,因此需要遍历CSS检查z-index。我们可以调用cssRoot.walkDecls对做遍历:
// 遍历
cssRoot.walkDecls((decl) => {
// 获取属性定义
if (decl) {
// ...
}
});
前置基础知识差不多够用了。

假如我们要检测一个两个文件夹下的.css文件的z-index是否合乎规矩。
我们设置好两个模块stylelint配置文件下的z-index范围。
这里我们可以看到stylelint配置文件,两个css文件。
├── .stylelintrc.js
├── module1
│ └── index.css
├── module2
│ └── index2.css
stylelint配置文件
// .stylelintrc.js
module.exports = {
"extends": "stylelint-config-standard",
// 自定义插件
"plugins": ["./plugin.js"],
"rules": {
// 自定义插件的规则
"plugin/z-index-range-plugin": {
// 设置的范围,保证各模块不重复
"module1": [100, 199],
"module2": [200, 299]
}
}
}
CSS测试文件
/* module1/index.css */
.classA {
color: red;
width: 99px;
height: 100px;
z-index: 99;
}
/* module2/index.css */
.classB {
color: red;
width: 99px;
height: 100px;
z-index: 200;
}
我们要达到的目的是,运行如下命令,会让module1/index.css报错,说z-index小于预期。
npx stylelint "*/index.css"
于是乎我们完成了如下代码,达成了预期目的。
const stylelint = require('stylelint');
const ruleName = 'plugin/z-index-range-plugin';
function ruleFn(options) {
return function (cssRoot, result) {
cssRoot.walkDecls('z-index', function (decl) {
// 遍历路径
const path = decl.source.input.file
// 提取文件路径里的模块信息
const match = path.match(/module\d/)
// 获取文件夹
const folder = match?.[0]
// 获取z-index的值
const value = Number(decl.value);
// 获取设定的最大值、最小值
const params = {
min: options?.[folder]?.[0],
max: options?.[folder]?.[1],
}
if (params.max && Math.abs(value) > params.max) {
// 调用 stylelint 提供的report方法给出报错提示
stylelint.utils.report({
ruleName,
result,
node: decl,
message: `Expected z-index to have maximum value of ${params.max}.`
});
}
if (params.min && Math.abs(value) < params.min) {
// 调用 stylelint 提供的report方法给出报错提示
stylelint.utils.report({
ruleName,
result,
node: decl,
message: `Expected z-index to have minimum value of ${params.min}.`
});
}
});
};
}
module.exports = stylelint.createPlugin(
ruleName,
ruleFn
);
module.exports.ruleName = ruleName;
可以尝试项目:github.com/fly0o0/styl…,试一试感受一下🐶。
这样基本一个远程弹层的设计就完成了。
但还是遇到了些问题,艰难😂。

○ 遇到的问题
我们兴冲冲的打算发上线了,结果报错了🐶。报的错是webpackJsonp不是一个function。
不要慌,先吃个瓜镇静镇静。webpackJsonp是做什么的呢?
异步加载的例子
先看下以下例子,通过import的按需异步加载特性加载了test.js,以下例子基于Webpack3构建。
// 异步加载 test.js
import('./test').then((say) => {
say();
});
然后生成了异步加载文件 0.bundle.js。
// 异步加载的文件,0.bundle.js
webpackJsonp(
// 在其它文件中存放着的模块的 ID
[0],
// 本文件所包含的模块
[
// test.js 所对应的模块
(function (module, exports) {
function ;(content) {
console.log('i am test')
}
module.exports = say;
})
]
);
和执行入口文件 bundle.js。
// 执行入口文件,bundle.js
(function (modules) {
/***
* webpackJsonp 用于从异步加载的文件中安装模块。
*
*/
window["webpackJsonp"] = function webpackJsonpCallback(chunkIds, moreModules, executeModules) {
var moduleId, chunkId, i = 0, resolves = [], result;
for (; i < chunkIds.length; i++) {
chunkId = chunkIds[i];
if (installedChunks[chunkId]) {
resolves.push(installedChunks[chunkId][0]);
}
installedChunks[chunkId] = 0;
}
for (moduleId in moreModules) {
if (Object.prototype.hasOwnProperty.call(moreModules, moduleId)) {
modules[moduleId] = moreModules[moduleId];
}
}
while (resolves.length) {
resolves.shift()();
}
};
// 模拟 require 语句
function __webpack_require__(moduleId) {
}
/**
* 用于加载被分割出去的,需要异步加载的 Chunk 对应的文件
*/
__webpack_require__.e = function requireEnsure(chunkId) {
// ... 省略代码
return promise;
};
return __webpack_require__(__webpack_require__.s = 0);
})
(
[
// main.js 对应的模块
(function (module, exports, __webpack_require__) {
// 通过 __webpack_require__.e 去异步加载 show.js 对应的 Chunk
__webpack_require__.e(0).then(__webpack_require__.bind(null, 1)).then((show) => {
// 执行 show 函数
show('Webpack');
});
})
]
);
可以看出webpackJsonp的作用是加载异步模块文件。但为什么会报webpackJsonp不是一个函数呢?
开始排查问题
我们开始检查构建出的源码,发现我们的webpackJsonp并不是一个函数,而是一个数组(现已知Webpack4,当时排查时候不知道)。
我们发现异步文件加载的时候确实是变成了数组,通过push去增加一个异步模块到系统里。
// 异步加载的文件
(window["webpackJsonp"] = window["webpackJsonp"] || []).push([[/* chunk id */ 0], {
"./src/async.js": (function(module, __webpack_exports__, __webpack_require__) {
//...
}))
且在执行入口文件也发现了webpackJsonp被定义为了数组。
// 执行入口文件,bundle.js中的核心代码
var jsonpArray = window["webpackJsonp"] = window["webpackJsonp"] || [];
var oldJsonpFunction = jsonpArray.push.bind(jsonpArray);
jsonpArray.push = webpackJsonpCallback;
jsonpArray = jsonpArray.slice();
for (var i = 0; i < jsonpArray.length; i++) webpackJsonpCallback(jsonpArray[i]);
var parentJsonpFunction = oldJsonpFunction;
确实我们构建出的源码的webpackJsonp是一个数组,确实不是一个函数了,感觉找到了一点线索。但为什么会webpackJsonp会函数形式去使用呢?
我们怀疑报错处有问题,开始排查报错处,发现对应的文件确实是用webpackJsonp当作函数去调用的,这是什么情况?🤔️
这时我们注意到报错的都是老架构下的远程组件,是不是在老架构的项目里会有什么蛛丝马迹?
我们开始探索老架构,这时候发现老架构是使用的webpack3,而我们新架构是使用webpack4构建的。难道是这里出了问题?💡
于是我们用webpack3重新构建了下老架构的远程组件,发现webpackJsonp对应的确实是函数,如上一节“异步加载的例子”里所示。
所以定位到了原因,webpack4和webpack3分别构建了新老两种的异步远程组件,webpackJsonp在版本4下是数组,而在版本3下面是函数。
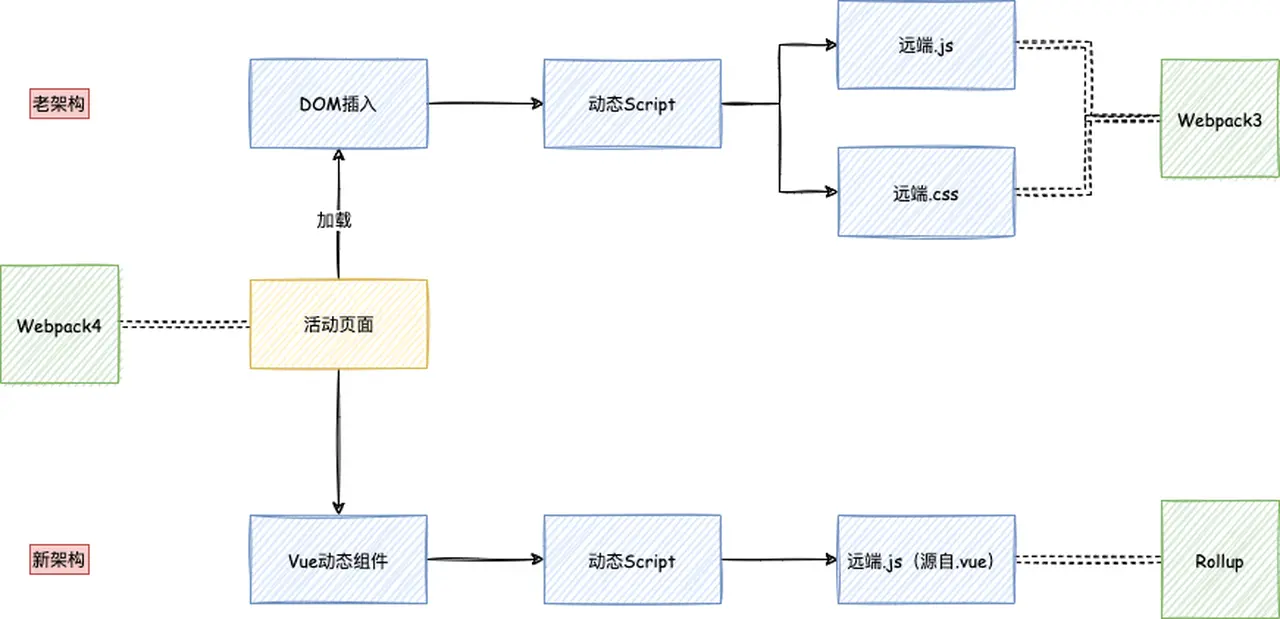
细心的同学可能已经发现上面的图在之前出现过,webpack4构建的入口文件去加载webpack3构建的异步组件,就出现了章节头出现的webpackJsonp不是函数的错误。

好好想一想,大概有几个方案。
- 批量去修改webpack3构建出来的异步组件中webpackJsonp的命名,然后在容器页面入口里自定义异步加载能力(webpackJsonp功能)的函数。
- 重新去用webpack4构建所有遗留的老架构webpack3构建出来的异步组件。
- 搜寻是否有官方支持,毕竟这是一个webpack4从webpack3的过来的breack changes。
第一个方案工作量有点大,且怎么保证异步组件和入口文件同步修改完毕呢?
第二个方案工作量也很大,对于所有老架构的异步组件都得更新,且更新后的可靠性堪忧,万一有遗漏。
第三个方案看起来是最靠谱的。

于是在第三个方案的方向下,开始做了搜寻。
我们通过webpack4源码全局搜寻webpackJsonp,发现了jsonpFunction。通过官方文档找到了jsonpFunction是可以自定义webpack4的webpackJsonp的名称。比如可以改成如下。
output: {
// 自定义名称
jsonpFunction: 'webpack4JsonpIsArray'
},
这样后,webpackJsonp就不是一个数组了,而是未定义了。因此我们需要在我们的公共代码库里提供webpackJsonp函数版本的定义。如异步加载的例子小节所提到的。
// webpackJsonp函数版
!(function (n) {
window.webpackJsonp = function (t, u, i) {
//...
}
}([]))
以此来提供入口页面能加载webpack3构建的异步文件的能力。
○ 演进
我们还对远程组件弹层做了一些演进,由于跟本文关联度不大,只做一些简单介绍。
图片压缩问题
券弹层的券有PNG、JPG、GIF格式,需要更快的展现速度,因此我们做了图片压缩的统一服务。
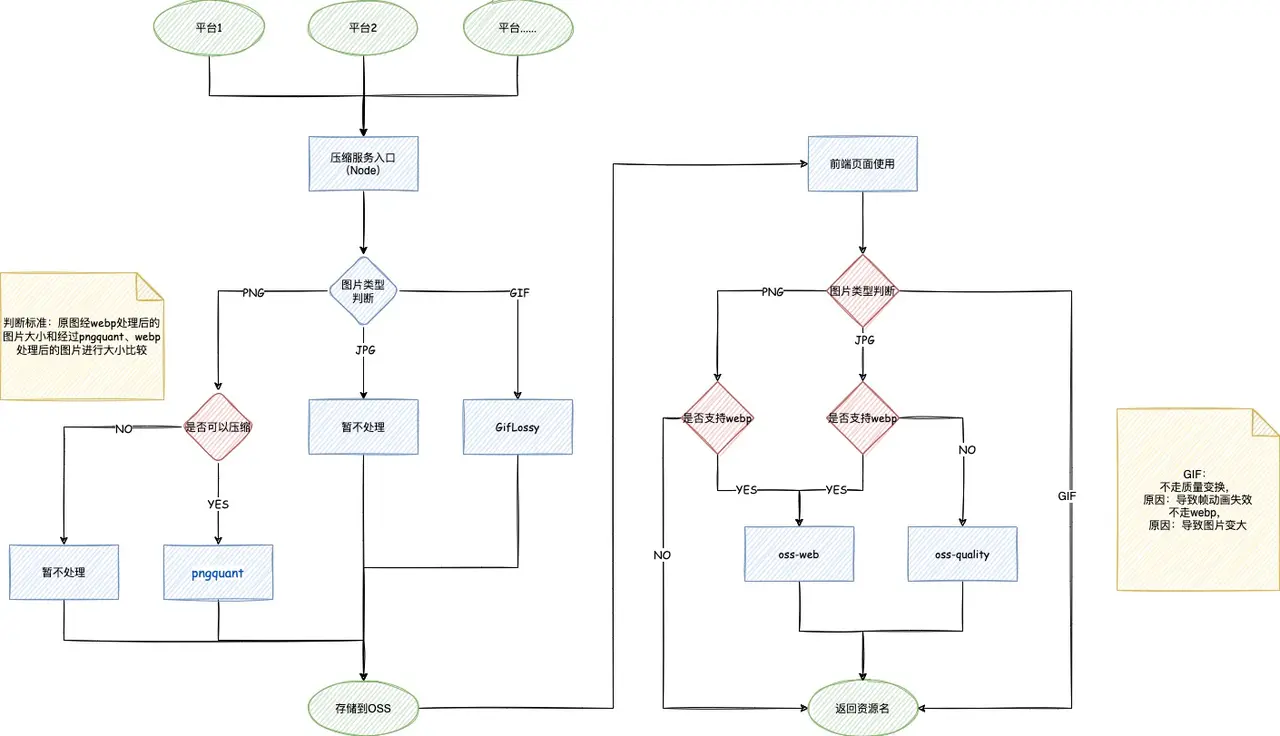
gif处理策略:github.com/kornelski/g…
png处理策略:pngquant.org
效率问题
有规律的远程组件,可通过搭建工具处理,因此我们构建了可视化低代码建站工具,有感兴趣的同学留言,我考虑写一篇😂 。