环信React-UIKIT 库使用指南,瞬间实现即时通讯功能!
一、前言
为了加快即时通讯需求产品开发速度,将更多的时间放在关系核心业务逻辑的处理上,环信正式推出可扩展,易使用的 React 版本的 UIKIT 库!此 UIKit 库 是基于 环信 Web SDK 开发的的 UI 组件库,它提供了常用的 UI 组件、包含聊天业务逻辑的模块组件以及容器组件,允许用户使用 renderX 方法进行自定义。UIKIT 库 还提供了一个 provider 来管理数据,该 provider 自动监听 chat SDK 事件以更新数据并驱动 UI 更新。开发人员可以使用此库根据实际业务需求快速构建定制的即时通讯应用程序。
二、前置技能
- 了解 React 框架基本使用
- 了解环信 SDK 基本功能
- 了解 Mobox 状态管理库基本使用
三、快速开始
在自己的终端执行命令使用 vite 模版创建一个 react+typescript 项目
有同学可能会问为什么不用 react-cli 创建一个基于 webpack 的模板项目?只是单纯的觉得 vite 快相对也是比较好用,但是 webpack 搭建的项目也会遇到一个问题具体问题后面描述。
Vite 模版地址:https://vitejs.cn/guide/#scaffolding-your-first-vite-project
yarn create vite my-react-app --template react-ts终端执行
yarn install初始化项目依赖终端执行
yarn run dev启动项目,检查是否正常运行。上述两部没有问题则清除模版默认代码,并重新运行检查是否正常。
3、安装 UIKIT 库
终端命令
yarn add chatuim24、注册全局 Provider 组件
1、
App.tsx中引入Provider组件import { Provider } from 'chatuim2';App.tsx中import 'chatuim2/style.css';App.tsx给一个根 dom 元素作为容器并给与默认样式。function App() {
return ;
}/* App.css */
.app_container {
width: 100%;
}Proveider组件,并传入 appKeyappKey 是在环信注册并创建应用项目生成的,具体可以参考该文档
import { Provider } from 'chatuim2';

import { APPKEY } from './config';

import './App.css';

import 'chatuim2/style.css';

function App() {

  return (

    <div className='app_container'>

      <Provider initConfig={{ appKey: APPKEY }}></Provider>

    </div>

  );

}


export default App;
在项目目录
src下创建views文件夹,并在views下新建一个main文件夹在
main中从 UIKIT 库中引入 useClient(此为 UIKIT 中内置使用 IM 实例的 hook),并处理 IM 登录(这一步非常重要,因为之后登录成功之后,后续所有操作方可有效。)import { useEffect } from 'react';
/* EaseIM */
import { useClient } from 'chatuim2';
const Main = () => {
const client = useClient();
useEffect(() => {
client &&
client
.open({
user: '环信ID号',
pwd: '环信ID密码',
})
.then((res: any) => {
console.log('get token success', res);
});
}, [client]);
return ;
};
export default Main;6、引入 Conversation 会话 UI 组件
在
views下新建一个conversation组件,作为会话列表组件的容器。import { ConversationList } from 'chatuim2';
import './index.css';
const Conversation = () => {
return (
<div className='conversation_container'>
<ConversationList />
</div>
);
};
export default Conversation;
main中引入并注册conversation组件。import { useEffect } from 'react';
/* EaseIM */
import { useClient } from 'chatuim2';
/* components */
import Conversation from '../conversation';
const Main = () => {
const client = useClient();
useEffect(() => {
client &&
client
.open({
user: 'hfp',
pwd: '1',
})
.then((res: any) => {
console.log('get token success', res);
});
});
}, [client]);
return (
<div className='main_container'>
<Conversation />
</div>
);
};
export default Main;
main组件同样需要在 App.tsx 根组件下进行注册import { Provider } from 'chatuim2';
import { APPKEY } from './config';
import './App.css';
import 'chatuim2/style.css';
import Main from './views/main';
function App() {
return (
<div className='app_container'>
<Provider initConfig={{ appKey: APPKEY }}>
<Main />
</Provider>
</div>
);
}
export default App;流程与上面会话组件的引入类型创建一个名为
chatContainer组件作为Chat组件容器。import { Chat } from 'chatuim2';
import './index.css';
const ChatContainer = () => {
return (
<div className='emChat_container'>
<Chat />
</div>
);
};
export default ChatContainer;
同样需要在
main组件中引入注册import { useEffect } from 'react';
/* EaseIM */
import { useClient } from 'chatuim2';
/* components */
import Conversation from '../conversation';
import ChatContainer from '../chatContainer';
const Main = () => {
const client = useClient();
useEffect(() => {
client &&
client
.open({
user: 'hfp',
pwd: '1',
})
.then((res: any) => {
console.log('get token success', res);
});
}, [client]);
return (
<div className='main_container'>
<Conversation />
<ChatContainer />
</div>
);
};
export default Main;
四、遇到的问题
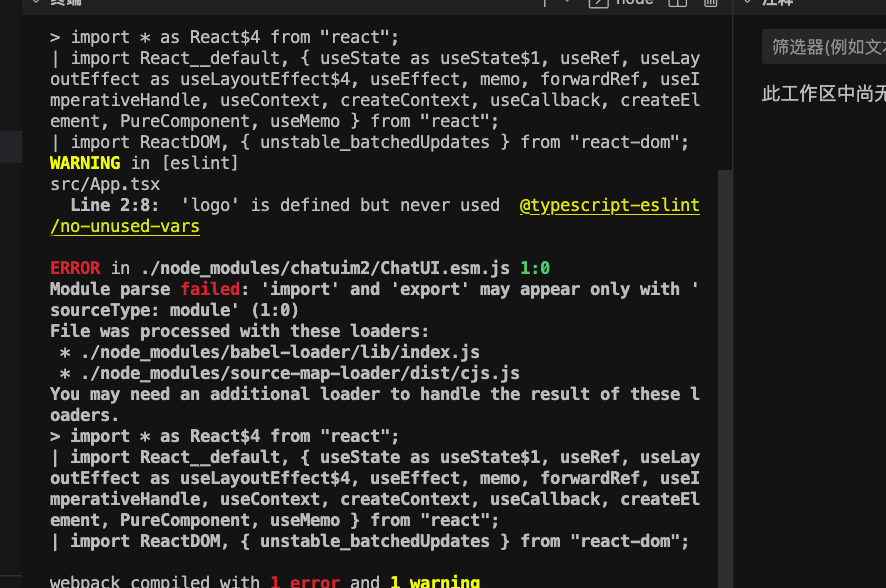
使用 react-cli 创建的项目,在注册
Provider组件时出现截图报错。
解决方式
babel-loader、source-map-loader执行yarn ejest展现 webpack 相关配置,并在webpack.config.js中,babel-loader下增加sourceType: 'unambiguous',这段代码。相关配置代码如下面示例:
{
              test: /\.(js|mjs|jsx|ts|tsx)$/,
              include: paths.appSrc,
              loader: require.resolve('babel-loader'),
              options: {
                customize: require.resolve(
                  'babel-preset-react-app/webpack-overrides'
                ),
                sourceType: 'unambiguous',
                presets: [
                  [
                    require.resolve('babel-preset-react-app'),
                    {
                      runtime: hasJsxRuntime ? 'automatic' : 'classic',
                    },
                  ],
                ],

                plugins: [
                  isEnvDevelopment &&
                    shouldUseReactRefresh &&
                    require.resolve('react-refresh/babel'),
                ].filter(Boolean),
                // This is a feature of `babel-loader` for webpack (not Babel itself).
                // It enables caching results in ./node_modules/.cache/babel-loader/
                // directory for faster rebuilds.
                cacheDirectory: true,
                // See #6846 for context on why cacheCompression is disabled
                cacheCompression: false,
                compact: isEnvProduction,
              },
            },
七、相关可参考文档地址
UIKIT 源码地址:https://github.com/easemob/Easemob-UIKit-web
环信 Web 端开发文档:http://docs-im-beta.easemob.com/document/web/quickstart.html
该示例源码地址:https://github.com/HuangFeiPeng/react-uikit-demo-test
小结
该 UIKIT 组件新鲜出炉,如果有兴趣可以进行下载体验,另有一些不足之处,也虚心接受大家批评指正,如果能共享你的代码那真是再好不过,诚信邀请你提交你的 PR。
另有其他使用问题请在评论区友好交流。
