ConstraintLayout 约束布局
约束布局
约束布局概念
ConstraintLayout 可让您使用扁平视图层次结构(无嵌套视图组)创建复杂的大型布局。它与 RelativeLayout相似,其中所有的视图均根据同级视图与父布局之间的关系进行布局,但其灵活性要高于 RelativeLayout,并且更易于与 Android Studio 的布局编辑器配合使用。
要在 ConstraintLayout 中定义某个视图的位置,您必须为该视图添加至少一个水平约束条件和一个垂直约束条件。每个约束条件均表示与其他视图、父布局或隐形引导线之间连接或对齐方式。每个约束条件均定义了视图在竖轴或者横轴上的位置;因此每个视图在每个轴上都必须至少有一个约束条件,但通常情况下会需要更多约束条件。
当您将视图拖放到布局编辑器中时,即使没有任何约束条件,它也会停留在您放置的位置。不过,这只是为了便于修改;当您在设备上运行布局时,如果视图没有任何约束条件,则会在位置 [0,0](左上角)处进行绘制。
从 Android Studio 2.3 起,官方的模板默认使用 ConstraintLayout
ConstraintLayout 添加到项目中
如需在项目中使用 ConstraintLayout,请按以下步骤操作:
确保您的
maven.google.com代码库已在模块级build.gradle文件中声明repositories {
google()
}
复制代码2将该库作为依赖项添加到同一个文件中,如以下示例所示。请注意,最新版本可能与示例中显示的不同:
dependencies {

    implementation "androidx.constraintlayout:constraintlayout:2.0.4"

}

复制代码
转换布局
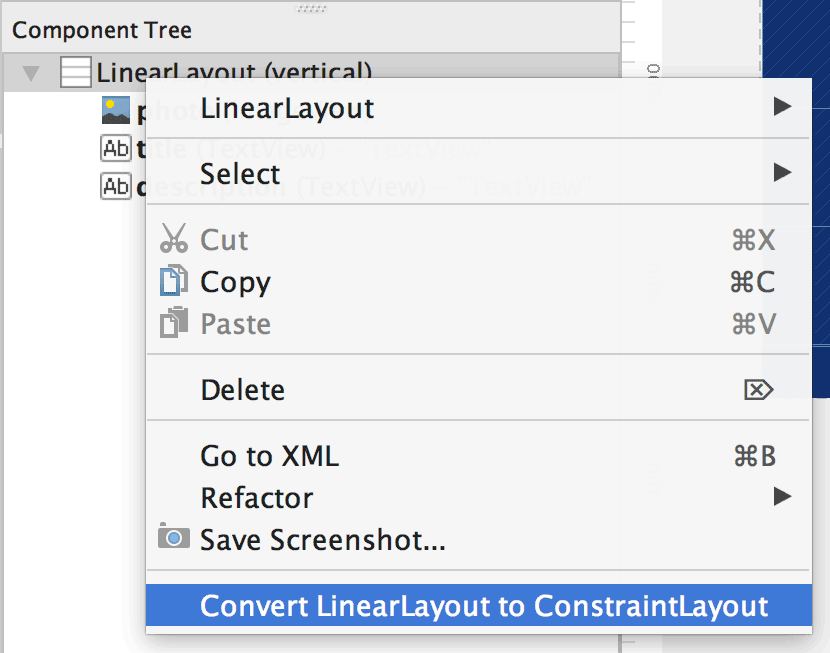
如需将现有布局转换为约束布局,请按以下步骤操作:
在
Android Studio中打开您的布局,然后点击编辑器窗口底部的Design标签页。在
ComponentTree窗口中,右键点击该布局,然后点击Convert layout to ConstraintLayout。

Constraintlayout基本使用
相对定位,基线
layout_constraintLeft_toLeftOflayout_constraintLeft_toRightOflayout_constraintRight_toLeftOflayout_constraintRight_toRightOflayout_constraintTop_toTopOflayout_constraintTop_toBottomOflayout_constraintBottom_toTopOflayout_constraintBottom_toBottomOflayout_constraintBaseline_toBaselineOf//基础线layout_constraintStart_toEndOflayout_constraintStart_toStartOflayout_constraintEnd_toStartOflayout_constraintEnd_toEndOf

居中
app:layout_constraintBottom_toBottomOf=parentapp:layout_constraintLeft_toLeftOf=parentapp:layout_constraintRight_toRightOf=parentapp:layout_constraintTop_toTopOf=parent
边距
android:layout_marginStartandroid:layout_marginEndandroid:layout_marginLeftandroid:layout_marginTopandroid:layout_marginRightandroid:layout_marginBottom

隐藏边距
layout_goneMarginStartlayout_goneMarginEndlayout_goneMarginLeftlayout_goneMarginToplayout_goneMarginRightlayout_goneMarginBottom
偏移量(Bias)
layout_constraintHorizontal_biaslayout_constraintVertical_bias


角度定位
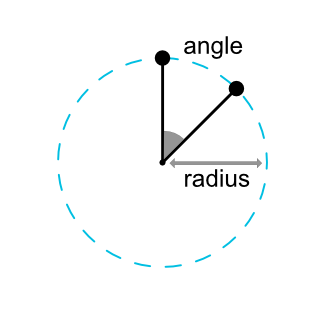
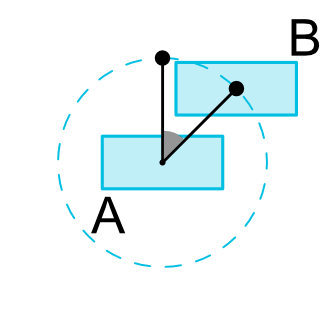
layout_constraintCircle: 设置一个控件idlayout_constraintCircleRadius: 设置半径layout_constraintCircleAngle:控件的角度 (in degrees, from 0 to 360)


宽高约束Ratio
Raito可以根据控件一个边尺寸比重生成另一个边的尺寸。Ration必须设置一个控件宽高尺寸为odp(MATCH_CONSTRAINT)。
 //根据宽的边生成高的边按比重1:1

 <Button android:layout_width="wrap_content"

                   android:layout_height="0dp"

                   app:layout_constraintDimensionRatio="1:1" />

复制代码
//高比16:9
<Button android:layout_width="0dp"
android:layout_height="0dp"
app:layout_constraintDimensionRatio="H,16:9"
app:layout_constraintBottom_toBottomOf="parent"
app:layout_constraintTop_toTopOf="parent"/>
复制代码链
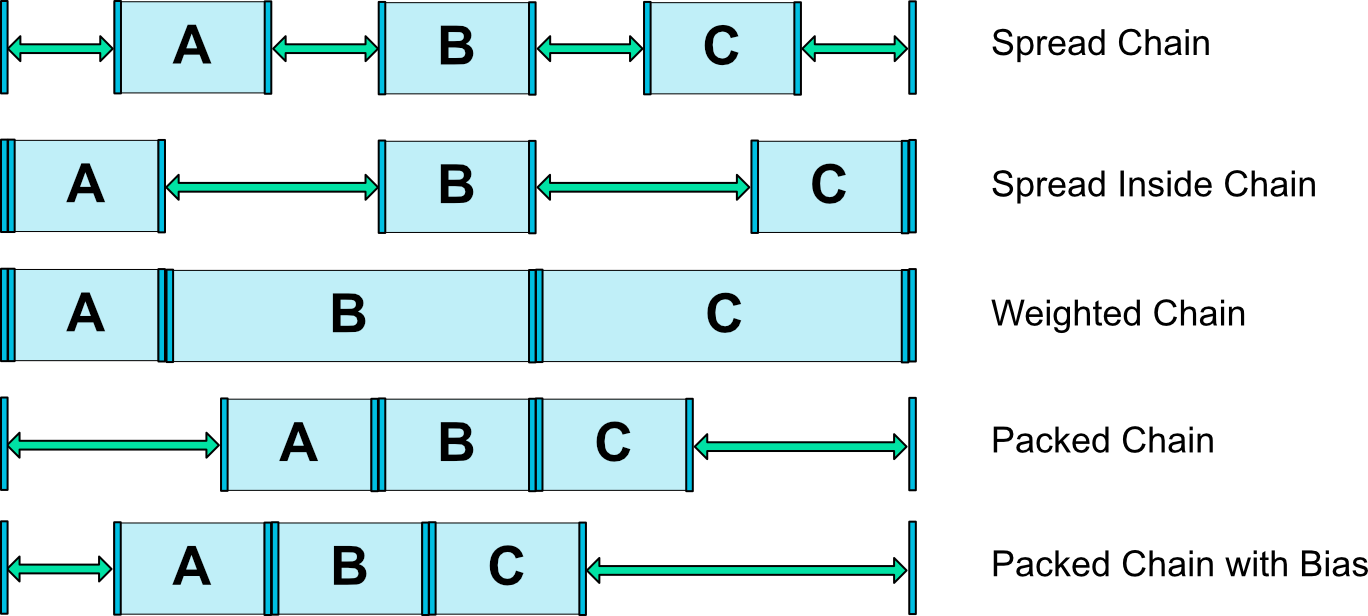
app:layout_constraintVertical_chainStyle="",app:layout_constraintHorizontal_chainStyle=""
CHAIN_SPREAD:有点像LinearLayout里面元素设置比重1:1:1 平均分布。CHAIN_SPREAD_INSIDE:链的两边元素靠边,里面元素平均分配距离。CHAIN_PACKED:链的元素挨到一起。


辅助工具
优化器Optimizer
app:layout_optimizationLevel对使用约束布局公开的优化配置项
- none : 不启动优化
- standard : 仅优化直接约束和屏障约束(默认)
- direct : 优化直接约束
- barrier : 优化屏障约束
- chain : 优化链约束 (experimental)
- dimensions :优化尺寸测量(experimental), 减少测量匹配约束布局的节点
障碍Barrier
app:barrierDirection=""
有点像弱化(轻量级)的基础线通过设置指向的方向在此方向位置最远处生成一个虚拟线做一个阻挡作用的线。
<androidx.constraintlayout.widget.ConstraintLayout xmlns:android="http://schemas.android.com/apk/res/android"

    xmlns:app="http://schemas.android.com/apk/res-auto"

    xmlns:tools="http://schemas.android.com/tools"

    android:layout_width="match_parent"

    android:layout_height="match_parent">


   <androidx.constraintlayout.widget.Barrier

       android:id="@+id/barrier"

       android:layout_width="wrap_content"

       android:layout_height="wrap_content"

       app:barrierDirection="start"

       app:constraint_referenced_ids="button9,button10,button11" />


   <Button

       android:id="@+id/button9"

       android:layout_width="65dp"

       android:layout_height="50dp"

       android:text="Button"

       tools:layout_editor_absoluteX="108dp"

       tools:layout_editor_absoluteY="341dp" />


   <Button

       android:id="@+id/button10"

       android:layout_width="203dp"

       android:layout_height="49dp"

       android:text="Button"

       tools:layout_editor_absoluteX="84dp"

       tools:layout_editor_absoluteY="242dp" />


   <Button

       android:id="@+id/button11"

       android:layout_width="146dp"

       android:layout_height="49dp"

       android:text="Button"

       tools:layout_editor_absoluteX="71dp"

       tools:layout_editor_absoluteY="437dp" />


</androidx.constraintlayout.widget.ConstraintLayout>

复制代码
Group
Group可以同意控制引用的控件集合的visible状态。
<androidx.constraintlayout.widget.ConstraintLayout xmlns:android="http://schemas.android.com/apk/res/android"

    xmlns:app="http://schemas.android.com/apk/res-auto"

    xmlns:tools="http://schemas.android.com/tools"

    android:layout_width="match_parent"

    android:layout_height="match_parent">


   <androidx.constraintlayout.widget.Group

       android:id="@+id/group"

       android:layout_width="wrap_content"

       android:layout_height="wrap_content"

       app:constraint_referenced_ids="button9,button10,button11" />


   <Button

       android:id="@+id/button9"

       android:layout_width="wrap_content"

       android:layout_height="wrap_content"

       android:text="Button"

       tools:layout_editor_absoluteX="46dp"

       tools:layout_editor_absoluteY="241dp" />


   <Button

       android:id="@+id/button10"

       android:layout_width="wrap_content"

       android:layout_height="wrap_content"

       android:text="Button"

       tools:layout_editor_absoluteX="171dp"

       tools:layout_editor_absoluteY="241dp" />


   <Button

       android:id="@+id/button11"

       android:layout_width="wrap_content"

       android:layout_height="wrap_content"

       android:text="Button"

       tools:layout_editor_absoluteX="296dp"

       tools:layout_editor_absoluteY="237dp" />


</androidx.constraintlayout.widget.ConstraintLayout>

复制代码
指示线Guideline
//已parent start作为边开始计算
app:layout_constraintGuide_begin=""
//已parent end作为边开始计算
app:layout_constraintGuide_end=""
//百分比的位置
app:layout_constraintGuide_percent=""
<androidx.constraintlayout.widget.Guideline

    android:id="@+id/guideline"

    android:layout_width="wrap_content"

    android:layout_height="wrap_content"

    android:orientation="vertical"

    app:layout_constraintGuide_begin="196dp" />


<androidx.constraintlayout.widget.Guideline

    android:id="@+id/guideline2"

    android:layout_width="wrap_content"

    android:layout_height="wrap_content"

    android:orientation="horizontal"

    app:layout_constraintGuide_begin="336dp" />

复制代码
占位符Placeholder
<androidx.constraintlayout.widget.ConstraintLayout xmlns:android="http://schemas.android.com/apk/res/android"

    xmlns:app="http://schemas.android.com/apk/res-auto"

    xmlns:tools="http://schemas.android.com/tools"

    android:layout_width="match_parent"

    android:layout_height="match_parent">


   <androidx.constraintlayout.widget.Placeholder

       android:id="@+id/placeholder"

       android:layout_width="wrap_content"

       android:layout_height="wrap_content"

       app:content="@+id/textview"

       app:layout_constraintLeft_toLeftOf="parent"

       app:layout_constraintTop_toTopOf="parent" />


   <ImageView

       android:id="@+id/textview"

       android:layout_width="wrap_content"

       android:layout_height="wrap_content"

       android:src="@drawable/ic_launcher_background"

       app:layout_constraintRight_toRightOf="parent"

       app:layout_constraintTop_toTopOf="parent"

       android:onClick="toSetGoneWithPlaceHolder"

       />


</androidx.constraintlayout.widget.ConstraintLayout>

复制代码placehoder提供了一个虚拟(空的)控件,但是它可以成一个布局已经存在的控件
使用setContent()方法在placehoder上设置一个其他控件的id,placehoder会成为设置控件id的内容,如果显示内容的控件存在屏幕内它会从隐藏
通过PlaceHolder的参数来显示内容.
设置约束布局
可以通过代码的方式设置约束布局的属性
//创建一个Constraint数据集合

ConstraintSet c = new ConstraintSet();

//Copy布局的配置

c.clone(mContext, R.layout.mine_info_view);

//新增或者替换行为参数

c.setVerticalChainStyle(userNameView.getId(),chain);

//执行

c.applyTo(this.<ConstraintLayout>findViewById(R.id.constraintlayout));
作者:剑yyds
链接:https://juejin.cn/post/6953937448875327495
来源:掘金
著作权归作者所有。商业转载请联系作者获得授权,非商业转载请注明出处。
