在views/Channel/components文件夹下新增一个组件StreamHandler, 该组件为后续我们处理游戏房间的组件, 先初步编写声网接入逻辑
// views/Channel/components/StreamHandler/index.js


const options = {

  appId:

    process.env.REACT_APP_AGORA_APPID || "default id",

  channel: process.env.REACT_APP_AGORA_CHANNEL || "test",

  token:

    process.env.REACT_APP_AGORA_TOKEN ||

    "default token",

  uid: process.env.REACT_APP_AGORA_UID || "default uid",

};


const StreamHandler =  (props) => {

  // 组件参数: 用户信息, 当前频道所有消息, 当前频道id, 是否开启本地语音

  const { userInfo, messageInfo, channelId, enableLocalVoice = false } = props;


  const [rtcClient, setRtcClient] = useState(null);

  // 声网client连接完成

  const [connectStatus, setConnectStatus] = useState(false);


  // RTC相关逻辑

  useEffect(() => {

    AgoraRTC.setLogLevel(3);

    const client = AgoraRTC.createClient({ mode: "rtc", codec: "vp8" });

    // TODO: use right channel

    client

      .join(options.appId, options.channel, options.token, userInfo?.username)

      .then(() => {

        setConnectStatus(true);

        console.log("[Stream] join channel success");

      })

      .catch((e) => {

        console.log(e);

      });


    setRtcClient(client);

    return () => {

      // 销毁时, 自动退出RTC频道

      client.leave();

      setRtcClient(null);

    };

  }, []);


  return (

	<>

	  {!connectStatus && <Spin tip="Loading" size="large" />}

	</>

  );

}


// 我们需要全局状态中的userinfo, 映射一下到当前组件的props中

const mapStateToProps = ({ app }) => {

  return {

    userInfo: app.userInfo,

  };

};

export default memo(connect(mapStateToProps)(StreamHandler));
然后回到Channel中, 在之前的renderStreamChannel函数中添加上StreamHandler组件
// view/Channel/index.js

const [enableVoice, setEnableVoice] = useState(false);

const toggleVoice = () => {

	setEnableVoice((enable) => {

	  return !enable;

	});

}


// 保留了输入窗口, 可以在它的菜单栏中添加游戏频道独有的一些逻辑,

// 这里我加入了开关本地语音的逻辑, 拓展Input的细节可以参照完整版代码

const renderStreamChannel = () => {

    return (

      <>

        <div className={s.messageRowWrap}>

		  <StreamHandler messageInfo={messageInfo} channelId={channelId} enableLocalVoice={enableVoice} />

        </div>

        <div className={s.iptWrap}>

          <Input chatType={CHAT_TYPE.groupChat} fromId={channelId} extraMenuItems={renderStreamMenu()} />

        </div>

      </>

    );

  }


const renderStreamMenu = () => {

    return [

      {

        key: "voice",

        label: (

          <div

            className="circleDropItem"

            onClick={toggleVoice}

          >

            <Icon

              name="person_wave_slash"

              size="24px"

              iconClass="circleDropMenuIcon"

            />

            <span className="circleDropMenuOp">

              {enableVoice ? "关闭语音" : "开启语音"}

            </span>

          </div>

        ),

      }

    ];

  }
此时我们创建一个video-开题的游戏频道, 应该可以看到命令行中输出了RTC连接成功信息. [Stream] join channel success
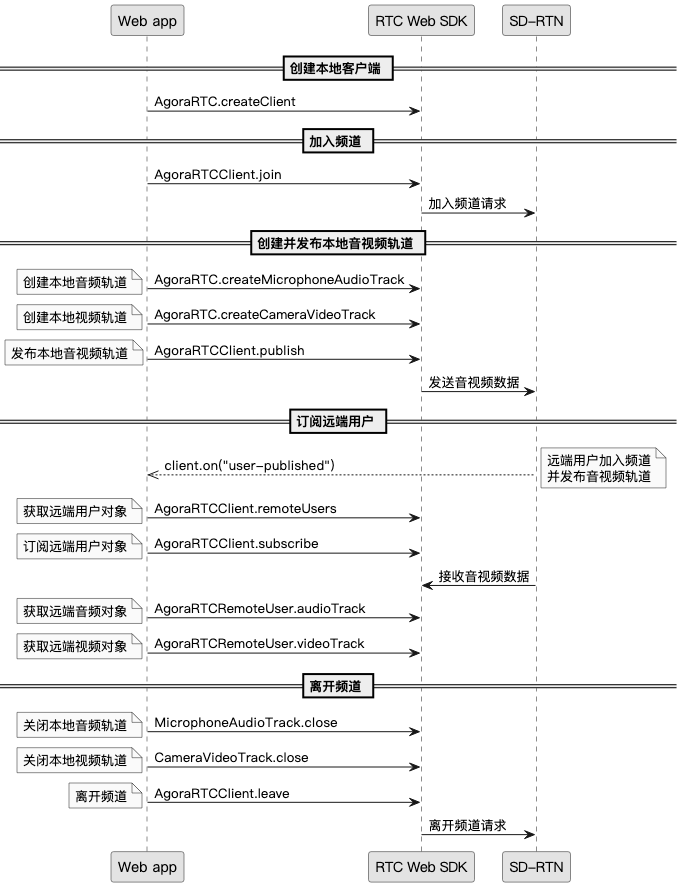
接下来我们继续做实质的RTC推流逻辑, 及用户上下播的入口. 但在那之前, 先简单过一下声网RTC中的一些概念.
在上面的接入中, 我们已经完成了创建对象并加入频道两步.
在RTC中, 可以传输音频和视频信号, 由于单个RTC客户端要传输不同种类的数据, 每个单独的音视频源被分成不同的track(由于它们都是实时不断产生的, 我们称作流), 随后通过publish方法, 将我们本地的信号源交付给RTC客户端传输.
随后通过user-published事件的回调来在其他用户发布信号源时进行处理, 首先需要subscribe该用户来获取后续数据, 随后根据不同类型的信号流做处理.
离开时需要关闭本地当前的信号源, 并退出RTC客户端.
最后通过user-unpublished事件监听其他用户退出, 移除它们对应的信号流.
// views/Channel/components/StreamHandler/index.js

const StreamHandler = (props) => {

  ...

  // 本地视频元素

  const localVideoEle = useRef(null);

  // 远程视频元素

  const canvasEle = useRef(null);

  const [rtcClient, setRtcClient] = useState(null);

  const [connectStatus, setConnectStatus] = useState(false);

  // 当前直播的用户

  const [remoteUser, setRemoteUser] = useState(null);

  // 远程音视频track

  const [remoteVoices, setRemoteVoices] = useState([]);

  const [remoteVideo, setRemoteVideo] = useState(null);


  // RTC相关逻辑

  useEffect(() => {

    ...

    // client.join 后


	// 监听新用户加入

    client.on("user-published", async (user, mediaType) => {

      // auto subscribe when users coming

      await client.subscribe(user, mediaType);

      console.log("[Stream] subscribe success on user ", user);

      if (mediaType === "video") {

        // 获取直播流

        if (remoteUser && remoteUser.uid !== user.uid) {

          // 只能有一个用户推视频流

          console.error(

            "already in a call, can not subscribe another user ",

            user

          );

          return;

        }

        // 播放并记录下视频流

        const remoteVideoTrack = user.videoTrack;

        remoteVideoTrack.play(localVideoEle.current);

        setRemoteVideo(remoteVideoTrack);

        // can only have one remote video user

        setRemoteUser(user);

      }

      if (mediaType === "audio") {

        // 获取音频流

        const remoteAudioTrack = user.audioTrack;

        // 去重

        if (remoteVoices.findIndex((item) => item.uid === user.uid) == -1) {

		  remoteAudioTrack.play();

          // 添加到数组中

          setRemoteVoices([

            ...remoteVoices,

            { audio: remoteAudioTrack, uid: user.uid },

          ]);

        }

      }

    });


    client.on("user-unpublished", (user) => {

      // 用户离开, 去除流信息

      console.log("[Stream] user-unpublished", user);

      removeUserStream(user);

    });

    setRtcClient(client);

    return () => {

      client.leave();

      setRtcClient(null);

    };

  }, []);


  const removeUserStream = (user) => {

    if (remoteUser && remoteUser.uid === user.uid) {

      setRemoteUser(null);

      setRemoteVideo(null);

    }

    setRemoteVoices(remoteVoices.filter((voice) => voice.uid !== user.uid));

  };

}
接着我们根据之前提到的自定义消息判断当前在播状态, 以最后一条自定义消息为准.
// views/Channel/components/StreamHandler/index.js

const StreamHandler = (props) => {

  const { userInfo, messageInfo, channelId, enableLocalVoice = false } = props;


  // 第一条 stream 消息, 用于判断直播状态

  const firstStreamMessage = useMemo(() => {

    return messageInfo?.list?.find(

      (item) => item.type === "custom" && item?.ext?.type === "stream"

    );

  }, [messageInfo]);


  // 是否有直播

  const hasRemoteStream =

    firstStreamMessage?.ext?.status === CMD_START_STREAM &&

    firstStreamMessage?.ext?.user !== userInfo?.username;

  // 本地直播状态

  const [localStreaming, setLocalStreaming] = useState(

    firstStreamMessage?.ext?.status === CMD_START_STREAM &&

      firstStreamMessage?.ext?.user === userInfo?.username

  );


 // 本地直播流状态

  const toggleLocalGameStream = () => {

    if (hasRemoteStream) {

      return;

    }

    setLocalStreaming(!localStreaming);

  };

  // 根据直播状态选择渲染

  return (

    <>

      {!connectStatus && <Spin tip="Loading" size="large" />}

      {hasRemoteStream ? (

        <RemoteStreamHandler

          remoteUser={firstStreamMessage?.ext?.user}

          localVideoRef={localVideoEle}

          channelId={channelId}

          userInfo={userInfo}

          rtcClient={rtcClient}

        />

      ) : (

        <LocalStreamHandler

          localStreaming={localStreaming}

          canvasRef={canvasEle}

          toggleLocalGameStream={toggleLocalGameStream}

          rtcClient={rtcClient}

          userInfo={userInfo}

          channelId={channelId}

        />

      )}

    </>

  );

}
我们根据hasRemoteStream分成两种逻辑RemoteStreamHandler和LocalStreamHandler(可以先用div+文字的空实现占位), 首先我们来看本地游戏的逻辑
// view/Channel/components/StreamHandler/local_stream.js

const LocalStreamHandler = (props) => {


  const {

    toggleLocalGameStream,

    canvasRef,

    localStreaming,

    rtcClient,

    userInfo,

    channelId,

  } = props;


  const [localVideoStream, setLocalVideoStream] = useState(false);

  const localPlayerContainerRef = useRef(null);


  // 开启本地视频流

  useEffect(() => {

    if (!localPlayerContainerRef.current) return;

    const f = async () => {

      // 暂时使用视频代替游戏流

      let lgs = await AgoraRTC.createCameraVideoTrack();

      lgs.play(localPlayerContainerRef.current);

      setLocalGameStream(lgs);

    }

    f();

  }, [localPlayerContainerRef])


  const renderLocalStream = () => {

    return (

	  <div style={{ height: "100%" }} ref={localPlayerContainerRef}>

	  </div>

    )

  }


  // 控制上下播

  const renderFloatButtons = () => {

    return (

      <FloatButton.Group

        icon={<DesktopOutlined />}

        trigger="click"

        style={{ left: "380px" }}

      >

        <FloatButton

          onClick={toggleLocalGameStream}

          icon={

            localStreaming ? <VideoCameraFilled /> : <VideoCameraOutlined />

          }

          tooltip={<div>{localStreaming ? "停止直播" : "开始直播"}</div>}

        />

      </FloatButton.Group>

    );

  };


  // 渲染: 悬浮窗和本地流

  return (

    <>

      <div style={{ height: "100%" }}>

        {renderFloatButtons()}

        {renderLocalStream()}

      </div>

    </>

  );

}
现在我们进入直播房间已经可以看到本地摄像头的内容了, 但我们还没有将视频流投放到RTC中, 且上播逻辑也没有处理
// view/Channel/components/StreamHandler/local_stream.js

  useEffect(() => {

    // 发布直播推流

    if (!localStreaming || !rtcClient || !localVideoStream) {

      return;

    }

    console.log("height", canvasRef.current.height);

    console.log("publishing local stream", localVideoStream);

    // 将流publish到rtc中

    rtcClient.publish(localVideoStream).then(() => {

      // 频道中发布一条消息, 表示开始直播

      sendStreamMessage(

        {

          user: userInfo?.username,

          status: CMD_START_STREAM,

        },

        channelId

      ).then(() => {

        message.success({

          content: "start streaming",

        });

      });

    });

    return () => {

      // 用户退出的清理工作,

      // unpublish流(远程), 停止播放流(本地), 发送直播关闭消息(频道)

      if (localVideoStream) {

        rtcClient.unpublish(localVideoStream);

        localVideoStream.stop();

        sendStreamMessage(

          {

            user: userInfo?.username,

            status: CMD_END_STREAM,

          },

          channelId

        );

        message.info({

          content: "stop streaming",

        });

      }

    };

  }, [rtcClient, localStreaming, canvasRef, userInfo, channelId, localVideoStream]);
为了测试直播效果, 我们需要登录第二个账号(使用浏览器的匿名/开其他的浏览器, 此时cookie没有共享, 可以多账号登录), 进入相同频道, 开启直播, 此时第一个账号应该会自动刷新状态(如果没有则手动切换一下频道), 进入到RemoteStreamHandler, 说明我们直播的逻辑已经完成.
接下来是远程流的渲染逻辑, 它的逻辑相对简单, 观看者可以选择开始/停止观看直播流
// view/Channel/components/StreamHandler/remote_stream.js
const RemoteStreamHandler = (props) => {
const {
remoteUser,
localVideoRef,
toggleRemoteVideo,
channelId,
userInfo,
rtcClient,
} = props;
// 这里加一个强制t人的开关, 由于debug
const enableForceStop = true;
const forceStopStream = () => {
sendStreamMessage(
{
user: userInfo?.username,
status: CMD_END_STREAM,
},
channelId
);
};
const renderRemoteStream = () => {
return (
<div style={{ height: "100%" }}>
<div
id="remote-player"
style={{
width: "100%",
height: "90%",
border: "1px solid #fff",
}}
ref={localVideoRef}
/>
<div
style={{
display: "flex",
justifyContent: "center",
marginTop: "10px",
}}
>
<span style={{ color: "#0ECD0A" }}>{remoteUser}</span>
is playing{" "}
</div>
</div>
);
};
const renderFloatButtons = () => {
return (
<FloatButton.Group
icon={<DesktopOutlined />}
trigger="click"
style={{ left: "380px" }}
>
<FloatButton
onClick={toggleRemoteVideo}
icon={<VideoCameraAddOutlined />}
tooltip={<div>观看/停止观看直播</div>}
/>
{enableForceStop && (
<FloatButton
onClick={forceStopStream}
icon={<VideoCameraAddOutlined />}
tooltip={<div>强制停止直播</div>}
/>
)}
</FloatButton.Group>
);
};
return (
<>
<div style={{ height: "100%" }}>
{renderFloatButtons()}
{renderRemoteStream()}
</div>
</>
);
}
开关远程流的代码在StreamHander中, 作为参数传给RemoteStream
// views/Channel/components/StreamHandler/index.js

  const toggleRemoteVideo = () => {

    if (!hasRemoteStream) {

      return;

    }

    console.log("[Stream] set remote video to ", !enableRemoteVideo);

    // 当前是关闭状态,需要打开

    // 开关远程音频的逻辑也与此类型.

    if (enableRemoteVideo) {

      remoteVideo?.stop();

    } else {

      remoteVideo?.play(localVideoEle.current);

    }

    setEnableRemoteVideo(!enableRemoteVideo);

  };
ok, 现在我们已经实现了基于声网RTC, 在环信超级社区集成视频直播的功能.
RustNESEmulator 是一个基于Rust语言的NES模拟器, 我们在web平台可以使用它编译好的wasm版本
并将mario.nes文件放到src/assets目录下, 这是初代马里奥游戏的ROM文件(你也可以使用你喜欢的nes游戏, 如果遇到问题, 欢迎到RustNESEmulator中提issue)
// views/Channel/components/StreamHandler

// from tetanes.


import * as wasm from "@/pkg";

class State {

  constructor() {

    this.sample_rate = 44100;

    this.buffer_size = 1024;

    this.nes = null;

    this.animation_id = null;

    this.empty_buffers = [];

    this.audio_ctx = null;

    this.gain_node = null;

    this.next_start_time = 0;

    this.last_tick = 0;

    this.mute = false;

    this.setup_audio();

    console.log("[NES]: create state");

  }


  load_rom(rom) {

    this.nes = wasm.WebNes.new(rom, "canvas", this.sample_rate);

    this.run();

  }


  toggleMute() {

    this.mute = !this.mute;

  }


  setup_audio() {

    const AudioContext = window.AudioContext || window.webkitAudioContext;

    if (!AudioContext) {

      console.error("Browser does not support audio");

      return;

    }

    this.audio_ctx = new AudioContext();

    this.gain_node = this.audio_ctx.createGain();

    this.gain_node.gain.setValueAtTime(1, 0);

  }


  run() {

    const now = performance.now();

    this.animation_id = requestAnimationFrame(this.run.bind(this));

    if (now - this.last_tick > 16) {

      this.nes.do_frame();

      this.queue_audio();

      this.last_tick = now;

    }

  }


  get_audio_buffer() {

    if (!this.audio_ctx) {

      throw new Error("AudioContext not created");

    }


    if (this.empty_buffers.length) {

      return this.empty_buffers.pop();

    } else {

      return this.audio_ctx.createBuffer(1, this.buffer_size, this.sample_rate);

    }

  }


  queue_audio() {

    if (!this.audio_ctx || !this.gain_node) {

      throw new Error("Audio not set up correctly");

    }


    this.gain_node.gain.setValueAtTime(1, this.audio_ctx.currentTime);


    const audioBuffer = this.get_audio_buffer();

    this.nes.audio_callback(this.buffer_size, audioBuffer.getChannelData(0));

    if (this.mute) {

      return;

    }

    const source = this.audio_ctx.createBufferSource();

    source.buffer = audioBuffer;

    source.connect(this.gain_node).connect(this.audio_ctx.destination);

    source.onended = () => {

      this.empty_buffers.push(audioBuffer);

    };

    const latency = 0.032;

    const audio_ctxTime = this.audio_ctx.currentTime + latency;

    const start = Math.max(this.next_start_time, audio_ctxTime);

    source.start(start);

    this.next_start_time = start + this.buffer_size / this.sample_rate;

  }

  // ...

}


export default State;
// view/Channel/components/StreamHandler/local_stream.js


import mario_url from "@/assets/mario.nes";

import * as wasm_emulator from "@/pkg";

import State from "./state";


const LocalStreamHandler = (props) => {

  // 模拟器 state

  const stateRef = useRef(new State());


  // 注意要将原来的代码注释掉

  /*

  const [localVideoStream, setLocalVideoStream] = useState(false);

  const localPlayerContainerRef = useRef(null);


  // 开启本地视频流

  useEffect(() => {

    if (!localPlayerContainerRef.current) return;

    const f = async () => {

      // 暂时使用视频代替游戏流

      let lgs = await AgoraRTC.createCameraVideoTrack();

      lgs.play(localPlayerContainerRef.current);

      setLocalGameStream(lgs);

    }

    f();

  }, [localPlayerContainerRef])


  // 推流的函数也暂时注释

  useEffet...

  */


  useEffect(() => {

    // 本地游戏

    if (!canvasRef) {

      return;

    }

	// 开启键盘监听等全局事件

    wasm_emulator.wasm_main();

    fetch(mario_url, {

      headers: { "Content-Type": "application/octet-stream" },

    })

      .then((response) => response.arrayBuffer())

      .then((data) => {

        let mario = new Uint8Array(data);

        // 加载 rom数据

        stateRef.current.load_rom(mario);

      });

  }, [canvasRef]);


  // 更新本地流渲染

  const renderLocalStream = () => {

    return (

      <div style={{ height: "100%" }}>

        <canvas

          id="canvas"

          style={{ width: 600, height: 500 }}

          width="600"

          height="500"

          ref={canvasRef}

        />

      </div>

    );

  };

}
这一步完成后, 我们就可以在本地试玩马里奥游戏了, 键盘绑定为
A      = J

B      = K

Select = RShift

Start  = Return

Up     = W

Down   = S

Left   = A

Right  = D
  useEffect(() => {

    // 发布直播推流

    if (!localStreaming || !rtcClient) {

      return;

    }

    // 只修改了流获取部分

    // canvas的captureStream接口支持获取视频流

    // 我们用这个视频流构造一个声网的自定义视频流

    let stream = canvasRef.current.captureStream(30);

    let localVideoStream = AgoraRTC.createCustomVideoTrack({

      mediaStreamTrack: stream.getVideoTracks()[0],

    });

    console.log("height", canvasRef.current.height);

    console.log("publishing local stream", localVideoStream);

    rtcClient.publish(localVideoStream).then(() => {

      sendStreamMessage(

        {

          user: userInfo?.username,

          status: CMD_START_STREAM,

        },

        channelId

      ).then(() => {

        message.success({

          content: "start streaming",

        });

      });

    });

    return () => {

      if (localVideoStream) {

        rtcClient.unpublish(localVideoStream);

        localVideoStream.stop();

        sendStreamMessage(

          {

            user: userInfo?.username,

            status: CMD_END_STREAM,

          },

          channelId

        );

        message.info({

          content: "stop streaming",

        });

      }

    };

  }, [rtcClient, localStreaming, canvasRef, userInfo, channelId]);
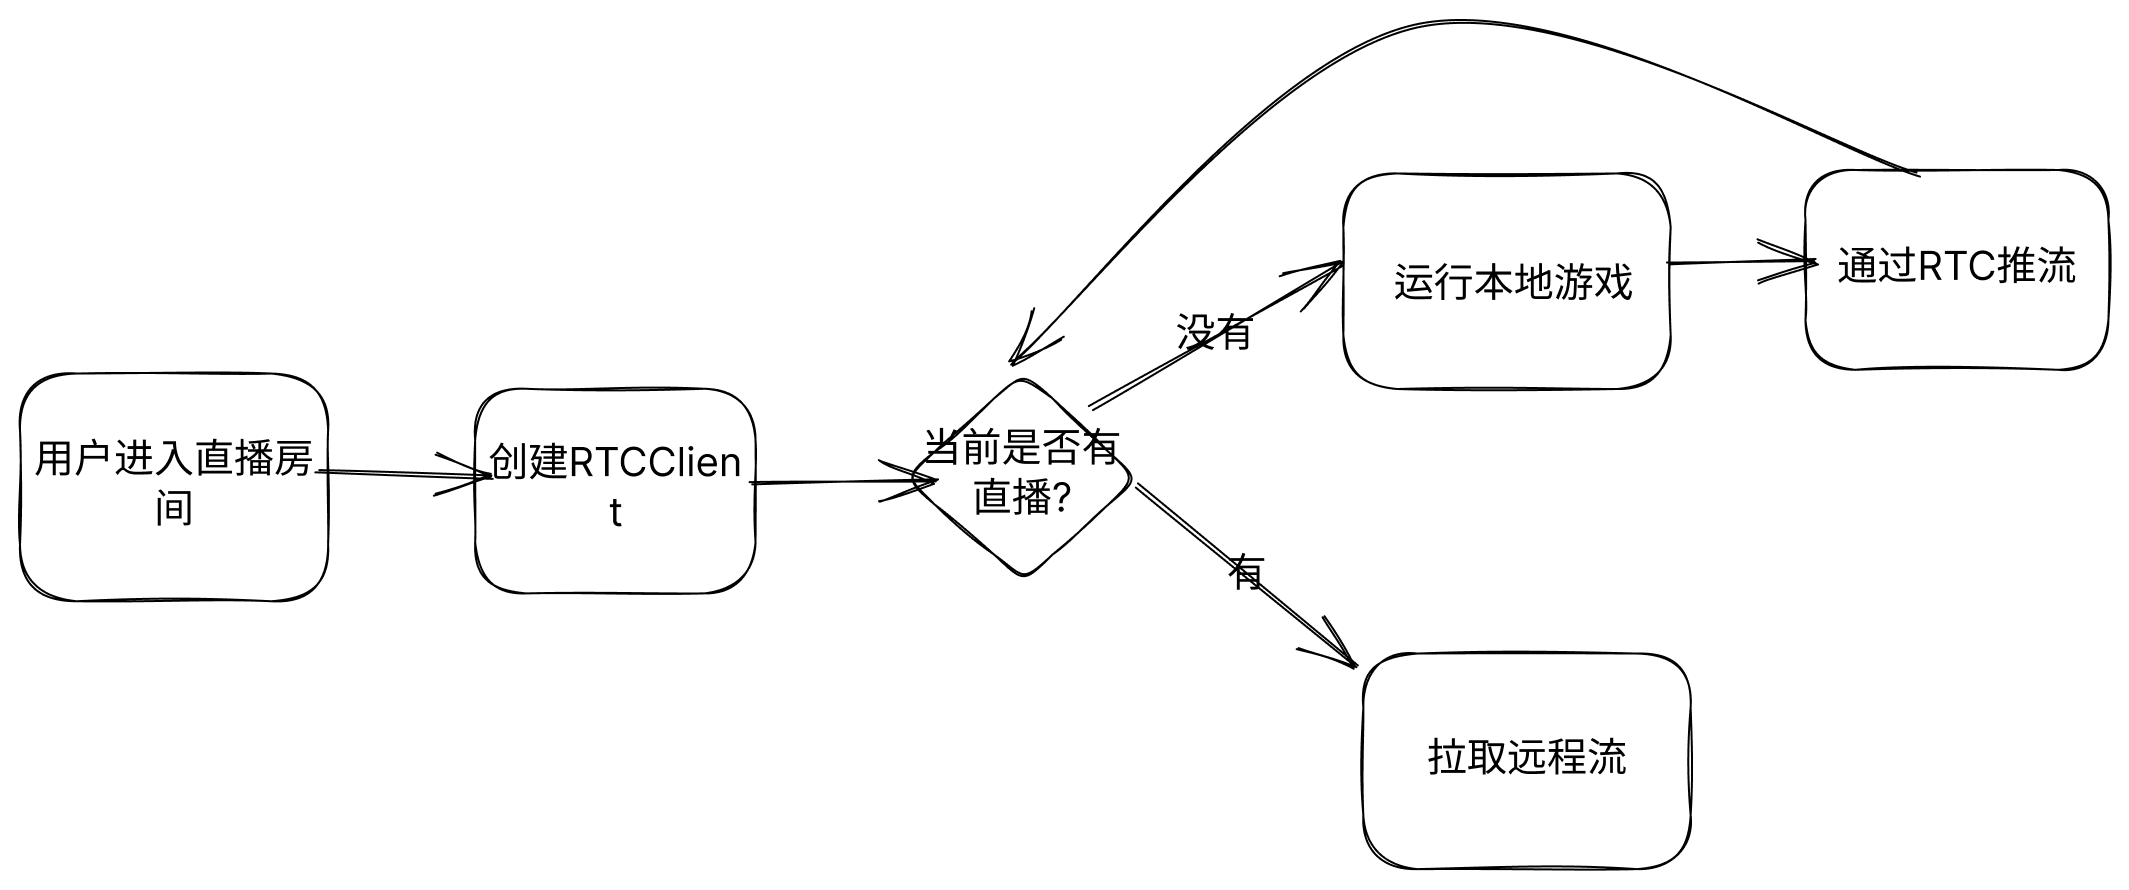
最后总结一下房间的流程图