iOS皮肤适配
皮肤配置文件创建
1、皮肤颜色资源和图片路径配置

皮肤配置文件
如图所示,创建 light.json 和 dark.json ( light 和 dark 配置路径key 一样,对应的value 不同)
light.json 配置示例
{
"statusBarStyle": "black",
"colors":{
"mainFunction":"#E92424",
"gradientStockUp":[
"#0FFFFFFF",
"#0FE92424"
]
},
"images": {
"selfStock_info_icon": "appres/skinImage/light/selfStock_info_icon.png",
"selfStock_money_icon": "appres/skinImage/light/selfStock_money_icon.png",
}

// appres/skinImage/light/selfStock_info_icon.png 对应的图片文件夹路径
}
dark.json 配置示例
{
"statusBarStyle": "red",
"colors":{
"mainFunction":"#BC935C",
"gradientStockUp":[
"#26171717",
"#26E92424"
]
},
"images": {
"selfStock_info_icon": "appres/skinImage/dark/selfStock_info_icon.png",
"selfStock_money_icon": "appres/skinImage/dark/selfStock_money_icon.png",
}
}
2、设置全局的colorKey 来对应颜色路径 imageKey 来对应图片路径,利于维护

颜色key配置

图片key配置
皮肤使用
1、获取皮肤资源协议方法
// 获取皮肤资源协议方法
- (HJThemeDataModel *)getThemeModelWithName:(NSString *)name {
NSString *path = [NSString stringWithFormat:@"appres/theme/%@",name];
NSDictionary *colorDic = [self getDictFromJsonName:path][@"colors"];
NSDictionary *imageDic = [self getDictFromJsonName:path][@"images"];

    HJThemeDataModel *model = [HJThemeDataModel new];

    model.colorDic = colorDic;

    model.imageDic = imageDic;
return model;
}

/// 设置默认主题(使用皮肤,至少有一个默认皮肤)
- (HJThemeDataModel *)getDefaultThemeModel {
return [self getThemeModelWithName:@"light"];
}
2、皮肤使用
// 导入头文件
#import "HJThemeManager.h"

// 设置当前皮肤 或切换 皮肤为 @"light"
[[HJThemeManager sharedInstance] switchThemeWithName:@"light"];

// 设置当前view 的背景色
//1、适配皮肤
self.view.themeBackgroundColor = backgroundColorKey;
//2、不适配皮肤,必须带#号
self.view.themeBackgroundColor = @“#333333”;
//3、适配皮肤,随皮肤变化
self.view.themeBackgroundColor = [HJThemeManager getThemeColor:backgroundColorKey];
//4、指定皮肤,不会随皮肤变化
self.view.themeBackgroundColor = [HJThemeManager getThemeColor:backgroundColorKey themeName:@"light"];

/**

  * [HJThemeManager getThemeColor:backgroundColorKey];

  * 实质上是 "backgroundColorKey"?

  *

  * [HJThemeManager getThemeColor:backgroundColorKey themeName:@"light"];

  * 实质上是 "backgroundColorKey"?themeName=light

  */
//所以可以直接写URL 例如:
self.view.themeBackgroundColor = theme://backgroundColorKey?themeName=light;

// 设置当前imageView 的image
//1、适配皮肤

imageView.themeImage = imageKey;
//2、适配皮肤,随皮肤变化

imageView.themeImage = [HJThemeManager getThemeImage:imageKey];
//3、指定皮肤,不会随皮肤变化

imageView.themeImage = [HJThemeManager getThemeImage:imageKey themeName:@"light"];

/**

  * [HJThemeManager getThemeImage:imageKey];

  * 实质上是 "imageKey"?

  *

  * [HJThemeManager getThemeImage:imageKey themeName:@"light"];

  * 实质上是 "imageKey"?themeName=light

  */

//完整写法,指定皮肤

imageView.themeImage = theme://"imageKey"?themeName=light;

//  兼容不适配皮肤写法
//  imageNamed 加载图片

imageView.themeImage = bundle://"imageKey";
//  sdwebimage 解析 http/https 加载图片

imageView.themeImage = http://imagePath;
//  使用serverManager  getimage 的协议方法获取图片

imageView.themeImage = imagePath;
3、皮肤的实现原理
1、创建一个NSObject分类(category),然后关联一个字典属性(themes),用于进行缓存UI控件调用的颜色方法和参数或者是图片方法和参数。再关联属性的时候添加一个通知监听,用于切换皮肤时,发送通知,然后再次调用缓存的方法和参数,进行颜色和图片的更换。
2、创建UI控件的分类(category),然后每个分类都有themes字典,然后设置新的方法来设置颜色或图片。在该方法内,需要做的处理有:
颜色举例说明:themeBackgroundColor = colorKey
a、在 themeBackgroundColor 的set方法中,判断是否是皮肤设置,皮肤的设置都是带有 theme:// 的字符串。这个(theme://)字符串是约定的。
b、皮肤适配模式,即带有 theme:// 字符串,就会用 themes 字典保存 系统的方法setBackgroundColor:方法和参数colorKey和themeName,当切换皮肤时,再次调用setBackgroundColor:方法和参数colorKey和themeName
c、@"#333333", 直接是色值方法的 不需要 themes 字典保存,只需要直接调用系统方法 setBackgroundColor:[UIColor colorFromHexString:@"#333333"];
图片举例说明:imageView.themeImage = imageKey
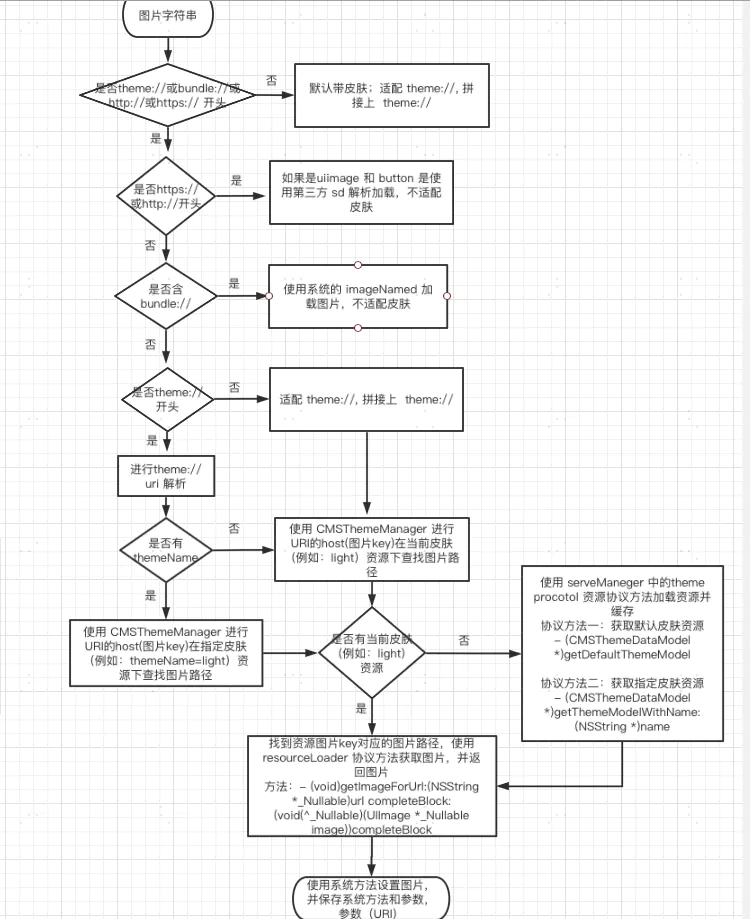
a、在 themeImage 的set方法中,判断是否是皮肤设置,皮肤的设置都是带有 theme:// 的字符串。这个(theme://)字符串是约定的。
b、皮肤适配模式,即带有 theme:// 字符串,就会用 themes 字典保存 系统的方法setImage:方法和参数imageKey和themeName,当切换皮肤时,再次调用setImage:方法和参数imageKey和themeName
c、bundle://, 直接是调用系统方法setImage:[UIImage imageNamed:@"imageNamed"] 进行赋值,不需要进行 themes 字典保存处理;
d、http:// 或 https:// , 采用SD框架加载图片,不需要进行 themes 字典保存处理;
3、主要的UI控件的分类
#import <UIKit/UIKit.h>
#import <Foundation/Foundation.h>

@interface UIView (CMSThemeView)

/// 设置皮肤文件名称 默认为空值,取当前皮肤
/// 可以设置指定皮肤  例如:  @"Dark" / @"Light" ;
/// defaultThemeKey 为默认皮肤
/// 如何设置  Color 或 Image 有 themeName ,优先使用 themeName

指定皮肤
@property (nonatomic, copy) NSString *themeStyle;
@property (nonatomic, copy) NSString *themeBackgroundColor;
@property (nonatomic, copy) NSString *themeTintColor;
/// 根据路径获取color 并缓存方法和参数 ()
- (void)setThemeColorWithIvarName:(NSString *)ivarName colorPath:(NSString *)path;
@end

@interface UILabel (ThemeLabel)
@property (nonatomic, copy) NSString *themeTextColor;
@property (nonatomic, copy) NSString *themeHighlightedTextColor;
@property (nonatomic, copy) NSString *themeShadowColor;
/// 主要是颜色
@property (nonatomic, strong) NSAttributedString *themeAttributedText;
@end

@interface UITextField (ThemeTextField)
@property (nonatomic, copy) NSString *themeTextColor;
@end

@interface UIImageView (CMSThemeImageView)
@property (nonatomic, copy) NSString *themeImage;

// 带有 UIImageRenderingMode 的处理,image 修改渲染色的,即tintColor
- (void)themeSetImageKey:(NSString *)imageKey
renderingMode:(UIImageRenderingMode)mode;

@end

@interface UIButton (ThemeButton)

- (void)themeSetImage:(NSString *)path forState:(UIControlState)state;
- (void)themeSetImage:(NSString *)path forState:(UIControlState)state renderingMode:(UIImageRenderingMode)mode;
- (void)themeSetBackgroundImage:(NSString *)path forState:(UIControlState)state;
- (void)themeSetTitleColor:(NSString *)path forState:(UIControlState)state;
@end

@interface UITableView (ThemeTableView)
@property (nonatomic, copy) NSString *themeSeparatorColor;
@end

@interface CALayer (ThemeLayer)
/// 设置皮肤文件名称 默认为空值,取当前皮肤  eg:  @"Dark" / @"Light" ; defaultThemeKey 为默认皮肤
@property (nonatomic, copy) NSString *themeStyle;
@property (nonatomic, copy) NSString *themeBackgroundColor;
@property (nonatomic, copy) NSString *themeBorderColor;
@property (nonatomic, copy) NSString *themeShadowColor;
/// 根据路径获取cgcolor 并缓存方法和参数 ()
- (void)setThemeCGColorWithIvarName:(NSString *)ivarName colorPath:(NSString *)path;
@end
以上是简单列举了几个,其他UIKIt 控件一样分类处理即可
皮肤颜色流程图

皮肤颜色流程图
皮肤图片流程图

皮肤图片流程图
存在的缺陷
1、不能全局统一处理,需要一处一处的设置,比较麻烦。
2、目前还不支持网络下载皮肤功能,需要其他位置处理下载解压过程。
3、XIB的使用还需要其他的处理,这个比较重要
