
CYLTabBarController的使用
CYLTabBarController 是一个自定义的TabBarController, 集成非常简单
https://github.com/ChenYilong/CYLTabBarController
1.首先使用CocoaPods 进行集成:
pod 'CYLTabBarController'
在终端上执行:
pod install --verbose --no-repo-update
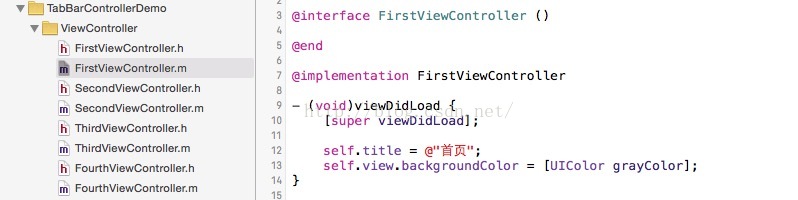
2. 创建TabBar对应的视图控制器
3.创建CYLTabBarControllerConfig
#import <Foundation/Foundation.h>

#import "CYLTabBarController.h"
@interface CYLTabBarControllerConfig : NSObject

@property (nonatomic, retain) CYLTabBarController * tabBarController;

@end
#import "CYLTabBarControllerConfig.h"
#import "FirstViewController.h"
#import "SecondViewController.h"
#import "ThirdViewController.h"
#import "FourthViewController.h"
@implementation CYLTabBarControllerConfig
- (CYLTabBarController *)tabBarController {
if (_tabBarController == nil) {
FirstViewController * firstViewController = [[FirstViewController alloc] init];
UIViewController * firstNavigationController = [[UINavigationController alloc] initWithRootViewController:firstViewController];
SecondViewController * secondViewController = [[SecondViewController alloc] init];
UIViewController * secondNavigationController = [[UINavigationController alloc] initWithRootViewController:secondViewController];
ThirdViewController * thirdViewController = [[ThirdViewController alloc] init];
UIViewController * thirdNavigationController = [[UINavigationController alloc] initWithRootViewController:thirdViewController];
FourthViewController * fourthViewController = [[FourthViewController alloc] init];
UIViewController * fourthNavigationController = [[UINavigationController alloc] initWithRootViewController:fourthViewController];
NSArray * tabBarItemsAttributes = [self tabBarItemsAttributes];
NSArray * viewControllers = @[firstNavigationController, secondNavigationController, thirdNavigationController, fourthNavigationController];
CYLTabBarController * tabBarController = [[CYLTabBarController alloc] init];
tabBarController.tabBarItemsAttributes = tabBarItemsAttributes;
tabBarController.viewControllers = viewControllers;
_tabBarController = tabBarController;
}
return _tabBarController;
}
- (NSArray *)tabBarItemsAttributes {
NSDictionary * tabBarItem1Attribute = @{
CYLTabBarItemTitle : @"首页",
CYLTabBarItemImage : @"home_normal",
CYLTabBarItemSelectedImage : @"home_highlight"
};
NSDictionary * tabBarItem2Attribute = @{
CYLTabBarItemTitle : @"同城",
CYLTabBarItemImage : @"mycity_normal",
CYLTabBarItemSelectedImage : @"mycity_highlight"
};
NSDictionary * tabBarItem3Attribute = @{
CYLTabBarItemTitle : @"消息",
CYLTabBarItemImage : @"message_normal",
CYLTabBarItemSelectedImage : @"message_highlight"
};
NSDictionary * tabBarItem4Attribute = @{
CYLTabBarItemTitle : @"我的",
CYLTabBarItemImage : @"account_normal",
CYLTabBarItemSelectedImage : @"account_highlight"
};
NSArray * tarBarItemsAttrbutes = @[tabBarItem1Attribute, tabBarItem2Attribute, tabBarItem3Attribute, tabBarItem4Attribute];
return tarBarItemsAttrbutes;
}
/**
* 更多TabBar自定义设置:比如:tabBarItem 的选中和不选中文字和背景图片属性、tabbar 背景图片属性
*/
+ (void)customizeTabBarAppearance {
//去除 TabBar 自带的顶部阴影
[[UITabBar appearance] setShadowImage:[[UIImage alloc] init]];
// set the text color for unselected state
// 普通状态下的文字属性
NSMutableDictionary *normalAttrs = [NSMutableDictionary dictionary];
normalAttrs[NSForegroundColorAttributeName] = [UIColor blackColor];
// set the text color for selected state
// 选中状态下的文字属性
NSMutableDictionary *selectedAttrs = [NSMutableDictionary dictionary];
selectedAttrs[NSForegroundColorAttributeName] = [UIColor blackColor];
// set the text Attributes
// 设置文字属性
UITabBarItem *tabBar = [UITabBarItem appearance];
[tabBar setTitleTextAttributes:normalAttrs forState:UIControlStateNormal];
[tabBar setTitleTextAttributes:selectedAttrs forState:UIControlStateSelected];
// Set the dark color to selected tab (the dimmed background)
// TabBarItem选中后的背景颜色
[[UITabBar appearance] setSelectionIndicatorImage:[self imageFromColor:[UIColor colorWithRed:26 / 255.0 green:163 / 255.0 blue:133 / 255.0 alpha:1] forSize:CGSizeMake([UIScreen mainScreen].bounds.size.width / 5.0f, 49) withCornerRadius:0]];
// set the bar background color
// 设置背景图片
// UITabBar *tabBarAppearance = [UITabBar appearance];
// [tabBarAppearance setBackgroundImage:[UIImage imageNamed:@"tabbar_background_ios7"]];
}
+ (UIImage *)imageFromColor:(UIColor *)color forSize:(CGSize)size withCornerRadius:(CGFloat)radius {
CGRect rect = CGRectMake(0, 0, size.width, size.height);
UIGraphicsBeginImageContext(rect.size);
CGContextRef context = UIGraphicsGetCurrentContext();
CGContextSetFillColorWithColor(context, [color CGColor]);
CGContextFillRect(context, rect);
UIImage *image = UIGraphicsGetImageFromCurrentImageContext();
UIGraphicsEndImageContext();
// Begin a new image that will be the new image with the rounded corners
// (here with the size of an UIImageView)
UIGraphicsBeginImageContext(size);
// Add a clip before drawing anything, in the shape of an rounded rect
[[UIBezierPath bezierPathWithRoundedRect:rect cornerRadius:radius] addClip];
// Draw your image
[image drawInRect:rect];
// Get the image, here setting the UIImageView image
image = UIGraphicsGetImageFromCurrentImageContext();
// Lets forget about that we were drawing
UIGraphicsEndImageContext();
return image;
}4. AppDelegate 设置根视图控制器
- (BOOL)application:(UIApplication *)application didFinishLaunchingWithOptions:(NSDictionary *)launchOptions {
    // TabBar
    CYLTabBarControllerConfig * TabBarControllerConfig = [[CYLTabBarControllerConfig alloc] init];
    self.window.rootViewController = TabBarControllerConfig.tabBarController;
    [self customizeInterface];

    return YES;
}
- (void)customizeInterface {
    [self setUpNavigationBarAppearance];
}

/**
 *  设置navigationBar样式
 */
- (void)setUpNavigationBarAppearance {
    UINavigationBar *navigationBarAppearance = [UINavigationBar appearance];

    UIImage *backgroundImage = nil;
    NSDictionary *textAttributes = nil;
    if (NSFoundationVersionNumber > NSFoundationVersionNumber_iOS_6_1) {
        backgroundImage = [UIImage imageNamed:@"navigationbar_background_tall"];

        textAttributes = @{
                           NSFontAttributeName: [UIFont boldSystemFontOfSize:18],
                           NSForegroundColorAttributeName: [UIColor blackColor],
                           };
    } else {
#if __IPHONE_OS_VERSION_MIN_REQUIRED < __IPHONE_7_0
        backgroundImage = [UIImage imageNamed:@"navigationbar_background"];

        textAttributes = @{
                           UITextAttributeFont: [UIFont boldSystemFontOfSize:18],
                           UITextAttributeTextColor: [UIColor blackColor],
                           UITextAttributeTextShadowColor: [UIColor clearColor],
                           UITextAttributeTextShadowOffset: [NSValue valueWithUIOffset:UIOffsetZero],
                           };
#endif
    }

    [navigationBarAppearance setBackgroundImage:backgroundImage
                                  forBarMetrics:UIBarMetricsDefault];
    [navigationBarAppearance setTitleTextAttributes:textAttributes];
}
运行即可实现效果,如果想实现凸起的加号效果需要 CYLPlusButtonSubclass
#import "CYLPlusButton.h"

@interface CYLPlusButtonSubclass : CYLPlusButton <CYLPlusButtonSubclassing>

@end
#import "CYLPlusButtonSubclass.h"
@interface CYLPlusButtonSubclass ()<UIActionSheetDelegate> {
CGFloat _buttonImageHeight;
}
@end
@implementation CYLPlusButtonSubclass
#pragma mark -
#pragma mark - Life Cycle
+ (void)load {
[super registerSubclass];
}
- (instancetype)initWithFrame:(CGRect)frame {
if (self = [super initWithFrame:frame]) {
self.titleLabel.textAlignment = NSTextAlignmentCenter;
self.adjustsImageWhenHighlighted = NO;
}
return self;
}
//上下结构的 button
- (void)layoutSubviews {
[super layoutSubviews];
// 控件大小,间距大小
CGFloat const imageViewEdge = self.bounds.size.width * 0.6;
CGFloat const centerOfView = self.bounds.size.width * 0.5;
CGFloat const labelLineHeight = self.titleLabel.font.lineHeight;
CGFloat const verticalMarginT = self.bounds.size.height - labelLineHeight - imageViewEdge;
CGFloat const verticalMargin = verticalMarginT / 2;
// imageView 和 titleLabel 中心的 Y 值
CGFloat const centerOfImageView = verticalMargin + imageViewEdge * 0.5;
CGFloat const centerOfTitleLabel = imageViewEdge + verticalMargin * 2 + labelLineHeight * 0.5 + 5;
//imageView position 位置
self.imageView.bounds = CGRectMake(0, 0, imageViewEdge, imageViewEdge);
self.imageView.center = CGPointMake(centerOfView, centerOfImageView);
//title position 位置
self.titleLabel.bounds = CGRectMake(0, 0, self.bounds.size.width, labelLineHeight);
self.titleLabel.center = CGPointMake(centerOfView, centerOfTitleLabel);
}
#pragma mark -
#pragma mark - Public Methods
/*
*
Create a custom UIButton with title and add it to the center of our tab bar
*
*/
+ (instancetype)plusButton {
CYLPlusButtonSubclass *button = [[CYLPlusButtonSubclass alloc] init];
[button setImage:[UIImage imageNamed:@"post_normal"] forState:UIControlStateNormal];
[button setTitle:@"发布" forState:UIControlStateNormal];
[button setTitleColor:[UIColor grayColor] forState:UIControlStateNormal];
button.titleLabel.font = [UIFont systemFontOfSize:9.5];
[button sizeToFit];
[button addTarget:button action:@selector(clickPublish) forControlEvents:UIControlEventTouchUpInside];
return button;
}
/*
*
Create a custom UIButton without title and add it to the center of our tab bar
*
*/
//+ (instancetype)plusButton
//{
//
// UIImage *buttonImage = [UIImage imageNamed:@"hood.png"];
// UIImage *highlightImage = [UIImage imageNamed:@"hood-selected.png"];
//
// CYLPlusButtonSubclass* button = [CYLPlusButtonSubclass buttonWithType:UIButtonTypeCustom];
//
// button.autoresizingMask = UIViewAutoresizingFlexibleRightMargin | UIViewAutoresizingFlexibleLeftMargin | UIViewAutoresizingFlexibleBottomMargin | UIViewAutoresizingFlexibleTopMargin;
// button.frame = CGRectMake(0.0, 0.0, buttonImage.size.width, buttonImage.size.height);
// [button setBackgroundImage:buttonImage forState:UIControlStateNormal];
// [button setBackgroundImage:highlightImage forState:UIControlStateHighlighted];
// [button addTarget:button action:@selector(clickPublish) forControlEvents:UIControlEventTouchUpInside];
//
// return button;
//}
#pragma mark -
#pragma mark - Event Response
- (void)clickPublish {
UITabBarController *tabBarController = (UITabBarController *)self.window.rootViewController;
UIViewController *viewController = tabBarController.selectedViewController;
UIActionSheet *actionSheet = [[UIActionSheet alloc] initWithTitle:nil
delegate:self
cancelButtonTitle:@"取消"
destructiveButtonTitle:nil
otherButtonTitles:@"拍照", @"从相册选取", @"淘宝一键转卖", nil nil];
[actionSheet showInView:viewController.view];
}
#pragma mark - UIActionSheetDelegate
- (void)actionSheet:(UIActionSheet *)actionSheet clickedButtonAtIndex:(NSInteger)buttonIndex {
NSLog(@"index: %ld", buttonIndex);
}
#pragma mark - CYLPlusButtonSubclassing
//+ (NSUInteger)indexOfPlusButtonInTabBar {
// return 3;
//}
+ (CGFloat)multiplerInCenterY {
return 0.3;
}
@endDemo 下载地址:
http://download.csdn.net/detail/vbirdbest/9431253
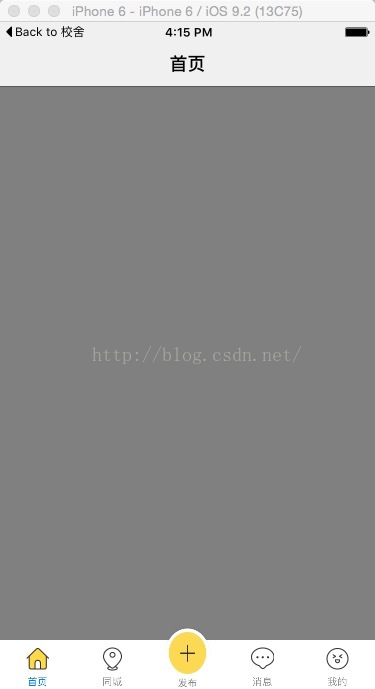
实现效果如图:
转自:https://blog.csdn.net/man_liang/article/details/56671353
