CocoaAsyncSocket源码分析---Connect (一)
CocoaAsyncSocket是谷歌的开发者,基于BSD-Socket写的一个IM框架,它给Mac和iOS提供了易于使用的、强大的异步套接字库,向上封装出简单易用OC接口。省去了我们面向Socket以及数据流Stream等繁琐复杂的编程。本文为一个系列,旨在让大家了解
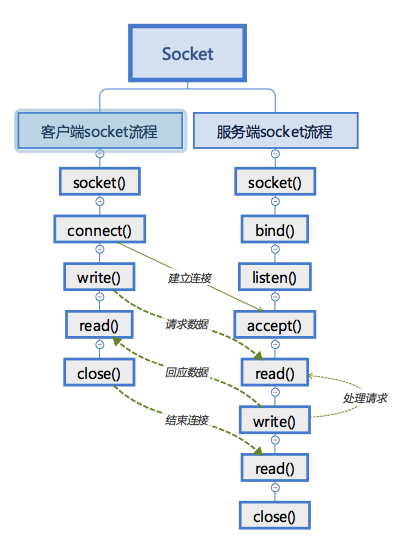
CocoaAsyncSocket是如何基于底层进行封装、工作的。附上一张socket流程图

正文:
首先我们来看看框架:
整个库就这么两个类,一个基于TCP,一个基于UDP。其中基于TCP的GCDAsyncSocket,大概8000多行代码。而GCDAsyncUdpSocket稍微少一点,也有5000多行。
所以单纯从代码量上来看,这个库还是做了很多事的。
顺便提一下,之前这个框架还有一个runloop版的,不过因为功能重叠和其它种种原因,后续版本便废弃了,现在仅有GCD版本。
本系列我们将重点来讲GCDAsyncSocket这个类。
我们先来看看这个类的属性:
@implementation GCDAsyncSocket

{
//flags,当前正在做操作的标识符

    uint32_t flags;

    uint16_t config;

//代理

    __weak id<GCDAsyncSocketDelegate> delegate;
//代理回调的queue
dispatch_queue_t delegateQueue;

//本地IPV4Socket
int socket4FD;
//本地IPV6Socket
int socket6FD;
//unix域的套接字
int socketUN;
//unix域 服务端 url
NSURL *socketUrl;
//状态Index
int stateIndex;

//本机的IPV4地址
NSData * connectInterface4;
//本机的IPV6地址
NSData * connectInterface6;
//本机unix域地址
NSData * connectInterfaceUN;

//这个类的对Socket的操作都在这个queue中,串行
dispatch_queue_t socketQueue;


    dispatch_source_t accept4Source;

    dispatch_source_t accept6Source;

    dispatch_source_t acceptUNSource;

//连接timer,GCD定时器

    dispatch_source_t connectTimer;

    dispatch_source_t readSource;

    dispatch_source_t writeSource;

    dispatch_source_t readTimer;

    dispatch_source_t writeTimer;

//读写数据包数组 类似queue,最大限制为5个包
NSMutableArray *readQueue;
NSMutableArray *writeQueue;

//当前正在读写数据包

    GCDAsyncReadPacket *currentRead;

    GCDAsyncWritePacket *currentWrite;
//当前socket未获取完的数据大小
unsigned long socketFDBytesAvailable;

//全局公用的提前缓冲区

    GCDAsyncSocketPreBuffer *preBuffer;

#if TARGET_OS_IPHONE
CFStreamClientContext streamContext;
//读的数据流
CFReadStreamRef readStream;
//写的数据流
CFWriteStreamRef writeStream;
#endif
//SSL上下文,用来做SSL认证

    SSLContextRef sslContext;

//全局公用的SSL的提前缓冲区

    GCDAsyncSocketPreBuffer *sslPreBuffer;

    size_t sslWriteCachedLength;

//记录SSL读取数据错误

    OSStatus sslErrCode;
//记录SSL握手的错误

    OSStatus lastSSLHandshakeError;

//socket队列的标识key
void *IsOnSocketQueueOrTargetQueueKey;

id userData;

//连接备选服务端地址的延时 (另一个IPV4或IPV6)
NSTimeInterval alternateAddressDelay;

}
这个里定义了一些属性,可以先简单看看注释,这里我们仅仅先暂时列出来,给大家混个眼熟。
在接下来的代码中,会大量穿插着这些属性的使用。所以大家不用觉得困惑,具体作用,我们后面会一一讲清楚的。
接着我们来看看本文方法一--初始化方法:
//层级调用
- (id)init

{
return [self initWithDelegate:nil delegateQueue:NULL socketQueue:NULL];

}

- (id)initWithSocketQueue:(dispatch_queue_t)sq

{
return [self initWithDelegate:nil delegateQueue:NULL socketQueue:sq];

}

- (id)initWithDelegate:(id)aDelegate delegateQueue:(dispatch_queue_t)dq

{
return [self initWithDelegate:aDelegate delegateQueue:dq socketQueue:NULL];

}

- (id)initWithDelegate:(id)aDelegate delegateQueue:(dispatch_queue_t)dq socketQueue:(dispatch_queue_t)sq

{
if((self = [super init]))

     {

          delegate = aDelegate;

          delegateQueue = dq;

//这个宏是在sdk6.0之后才有的,如果是之前的,则OS_OBJECT_USE_OBJC为0,!0即执行if语句
//对6.0的适配,如果是6.0以下,则去retain release,6.0之后ARC也管理了GCD
#if !OS_OBJECT_USE_OBJC

if (dq) dispatch_retain(dq);
#endif

//创建socket,先都置为 -1
//本机的ipv4

          socket4FD = SOCKET_NULL;
//ipv6

          socket6FD = SOCKET_NULL;
//应该是UnixSocket

          socketUN = SOCKET_NULL;
//url

          socketUrl = nil;
//状态

          stateIndex = 0;

if (sq)

          {
//如果scoketQueue是global的,则报错。断言必须要一个非并行queue。
NSAssert(sq != dispatch_get_global_queue(DISPATCH_QUEUE_PRIORITY_LOW, 0),
@"The given socketQueue parameter must not be a concurrent queue.");
NSAssert(sq != dispatch_get_global_queue(DISPATCH_QUEUE_PRIORITY_HIGH, 0),
@"The given socketQueue parameter must not be a concurrent queue.");
NSAssert(sq != dispatch_get_global_queue(DISPATCH_QUEUE_PRIORITY_DEFAULT, 0),
@"The given socketQueue parameter must not be a concurrent queue.");
//拿到scoketQueue

               socketQueue = sq;
//iOS6之下retain
#if !OS_OBJECT_USE_OBJC
dispatch_retain(sq);
#endif

          }
else

          {
//没有的话创建一个,  名字为:GCDAsyncSocket,串行

               socketQueue = dispatch_queue_create([GCDAsyncSocketQueueName UTF8String], NULL);

          }

// The dispatch_queue_set_specific() and dispatch_get_specific() functions take a "void *key" parameter.
// From the documentation:
//
// > Keys are only compared as pointers and are never dereferenced.
// > Thus, you can use a pointer to a static variable for a specific subsystem or
// > any other value that allows you to identify the value uniquely.
//
// We're just going to use the memory address of an ivar.
// Specifically an ivar that is explicitly named for our purpose to make the code more readable.
//
// However, it feels tedious (and less readable) to include the "&" all the time:
// dispatch_get_specific(&IsOnSocketQueueOrTargetQueueKey)
//
// So we're going to make it so it doesn't matter if we use the '&' or not,
// by assigning the value of the ivar to the address of the ivar.
// Thus: IsOnSocketQueueOrTargetQueueKey == &IsOnSocketQueueOrTargetQueueKey;

//比如原来为   0X123 -> NULL 变成  0X222->0X123->NULL
//自己的指针等于自己原来的指针,成二级指针了  看了注释是为了以后省略&,让代码更可读?

          IsOnSocketQueueOrTargetQueueKey = &IsOnSocketQueueOrTargetQueueKey;

void *nonNullUnusedPointer = (__bridge void *)self;

//dispatch_queue_set_specific给当前队里加一个标识 dispatch_get_specific当前线程取出这个标识,判断是不是在这个队列
//这个key的值其实就是一个一级指针的地址  ,第三个参数把自己传过去了,上下文对象?第4个参数,为销毁的时候用的,可以指定一个函数
dispatch_queue_set_specific(socketQueue, IsOnSocketQueueOrTargetQueueKey, nonNullUnusedPointer, NULL);
//读的数组 限制为5

          readQueue = [[NSMutableArray alloc] initWithCapacity:5];

          currentRead = nil;

//写的数组,限制5

          writeQueue = [[NSMutableArray alloc] initWithCapacity:5];

          currentWrite = nil;

//设置大小为 4kb

          preBuffer = [[GCDAsyncSocketPreBuffer alloc] initWithCapacity:(1024 * 4)];

#pragma mark alternateAddressDelay??
//交替地址延时?? wtf

        alternateAddressDelay = 0.3;

     }
return self;

}
其中值得一提的是第三种:UnixSocket,这个是用于Unix Domin Socket通信用的。
那么什么是Unix Domain Socket呢?
原来它是在socket的框架上发展出一种IPC(进程间通信)机制,虽然网络socket也可用于同一台主机的进程间通讯(通过loopback地址127.0.0.1),但是UNIX Domain Socket用于IPC 更有效率 :
- 不需要经过网络协议栈
- 不需要打包拆包、计算校验和、维护序号和应答等,只是将应用层数据从一个进程拷贝到另一个进程。这是因为,IPC机制本质上是可靠的通讯,而网络协议是为不可靠的通讯设计的。UNIX Domain Socket也提供面向流和面向数据包两种API接口,类似于TCP和UDP,但是面向消息的UNIX Domain Socket也是可靠的,消息既不会丢失也不会顺序错乱。
基本上它是当今应用于IPC最主流的方式。至于它到底和普通的socket通信实现起来有什么区别,别着急,我们接着往下看。
3.生成了一个socketQueue,这个queue是串行的,接下来我们看代码就会知道它贯穿于这个类的所有地方。所有对socket以及一些内部数据的相关操作,都需要在这个串行queue中进行。这样使得整个类没有加一个锁,就保证了整个类的线程安全。
4.创建了两个读写队列(本质数组),接下来我们所有的读写任务,都会先追加在这个队列最后,然后每次取出队列中最前面的任务,进行处理。
5.创建了一个全局的数据缓冲区:preBuffer,我们所操作的数据,大部分都是要先存入这个preBuffer中,然后再从preBuffer取出进行处理的。
6.初始化了一个交替延时变量:alternateAddressDelay,这个变量先简单的理解下:就是进行另一个服务端地址请求的延时。后面我们一讲到,大家就明白了。
初始化方法就到此为止了。
接着我们有socket了,我们如果是客户端,就需要去connect服务器。
又或者我们是服务端的话,就需要去bind端口,并且accept,等待客户端的连接。(基本上也没有用iOS来做服务端的吧...)
connect总方法见下篇
全篇地址
CocoaAsyncSocket源码分析---Connect (一)
CocoaAsyncSocket源码分析---Connect (二)
CocoaAsyncSocket源码分析---Connect (三)
CocoaAsyncSocket源码分析---Connect (四)
CocoaAsyncSocket源码分析---Connect (五)
链接:https://www.jianshu.com/p/9968ff0280e5
