怎样在Apple Watch上集成环信SDK
本文简单的讲述下如何用Apple Watch Kit集成环信SDK.
首先:需要升级xcode到version 6.2,和 IOS SDK8.2
然后下载环信SDK从官网
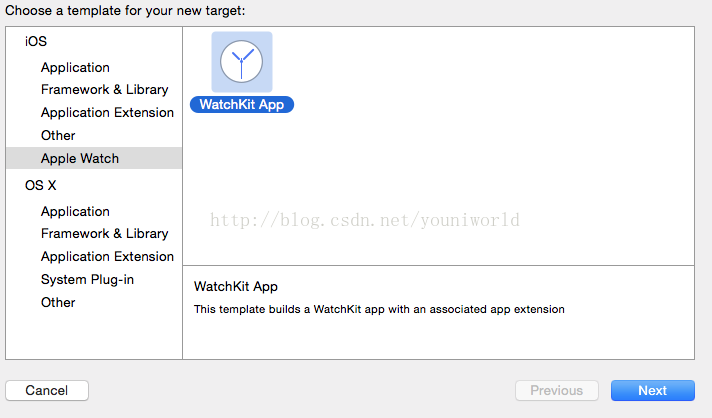
打开XCode->new project->new target->选择WatchKit App
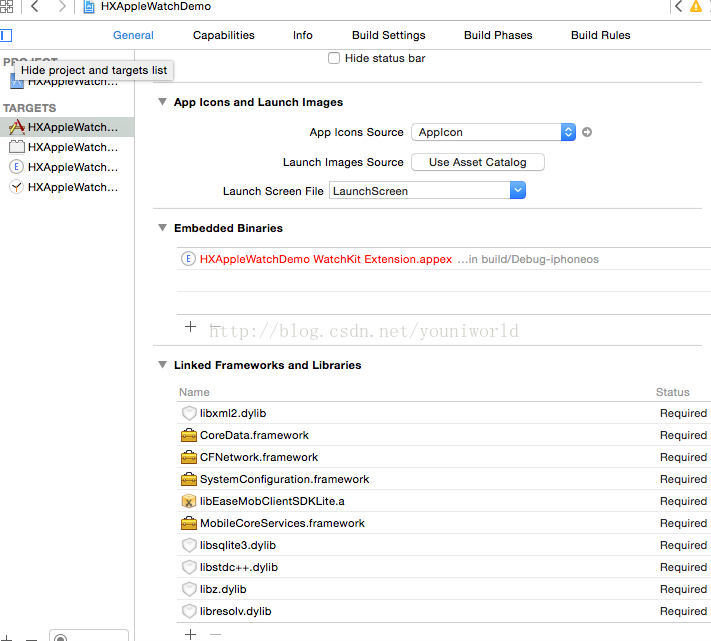
xcode 会自动给你创建几个targets,例如下图:
把EaseMobSDK文件夹拖拽到HxAppleWatchDemo Target里
选择target HXAppleWatchDemo,加入下图所有的Linked Frameworks and Libraries里的库文件
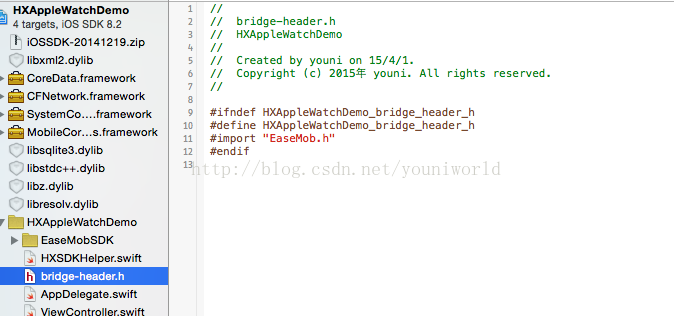
在HXAppleWatchDemo target 创建bridging header文件
设置bridging header文件
设置other linker flags 以保证SDK Lib category的扩展方法可用
所有环境设置都已完成,试着build下看有啥问题么
接着开始写代码:
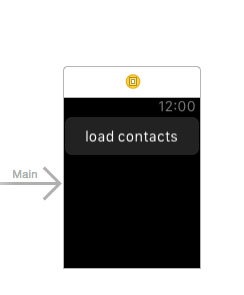
1. 打开HXAppleWatchDemo WatchKit App 里的interface.storyboard然后加个button 叫load contacts
2. 找到HXAppleWatchDemo WatchKit Extension里的文件InterfaceController.swift,然后把上述的button关联到 @IBOutlet weakvar open:WKInterfaceButton!
InterfaceController.swift代码如下
//
// InterfaceController.swift
// HXAppleWatchDemo WatchKit Extension
//
// Created by youni on 15/4/1.
// Copyright (c) 2015年 youni. All rights reserved.
//
import WatchKit
import Foundation
class InterfaceController: WKInterfaceController {
@IBOutlet weak var open: WKInterfaceButton!
@IBAction func openApp() {
InterfaceController.openParentApplication(["action":"getcontact"], reply: {(info:[NSObject : AnyObject]!, error:NSError!) -> Void in
if info != nil{
if info.count > 0{
self.getContacts(info!["contacts"] as [String])
}
}
})
}
func getContacts(contacts:[String]){
presentTextInputControllerWithSuggestions(contacts, allowedInputMode: WKTextInputMode.Plain, completion: {(result:[AnyObject]!)-> Void in
if result != nil{
var id:String = result[0] as String
var date:NSDate = NSDate()
var now:NSTimeInterval = date.timeIntervalSinceNow
self.sendMessage(id,text: now.description)
}
}
)
}
func sendMessage(id:String,text:String){
InterfaceController.openParentApplication(["action":"send","name":id,"message":text], reply: {(info:[NSObject : AnyObject]!, error:NSError!) -> Void in
})
}
override func awakeWithContext(context: AnyObject?) {
super.awakeWithContext(context)
// Configure interface objects here.
}
override func willActivate() {
// This method is called when watch view controller is about to be visible to user
super.willActivate()
}
override func didDeactivate() {
// This method is called when watch view controller is no longer visible
super.didDeactivate()
}
}
InterfaceController.openParentApplication是用来和IOS的程序通讯的接口,大部分的业务逻辑需要在parent application实现也就是上述说的HXAppleWatchDemo Target
我们看下HXAppleWatchDemo是如何实现和Apple Watch App通讯的
//
// AppDelegate.swift
// HXAppleWatchDemo
//
// Created by youni on 15/4/1.
// Copyright (c) 2015年 youni. All rights reserved.
//
import UIKit
@UIApplicationMain
class AppDelegate: UIResponder, UIApplicationDelegate,IChatManagerDelegate{
var window: UIWindow?
var callback:(([NSObject : AnyObject]!) -> Void)!
func application(application: UIApplication, didFinishLaunchingWithOptions launchOptions: [NSObject: AnyObject]?) -> Bool {
// Override point for customization after application launch.
let apnsCertName:String = "chatdemoui";
EaseMob.sharedInstance().registerSDKWithAppKey("easemob-demo#chatdemoui", apnsCertName: apnsCertName)
EaseMob.sharedInstance().chatManager.addDelegate(self, delegateQueue: nil)
EaseMob.sharedInstance().chatManager.asyncLoginWithUsername("tt1", password: "1", completion: { (loginInfo,error) -> Void in
NSLog("login callback : ")
HXSDKHelper.instance.sendTextMessage("uni3", textMessge:"test from")
}, onQueue: nil)
return true
}
func applicationWillResignActive(application: UIApplication) {
// Sent when the application is about to move from active to inactive state. This can occur for certain types of temporary interruptions (such as an incoming phone call or SMS message) or when the user quits the application and it begins the transition to the background state.
// Use this method to pause ongoing tasks, disable timers, and throttle down OpenGL ES frame rates. Games should use this method to pause the game.
}
func applicationDidEnterBackground(application: UIApplication) {
// Use this method to release shared resources, save user data, invalidate timers, and store enough application state information to restore your application to its current state in case it is terminated later.
// If your application supports background execution, this method is called instead of applicationWillTerminate: when the user quits.
}
func applicationWillEnterForeground(application: UIApplication) {
// Called as part of the transition from the background to the inactive state; here you can undo many of the changes made on entering the background.
}
func applicationDidBecomeActive(application: UIApplication) {
// Restart any tasks that were paused (or not yet started) while the application was inactive. If the application was previously in the background, optionally refresh the user interface.
}
func applicationWillTerminate(application: UIApplication) {
// Called when the application is about to terminate. Save data if appropriate. See also applicationDidEnterBackground:.
}
func application(application: UIApplication!, handleWatchKitExtensionRequest userInfo: [NSObject : AnyObject]!, reply: (([NSObject : AnyObject]!) -> Void)!) {
if(userInfo != nil){
if userInfo!["action"] != nil{
var action:String = userInfo!["action"] as String
if action == "getcontact"{
reply!(["contacts":["uni3","uni5","tt2"]])
}else if action == "send"{
var name:String = userInfo!["name"] as String
var message:String = userInfo!["message"] as String
NSLog("name : " + name + "message : " + message)
HXSDKHelper.instance.sendTextMessage(name, textMessge:message)
callback = reply
}
}
}
}
func didSendMessage(message: EMMessage!, error: EMError!) {
if(error != nil){
callback!(["send":error!.errorCode.value])
}else{
callback!(["send":"ok"])
}
}
func didReceiveMessage(message: EMMessage!) {
}
}
这个就是和Apple WatchKit App实现通讯的接口:
func application(application: UIApplication!, handleWatchKitExtensionRequest userInfo: [NSObject : AnyObject]!, reply: (([NSObject : AnyObject]!) -> Void)!) {
if(userInfo != nil){
if userInfo!["action"] != nil{
var action:String = userInfo!["action"] as String
if action == "getcontact"{
reply!(["contacts":["uni3","uni5","tt2"]])
}else if action == "send"{
var name:String = userInfo!["name"] as String
var message:String = userInfo!["message"] as String
NSLog("name : " + name + "message : " + message)
HXSDKHelper.instance.sendTextMessage(name, textMessge:message)
callback = reply
}
}
}
}
HXSDKHelper就是对环信一个简单的封装,现在里面只实现了一个函数
//
// HXSDKHelper.swift
// swittest
//
// Created by youni on 15/3/15.
// Copyright (c) 2015年 youni. All rights reserved.
//
import Foundation
private var gInstance = HXSDKHelper()
class HXSDKHelper : NSObject{
class var instance:HXSDKHelper{
return gInstance
}
func sendTextMessage(to : String, textMessge : String){
var latestMessage:EMMessage = EMMessage()
var chatText:EMChatText = EMChatText(text: textMessge)
var txtBody:EMTextMessageBody = EMTextMessageBody(chatObject: chatText)
latestMessage.addMessageBody(txtBody);
latestMessage.to = to;
EaseMob.sharedInstance().chatManager.asyncSendMessage(latestMessage, progress: nil);
}
}
大功告成,完成以上步骤,你就能够做个简单的Watch App 可以用环信的SDK发消息了。
由于没有真机,以上都是在模拟器上测试通过。
如果需要工程代码请联系我:syyorient@outlook.com
或者从github上获取
https://github.com/youniworld/AppleWatchDemo-HuanXin
如果其他问题可以登陆http://www.easemob.com/docs/gettingstart/
作者:隋云怡


